
From urban planning and architecture to video game development and tourism marketing, high-quality 3D city models are in high demand across industries. Whether you’re an architect designing a new mixed-use development, a game developer building an open-world setting, or a city planner testing flood mitigation strategies, having an accurate 3D model of your target city can turn abstract concepts into immersive, actionable visuals. But how do you actually get a 3D model of a city that fits your needs, budget, and timeline? The process ranges from downloading free, ready-made assets to capturing custom data with drones or laser scanning, and choosing the right approach can save you months of work and thousands of dollars. This guide breaks down every common method, its pros and cons, and practical tips to help you get the perfect 3D city model for your project.
Understand Your Project Requirements First
Before you start browsing 3D model repositories or booking a drone flight, it’s critical to define exactly what you need from your city model. Not all 3D city models are created equal: a low-poly model for a background in a mobile game looks very different from a millimeter-accurate model for civil engineering surveying. Taking 10 minutes to outline your requirements will save you from wasting time and money on the wrong solution.
Key questions to answer before you start
- What level of detail (LOD) do you need? The Open Geospatial Consortium defines five levels of detail for 3D city models, from LOD0 (a 2D map extruded into simple blocks) to LOD4 (fully detailed interior models of individual buildings). A tourism marketing project might only need LOD1 or LOD2, while a construction project will require LOD3 or higher.
- What is your budget? Ready-made free models cost nothing, while custom drone mapping can run from a few hundred to a few thousand dollars, and airborne LiDAR scanning can cost tens of thousands for large cities.
- How large is the area you need to model? A 10-block neighborhood in downtown Manhattan is very different from an entire 500-square-mile metropolitan area. Some methods work well for small areas but are impractical for large regions, and vice versa.
- Do you need geospatial accuracy? If you’re using the model for urban planning or civil engineering, you’ll need coordinates that align with real-world GPS data. If you’re using it for a fictional game set in a real city, approximate accuracy is probably enough.
- What file format do you need? Different tools use different formats: GIS software often requires CityGML, while game engines use FBX or GLB, and architectural software uses RVT or OBJ. Make sure the method you choose can export your model in a format that works for your workflow.
For example, if you’re a indie game developer building a open-world game set in Chicago, you probably need a medium-detail model covering the entire city, with approximate geometry, and a budget of less than $500. If you’re a civil engineer working on a new light rail line through Seattle, you need a high-detail, georeferenced model of a 10-mile corridor, with accurate elevation and building facade data, and a larger budget to match. Your requirements will directly determine which method of getting a 3D city model is right for you.
Download Pre-Made 3D City Models from Public and Commercial Repositories
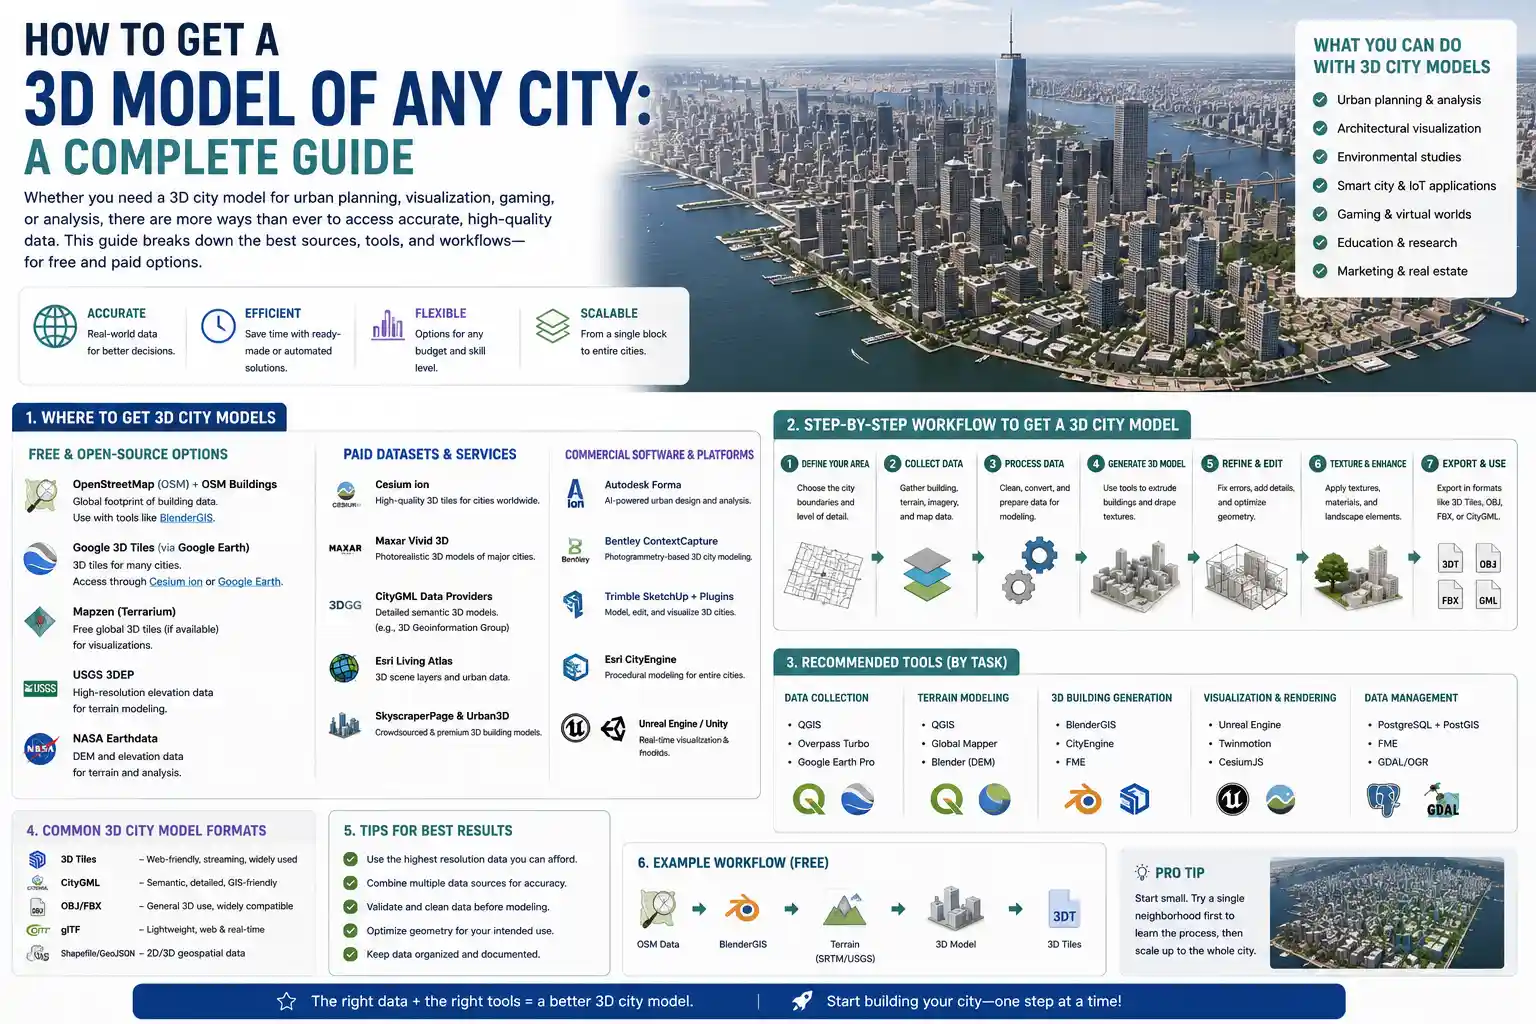
The fastest and cheapest way to get a 3D city model is to download one that someone else has already built. There are hundreds of public and commercial repositories that host ready-made 3D city models for everything from major world cities to small towns, with options for every budget and level of detail. This method is ideal if you need a model quickly, your LOD requirements are low to medium, and you don’t need fully custom data.
Free Public Repositories
Many city governments and open data projects release 3D city models for free to the public, as part of open data initiatives for urban planning and economic development. For example, New York City, London, Singapore, and dozens of other major cities publish full 3D models of their entire metropolitan areas on their official open data portals, usually at LOD1 or LOD2, for free download. These models are often georeferenced and accurate enough for most planning and visualization projects.
Beyond government portals, there are several popular open platforms that host free 3D city data:
- OpenStreetMap (OSM): OSM has crowdsourced 2D map data for nearly every city on Earth, and you can convert this data into a 3D model for free using tools like Blender OSM, Three.js OSM Buildings, or Procedural Spaces. The resulting models are usually LOD0 or LOD1, with basic building heights, and work great for visualization or game development backgrounds.
- Google Earth 3D: Google Earth has detailed 3D terrain and building data for most of the world, and you can export small areas for non-commercial use using third-party tools like Global Mapper or Blender add-ons. Note that Google’s terms of service restrict commercial use of exported Google Earth data, so this is only a good option for personal or non-commercial projects.
- CityJSON Repository: The 3D geospatial community maintains a free repository of open CityGML and CityJSON models for dozens of cities around the world, with varying levels of detail. All models are free to download and use for any purpose.
Commercial 3D Asset Marketplaces
If you can’t find a free pre-made model that fits your needs, commercial marketplaces like TurboSquid, Sketchfab, CGTrader, and Unreal Engine Marketplace have thousands of paid 3D city models available for instant download. Prices range from less than $50 for a small neighborhood model to a few hundred dollars for a full medium-detail city model, and most models come in common formats like FBX, OBJ, or GLB that work directly in game engines and architectural software.
Commercial models often have higher detail than free open data models, with textured building facades, roads, vegetation, and even interior details for major landmarks. This makes them a great option for architects, game developers, and marketing teams that need a polished model quickly. For example, if you need a detailed 3D model of downtown Los Angeles for a film background, you can download a fully textured model from TurboSquid in minutes for under $200, instead of spending weeks building it from scratch.
"For most small to medium projects, a pre-made 3D city model from a trusted repository will check every box. It’s fast, cheap, and good enough for 80% of use cases. You only need to build a custom model if you have very specific accuracy or detail requirements that off-the-shelf options can’t meet."
The biggest downside of pre-made models is that they rarely have the high level of detail needed for engineering or construction projects, and they may be out of date if the city has undergone recent development. If you need up-to-date, highly accurate data for a specific site, you’ll need to create a custom 3D model using one of the methods below.
Generate a Custom Procedural 3D City Model
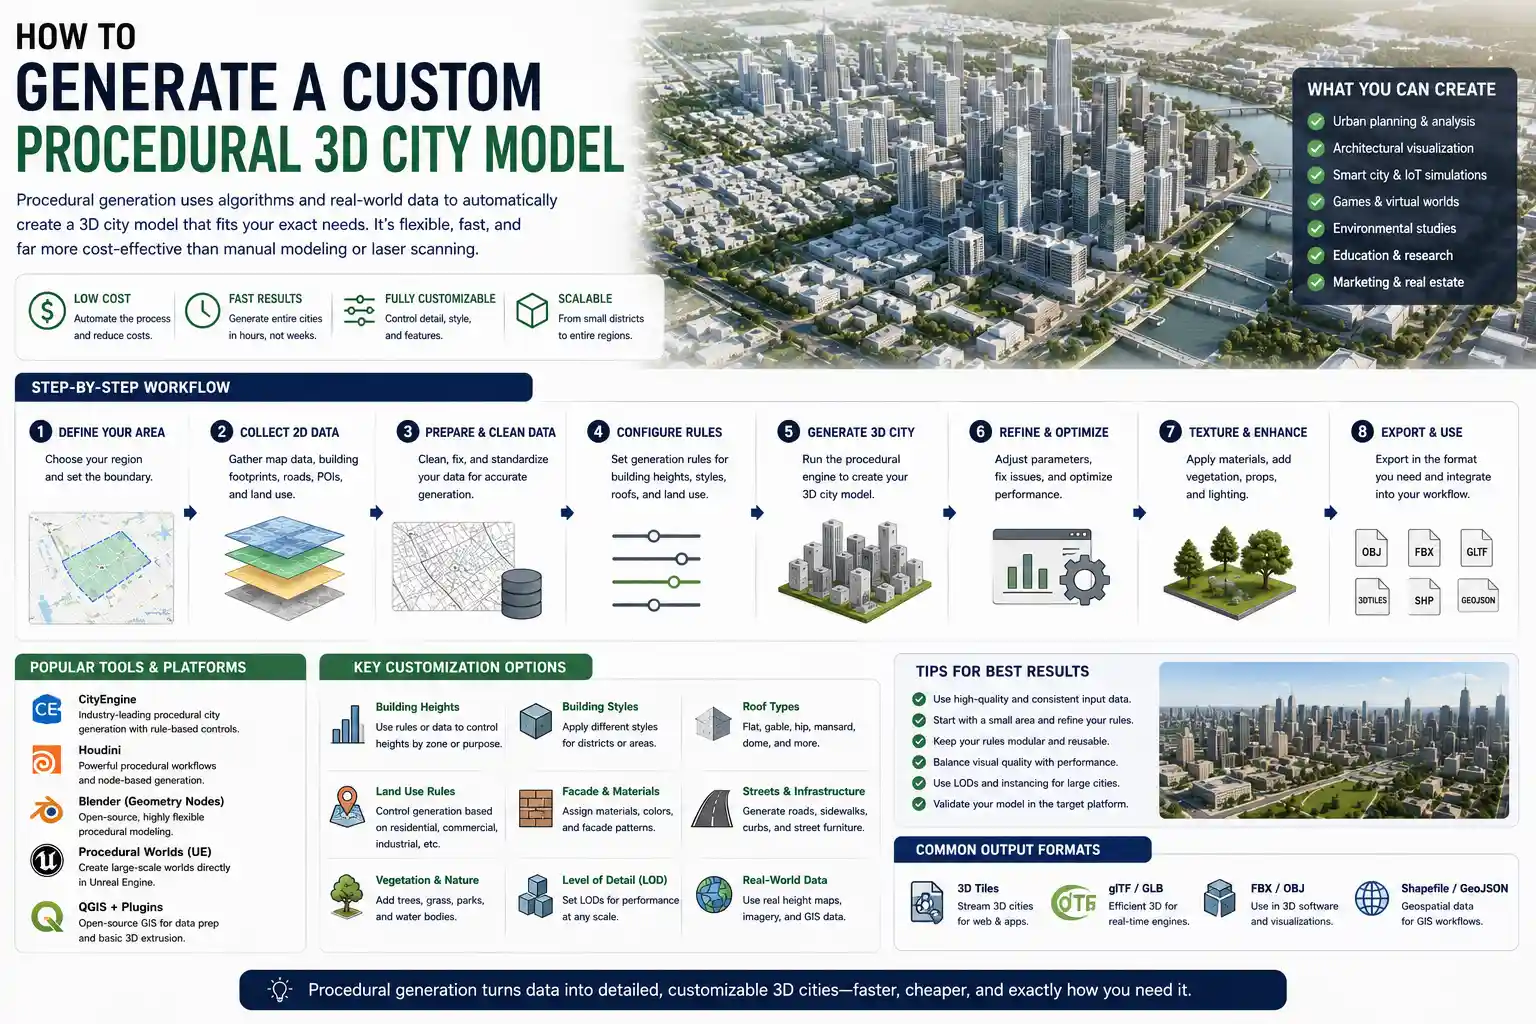
If you can’t find a pre-made model that fits your needs, procedural generation is a flexible, low-cost way to create a custom 3D city model. Procedural generation uses algorithms to automatically build a 3D city from existing 2D map data, building footprints, and height information. You can control the level of detail, style, and features to match your exact requirements, and it’s much faster and cheaper than manual modeling or laser scanning.
How procedural city generation works
Most procedural generation tools pull base data from open sources like OpenStreetMap or government GIS datasets, which include building footprints, road networks, elevation data, and land use information. The algorithm then automatically extrudes buildings to the correct height, adds roads and sidewalks, places vegetation and street furniture, and applies textures to building facades based on building type (residential, commercial, industrial). More advanced tools can even generate roof shapes, windows, and parking lots automatically.
Popular procedural generation tools
There are tools for every skill level and workflow, from free open-source options to premium professional software:
- Blender with the OSM Add-on: This free open-source add-on for Blender pulls data directly from OpenStreetMap and generates a 3D city model automatically. It’s completely free, works for small to medium areas, and lets you edit the model manually after generation to add extra detail. It’s ideal for hobbyists, indie game developers, and students on a budget.
- Esri CityEngine: Esri CityEngine is the industry standard for professional procedural 3D city generation, used by urban planners, architects, and government agencies. It can generate large, georeferenced 3D city models with custom rule sets for different building types and styles, and exports to all common GIS and 3D formats. A single license costs around $2,500 per year, but there are free educational licenses available for students and teachers.
- Sidewalk Labs CityKit: CityKit is a simpler procedural generation tool that works directly with ArcGIS and SketchUp, designed for urban planning teams that need to quickly generate 3D models for public consultation. It’s cheaper than CityEngine for small projects, starting at around $50 per month.
- Procedural Worlds Gaia / City Generator: These tools are designed specifically for game developers, and let you generate both realistic and fictional 3D cities with custom styles, terrain, and assets that work directly in Unity or Unreal Engine.
Procedural generation works best for projects that need custom coverage of a large area, but don’t require photorealistic accuracy of every individual building. For example, if you’re an urban planner testing different zoning scenarios for a 10-square-mile area, procedural generation can give you a consistent, georeferenced 3D model in a day, instead of taking weeks to model every building manually. For game developers building a realistic open-world city, procedural generation can create the base geometry, and you can add custom detail to major landmarks manually later.
The main downside of procedural generation is that it’s only as accurate as the base data it uses. If OpenStreetMap is missing building height data for your area, or the building footprints are out of date, the resulting model will have inaccuracies. It also rarely captures the fine detail of individual building facades, trees, and terrain features the way that a captured model from drone or LiDAR data can. If you need that level of accuracy, you’ll need to capture your own 3D data.
Capture Your Own Custom 3D City Model with Drone or Aerial Photogrammetry
When you need an up-to-date, highly accurate 3D model of a specific area (like a neighborhood, construction site, or small city), photogrammetry using drone or aerial imagery is one of the most popular and cost-effective methods. Photogrammetry works by taking hundreds or thousands of overlapping photos of the city from different angles, then using software to stitch the photos together into a 3D mesh with realistic texture. It can produce models with centimeter-level accuracy, at a fraction of the cost of traditional LiDAR scanning.
Drone photogrammetry for small to medium areas
For areas up to 10-15 square miles, drone photogrammetry is the sweet spot for cost and accuracy. All you need is a consumer or professional drone with a high-resolution camera, a flight plan that covers the entire area with 70-80% overlap between photos, and photogrammetry software to process the images into a 3D model. Many drone service providers offer end-to-end drone mapping services, so you don’t even need to own a drone or learn how to operate it yourself.
What does it cost? For a 1-square-mile neighborhood, a local drone service provider will typically charge between $500 and $2,000 for a full processed 3D model, depending on the level of detail you need. That’s far cheaper than airborne LiDAR, and the resulting model will have accurate terrain, building heights, facade textures, and even individual trees and street furniture.
Aerial photogrammetry for larger cities
If you need to model an entire city that’s larger than what a single drone can cover in a reasonable amount of time, you can use aerial imagery from planes or satellites to generate your 3D model. Many commercial geospatial companies like Maxar and Airbus sell high-resolution overlapping aerial imagery that you can process into a 3D model using the same photogrammetry software you use for drone data. The resolution is lower than drone data (usually 30cm to 1 meter per pixel, compared to 1-5cm per pixel for drone data), but it’s good enough for LOD2 models of entire large cities.
Key tips for a successful photogrammetry project
- Plan your flight for a day with uniform, overcast lighting. Direct sunlight creates harsh shadows that can confuse photogrammetry software and lead to inaccurate mesh geometry.
- Make sure you get enough front overlap and side overlap between photos. 70-80% overlap is the standard for 3D city modeling; too little overlap will leave gaps in your model.
- Use ground control points (GCPs) if you need geospatial accuracy. Placing a few GCPs with known GPS coordinates around the area will align your model to real-world coordinates within a few centimeters.
- Choose the right processing software. For beginners and small projects, tools like DroneDeploy and Pix4Dmapper are cloud-based and easy to use, while professional users often prefer Agisoft Metashape for more control over the processing pipeline.
Photogrammetry is a great option for most custom 3D city modeling projects. It’s much cheaper than LiDAR, produces photorealistic textured models, and can capture up-to-date data even if the city has had recent construction. The main limitations are that it can’t capture data through tree cover or buildings, so it’s less accurate for terrain in heavily forested areas, and it doesn’t capture data below the ground surface. For projects that need subsurface data or penetration through vegetation, LiDAR is a better option.
Use LiDAR Scanning for High-Accuracy Large-Scale 3D City Models
LiDAR (Light Detection and Ranging) scanning is the gold standard for high-accuracy 3D city modeling, especially for large areas and projects that require precise elevation and terrain data. LiDAR works by emitting thousands of laser pulses per second from an airborne, mobile, or terrestrial scanner, measuring the time it takes for the pulses to bounce back to create a highly accurate 3D point cloud of the entire area. That point cloud can then be processed into a full 3D city model with accurate terrain, building heights, and even structural detail.
Types of LiDAR scanning for city modeling
Airborne LiDAR is the most common type for full city modeling. The scanner is mounted on a plane that flies over the entire city, collecting millions of data points across hundreds of square miles. Airborne LiDAR can penetrate through tree cover to capture the underlying terrain, which makes it ideal for flood modeling, urban planning, and infrastructure projects that need accurate elevation data. Many governments already have free airborne LiDAR data available for public download through their GIS portals: for example, the USGS’s 3D Elevation Program provides free LiDAR data for most of the United States, and the EU’s Copernicus program provides free LiDAR for many European countries.
Mobile Terrestrial LiDAR is used for higher-detail modeling of city streets and corridors. The scanner is mounted on a truck or van that drives through the city streets, capturing high-density point cloud data of building facades, street furniture, and infrastructure at centimeter-level accuracy. This is ideal for projects like transportation planning, historic preservation of city districts, and utility mapping, where you need detailed data of street-level features.
Terrestrial Static LiDAR is used for extremely high-detail modeling of small areas or individual historic buildings within a city. It’s rarely used for modeling an entire city, due to the time and cost involved, but it’s useful if you need to capture millimeter-level detail for specific landmarks or structures.
The biggest advantage of LiDAR over photogrammetry is its accuracy and ability to capture data through vegetation and in dark or low-light conditions. For civil engineering projects, flood risk mapping, and infrastructure development, LiDAR’s elevation accuracy is unmatched. The biggest downside is cost: custom airborne LiDAR scanning for an entire medium-sized city can cost tens of thousands of dollars, which is out of reach for many small projects. But if you only need existing LiDAR data that’s already been captured by the government, it’s often available for free or a low cost, and you can process it into a 3D city model using standard GIS software.
Many projects combine LiDAR and photogrammetry to get the best of both worlds: LiDAR provides accurate elevation and terrain data, while photogrammetry provides high-resolution textures for building facades. This hybrid approach is becoming increasingly common for professional 3D city modeling, combining the accuracy of LiDAR with the visual quality of photogrammetry.
Conclusion
Getting a 3D model of a city doesn’t have to be complicated or expensive, and there’s a method that fits every project, budget, and timeline. Start by defining your requirements for level of detail, accuracy, area size, and budget: if you need a quick, low-cost model, start with pre-made models from open data portals or commercial marketplaces, or generate a custom model using procedural generation from OpenStreetMap data. If you need an up-to-date, accurate model of a small to medium area, drone photogrammetry is the best balance of cost and quality. For large-scale projects that require the highest accuracy and terrain data, use existing free LiDAR data if it’s available, or invest in custom LiDAR scanning if you need new data.
No matter what your project is, the key is to start simple and only invest in more complex, expensive methods when you actually need the extra detail or accuracy. For 80% of projects, a pre-made or procedurally generated model will be more than enough, and will save you weeks of work and thousands of dollars. For the remaining 20% of projects that need custom high-accuracy data, drone photogrammetry and LiDAR give you the level of quality you need, with flexible options to match your budget. By matching your method to your requirements, you can get the perfect 3D city model for your project without overspending or wasting time.