
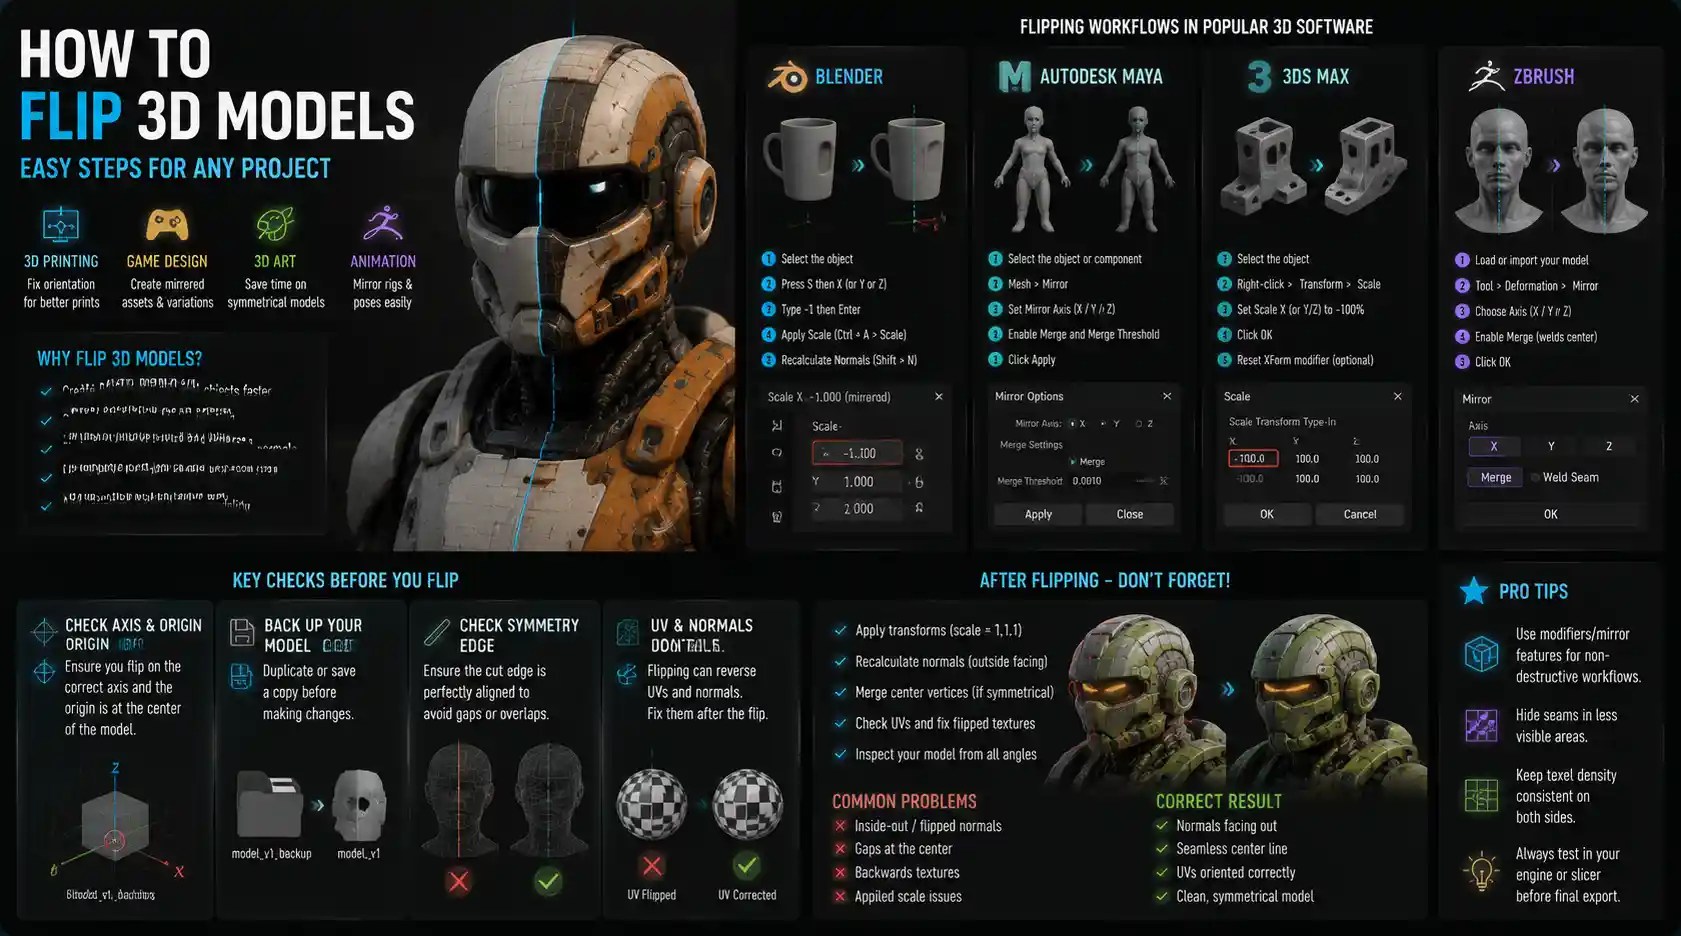
If you’ve ever spent hours building a 3D model for 3D printing, game design, or 3D art only to realize it’s facing the wrong way, or needed a mirrored version for a symmetrical asset, you know how frustrating starting over can be. Flipping 3D models is one of the most fundamental editing skills, but it’s far more nuanced than just clicking a “flip” button. The right approach depends on your software, your end goal, and whether you’re flipping the whole model or just a portion of it. Whether you’re a hobbyist 3D printer, a freelance game asset designer, or a beginner 3D artist, learning to flip models correctly will save you hours of rework and help you create polished, usable assets every time.
Why and When You Might Need to Flip a 3D Model
Flipping a 3D model sounds like a trivial task at first glance, but it solves a surprising number of common problems across 3D workflows. Before diving into the step-by-step how-to, it’s helpful to understand the most common scenarios that call for flipping, to help you approach the task with the right technique.
Symmetrical Asset Creation
One of the most common use cases for flipping is building symmetrical assets. Most organic objects (from human faces to car wheels to furniture) are symmetrical across one axis. Instead of modeling both halves from scratch, artists typically model one half, duplicate it, flip the duplicate, and weld the two halves together to create a complete, perfectly symmetrical model. This cuts modeling time in half and ensures clean, even symmetry that’s hard to achieve by modeling the entire object manually.
Correcting Orientation for 3D Printing
For 3D printing, orientation is everything. If you download a pre-made model or import a design from another creator, it might be oriented incorrectly on your print bed. Flipping the entire model can reorient it so overhangs are minimized, support material is reduced, and the print adheres properly to the build plate. For example, a functional vise bracket you downloaded might be oriented vertically by default, but flipping it 180 degrees lays it flat on the print bed, eliminating the need for extensive support and resulting in a much stronger part.
Fixing Import/Export Errors and Reversed Normals
When you import a 3D model from another software or a third-party site, it’s not uncommon to encounter reversed normals. Normals are the vectors that define which side of a polygon is the “outside” of the model. If normals are reversed, your model will appear transparent in your viewport or come out hollow when 3D printed. Flipping normals is a specific type of flipping that corrects this common error. It’s different from flipping the entire model’s position, but it’s just as important to know how to do.
Mirroring for Game Design and Animation
In game design and animation, flipping is often used to create variations of existing assets to add variety without extra modeling work. For example, if you’ve built a left hand for a character, you can flip it to create a matching right hand. If you’ve designed a building facade with a specific window arrangement, flipping it gives you a second unique facade for the opposite side of the building, cutting down on asset creation time. For 2D sprites in older games, this trick is still used to make a character walk left without having to animate a whole new set of frames, and the same logic applies to 3D character models.
Key Pre-Flip Checks and Preparation
Before you click any flip buttons, a few quick preparation steps will save you from common mistakes that can break your model. Rushing into flipping without checking these details can result in flipped normals, broken UV maps, or misaligned parts that take hours to fix.
Check Your Model Origin and Axis Orientation
Every 3D software uses a standard 3-axis coordinate system: X (left/right), Y (up/down), and Z (forward/backward). The first step before flipping is confirming which axis you need to flip across. Most of the time, symmetry flips happen across the X axis, but that can vary depending on how you oriented your original model. To avoid flipping in the wrong direction, toggle on axis guides in your viewport and measure the position of your model to confirm which axis runs along your desired line of symmetry.
It’s also a good idea to check your model’s origin point. If your origin is offset from the center of your model, flipping can move the entire model to an unexpected position, leaving you to realign it manually. Most software lets you reset the origin to the center of the geometry in one click, which ensures flipping happens around the correct center point.
Back Up Your Original Model
It sounds obvious, but many beginners skip this step and end up losing hours of work when a flip goes wrong. Before you make any changes, duplicate your original model and hide the copy, or save a separate version of your project named with a “pre-flip” suffix. This is especially important if you’re working on a complex model with multiple attached parts or painted textures – a bad flip can break texture mapping that’s hard to redo.
Check for Existing Symmetry and UV Maps
If you’re flipping a half-model to create a full symmetrical object, check that your cut edge is perfectly aligned along the axis you’re going to flip across. If the edge is even slightly offset, you’ll end up with a gap or an overlap where the two halves meet, requiring extra cleanup after welding. If you’ve already created UV textures for your model, keep in mind that flipping the model will also flip the UV map. If you don’t correct this, your textures will be backwards. For example, text on a logo will read reversed after the flip. Plan to adjust your UVs after flipping if you’ve already textured your model.
Step-by-Step Flipping Workflows for Common 3D Software
Flipping works slightly differently in every popular 3D software, but the core logic is the same. Below are step-by-step workflows for the most common tools used by hobbyists and professionals alike, covering both full-model flips and symmetry flips for asset creation.
Blender (Free, Open-Source)
Blender is the most popular free 3D tool for beginners and professionals, and flipping models is straightforward once you know where to find the options.
- Select the object or part of the object you want to flip. If you’re flipping the entire model, click the object in Object Mode. If you’re flipping only part of the mesh, switch to Edit Mode and select the relevant faces/vertices.
- If you’re in Object Mode, press S to scale, then press the axis key (X, Y, or Z) corresponding to the axis you want to flip across.
- Type -1 and press Enter. This scales the object to -1 on your chosen axis, which flips it perfectly. If you’re in Edit Mode, use the same shortcut: S > (axis) > -1 > Enter.
- For flipping normals to fix reversed faces: in Edit Mode, select all reversed faces, go to the Mesh menu > Normals > Flip Normals.
- To create a symmetrical full model from a half: duplicate your half-model, flip the duplicate across the center axis, then select both objects, join them, and use the Merge by Distance tool to weld the center vertices together.
A common tip for Blender users: after scaling to flip, apply your scale by pressing Ctrl + A and selecting Scale. This resets the transformation data and prevents unexpected behavior when you edit the model later.
Autodesk Fusion 360 (CAD for 3D Printing)
Fusion 360 is the go-to tool for 3D printing and functional CAD modeling, and flipping (called mirroring in Fusion) is built into the modify toolbar.
- To mirror an entire component or body: Open the Modify menu and select Mirror. Choose the body or component you want to flip, then select a planar face or construction plane that you want to mirror across. Click OK to create the flipped duplicate.
- To flip an existing model in place for 3D printing: Right-click the body in the Browser window, select Move/Copy, check the Duplicate box if you want to keep the original, then select the Mirror option in the move dropdown. Select your mirror plane and confirm to create the flipped body.
- To fix reversed normals in Fusion: Right-click the body, select Display > Show Normal Direction, then click the Flip Normals button to reverse the direction for any incorrect faces.
ZBrush (Sculpting)
For 3D sculptors working in ZBrush, flipping is most commonly used for symmetry during the sculpting process. ZBrush actually has a built-in symmetry toggle that flips your sculpt strokes in real time, so you don’t have to manually flip after sculpting one half. But if you need to flip a finished sculpt:
- Go to the Transform palette at the top of the interface.
- Select Flip, then choose which axis you want to flip across (X, Y, or Z).
- If you need to mirror a half-sculpt to create a full sculpt, use the Geometry > Dynamesh tool after flipping to merge the two halves and remesh the combined model.
Unity/Unreal Engine (Game Development)
If you’re working with assets in a game engine and need to flip them directly in the editor, the process is even simpler. In both Unity and Unreal, you can flip an object by scaling it negatively on the desired axis, just like in Blender. Select the asset in your scene, open the Transform panel, and change the value for your chosen axis to -1 times its original scale. Keep in mind that this can flip normals in-engine, so you may need to enable double-sided rendering for the material if your model becomes transparent.
“Flipping is one of the first skills new 3D artists learn, but doing it correctly teaches you a core lesson: 3D modeling is all about understanding how your software interprets geometry. A bad flip can break normals, UVs, and even entire assets, but taking two minutes to check your axis and back up your work will save you hours of frustration later.”
Common Flipping Mistakes and How to Fix Them
Even experienced 3D artists run into issues when flipping models. Below are the most common mistakes and simple fixes for each, so you can get back to work quickly.
Backwards Textures and Reversed UVs
When you flip a model that already has a baked texture or UV map, the texture will flip along with the geometry. That means any text, logos, or asymmetrical details will be reversed, which is especially noticeable on things like game character clothing or functional parts with printed labels. To fix this:
After flipping your model, open the UV editor and select all the UVs. Flip just the UVs across the same axis you flipped the model on. This reverses the UV mapping without changing the model geometry, so your texture lines up correctly. If you’re working with a baked texture image, you can also flip the image file itself in an image editor like Photoshop or GIMP, which achieves the same result.
Reversed Normals and Transparent Faces
It’s extremely common for flipping to reverse normals accidentally, especially if you’re flipping individual faces rather than the whole model. The result is faces that look transparent in the viewport or render as black or missing. If this happens:
First, enable the option in your software to show backface culling. This will make reversed faces invisible in the viewport, so you can easily select them. Then, simply use the flip normals tool to reverse their direction. Most software has a one-click “recalculate normals” option that will automatically fix all reversed normals on a mesh in seconds, which is faster than selecting individual faces.
Misaligned Center Seams After Symmetry Flipping
When you flip a half-model to create a full symmetrical model, a common mistake is ending up with a visible seam, gap, or overlapping vertices along the center line where the two halves meet. This happens when the original cut edge wasn’t perfectly aligned along the flip axis. To fix this:
Before you flip, select all the vertices along the cut edge and set their position on the flip axis to 0 (or whatever your center coordinate is). This locks them perfectly to the axis, so when you flip the duplicate, the vertices from both halves line up exactly. After merging, use the smooth or weld tool to blend any minor discrepancies, and the seam will disappear. For 3D printing, a small seam is usually easy to sand away after printing, but a clean weld in your 3D file will save you post-processing work.
Broken Rigging and Animation After Flipping
If you flip a 3D character model that’s already been rigged with a skeleton for animation, the weighting and bone positions will be reversed, which breaks the animation. Flipping a rigged character requires a few extra steps to fix the rigging after flipping. Most software has a “mirror weights” tool that will automatically transfer the skin weighting from the original side to the flipped side, which saves you from repainting the weights manually. Always test the animation after flipping to check for any odd deformation around the joints, and adjust the weights if needed.
Advanced Flipping Tips for Special Use Cases
Once you’ve mastered basic flipping, these advanced tips will help you handle more complex use cases, from 3D printing to professional asset creation.
Flipping Multi-Part Assemblies
If you’re working with an assembly that has multiple separate components (like a piece of furniture or a functional 3D printed mechanism), flipping the entire assembly can be tricky if you don’t do it correctly. Instead of flipping each part individually, group all the parts into a single parent object or assembly, then flip the entire group. This keeps all the parts aligned correctly relative to each other, so you don’t end up with misaligned connections. Always check that moving parts still fit together after flipping – minor misalignments can prevent moving parts from working properly when 3D printed.
Flipping STL Files for 3D Printing
STL is the most common file format for 3D printing, and many people download STL files from sites like Thingiverse that need flipping before printing. If you don’t have the original editable source file, you can still flip an STL easily in most slicers or free tools like Meshmixer. In Cura (the most popular 3D slicer), you can flip an STL by selecting the model, opening the transform tool, and scaling the axis you want to flip to -1. That’s all you need to do before slicing – no advanced editing required. If you have multiple STLs in one assembly, the same trick applies: select all models, group them, then flip the whole group.
Using Flipping to Create Variations
Flipping isn’t just for correcting orientation or symmetry – it’s also a great way to create unique asset variations quickly. For example, if you’re creating a set of 10 chairs for a game environment, you can model one chair, flip it, and slightly scale the flipped version to get a second unique chair without any extra modeling work. For environment art, this cuts down asset creation time dramatically and makes your scene feel more natural, instead of repeating the exact same model over and over. Just keep in mind that obvious asymmetrical details will be reversed, so avoid this trick for assets with clear directional details like text or logos unless you want the reversed variation.
Incremental Flipping for Organic Sculpting
For organic sculpting, you don’t have to wait until you finish sculpting one half to flip it. Most sculpting software has a live symmetry option that automatically flips every brush stroke across your chosen axis as you sculpt. This lets you sculpt the entire model in real time, resulting in perfect symmetry without having to manually flip at the end. If you want to add asymmetrical details later, you can just turn off symmetry and sculpt them in, so it’s a flexible workflow that works for most organic projects.
Conclusion
Flipping 3D models is a fundamental skill that every 3D artist, designer, and 3D printing hobbyist needs to master. While it’s simple once you understand the basics, rushing into flipping without preparation can lead to common mistakes like reversed textures, broken normals, and misaligned seams that waste time. By starting with pre-flip checks, backing up your work, confirming your axis, and using the right workflow for your software, you can flip models quickly and correctly every time.
Whether you’re creating a symmetrical character model, reorienting a downloaded STL for 3D printing, or creating asset variations for a game level, flipping is a tool that will save you hours of work and help you create cleaner, more polished assets. Like most 3D skills, it gets faster and more intuitive with practice – after a few successful flips, you’ll be able to do it in less than a minute, even for complex models.