
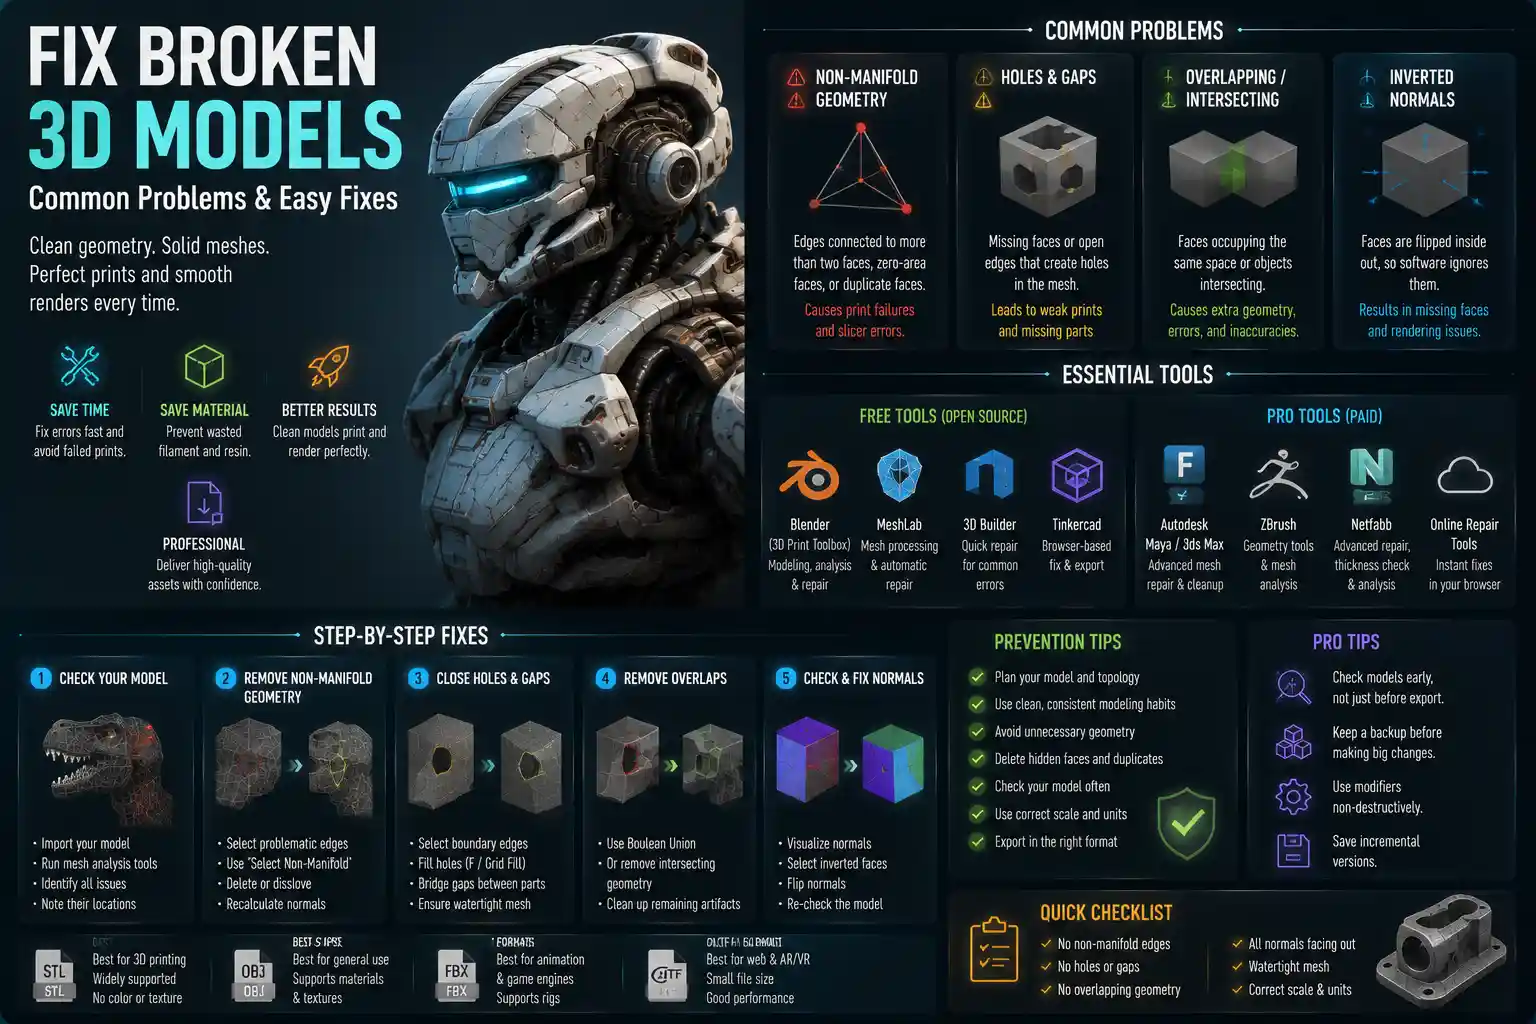
Anyone who’s spent time 3D printing, modeling for game development, or preparing assets for 3D rendering has encountered it: a broken 3D model. Maybe your slicer software throws a cryptic “non-manifold geometry” error mid-prep, your 3D printer starts oozing plastic in random spots, or your model exports with gaping holes where a face should be. Broken models derail projects, waste time and material, and turn an exciting creative process into a frustrating troubleshooting session. The good news is that most common 3D model issues are easy to fix once you know what to look for and the right tools to use. This guide breaks down the most common causes of broken 3D models, step-by-step fixes for everyday problems, and proactive habits to prevent issues from popping up in the first place.
Common Types of Broken 3D Models and Their Causes
Before you can fix a broken 3D model, you need to identify what’s wrong with it. Most issues fall into a handful of predictable categories, and understanding the root cause will save you hours of guesswork. Whether you downloaded a free model from Thingiverse or created your own from scratch in Blender, these are the problems you’re most likely to encounter.
Non-Manifold Geometry
The most common culprit for broken 3D models is non-manifold geometry. To understand what this means, think of a 3D model as a solid object: it should have a clear inside and outside, with every edge connected to exactly one or two faces. Non-manifold geometry breaks this rule. For example, an edge that connects three or more faces, a face with zero area, or an overlapping duplicate face all count as non-manifold. Most slicer software and 3D printers can’t process non-manifold geometry, because they can’t tell where the solid part of the model ends and empty space begins. This leads to failed prints, missing layers, or errors that stop the entire process before it even starts.
Holes and Gaps in Mesh
Holes and gaps are another extremely common issue, especially for models created by scanning real objects or exported from other design programs. A hole happens when one or more faces are missing from the mesh, leaving an open edge that connects the inside of the model to the outside. Gaps often form between separate parts of a model that were joined incorrectly, for example when you merge two different objects in your modeling software but don’t weld their shared edges together. Like non-manifold geometry, holes confuse slicers, leading to missing walls or structural weaknesses in the final printed part.
Overlapping and Intersecting Geometry
Overlapping geometry occurs when two or more faces occupy the same space, or when separate objects intersect without being merged into a single solid mesh. For example, if you add a screw head to the top of a bolt model but don’t remove the overlapping part of the bolt, you’ve got intersecting geometry. This issue doesn’t always throw an error immediately, but it can lead to extra dense mesh that slows down your software, unexpected extra material deposition during printing, or inaccuracies in the final model dimensions.
Distorted or Inverted Normals
Every face in a 3D mesh has a normal – a vector that indicates which side of the face is the outside. When normals are inverted, the face is flipped inside out. To the naked eye, this usually looks like a face that’s missing or transparent in preview mode, and rendering or 3D printing software will often ignore inverted faces entirely, leading to gaps or holes in the final output. This issue is common when you import models from other software or edit individual faces manually.
Essential Tools for Fixing Broken 3D Models
You don’t need an expensive enterprise license to fix most broken 3D models. There are free, professional-grade tools available for every operating system and use case, from beginner 3D printing enthusiasts to professional game developers. The right tool for your job depends on how complex your model is and what you plan to use it for.
Free Open-Source Tools for All Users
For most beginners and intermediate users, free tools are more than capable of handling 90% of common 3D model issues. Blender is the gold standard here: it’s a full-featured 3D modeling suite with built-in tools to analyze and repair meshes, and it works on Windows, Mac, and Linux. The built-in 3D Print Toolbox add-on, which comes pre-installed with Blender, is specifically designed to check for common errors like non-manifold edges, overlapping faces, and holes, making it ideal for anyone prepping models for 3D printing.
Another popular free option is Meshlab, an open-source tool designed specifically for processing and repairing unstructured 3D meshes. Meshlab is particularly good for fixing scanned 3D models that have lots of holes and irregular geometry, and it includes automated repair functions that can fix multiple issues at once. For casual users who just need to quickly fix a model before printing, Microsoft’s 3D Builder (pre-installed on most Windows devices) has a one-click “repair model” function that works well for simple errors.
Paid Tools for Professional Workflows
If you work with 3D models professionally, you may already have access to advanced tools that can handle more complex repairs. Autodesk Maya, 3ds Max, and ZBrush all include comprehensive mesh analysis and repair tools, and they integrate seamlessly with professional pipelines for game development, VFX, and industrial design. For users who specifically work with 3D printing, Netfabb is one of the most popular options: it has advanced automated repair, wall thickness analysis, and error checking that handles even very complex models with ease. While it’s a paid tool, many 3D printing services include a free basic version that works for most small projects.
There are also great browser-based tools that let you fix models without downloading any software. Tools like 3D Slash, Meshfix, and the online repair tool on Sketchfab let you upload your STL or OBJ file, run automated repair, and download the fixed model in minutes. This is perfect for casual users who don’t use 3D software regularly and just need a quick fix for a downloaded model.
“The biggest mistake new 3D designers make is jumping straight to automated repair before checking the model manually. Automated tools can fix 60% of common issues, but they’ll often introduce new problems like shrinking your model or distorting fine details that a quick manual check would catch.”
— Nathan Vegdahl, Senior 3D Artist and Blender educator
Step-by-Step Fixes for the Most Common Issues
Now that you know what causes broken models and what tools you need, let’s walk through how to fix the most common issues. We’ll use Blender for this step-by-step guide, since it’s free and widely used, but the same principles apply to almost any 3D modeling software.
Fixing Non-Manifold Geometry
Before you start fixing, you first need to find where the non-manifold edges are in your model. In Blender, this takes just a few clicks:
- Enable the 3D Print Toolbox add-on by going to Edit > Preferences > Add-ons, searching for “3D Print Toolbox”, and checking the box next to it.
- Switch to Edit Mode, select your entire mesh, and open the 3D Print Toolbox panel on the right side of the screen.
- Click “Check All” to run a full diagnostic of your model. The software will highlight all non-manifold edges in red.
Once you’ve located the non-manifold edges, the fix depends on what’s causing the issue. The most common cause is overlapping edges that weren’t merged when you joined two parts of a model. To fix this, select all non-manifold edges by clicking “Select Non-Manifold” in the 3D Print Toolbox, then use the Merge > By Distance function to weld overlapping vertices together. For edges that are connected to three or more separate faces, you can usually delete one of the overlapping faces, then fill the resulting tiny gap with the Fill or Grid Fill tool. For more complex non-manifold issues, you can use Blender’s built-in Make Manifold tool to automatically adjust the mesh to meet manifold requirements.
Patching Holes and Gaps
Small holes are one of the easiest issues to fix, and most tools can do it automatically. In Blender, after you’ve run your diagnostic, select the borders of the hole (these will usually be selected automatically when you check for missing faces) and use the Fill tool to add a new face that seals the gap. For larger, irregularly shaped holes, you may need to use the Bridge Edge Loops tool or manually add a few extra faces to match the surrounding curvature of the model.
For scanned models that have dozens of small holes, automated tools work best. In Meshlab, you can use the “Filter > Cleaning and Repair > Close Holes” function, which lets you set a maximum hole size and automatically patches all holes smaller than that size. Just be sure to check the result after: automated patching can sometimes create bumpy or misaligned geometry on curved surfaces, so you may need to smooth the patched area by hand.
Removing Overlapping and Intersecting Geometry
Overlapping geometry is especially common when you combine multiple separate objects into a single model, for example when you download a model that’s split into multiple parts and want to print it as one piece. To fix this, start by using the boolean union function to merge the two objects into a single mesh, which will automatically remove any internal overlapping geometry. If you still have overlapping faces after merging, use the Select Intersecting function (in Blender, this is found under Select > Select Intersecting) to select all overlapping faces, then delete the duplicates.
For models that have lots of small overlapping triangles (common in scanned models), you can use a decimation or remeshing tool to simplify the mesh and remove redundant geometry. Remeshing rebuilds the entire mesh with evenly sized faces, which eliminates overlapping geometry and makes the model easier to slice and print.
Fixing Inverted Normals
Inverted normals are one of the simplest issues to fix. In almost all 3D modeling software, you can select all the faces in your model and use the “Recalculate Normals” function to automatically flip all faces so their normals point outward. In Blender, this is done with the shortcut Shift + N in Edit Mode. If you still have a few inverted faces after recalculating, just select those faces manually and flip them with the “Flip Normals” command.
Advanced Fixes for Complex 3D Models
Some broken 3D models require more than basic patching and edge merging, especially if you’re working with large scanned models, models with fine details, or models intended for high-end rendering or industrial use. Here are some practical solutions for more complex issues.
Fixing Wall Thickness Issues
One of the most common hidden issues that breaks 3D prints is incorrect wall thickness. If your model has walls that are too thin, the printer won’t be able to deposit material properly, leading to broken or fragile parts. If walls are too thick, you’ll waste extra material and end up with a heavy, over-sized part. Most modern repair tools include a wall thickness analysis function that highlights areas that are too thin or too thick.
To fix areas that are too thin, you can use the Solidify modifier in Blender to add thickness to the entire model, or use the Scrape or Clay Strips brush in sculpt mode to add material to thin areas manually. For areas that are too thick, you can hollow out the model to reduce material use, which also reduces printing time and prevents issues like warping in large prints.
Repairing Highly Irregular Scanned Models
3D scanning is an incredibly useful tool, but scanned models almost always come with a long list of issues: noise, stray vertices, hundreds of small holes, and messy non-manifold geometry. For heavily scanned models, automated repair tools are a good starting point, but you’ll usually need to do some manual cleanup to get a usable model.
- Start by removing stray vertices and disconnected mesh fragments that are floating away from the main model. These are easy to miss but can cause errors in slicing, so always remove them first.
- Use a noise reduction filter to smooth out small bumps and irregularities caused by scanning error. Don’t over-smooth, though, or you’ll lose fine details from the original object.
- Use a remeshing tool to rebuild the mesh with clean, consistent topology after you’ve patched all the large holes. This will eliminate any remaining non-manifold geometry and make the model much easier to edit later.
- For high-resolution scans, use retopology to create a clean, low-poly version of the model that retains all the original detail as a normal map. This makes the model much easier to use for 3D printing, games, or rendering.
Fixing Corrupted STL Files
Sometimes a 3D model breaks not because of bad geometry, but because the STL or OBJ file itself got corrupted during export, download, or file transfer. Corrupted files often won’t open at all, or will open with huge chunks of the model missing. There are a few ways to fix corrupted STL files: first, try re-downloading or re-exporting the file from the original source – that fixes the issue more often than you’d think. If that doesn’t work, you can use a file repair tool like Meshfix to reconstruct the mesh from the corrupted data. In many cases, the tool can recover most of the model geometry, and you can then fix any remaining holes or gaps manually.
Proactive Habits to Prevent Broken 3D Models
The best way to fix broken 3D models is to prevent them from breaking in the first place. A few simple habits during the modeling process will eliminate most common issues before they ever cause a problem.
First, always check your model for errors as you go, not just when you’re ready to export or print. It’s much easier to fix a small error when you just created it, rather than trying to find it in a complex finished model. Most 3D modeling software has a shortcut to check for non-manifold geometry, so get in the habit of running a quick check every time you finish editing a part of your model.
Second, clean up your topology as you model. Avoid leaving duplicate vertices or overlapping faces when you join objects – always merge vertices by distance immediately after joining two parts. When modeling from scratch, use consistent face sizes and avoid creating tiny faces with zero area, which are a common cause of non-manifold errors.
Third, export your files correctly. Different file formats have different requirements: STL, the most common format for 3D printing, is very forgiving but can lose detail if exported incorrectly. Always use the correct export settings for your intended use – for example, set the deviation tolerance low enough to retain fine details but not so low that you end up with an unnecessarily large file with millions of extra faces. When exporting from CAD software, make sure to enable the option to weld connected edges before exporting as an STL, which prevents gaps between adjacent faces.
Finally, if you’re downloading models from public repositories, always check the comments section before downloading. Other users will often mention if the model is broken, and may even post a fixed version that you can download instead of troubleshooting it yourself.
Conclusion
Fixing broken 3D models doesn’t have to be a daunting process. Most common issues – from non-manifold geometry to holes and inverted normals – can be fixed in a few minutes with the right knowledge and free tools. The key is to start by identifying the root cause of the problem, start with simple manual checks before relying on automated repair, and take proactive steps to prevent issues during the modeling process. Whether you’re a beginner prepping your first model for 3D printing or a professional working on complex assets for game development, these skills will save you hours of frustration and help you turn broken models into finished, functional projects. With a little practice, you’ll be able to diagnose and fix most issues in minutes, and spend more time creating and less time troubleshooting.