
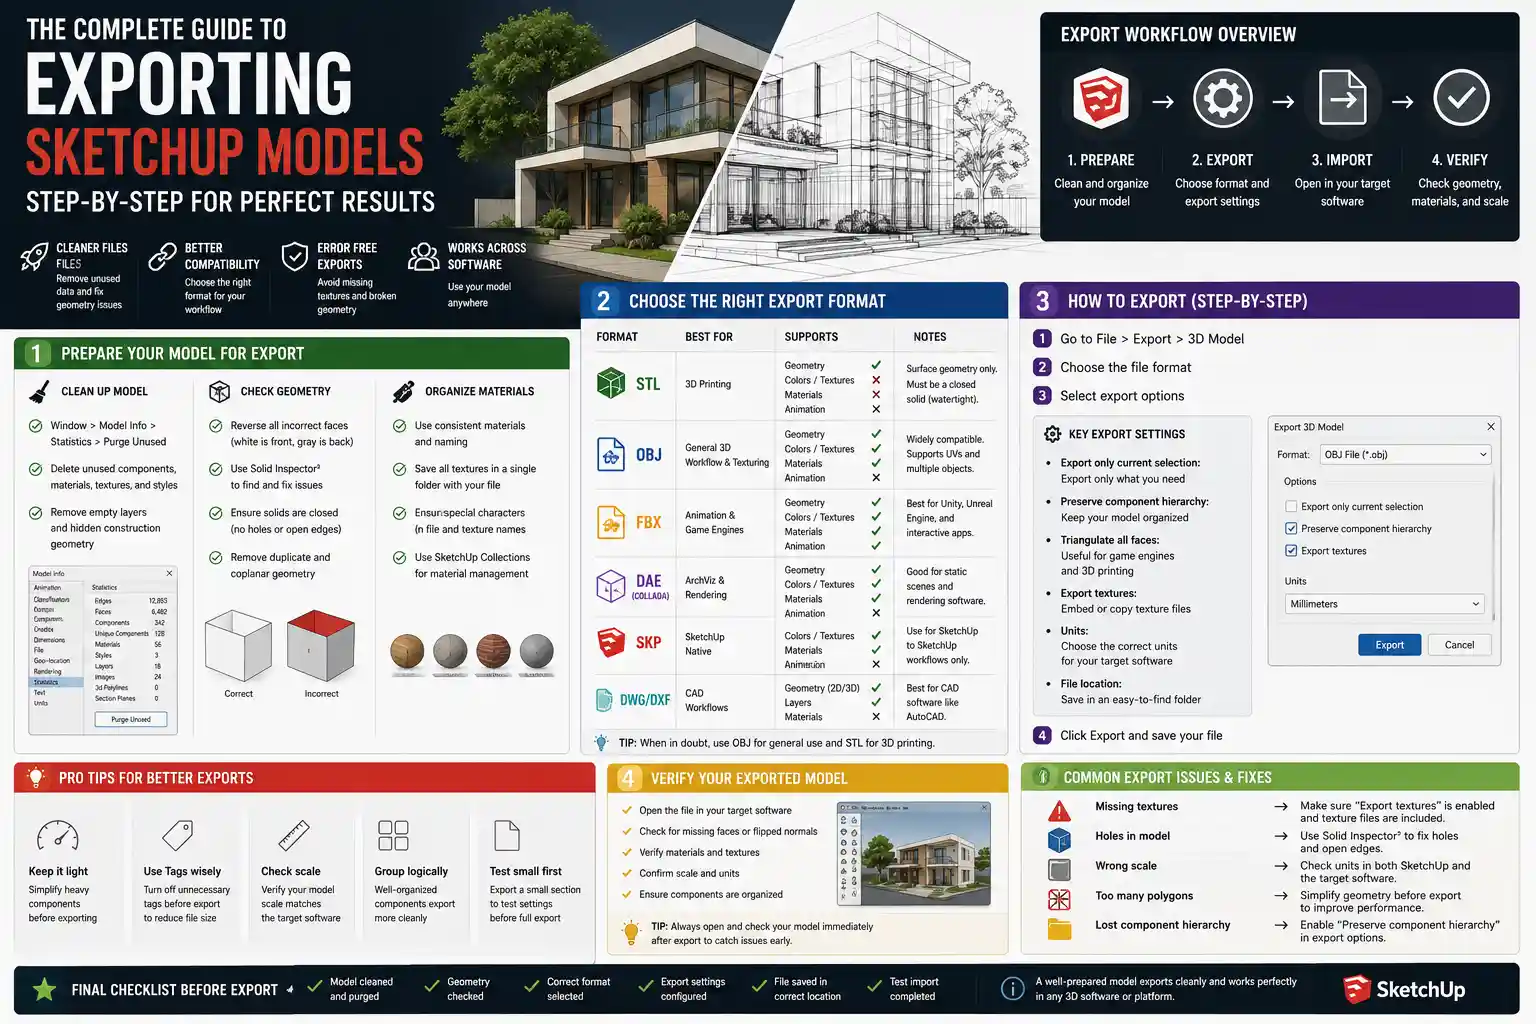
If you’ve ever spent hours refining a 3D SketchUp model of a residential extension, a product prototype, or a detailed urban landscape, you know that getting your design out of SketchUp and into another tool is make-or-break. Whether you need to send your model to a 3D printer, collaborate with a colleague using Blender or AutoCAD, or prepare it for a client presentation in a VR platform, a successful export avoids missing textures, broken geometry, and compatibility headaches. SketchUp offers dozens of export options tailored to different use cases, but knowing which format to pick and what settings to adjust can turn a 10-minute task into an hour of troubleshooting. This guide breaks down the entire process step by step, from prepping your model for export to choosing the right format and troubleshooting common issues that even experienced users face.
Preparing Your SketchUp Model for Export
Before you even open the export menu, a few simple preparation steps can eliminate most common export problems. Skipping this stage often leads to oversized files, missing components, or corrupted geometry that won’t open in other software. Think of prepping your model like packing a suitcase for a trip: sorting out what you need and organizing it ahead of time makes unpacking far easier.
Clean Up Unused Geometry and Layers
One of the most common issues with bad exports is excess, hidden content that bloats your file and confuses other software. Over the course of a project, it’s normal to accumulate hidden construction lines, unused components, duplicate geometry, and empty layers that you don’t need in the final export. Cleaning these up takes just a few minutes and makes a huge difference.
SketchUp has built-in tools to automate most of this work. Start by running the Purge Unused command, which removes unused materials, components, textures, and layers. You can find this by going to Window → Model Information → Statistics and clicking the “Purge Unused” button. Next, open the Layers panel and delete any empty layers or layers that contain content you don’t need for the final export. If you need to keep hidden content for future edits, simply move it to a separate hidden layer that you can toggle off before export.
Check for Common Geometry Issues
Broken or invalid geometry is another top cause of failed exports. SketchUp is forgiving of small errors like reversed faces or overlapping coplanar polygons when you’re modeling, but many other 3D tools aren’t. Exporting a model with these errors can lead to missing faces, distorted meshes, or completely unopenable files.
- Reverse all incorrect faces: By default, SketchUp shows the front of a face as white and the back as gray. Any reversed faces (gray faces facing outwards) can disappear when exported to other formats. Select all reversed faces and reverse them using the “Reverse Faces” right-click menu option.
- Fix overlapping and non-manifold geometry: Use the Solid Inspector extension (free from the SketchUp Extension Warehouse) to scan for non-manifold edges, holes in solids, and overlapping polygons. This tool automatically flags issues and helps you fix them in one click.
- Simplify high-poly components: If you’ve imported high-resolution 3D assets from other sources, your model can become unnecessarily dense for its intended use. Use the Simplify Mesh tool (or the Skimp extension) to reduce polygon count without losing critical detail, which results in smaller file sizes that are easier to work with in other tools.
Organize Textures and Materials
Missing textures are one of the most frustrating export problems, especially when you’ve spent hours matching custom colors and finishes for a client presentation. Most 3D export formats embed material data, but organizing your textures ahead of time avoids common mislinks. If you’re using custom textures, save them in a single dedicated folder with your SketchUp file before exporting, and avoid using special characters (like accents, ampersands, or spaces) in file names, which can break links on some operating systems. For SketchUp Pro users, the “Collection” feature lets you save all your project materials in one place, making it easier to package them with your export if needed.
Choosing the Right Export File Format
SketchUp supports more than 20 export formats, but the right choice depends entirely on what you’re going to do with the model after export. Picking the wrong format can leave you with missing data or a file that won’t open in your target software. Below are the most common formats and when to use each.
STL (Stereolithography): For 3D Printing
STL is the universal standard for 3D printing, and it’s the go-to choice if you’re sending your SketchUp model to a 3D printer or print service. STL only stores surface geometry, so it doesn’t carry texture or color data, which makes it a lightweight, reliable option for solid models. The biggest thing to remember when exporting STL is that your model must be a solid, closed manifold mesh—if it has holes or open edges, the 3D printer won’t be able to process it, which is why the geometry checks we covered earlier are so important.
OBJ: For General 3D Workflow and Texturing
OBJ is one of the most widely supported 3D formats across all design software, from Blender and Maya to 3ds Max and Cinema 4D. Unlike STL, OBJ supports texture and material data, and it can store multiple objects in a single file. That makes it ideal if you’re exporting a textured architectural model to a rendering software or sharing it with another designer who uses a different 3D tool. OBJ also preserves UV mapping, which means your custom textures will line up correctly when you open the model in another program.
FBX: For Animation and Interactive Applications
If you’re exporting your SketchUp model to a game engine like Unity or Unreal Engine, or for animation work, FBX is the best choice. FBX supports rigging, animation, materials, and hierarchical component structure, which other formats don’t handle well. It’s also the preferred format for VR and AR applications, where you need to preserve component organization for interactive use. For example, if you’re building a virtual walkthrough of a house, exporting as FBX preserves each room and fixture as a separate object, so developers can add interactive elements like opening doors or turning on lights.
DWG/DXF: For CAD and Architectural Collaboration
Many architects and civil engineers use SketchUp for conceptual design before moving to AutoCAD or Revit for construction documentation. For these workflows, DWG or DXF are the standard export formats. DWG is the native AutoCAD format, so it preserves layers, line weights, and 2D drafting data better than generic 3D formats. You can also export just 2D views of your SketchUp model (like floor plans or elevations) as DWG, which makes it easy to add construction details in CAD software later.
GLB/GLTF: For Web and VR/AR Applications
GLB and GLTF are modern, open-source formats designed for sharing 3D models on the web, in mobile apps, or for virtual and augmented reality experiences. These files are highly compressed, load quickly, and support textures, materials, and animations, making them ideal for embedding SketchUp models on a client website or sharing a VR walkthrough. SketchUp 2021 and later support native GLTF/GLB export, and many social and 3D portfolio platforms (like Sketchfab) prefer this format for its small size and broad compatibility.
The biggest mistake new SketchUp users make is exporting to the wrong format for their end goal. You wouldn’t export a 3D print model as a textured FBX, just like you wouldn’t export a VR model as an STL. Spend two minutes picking the right format upfront, and you’ll save hours of rework later.
Step-by-Step Export Guide for Common Use Cases
Now that you’ve prepped your model and chosen your format, let’s walk through the step-by-step export process for the most common use cases. These steps work for both SketchUp Free (web) and SketchUp Pro (desktop), with notes on where the two versions differ.
Exporting for 3D Printing (STL)
- Confirm your model is a closed solid: Open the Solid Inspector extension and run a check to fix any holes, non-manifold edges, or reversed faces. For SketchUp Free, you can use the “Solid” inspector in the Entity Info panel to confirm your model is a valid solid.
- Go to File → Export → 3D Model.
- Select “STereoLithography (*.stl)” from the file format dropdown menu.
- Name your file and choose a save location. For desktop versions, we recommend saving to your local drive first, rather than a cloud folder, to avoid export errors caused by sync delays.
- Adjust export settings: Most STL exports use the default settings, but if you need higher resolution (for fine-detail prints), increase the “Deviation” slider to a smaller value (0.01mm is standard for high-detail prints). A higher deviation value creates a smaller file with lower resolution, which works for large, low-detail models.
- Click “Export” to save your STL file.
Exporting a Textured Model for Rendering (OBJ)
- Confirm all your materials and textures are correctly applied and saved in your project folder.
- Go to File → Export → 3D Model.
- Select “Wavefront OBJ (*.obj)” from the format dropdown.
- Name your file and select your save location.
- Check the export options: Make sure the “Export Materials” and “Export Texture Maps” boxes are checked. This will create a separate .mtl material file alongside your OBJ, and save all your texture images in the same folder. If you want to preserve your layered organization, check “Export by Layer” to keep objects on separate layers when imported into other software.
- Click “Export” to complete the process. When you import the OBJ into your rendering software, keep the OBJ, MTL, and texture files in the same folder to avoid missing textures.
Exporting for CAD Collaboration (DWG)
- Organize your model by layer so that different elements (walls, doors, windows, furniture) are on separate layers, which makes editing in AutoCAD much easier.
- Go to File → Export → 2D Graphic if you’re exporting a floor plan, elevation, or other 2D view, or File → Export → 3D Model if you’re exporting a full 3D model.
- Select “AutoCAD DWG (*.dwg)” from the format dropdown.
- Click “Options” to adjust your output settings: Choose the AutoCAD version that matches your collaborator’s software (most teams use 2018 or later, so matching that avoids compatibility issues). Check the “Preserve Layers” box, and if you’re exporting 2D, select “Current view” to export exactly what you see in your SketchUp viewport.
- Save your file and export.
Exporting for VR/AR or Web (GLB)
- Prep your model by reducing polygon count and compressing textures to keep the file size small for fast loading.
- Go to File → Export → 3D Model.
- Select “GLB” or “glTF” from the format dropdown (GLB is a single-file version that’s easier to share, so we recommend it for most use cases).
- Check the “Embed Textures” box to pack all texture data into the single GLB file, so you don’t have to share multiple files.
- Adjust the texture quality slider if you need to reduce file size, then export.
Troubleshooting Common Export Problems
Even with careful preparation, you can run into issues when exporting from SketchUp. Here are the most common problems and how to fix them quickly.
Missing Textures After Export
If you open your exported model and all textures are missing or show up as solid gray, the issue is almost always broken file paths or unsupported texture formats. First, make sure you checked the “Export Materials” or “Embed Textures” box in your export settings—this is the most common mistake. If you’re exporting as OBJ, you need to keep the OBJ, MTL, and texture files in the same folder when you import them into another program; moving just the OBJ will break all texture links. Avoid using PNG files larger than 4096x4096 pixels for custom textures, as many older 3D tools don’t support large texture sizes. Also, remove any special characters from texture file names (like #, &, or accented letters) because they can break links on Windows and macOS.
Model Won’t Open in Other Software
If your exported file won’t open at all, the first thing to check is invalid geometry. A model with open edges, non-manifold geometry, or flipped faces can export as a corrupted file that other tools can’t read. Go back to SketchUp, run Solid Inspector, and fix any geometry errors, then export again. If that doesn’t work, check the file version: for example, if you export a DWG for AutoCAD 2024 but your collaborator is using AutoCAD 2016, the file won’t open. Adjust the version in the export options to match the older software and re-export. For large models, make sure you have enough hard drive space for the export file—SketchUp will fail to write a large file if your drive is full, which creates a corrupted, unopenable file.
File Size Is Too Large
Oversized files are hard to share, slow to load, and can crash other software. The fix is to reduce unnecessary detail before exporting. Start by purging unused components and materials, which can cut file size by 30% or more in many cases. Next, simplify high-poly components: if you have a 100,000-polygon tree component that you don’t need detail on, reduce it to 10,000 polygons using the Skimp extension or the built-in Simplify Mesh tool. Compress your textures: resize large textures to 1024x1024 or 2048x2048 pixels, which is enough detail for most use cases and reduces file size dramatically. For web or VR use, exporting as GLB instead of OBJ or FBX will automatically compress the model to a much smaller size without losing quality.
Missing Components or Layers After Export
If you open your exported model and whole components are gone, the most common cause is hidden layers that you didn’t toggle on before export. SketchUp only exports visible layers by default, so if your furniture is on a hidden layer, it won’t show up in the exported file. Go back to SketchUp, toggle on all layers you want to export, and re-export. If you need to preserve your layer or component structure, make sure you checked the “Preserve Layers” or “Export Components” box in the export options—some formats don’t preserve hierarchy by default, so enabling this setting keeps your organization intact.
Export Is Gray or Has Missing Faces
Missing faces almost always come from reversed faces in your original SketchUp model. As we mentioned earlier, SketchUp allows reversed faces, but many other 3D tools only render the front side of a face, so reversed faces become invisible when exported. Go back to your model, turn on monochrome view to easily spot gray reversed faces, select them, and reverse their direction, then export again. If you still have missing faces, check for overlapping coplanar faces—two faces occupying the same space can confuse export algorithms, so delete the duplicate face and re-export.
Advanced Tips for Professional Workflows
If you’re exporting SketchUp models for professional work, these advanced tips will help you streamline your process and get better results every time.
Use Extensions for More Control
SketchUp’s native export tools work great for most use cases, but extensions can add extra functionality for complex workflows. For 3D printing, the STL Tools extension adds advanced repair tools that fix common STL errors automatically, which is a huge time-saver. For high-poly models, the Skimp extension lets you reduce polygon count non-destructively, so you can keep a high-poly version in SketchUp and export a low-poly version for other tools. For architectural workflows, the DWG Export Pro extension adds more options for controlling line weights, layers, and dimension export when saving to CAD formats.
Package Your Files for Sharing
When sharing exported models with clients or collaborators, always package all related files into a single ZIP folder. If you’re exporting as OBJ, that means the OBJ file, the MTL material file, and all texture images. For other formats that don’t embed textures, include all texture files in the folder. Adding a simple text readme file with your export settings and any notes for the collaborator avoids confusion and extra back-and-forth. This is a small step that makes you look far more professional and avoids the common problem of lost files when sharing.
Test Exports Early in Your Workflow
If you’re working on a large project with a tight deadline, don’t wait until the last minute to export your model. Export a test version early on to confirm that the format works, that all geometry exports correctly, and that the file opens in your target software. Catching an issue early when you’ve only made minor changes is far easier than fixing it when the whole model is complete and your deadline is an hour away.
Adjust Export Settings for Your Target Platform
Different platforms have different requirements, so adjusting your settings to match will save time. For example, 3D print services usually require STL files with a deviation of 0.01mm or smaller, while 3D portfolio websites like Sketchfab prefer GLB files with compressed textures for fast loading. Game engines work best with FBX files that have simplified geometry and 1K or 2K textures, while architectural rendering software can handle high-resolution textures and larger file sizes.
Conclusion
Exporting a 3D model from SketchUp doesn’t have to be a frustrating process full of troubleshooting. The key to success is simple: prepare your model carefully before you export, pick the right format for your end use, and check for common issues before you share the file with others. By following the steps we’ve outlined here, you can avoid the most common mistakes that trip up new and experienced users alike, from missing textures and broken geometry to oversized files that won’t open. Whether you’re exporting a model for 3D printing, collaborating with a CAD team, or preparing an interactive VR walkthrough, the right export process ensures your design translates perfectly from SketchUp to whatever tool you use next.