
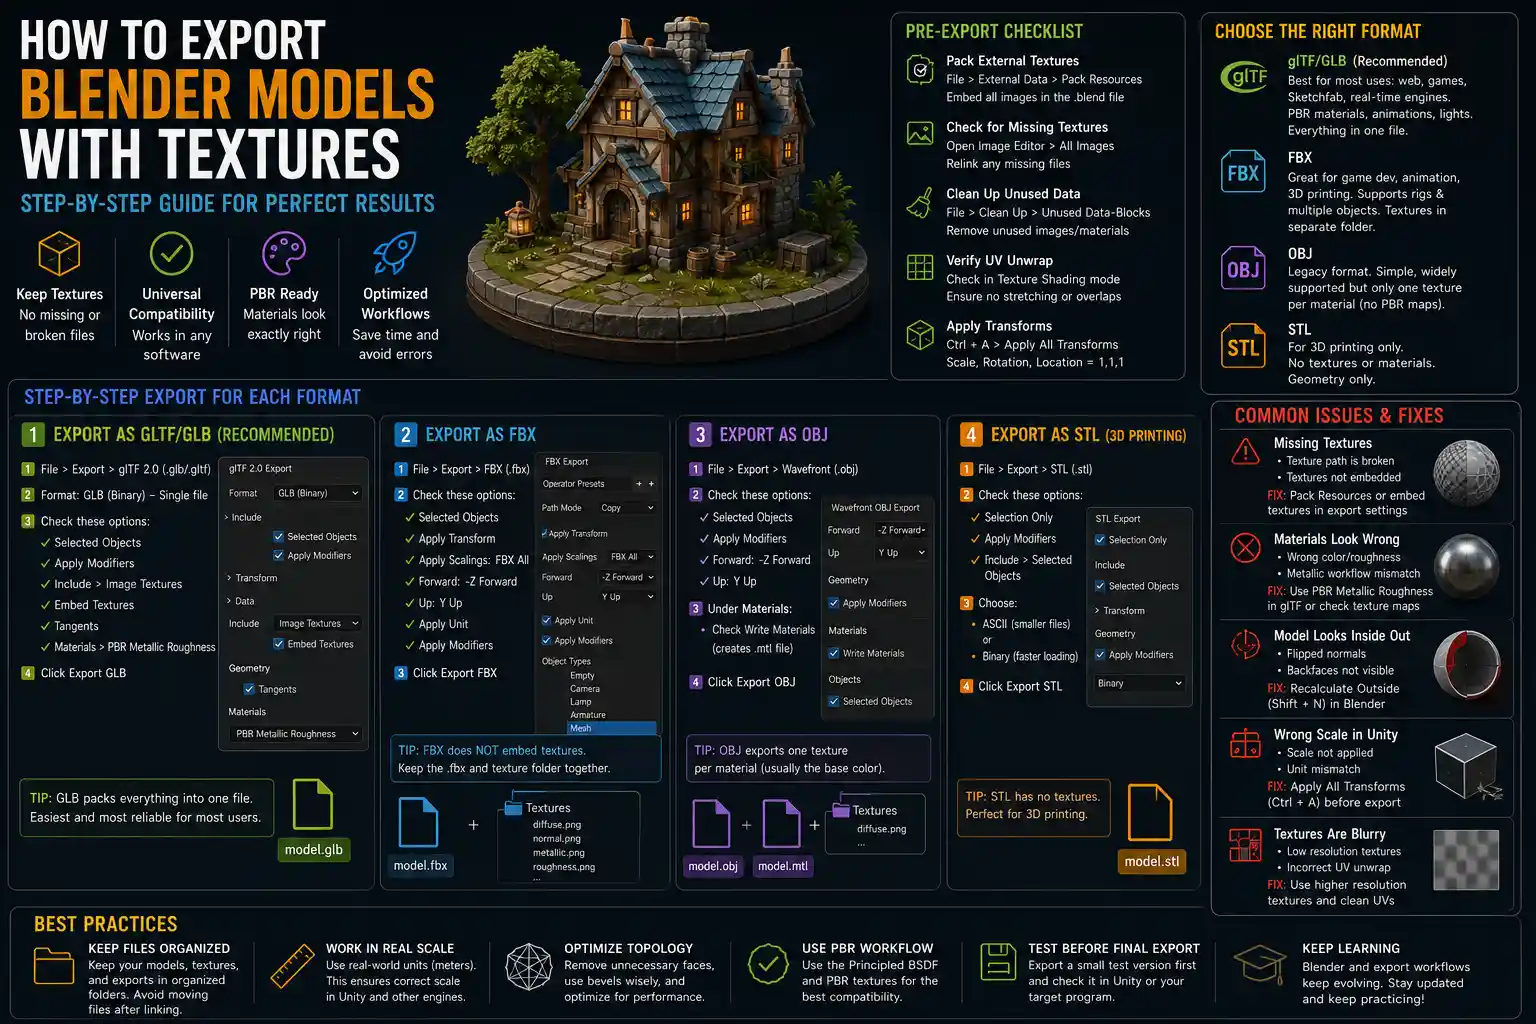
Whether you’re a 3D artist preparing a model for a game engine, a product designer sharing a prototype with a client, or a hobbyist uploading your work to Sketchfab, exporting a Blender model with intact textures can make or break your final result. It’s frustrating to spend hours tweaking PBR materials, adjusting roughness maps, and painting fine details only to open your exported file in another program and find a gray, textureless mesh. Blender’s flexible export tools offer options for every use case, but knowing which settings to choose—and how to prepare your model ahead of time—saves hours of troubleshooting. In this guide, we’ll walk through every step of the process, from pre-export texture organization to choosing the right file format and troubleshooting common issues.
Pre-Export Preparation: Organize Textures and Materials
Before you even open the export menu, taking 10 minutes to organize your Blender project will eliminate 90% of the most common texture missing errors. Blender relies on clear file paths and consistent material setups to pack or link textures correctly during export, so messy projects often lead to broken outputs. Even if you’ve finished modeling and texturing, a quick pre-export check ensures everything works as intended when you open the file in another program.
Pack External Textures into Your Blend File
By default, Blender links to texture files stored elsewhere on your computer, rather than embedding them directly in the .blend project file. If you move the original texture images or export the model without packing these files, the links break, and textures won’t show up in your exported model. Packing textures into your .blend file is a simple step that ensures all image data is stored in one place.
To pack textures, navigate to File > External Data > Pack Resources. Blender will automatically embed all linked images, including texture maps, into your project file. Keep in mind that this will increase the size of your .blend file, but it’s a small tradeoff for reliability. If you need to unpack textures later for editing, you can use the Unpack Resources option in the same menu to split them back into separate files on your drive.
Check for Missing Textures and Clean Up Materials
Before exporting, confirm that all your textures are properly loaded and that you don’t have any unused or duplicate materials cluttering your project. Blender won’t export unused materials by default, but leftover data can cause file bloat or unexpected errors. To check for missing textures, open the Image Editor and select All Images from the header menu. Any missing textures will be marked with a red “Missing” label, so you can relink or replace them before you export.
For a deeper clean, use Blender’s built-in Clean Up tool to remove unused data: go to File > Clean Up > Unused Data Blocks and select “Images” and “Materials” to delete anything that isn’t attached to your model. This step is especially important if you’ve been experimenting with different texture setups over the course of your project.
Verify UV Unwrapping
Even if your textures look perfect in Blender’s viewport, a bad UV unwrap can cause textures to stretch or disappear after export. Take a minute to switch to Texture Shading and check your model from all angles to confirm that UVs are correctly laid out. If you’re exporting a model for a game engine or 3D printing, ensure that your UV islands are properly packed and don’t have excessive overlapping, which can cause rendering errors in other software.
Choosing the Right File Format for Your Use Case
Blender supports more than a dozen 3D model export formats, but not all of them handle textures the same way. The right format depends on where you plan to use your model after export. Choosing the wrong format can lead to lost textures, incorrect material settings, or compatibility issues with your target software. Below are the most common use cases and the best format for each:
- glTF/GLB (General Use, Web, Game Engines, Sketchfab): glTF (GL Transmission Format) is often called the “JPEG of 3D” because it efficiently stores model data, materials, and textures in a single file. GLB is the binary version of glTF that packs everything (model, textures, materials) into one .glb file, making it the most convenient option for most users. It’s supported by every major 3D platform, including Three.js, Unity, Unreal Engine, Sketchfab, and Blender itself, and it preserves PBR texture setups perfectly.
- FBX (Game Development, Animation, 3D Printing): FBX is a longtime standard for game development and animated models, supported by Unity, Unreal, Autodesk Maya, and most 3D printing workflows. It supports textures and skeletal animation, but it doesn’t pack textures by default—you’ll need to manage texture folders manually when exporting.
- OBJ (Legacy Workflows, Simple Models): OBJ is one of the oldest 3D model formats, and it’s still widely supported by almost all 3D software. It’s simple, but it only supports one texture map per material, so it’s not ideal for complex PBR setups with roughness, normal, and metalness maps. If you’re exporting a simple model with a single diffuse texture, it works fine, but for most modern projects, glTF or FBX is a better choice.
- STL (3D Printing Only): STL is the standard for 3D printing, but it does not support textures or materials at all. If you’re exporting a model for 3D printing, you don’t need to worry about textures—just export the mesh as normal. If your 3D printer uses colored filament or full-color printing, you’ll likely need to use a different format like 3MF instead.
For most modern users, GLB is the default recommendation. It’s reliable, efficient, and eliminates the hassle of managing separate texture folders. Let’s take a closer look at how to export with each of the most common formats, with step-by-step settings for texture preservation.
Step-by-Step Export Guides for Common Formats
Below we’ll walk through export workflows for the three most popular texture-compatible formats, with specific settings to ensure your textures export correctly every time.
Exporting as GLB/glTF (Best for Most Use Cases)
GLB is the simplest option for exporting textured models because it packs all textures into a single file, so you don’t have to keep track of separate image files. Here’s the step-by-step process:
- Select the model you want to export in Object Mode. If you have multiple objects, you can select all of them or join them into a single mesh if your target software requires a single object.
- Navigate to File > Export > glTF 2.0 (.glb/.gltf).
- In the export menu on the right-hand side, under the Format dropdown, select glTF Binary (.glb) to get a single file with all textures included. If you need a separate .gltf file and texture folder, select glTF Embedded (.gltf) instead—it will still pack all textures into the one .gltf file.
- Check the export settings to ensure textures are included:
- Under Include, make sure Selected Objects is checked only if you want to export only the objects you selected. Leave it unchecked to export everything in your scene.
- Under Materials, check Export Materials and Export PBR Nodes to ensure your PBR textures (roughness, metalness, normal, etc.) are exported correctly. Blender will automatically map your node setup to the standard glTF PBR format by default, but if you have a custom node setup, you may need to adjust the naming of your outputs to match glTF standards.
- Under Images, select Automatic—this will pack all images into the GLB file by default.
- Name your file, select your export location, and click Export glTF.
When you open your GLB file in another program, all textures should be automatically loaded, no extra steps required. This makes it perfect for sharing models with clients or uploading to platforms like Sketchfab.
Exporting as FBX (Best for Game Engines)
FBX is the go-to format for Unity and Unreal Engine, but it doesn’t pack textures into the model file by default. Instead, you’ll need to keep your textures organized in a separate folder to link correctly when you import the model into your game engine. Follow these steps for successful FBX export with textures:
- Prepare a new empty folder on your computer to store your exported FBX and all texture files. This keeps everything organized and prevents broken file paths.
- In Blender, if you haven’t already, unpack your textures to this new folder: go to File > External Data > Unpack Resources, select Write files to current directory, and choose the folder you created.
- Select your model in Object Mode, then navigate to File > Export > FBX (.fbx).
- Adjust the export settings for textures:
- Under Include, check Selected Objects if you’re only exporting specific objects.
- Under Main, set Forward to -Z Forward and Up to Y Up to match the coordinate system used by Unity and Unreal. This prevents your model from being imported upside down.
- Under Geometry, check Export Materials to ensure material definitions are included in the FBX file.
- Under Texture Options, check Export Textures. This will copy your texture files into the same folder as your FBX automatically.
- Save the FBX into the folder you created earlier, then click Export FBX.
When you import the FBX into Unity or Unreal, the engine will automatically detect the textures in the same folder and link them to the model correctly. If you’re moving the FBX to another computer, make sure you copy the entire folder, not just the FBX file.
Exporting as OBJ (Legacy and Simple Models)
If you need to export to OBJ for an older workflow, the process is similar to FBX: you’ll need to keep texture files in the same folder as the exported OBJ. Follow these steps:
- Create a new folder for your export, and unpack your Blender textures into this folder as outlined in the FBX section above.
- Go to File > Export > Wavefront (.obj).
- Check Selection Only if you’re exporting selected objects, and check Export Materials to include the MTL material file that stores texture references.
- Export the OBJ to your new folder. Blender will automatically save the .obj file, a .mtl material file, and copy all texture images into the same folder.
When importing the OBJ into another program, make sure to keep the MTL file and textures in the same folder as the OBJ, or the textures won’t load. Remember that OBJ only supports basic diffuse color textures, so complex PBR maps will not be exported correctly.
The biggest mistake new artists make when exporting textured models from Blender is skipping the pre-export organization step. It doesn’t matter how good your textures are if Blender can’t find the image files when you hit export. Five minutes of checking paths and packing resources saves hours of rework later.
Troubleshooting Common Texture Export Issues
Even with careful preparation, you may run into issues where textures don’t show up after export. Below are the most common problems and how to fix them:
Textures Are Missing or Show Up as Gray
If your imported model is solid gray with no textures, the most common cause is missing or broken file paths. If you’re using a format that doesn’t pack textures (like FBX or OBJ), double-check that all texture files are in the same folder as the model file, and that you didn’t rename any texture files after export. If you packed textures into your .blend file but they still don’t export, try repacking them: go to File > External Data > Pack Resources again, then re-export.
Another common cause is incompatible material node setups. Blender’s default Principled BSDF shader is compatible with all major export formats, but if you’ve built a custom node group with multiple texture outputs, the exporter may not recognize how to map your textures to the standard format. For best results, stick to the default Principled BSDF shader when exporting, and make sure your texture maps are connected to the correct inputs (Base Color, Roughness, Normal, Metalness, etc.).
Textures Look Grainy or Have Incorrect Colors
If textures load but look wrong after export, the issue is often image encoding or color space. Blender tags image files with color space information, and if this is set incorrectly, textures will export wrong. For example, Base Color and albedo maps should be set to sRGB color space, while non-color data like normal maps, roughness maps, and metalness maps should be set to Non-Color.
To check and adjust this: open the texture in the Image Editor, go to the Image Properties tab (the icon that looks like a picture), and check the Color Space setting. Adjust it to match the type of texture, save your changes, then re-export. This is an extremely common issue that’s easy to fix, and it makes a huge difference in how your textures look after export.
Normal Maps Don’t Show Up Correctly
Normal maps add fine detail to your model without adding extra geometry, but they often export incorrectly if your settings are wrong. First, confirm that your normal map is set to Non-Color color space in Blender, as outlined above. Second, when exporting to glTF/GLB, make sure you have the Export PBR Nodes option checked—this tells Blender to export the normal map to the correct PBR output. For FBX export, make sure your normal map is connected to the Normal input of your Principled BSDF shader, and that you’ve checked Export Normals in the FBX export settings.
File Size Is Too Large
If your exported GLB or FBX file is too large for your use case (for example, if you’re uploading it to a website or sharing it online), the issue is usually large texture resolution. Before exporting, resize your textures to match your use case: a 4K texture is unnecessary for a mobile game or a web-based 3D viewer, and resizing to 1K or 2K will cut your file size dramatically. You can resize textures directly in Blender: open the texture in the Image Editor, go to Image > Resize, set your new resolution, and save the image before exporting. You can also enable the WebP compression option in the glTF export menu to further reduce file size without noticeable quality loss.
Best Practices for Consistent, Reliable Exports
Beyond the basic steps, following these best practices will ensure your textured exports work every time, regardless of where you plan to use your model:
- Name your files and materials clearly: Avoid generic names like “Texture.001” or “Material.001”. Name your materials and texture files based on what they are (e.g., “wood_floor_base_color.png”, “metal_door_normal.png”) to avoid confusion when importing into another program. Most software will match materials and textures by name, so clear naming reduces errors.
- Test your export before sharing: After exporting, import the file back into a new Blender project to confirm that all textures load correctly. This takes 30 seconds and catches errors before you send the model to a client or upload it to a public platform.
- Use PBR consistent naming: If you’re exporting multiple texture maps, follow the industry standard naming convention (e.g.,
[name]_basecolor,[name]_normal,[name]_roughness,[name]_metallic). This helps automatic importers in game engines and 3D platforms correctly assign maps to the right material inputs without manual adjustment. - Adjust export settings for your target platform: If you’re exporting for a game engine, check the engine’s documentation for recommended export settings. For example, Unity prefers certain axis settings and mesh data that are easy to adjust in Blender’s export menu before you export.
- Keep a backup of your original texture files: Even if you pack textures into your .blend file, keep a separate organized folder of your original high-resolution texture files. This makes it easy to re-export with different settings or resolutions later if you need to.
For artists who frequently export to the same platform, you can save your export settings as a preset in Blender to avoid adjusting them every time. After you set up your preferred export options, click the Save Preset button at the top right of the export menu, and name it something like “GLB for Sketchfab” or “FBX for Unity”. Next time you export, you can just select your preset and export in one click, which saves a lot of time if you export models regularly.
Conclusion
Exporting a 3D model from Blender with intact textures doesn’t have to be a frustrating process. The key is to prepare your project before you export, choose the right file format for your use case, and double-check a few key settings to ensure textures are included. For most users, GLB is the best choice—it’s simple, reliable, and packs all your textures into a single file that works everywhere from game engines to online 3D galleries. If you’re working with game development, FBX works well as long as you keep your textures organized in a single folder. By following the pre-export check steps, troubleshooting common issues like incorrect color space or broken file paths, and following industry naming best practices, you’ll get consistent, correct results every time you export.
Whether you’re sharing work with a client, uploading to a 3D marketplace, or moving your model into a game engine, taking the time to follow these steps ensures that your work looks exactly the way it did in Blender, no surprises after export. With a little practice, this process becomes second nature, and you’ll spend less time troubleshooting and more time creating.