
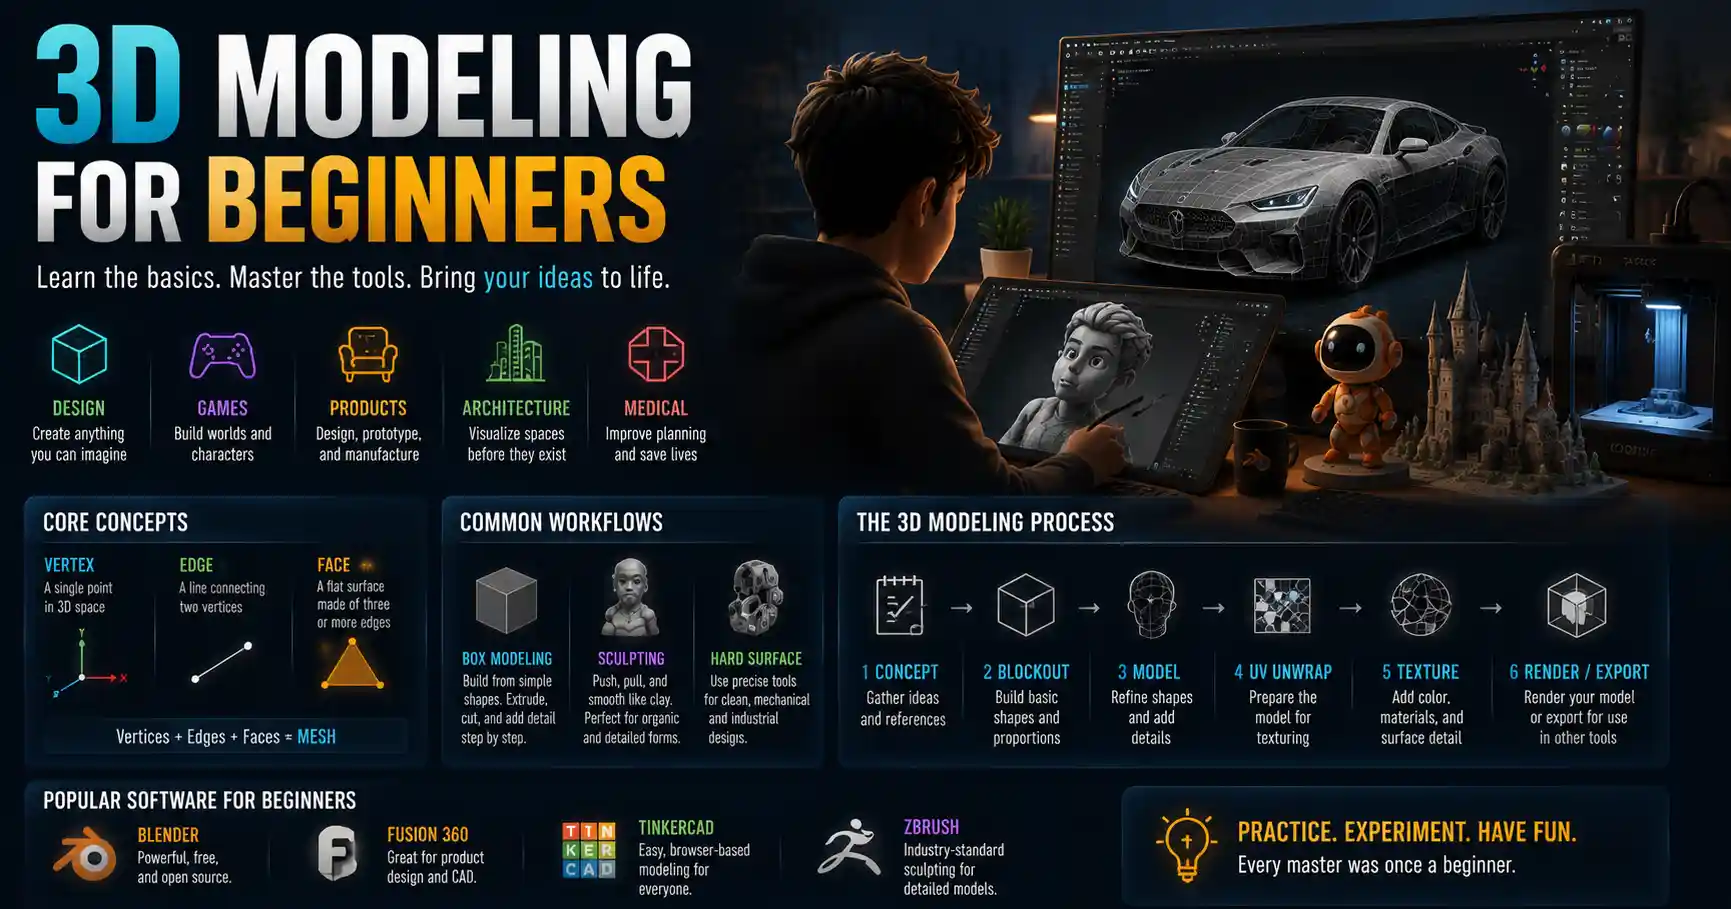
Whether you’re scrolling through a video game, browsing a product catalog, or watching the latest blockbuster, you’re interacting with 3D modeling. The digital blueprints that bring animated characters, architectural designs, and custom manufactured parts to life start with a simple 3D model. For beginners, the world of 3D modeling can feel overwhelming—full of confusing jargon, expensive software, and steep learning curves. But at its core, 3D modeling is just the process of creating a three-dimensional representation of any object or surface using specialized software. With modern tools and accessible learning resources, anyone can learn the basics, and start creating their own 3D assets in just a few weeks.
Core Concepts Every Beginner Needs to Understand
Before you open any 3D modeling software, it’s important to build a foundation of core concepts that apply across every tool and workflow. Unlike 2D art, which only has height and width, 3D modeling adds a third dimension: depth. This extra dimension opens up endless creative possibilities, but it also introduces new rules and terminology that can trip up new users. Understanding these basics will help you avoid common mistakes and adapt your skills to any project, from character design to 3D printing.
Geometry, Vertices, Edges, and Faces
Every 3D model is built from geometry, which is made up of three fundamental building blocks: vertices, edges, and faces. A vertex is a single point in 3D space, defined by three coordinates (X, Y, and Z, corresponding to width, height, and depth). When you connect two vertices, you create an edge. Connect three or more edges to close a shape, and you get a face, which is the flat surface that makes up the visible part of your model.
Most modern 3D models use triangles (three-sided faces) or quads (four-sided faces) because they render reliably in game engines, 3D printers, and animation software. Ngons—faces with five or more sides—are sometimes used during the modeling process but are usually converted to triangles or quads before final export. Keeping your geometry clean (meaning no extra overlapping vertices or disconnected edges) is critical for avoiding issues later in the workflow, whether you’re animating your model or 3D printing it.
Polygon vs. Non-Polygon Modeling
3D modeling is generally split into two broad categories: polygon modeling and non-polygon (or parametric) modeling. Polygon modeling builds shapes from the vertices, edges, and faces we just covered. It’s the most common approach for creative projects like video game assets, character animation, and visual effects for film, because it gives artists full freedom to sculpt and modify every part of a model.
Non-polygon modeling, by contrast, creates models based on mathematical equations rather than individual polygons. Parametric modeling, the most common type of non-polygon work, defines shapes by their dimensions and relationships between features. For example, if you design a 10cm cube with a 2cm hole drilled through the center, changing the cube size to 15cm will automatically adjust the position of the hole to keep its proportional relationship. This makes parametric modeling ideal for engineering, architecture, and industrial design, where precise measurements are non-negotiable.
Coordinate Systems
Every 3D software uses a coordinate system to track the position of every vertex in your 3D space. The three axes—X (horizontal), Y (vertical), and Z (depth)—are always present, but different software may arrange them differently. For example, many 3D animation packages treat Y as the vertical axis, while computer-aided design (CAD) software often uses Z as the vertical axis. Getting comfortable with how your chosen software labels axes will save you hours of frustration when moving, rotating, or scaling objects.
Common 3D Modeling Workflows for Beginners
Once you understand the core concepts, the next step is to learn the most common modeling workflows that beginners can start practicing today. No single workflow is best for every project—each has its own strengths and use cases. Experimenting with different approaches will help you find what works best for your goals, whether you want to design 3D printable products, create game characters, or visualize architectural projects.
Box Modeling
Box modeling is the most popular starting point for beginners, and for good reason. It’s a straightforward, intuitive process that starts with a basic primitive shape (like a cube, sphere, or cylinder) and builds up complexity by slowly adding detail and modifying existing geometry. For example, if you wanted to model a simple chair, you’d start with a long cube for the seat, add four thinner cubes for the legs, then extrude the backrest from the back edge of the seat.
One of the biggest advantages of box modeling is that it lets you focus on big-picture shape first, before you add small details. It’s also easy to learn, because you only need a handful of basic tools (extrude, inset, bevel, and cut) to create almost any shape. Box modeling works well for both hard-surface projects (like furniture and vehicles) and organic shapes (like characters and plants), making it a versatile skill for any 3D artist.
Sculpting
Digital sculpting is a more intuitive, art-driven workflow that mimics sculpting clay in the physical world. Instead of manipulating individual polygons one by one, you use sculpting brushes to push, pull, pinch, and smooth the surface of your model. This makes it ideal for creating highly detailed organic shapes, like character faces, creatures, or textured rock formations, where subtle surface changes make a big difference in the final result.
Modern sculpting software (like ZBrush or Blender’s Sculpt Mode) uses dynamic topology, which automatically adds more geometry to areas where you’re adding detail. This means you don’t have to worry about adding extra cuts or vertices manually—you can just focus on shaping your model like you would with real clay. For beginners, starting with digital sculpting can be a great way to build an intuitive understanding of 3D shape, without getting bogged down in technical geometry rules early on.
Parametric/Extrusion Modeling
For engineering, industrial design, and architecture, parametric extrusion modeling is the go-to workflow. This approach starts with a 2D sketch of an object’s cross-section, then extrudes (pushes) that sketch out along an axis to create a 3D shape. For example, if you sketch a 2D circle and extrude it, you get a cylinder. If you sketch a profile of a coffee mug and revolve it around an axis, you get a full 3D mug with the correct curve.
The biggest benefit of parametric modeling is that every feature of your model is editable at any time. If you design a table and decide later you want to make it 10cm wider, you just change the dimension of the top sketch, and every connected feature (like leg positions) updates automatically. This makes it perfect for projects that require precise measurements or multiple iterations, like 3D printing functional parts or designing a new building.
Photogrammetry
Photogrammetry is a unique workflow that creates 3D models from real-world photos. The process involves taking dozens or hundreds of photos of an object from every possible angle, then using specialized software to analyze the photos and automatically generate a 3D model with matching shape and texture. It’s become increasingly popular for creating realistic assets for games and film, because it lets you capture the exact texture and shape of real objects without modeling them by hand.
For beginners, photogrammetry can be a fun way to create 3D models without any manual modeling skills at all. All you need is a smartphone camera and free software like Meshroom to get started. The downside is that photogrammetry models often have messy geometry and require cleanup before they can be used for 3D printing or animation, so it’s usually combined with manual modeling to get a clean final result.
Essential Tools Every Beginner Should Master
Regardless of which workflow you choose, there are a handful of core tools that you’ll use in almost every 3D modeling project. Mastering these basic tools early will make it much easier to learn more advanced techniques later. You don’t need to memorize every tool in your software to get started—focus on these fundamentals first, and you’ll be able to create almost any basic shape.
- Transform Tools (Move, Rotate, Scale): The three transform tools are the first tools any beginner learns, and they’re the tools you’ll use most often. Move lets you reposition an object or selected vertices around your 3D space. Rotate lets you spin it around any axis. Scale lets you make it larger or smaller, uniformly or along a single axis. While these tools seem simple, getting comfortable with how they work along different axes is critical for building accurate models. Many beginners struggle with accidentally scaling along the wrong axis at the start, so practice this early.
- Extrude: Extrude is the workhorse of most 3D modeling workflows, especially box modeling. It lets you take a selected face or edge and pull it out into 3D space to create new geometry. For example, if you have a flat cube face that you want to turn into the arm of a character, you just select the face and extrude it outward to create the basic arm shape. Extrude can also be used inward to create holes or recessed features, like the button holes on a shirt or the hollow interior of a mug.
- Inset: Inset creates a smaller, new face inside an existing face, connected by new edges around the perimeter. It’s often used before extruding to create a step or a beveled edge. For example, if you want to add a raised logo to the side of a phone, you’d inset the area where the logo goes, then extrude the new smaller face outward to create the raised shape. Inset helps keep your geometry clean by avoiding extra odd-shaped faces when you add new details.
- Bevel: Bevel softens sharp edges by cutting them off and replacing them with a new flat face. Sharp edges almost never exist in the real world—even a knife has a tiny bevel on its edge, and furniture corners are usually slightly rounded. Adding bevels to your model makes it look much more realistic, and it also prevents rendering issues when your model is lit. Bevel can also be used to create chamfered edges (straight bevels) or fully rounded corners, depending on your settings.
- Loop Cut: Loop cut adds a new edge that runs all the way around a connected section of your model, creating more geometry where you need it. If you want to add more detail to a specific area—like adding a bend to a straight arm, or a curve to a door—you add a loop cut near the area you want to modify. This gives you extra vertices to work with, so you can shape the area without distorting the rest of your model. Loop cuts are essential for keeping your geometry evenly spaced, which makes it easier to animate and render your model later.
Beyond these core modeling tools, there are a few additional tools that every beginner should learn early: the bridge tool, which connects two separate edges to create new faces between them; the subdivision surface modifier, which smooths out a low-poly base mesh to create a clean, high-resolution shape; and the snap tool, which lets you align vertices and edges precisely to avoid messy misaligned geometry.
"The biggest mistake new 3D artists make is adding too much detail too early. Great 3D modeling is about getting the big shapes right first, then adding smaller and smaller details as you go. If your base shape is wrong, no amount of fine detail will fix it."
Choosing the Right Software for Your Goals
One of the most common questions beginners ask is which 3D modeling software they should learn first. The answer depends entirely on what you want to create, and how much you’re able to spend. There are free, powerful options available for every use case now, so you don’t need to invest hundreds of dollars in software to start practicing. Below is a breakdown of the most popular options for beginners:
Free & Open-Source Options for Beginners
- Blender: Blender is the most popular free 3D software in the world, and it’s a great choice for almost any beginner. It supports every modeling workflow we’ve covered—box modeling, sculpting, animation, rendering, even video editing. It has a huge global community that creates free tutorials, add-ons, and resources for new users. The only downside is that it has a steep learning curve for complete beginners, but there are more free learning resources for Blender than any other 3D software. It’s ideal for game development, character art, 3D printing, and visual effects.
- FreeCAD: If you’re interested in parametric modeling for engineering, 3D printing functional parts, or architecture, FreeCAD is the best free option. It’s fully open-source, designed specifically for technical design, and supports all the parametric features you’d get in expensive CAD software. It’s less useful for creative projects like character modeling, but it’s perfect for anyone who needs precise measurements for functional designs.
- Meshroom: If you want to experiment with photogrammetry, Meshroom is completely free and open-source. It lets you generate 3D models from photos directly on your computer, no subscription required.
Paid Software for Specific Use Cases
If you’re planning to pursue 3D modeling professionally, you may eventually want to learn industry-standard paid software, but most beginners don’t need to start with a paid subscription. For creative work like film and game development, Autodesk Maya is the industry standard, with a monthly subscription of around $200. ZBrush is the go-to for digital sculpting, with a one-time purchase price of around $500 for a permanent license. For industrial design and engineering, SolidWorks and AutoCAD are the industry standards, with subscription prices that can run into thousands of dollars per year, but many community colleges and universities offer free student access.
For beginners, the best advice is to start with a free option that matches your goals. If you want to do creative work, start with Blender. If you want to design functional parts, start with FreeCAD. Once you’ve mastered the basics and decide you want to go pro, you can transition to paid industry software—all the core skills you learn in free software will transfer over, because the fundamental concepts of 3D modeling are the same across every tool.
Top Beginner Tips for Fast Progress
Learning 3D modeling can feel frustrating at first—almost every new user struggles with navigating 3D space, keeping their geometry clean, and getting the shape they want. But there are a few simple habits you can adopt to speed up your progress and avoid common beginner mistakes.
First, start small. It’s tempting to jump straight into modeling a full detailed character or a complex house as your first project, but that’s a surefire way to get overwhelmed and discouraged. Start with simple objects: a mug, a chair, a cube with rounded edges, a simple human head. Mastering small projects teaches you the core tools and habits you need to tackle larger projects later. As the old saying goes, you have to learn to walk before you can run.
Keep Your Poly Count Low Early On
A common beginner mistake is adding too many polygons (too much geometry) to a model too early. High polygon counts make your software run slower, harder to edit, and can create messy results. Focus on creating a clean low-poly base mesh first, then add detail gradually. If you need a high-resolution model for rendering or 3D printing, you can always subdivide the mesh later to add more polygons once your base shape is correct.
Check Your Model From All Angles
It’s easy to work on your model from one camera angle and think it looks great, only to realize it’s lopsided or has big mistakes when you rotate it. Get in the habit of rotating your camera around your model after every change, and check it from every angle. It’s also a good idea to turn on wireframe view regularly to check for messy geometry, overlapping faces, or extra vertices that can cause problems later.
Practice Consistently
Like any new skill, 3D modeling improves with consistent practice. Even 15-30 minutes of practice a day will give you better results than 8 hours of cramming once a week. The muscle memory and intuition you build from regular practice will help you pick up new tools and techniques much faster over time. A great way to stay consistent is to join a beginner 3D modeling challenge, like the popular #30Daysof3D on social media, where you create one small model a day for 30 days.
Learn From Existing Models
One of the best ways to learn good modeling habits is to download free clean 3D models from sites like Sketchfab or Blender Market, and open them up in your software to study how they’re built. Look at how other artists organized their geometry, where they placed loop cuts, and how they kept their models clean. You can even try recreating an existing model from scratch to practice matching the shape and structure.
Conclusion
3D modeling is an incredibly useful and creative skill that opens up opportunities in everything from game development and film to product design and 3D printing. While it can feel intimidating to start, mastering the core concepts, learning a handful of essential tools, and practicing with small, simple projects will have you creating your own models in a matter of weeks. The key is to start with the basics, choose the right software for your goals, and avoid the common beginner mistake of rushing into complex projects before you’re ready. Whether you want to create art, design functional products, or just pick up a new creative hobby, 3D modeling is a rewarding skill that continues to grow in demand across almost every industry. With the free resources and tools available today, there’s never been a better time to start learning.