
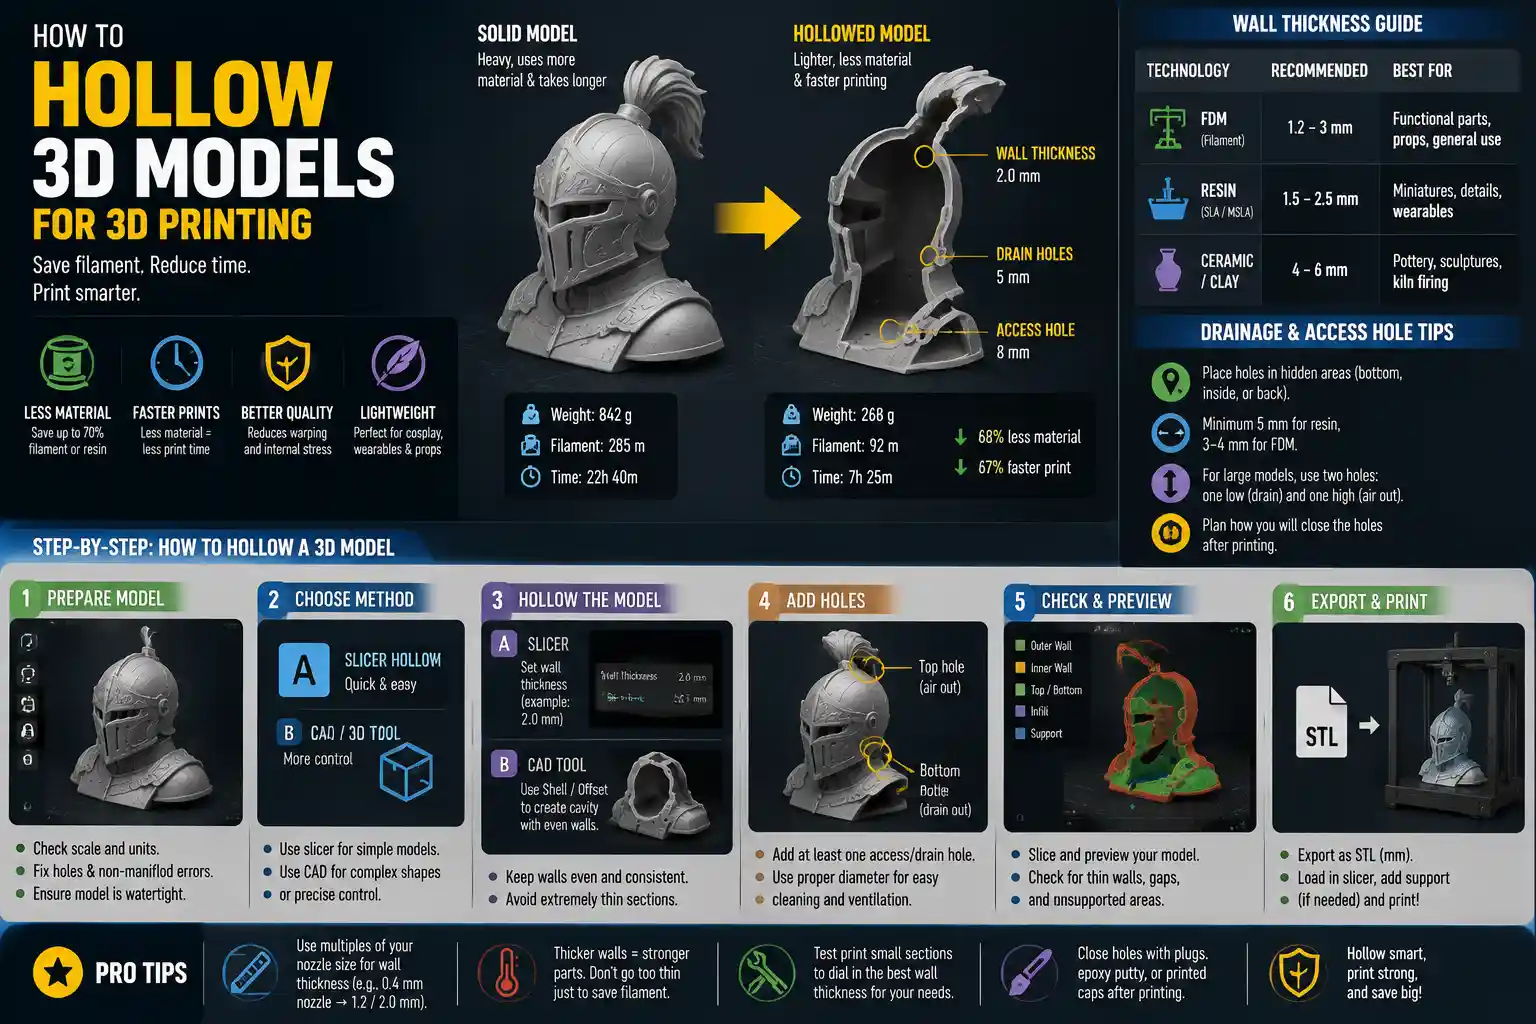
If you’ve ever 3D printed a large model only to end up with a heavy, overpriced print that uses far more filament than necessary, you’ve probably wondered why anyone prints solid objects in the first place. Hollowing 3D printed models is a game-changing technique that cuts material costs, reduces print time, and even improves part strength by preventing internal warping—all while maintaining the external shape and detail you designed. Whether you’re printing a cosplay helmet, a decorative vase, or a functional custom part, learning how to hollow models correctly will save you time, money, and a lot of post-printing frustration. This guide walks you through every step of the process, from pre-modeling prep to post-print finishing, for consistent, professional results every time.
Why Hollow 3D Printed Models? Key Benefits to Know
Before diving into the how-to, it’s worth understanding why hollowing is such a valuable skill for any 3D printing enthusiast. For most projects, a solid print is unnecessary—any object that doesn’t need to support extreme weight can perform just as well (if not better) when hollowed out. The benefits extend far beyond just saving filament, though that’s the most immediate advantage.
Reduced Material Cost and Print Time
Filament is the biggest recurring cost of FDM 3D printing, and resin isn’t cheap either. A 20cm tall bust, for example, can weigh 500 grams when printed solid, but just 150 grams when hollowed with a 3mm wall thickness. That cuts your material cost by 70% instantly. Because less material means less time for the printer to extrude or cure, hollow prints also finish hours faster than solid equivalents. For large projects like cosplay armor or full-size decorative figures, this time saving can turn a 2-day print into a 6-hour project.
Improved Print Quality and Reduced Warping
Solid prints are especially prone to internal stress and warping, because the inner layers cool at a different rate than the outer walls. Thick solid sections can also cause elephant’s foot on FDM printers, or layer separation from trapped heat in resin prints. Hollowing removes the dense internal material, allowing heat to dissipate evenly and reducing the risk of structural failure after printing. For large flat parts, this can mean the difference between a print that stays flat and one that curls up at the edges enough to ruin the design.
Additional Functional Benefits
Hollowing opens up a range of functional possibilities that solid prints can’t match. You can insert internal components like LED lights, batteries, or hinges into hollow cosplay props or decorative lamps. Hollow models are also much lighter, which is critical for wearable items like helmets or masks that need to be comfortable for hours of wear at conventions. For ceramic 3D printing that will be fired in a kiln, hollowing is non-negotiable: solid clay objects will trap moisture and explode during firing, so a hollow structure with drainage holes is mandatory.
The only real downside of hollowing is that it adds a small amount of prep time in your slicing or modeling software, and requires a few extra post-printing steps. But for most projects, the tradeoff is well worth the effort.
Pre-Hollowing Preparation: Key Design Decisions
Successful hollowing starts before you open your 3D modeling software. A few key decisions upfront will prevent common problems like leaks, thin walls, or trapped support material later on. The most critical choices you’ll make are wall thickness and drainage hole placement.
Choosing the Right Wall Thickness
Wall thickness is the single most important factor in a strong, functional hollow print. Too thin, and your model will be flimsy, prone to cracking, and may even fail mid-print. Too thick, and you lose most of the material and time saving benefits of hollowing. The ideal thickness depends on what 3D printing technology you’re using, and what the model will be used for:
- FDM printing: For most standard projects, 1.2mm to 3mm is ideal. If you’re using 1.75mm filament, aim for a thickness that’s a multiple of your nozzle diameter (e.g. 2mm for a 0.4mm nozzle) to ensure the slicer can fill the wall cleanly without gaps. For load-bearing parts like cosplay armor, go up to 3-4mm for extra strength.
- Resin (MSLA/SLA) printing: Resin is inherently stronger than most FDM filaments per layer, so you can get away with thinner walls. 1.5mm to 2.5mm is standard for most decorative and wearable projects. For very small, delicate models, you can go as thin as 1mm, but anything thinner than that increases the risk of breaking during post-processing.
- Ceramic and clay 3D printing: Aim for 4mm to 6mm, since clay shrinks during firing and needs enough structure to hold its shape through the process.
As a rule of thumb, make your walls at least three times the diameter of your printer’s nozzle. That guarantees the slicer will create a solid, gap-free wall instead of trying and failing to fill a space too thin for your nozzle to deposit material evenly.
Planning Drainage and Access Holes
No matter what printing method you use, you need at least one hole in your hollow model—for FDM, it lets out trapped air that can cause bulges; for resin, it lets you drain out excess uncured resin from the inside; for clay, it lets moisture escape during firing. Skipping this step leads to disastrous results, so planning where to put these holes early is key.
When planning your holes, follow these practical guidelines:
- Place holes in inconspicuous areas: the bottom of a bust, the inside of a helmet brim, or the back of a decorative figurine where they won’t be visible after finishing.
- Make holes at least 5mm in diameter for resin prints—any smaller and it’s hard to get all the uncured resin out. For FDM, 3-4mm is usually enough for ventilation.
- For large models, add two holes: one at the lowest point for drainage and one at the highest point to let air flow in, so liquid can drain out completely. This is especially important for resin prints, where trapped uncured resin will stay liquid forever and eventually leak through the walls.
- If you plan to insert internal components like batteries, make one of your holes large enough to fit the parts, and design it to be covered with a small plug after assembly.
It’s also a good idea to check your model for errors before hollowing. Use a mesh analysis tool like Meshmixer’s Inspector or Blender’s 3D Print Toolbox to fix non-manifold edges, overlapping faces, or small holes in the original model before you start hollowing. Fixing these errors upfront is much easier than trying to repair them after you’ve created the hollow shell.
Step-by-Step: Hollowing Models in Common Software
There are dozens of 3D modeling and slicing programs available, and most have built-in tools to hollow models quickly, even if you didn’t design the original model yourself. Whether you’re using a free open-source tool or a paid professional program, the process is straightforward. Below, we break down the steps for the most popular options.
Free Options: Meshmixer, Blender, and PrusaSlicer
If you’re working with a downloaded STL file and don’t want to pay for expensive modeling software, these free tools can hollow your model in just a few minutes. Meshmixer is the most popular choice for quick STL hollowing, and it’s designed specifically for 3D printing prep.
To hollow a model in Autodesk Meshmixer:
- Import your STL file, then click Inspector to automatically fix any errors in the mesh. Let the tool repair any holes or non-manifold geometry before proceeding.
- Go to the Edit menu on the left sidebar and select Hollow.
- Adjust the Solid Offset setting to match your desired wall thickness. For example, if you want a 2mm thick wall, enter 2mm in the offset field.
- Check the box that says Remove Inside to delete the internal solid mesh. Leave the Preview box checked to see what the hollow shell will look like before you confirm.
- Click Accept to generate the hollow shell. Then go to Edit > Make Hole to add your drainage holes. Click on the surface where you want the hole, adjust the diameter, and repeat for all required holes.
- Export the finished hollow model as a new STL file.
For users who prefer Blender, the process is just as simple for models that need more customization. Import your STL, enter Edit Mode, select all faces, use the Solidify modifier to set your wall thickness, then use the Boolean modifier to cut drainage holes with cylinder objects. If you just need a quick hollow and use PrusaSlicer, it has a built-in hollowing tool in the latest versions: import your model, click the Hollow button on the right sidebar, set your wall thickness, add holes directly in the slicer, and slice as normal—no extra modeling software required.
Paid Options: ZBrush, Fusion 360, and Blender Pro
If you designed your model from scratch in a CAD program like Fusion 360, hollowing is even easier than working with an existing STL. For solid bodies in Fusion 360, simply use the Shell command: select the outer face of your model, set your wall thickness, and the program automatically removes the internal material. You can then use the Extrude Cut tool to add drainage holes in seconds. This method is ideal for functional CAD models because it keeps the design parametric, so you can adjust wall thickness later if you need to.
For sculpted models in ZBrush, which is common for character busts and organic designs, the ZRemesher and extract tools make hollowing simple. After finishing your sculpt, duplicate the subtool, inflate the duplicate slightly inward, then use a boolean operation to subtract the inner sculpt from the outer one to create a uniform hollow shell. ZBrush also has plugins like ZBrushCore’s Hollowing Tool that automate the entire process for 3D printing.
No matter what software you use, always export a new STL file after hollowing and double-check the mesh before slicing. Open the exported STL in a viewer like MeshLab to make sure there are no gaps in the walls and that your drainage holes are placed correctly. A 2-minute check here can save you from wasting filament on a bad print.
Printing Hollow Models: Best Practices for FDM and Resin
Once you have your hollow STL prepped with the right wall thickness and drainage holes, printing a hollow model is similar to printing a solid one, but there are a few key adjustments you’ll need to make to get a strong, leak-free result. The process varies slightly between FDM and resin printing, so we’ve broken down best practices for both.
FDM Printing Best Practices
For FDM, the biggest risk with hollow prints is gaps in the outer wall, where the slicer doesn’t properly fill the wall perimeter. To avoid this, follow these tips:
- Set your wall count to match your wall thickness. For example, if you have a 2mm thick wall and a 0.4mm nozzle, use 5 perimeter walls instead of 4. This adds a small amount of extra material but ensures there are no gaps between perimeters that will cause leaks or weakness.
- Enable “avoid crossing perimeters” in your slicer settings. This prevents the nozzle from traveling through the hollow section of the print, which reduces oozing and stray filament inside the model.
- For large hollow models with wide spans, add internal ribbing to increase strength without adding a lot of material. Ribs are thin internal structures that connect opposite walls, and they can double the strength of a large hollow part with only a 5-10% increase in material use. You can add ribbing in your modeling software by creating thin rectangular structures inside the hollow shell, or use some slicers’ infill patterns to generate internal supports automatically.
- If you need extra strength, you can add a low-density infill (5-10%) to the hollow shell instead of leaving it completely empty. This adds a small amount of material but significantly increases rigidity, and it’s still far less material than a 100% infill solid print.
One common question for FDM printing is whether you need to use support material for the inside of the hollow model. In most cases, no. As long as your overhangs on the external surface are supported correctly, the internal cavity doesn’t need support because the outer wall is self-supporting as long as the angle is steeper than your printer’s overhang limit. If you have large internal overhangs, you can add small support pillars that are easy to remove after printing.
Resin Printing Best Practices
Resin printing introduces unique challenges for hollow models, mostly related to draining uncured resin and preventing the model from breaking during handling. The most important rule for resin hollow prints is to never skip the drainage holes—trapped uncured resin will not cure properly, and it can eventually seep through thin walls or crack the model as it expands slightly over time.
Follow these additional tips for successful resin hollow prints:
- After printing, let the excess resin drain out of the model for 5-10 minutes before moving it to the wash station. Tilting the model slowly and rotating it will help get most of the uncured resin out, and you can even use a syringe to flush out the inside with isopropyl alcohol to remove any residue.
- When curing the model after washing, make sure to cure the inside as well as the outside. If your model has large holes, you can rotate it during curing to let UV light reach all internal surfaces. For models with small holes, cure for twice as long as you would a solid model to ensure the inner walls cure completely through.
- Avoid hollowing very small models with thin walls, especially if they’re smaller than 5cm in any dimension. It’s often faster and cheaper to just print them solid, since the material saving is minimal and the risk of breaking during post-processing is high.
- If you’re hollowing a model with large flat walls, add subtle internal bracing to prevent the walls from flexing or cracking. 1-2mm thick ribs spaced every 2-3cm are enough to add rigidity without adding much extra resin.
For both FDM and resin, it’s a good idea to do a small test print of a section of your model if you’re working with an extra large design. This lets you check that your wall thickness is correct and that your drainage holes are big enough before you commit to a full 10+ hour print.
Post-Print Processing for Hollow Models
After printing, you’ll need to do a small amount of post-processing to finish your hollow model and hide any holes or imperfections. The process is straightforward, and most steps are the same as finishing a solid print, with a few extra steps for the drainage holes.
Cleaning Out the Interior
For resin prints, the first step after curing is to make sure all uncured resin and isopropyl alcohol is out of the interior. If you have a large model, you can leave the drainage holes open to let the alcohol evaporate completely over 24 hours before sealing. For FDM prints, you may have some stray filament or support material inside the hollow cavity—shake the model to loosen any loose bits, and use a pair of tweezers or a long needle-nose pliers to pull out any leftover support material that’s stuck inside.
Patching Drainage Holes
Once the interior is clean, you can patch the drainage holes to leave a smooth, seamless exterior. There are a few easy methods depending on what material you used:
- For FDM prints: 3D print a small plug that matches the diameter of your hole, glue it in place with super glue or 3D printing epoxy, then sand it smooth to match the surrounding surface. If you don’t want to print a plug, you can fill the hole with epoxy putty or wood filler, sand it smooth once it dries, then prime and paint as normal.
- For resin prints: Mix up a small amount of UV-curable putty or extra resin, fill the hole, then cure it with a UV flashlight. Sand it smooth once it’s hard, just like you would any other print blemish. You can also use a small 3D printed resin plug for larger holes, the same way you would for FDM.
If your drainage hole is in an inconspicuous spot that will never be seen—like the bottom of a figurine—you don’t need to patch it at all. Leaving it open can help prevent any trapped moisture from building up inside over time, which is especially useful for large prints kept in humid environments.
Adding Strength and Reinforcement
For large hollow prints like cosplay helmets or props, you may want to add extra reinforcement to the interior to prevent bending or breaking. A common trick is to insert a thin carbon fiber rod or aluminum tube into the hollow handle of a prop sword or staff, which adds far more strength than any printed infill. For large flat panels like armor, you can add expanding foam to the interior cavity: inject low-density expanding foam into the hollow, let it expand and cure, and it will hold the walls rigid with very little added weight.
If you’re planning to paint your hollow print, the finishing process after patching is exactly the same as for a solid print. Sand any uneven areas, prime, paint, and seal as you normally would—no extra steps required.
Conclusion
Hollowing 3D printed models is one of the most useful skills a 3D printing enthusiast can learn, and it’s far simpler than most new users think. With the right software tools, a bit of pre-planning for wall thickness and drainage holes, and a few simple adjustments to your printing process, you can cut your material costs by more than half, reduce print time, and end up with a lighter, stronger, better quality print. Whether you’re a hobbyist printing cosplay props, a designer making decorative art, or an engineer prototyping functional parts, hollowing will quickly become a standard part of your 3D printing workflow. The key is to start small: practice with a simple model first, test your wall thickness and hole placement, and you’ll be producing professional-quality hollow prints in no time.