
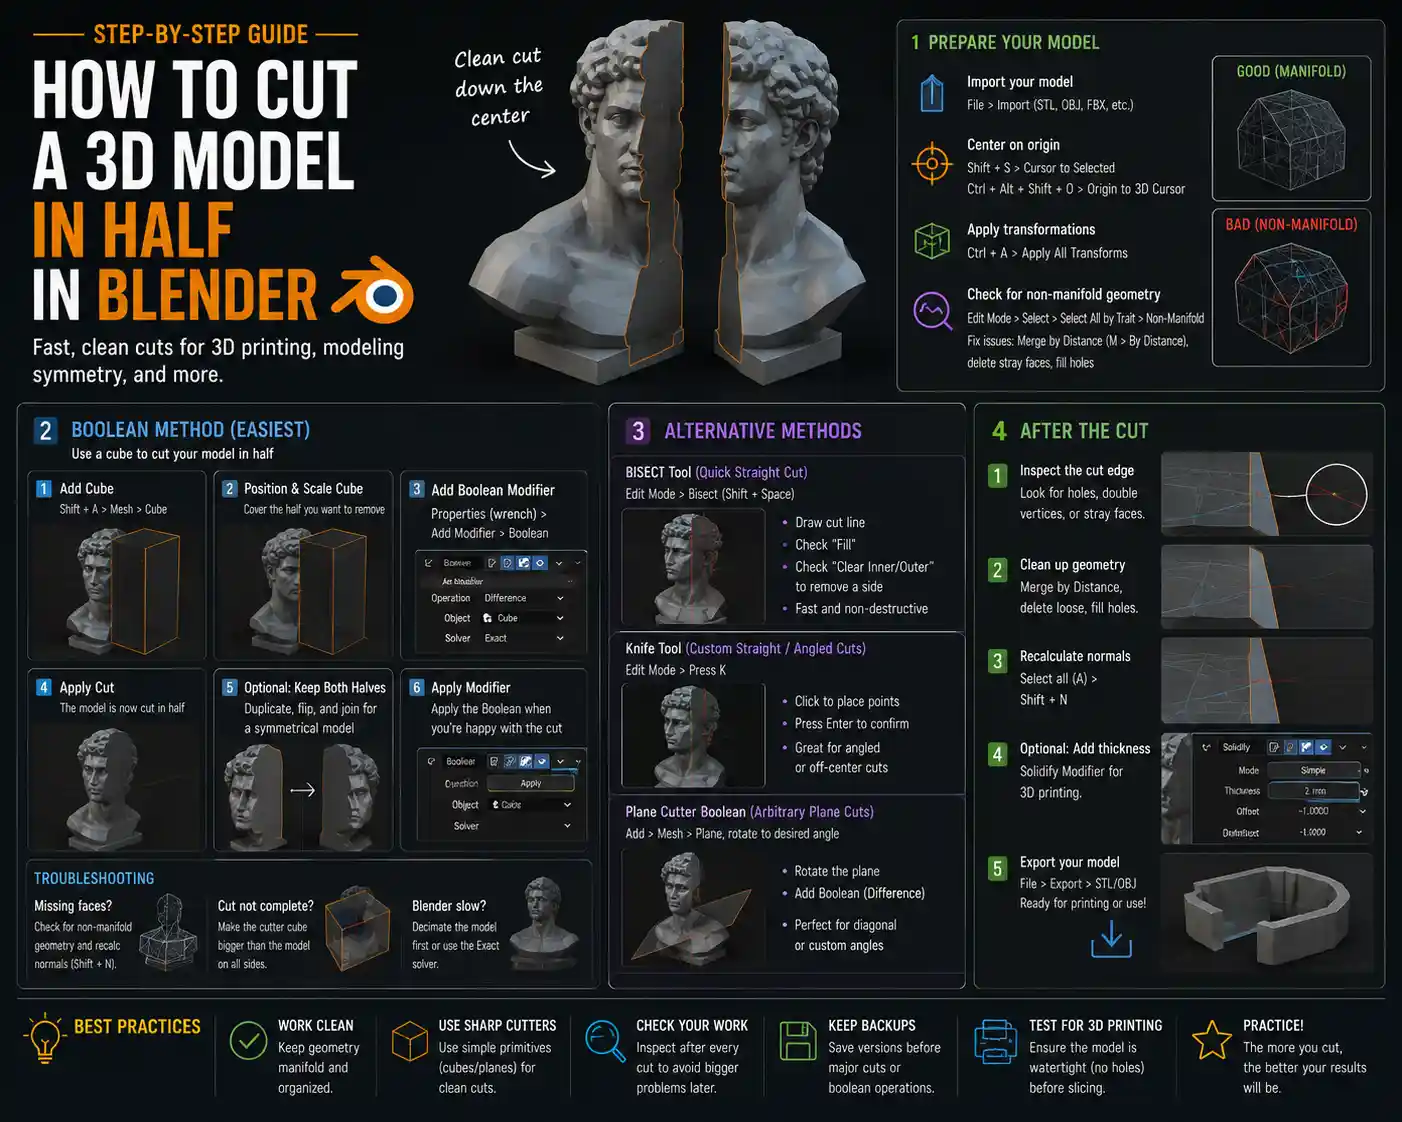
Whether you’re 3D printing a model that’s too large for your print bed, creating a symmetrical object from a single half, or splitting a complex design to add internal details, cutting a 3D model in half is one of the most useful core skills to master in Blender. Blender’s free, open-source platform gives you multiple tools to get a clean, precise cut—no expensive CAD software required. This step-by-step guide walks you through the most reliable methods for cutting models in half, from simple boolean cuts for beginners to advanced editing for professional results, so you can get the exact split you need every time.
Preparing Your 3D Model for Cutting
Before you make any cut, taking a few minutes to prepare your model will save you hours of fixing errors later. Blender works best with clean, manifold geometry, and a little prep work ensures your cut goes smoothly without unwanted holes, overlapping faces, or messy edges.
Import and Orient Your Model
First, import your model into Blender if you didn’t create it natively. Blender supports common 3D file formats like STL, OBJ, FBX, and GLB, so regardless of where your model came from (downloaded from Thingiverse, designed in another program, or built from scratch in Blender), you can work with it here. Once imported, you need to align your model so the cut line runs exactly where you want it. For most people cutting a model in half, this means aligning the center of the model with the global origin along the X or Y axis.
To do this quickly, enter Object Mode, select your model, then press Shift + S and choose “Cursor to Selected”. Next, set your object’s origin to the 3D cursor by pressing Ctrl + Alt + Shift + O. This centers your model on the origin point, making it easy to cut perfectly down the middle along one of the main axes. If you want an off-center cut or a diagonal cut, you can simply move your 3D cursor to the desired cut line position instead of centering it.
Check for Non-Manifold Geometry
Non-manifold geometry is the number one cause of failed boolean cuts in Blender. Non-manifold geometry refers to edges that are connected to more than two faces, faces with no volume, overlapping vertices, or disconnected parts of your model—all issues that confuse Blender’s boolean tool and result in messy, incomplete cuts. It’s critical to fix these issues before you start cutting.
To check for non-manifold geometry:
- Switch to Edit Mode by pressing Tab with your model selected
- Press 3 on your number pad to enable face selection mode
- Open the Select menu at the top of the viewport, choose “Select All by Trait”, then click “Non-Manifold”
Blender will automatically select all problematic geometry. Common fixes include merging overlapping vertices by pressing M and selecting “By Distance”, deleting extra floating faces, and filling in missing holes with the “Fill Hole” tool. For most downloaded STL models, running this check once and merging vertices will fix 90% of common issues.
The Boolean Method: Fast, Simple Cuts for Beginners
The boolean modifier is the easiest way to cut a 3D model in half in Blender, and it works perfectly for most use cases, from 3D printing to digital animation. This method uses a basic cube as a cutting object to remove half of your model, leaving a clean flat face where you made the cut. It’s fast, requires minimal editing experience, and gives predictable results if your model is clean.
Step-by-Step Boolean Cut Walkthrough
Once your model is prepped and centered, follow these steps to cut it in half:
- Stay in Object Mode, then press Shift + A to add a new object. Select “Mesh” then “Cube”. This cube will act as your cutting tool.
- Resize and position the cube so it completely covers the half of the model you want to remove. If you’re cutting down the middle of a centered model along the X-axis, scale the cube along the X-axis to 1 (so it extends from the origin to the edge of your model) and scale it up on the Y and Z axes so it’s larger than your entire model. This ensures the cut goes all the way through the model.
- Select your original model, not the cutting cube, then go to the Properties panel on the right side of the screen. Click the wrench icon to open the Modifiers menu, then click “Add Modifier” and select “Boolean” from the list.
- In the boolean modifier settings, set the Operation to “Difference”. This tells Blender to remove any part of your original model that overlaps with the cutting cube. Next, click the “Object” dropdown and select your cutting cube from the list.
- Blender will automatically apply the cut. You should now see only half of your original model, with a clean flat face where the cut was made.
At this point, you can keep the cut as a half-model, or you can duplicate the half, flip it along the cut axis, and join the two halves to create a perfectly symmetrical full model. This is a common trick used by 3D artists to cut down modeling time: you only need to model one half of a character, vase, or tool, then cut and mirror it to get a finished full model.
Troubleshooting Common Boolean Issues
Even with clean geometry, boolean cuts can sometimes go wrong. The most common issues and fixes are:
- Missing faces or messy edges: This is almost always caused by non-manifold geometry. Go back to the prep step and re-check for non-manifold edges, then try the boolean again. You can also try recalculating the normals of your model by pressing Shift + N in Edit Mode, which fixes inverted normals that can confuse the boolean tool.
- The cut doesn’t go all the way through the model: Your cutting cube is too small. Make the cube larger so it extends past the entire model on all sides beyond the cut line, and try again.
- Long processing time or Blender freezes: Your model has too many polygons. Decimate the model first to reduce polygon count using the Decimate modifier, which keeps the shape intact but lowers the processing load for the boolean tool.
Boolean gets a bad reputation for being unreliable, but 90% of boolean failures come down to bad geometry, not bad tools. A clean model will almost always give you a clean boolean cut in two clicks.
Once you’re happy with the cut, you can apply the boolean modifier by clicking the “Apply” button in the modifier settings. This permanently changes your model to the cut version. If you want to keep the ability to adjust the cut line later, leave the modifier unapplied until you’re ready to export or render.
The Knife Project Method: Clean Cuts for Irregular Shapes
While the boolean method is great for straight cuts down the middle, the Knife Project tool gives you more flexibility for custom cut lines, curved cuts, or cutting models at an angle. Knife Project projects a 2D cut line from a reference mesh onto your 3D model, resulting in a clean, precise cut that follows your custom shape. This is the method you’ll want to use if you’re not just cutting a straight line through the middle of your model, but want a custom split.
How to Use Knife Project to Cut a Model in Half
To cut your model in half with Knife Project, start with a prepared, centered model as we covered earlier. Then follow these steps:
- Add a new plane object by pressing Shift + A, selecting “Mesh” then “Plane”. Align the plane to the cut line, just like you aligned the cutting cube for the boolean method. For a center cut, center the plane on the origin and rotate it so it’s perpendicular to the axis you want to cut along. Scale the plane so it’s larger than your entire model, to ensure the cut covers the whole shape.
- Move the plane slightly in front of your model along the cut axis, so it doesn’t overlap perfectly. This helps Blender correctly project the cut line.
- Select your original model, then switch to Edit Mode by pressing Tab. Press A to select all faces of the model.
- Hold Shift and select the cutting plane, so both your model and the plane are selected (make sure your model is the active object, which it will be if you selected it first).
- Open the Knife menu by pressing K, then select “Knife Project” from the options that appear at the bottom of the viewport. Blender will automatically project the edge of the plane onto your model, creating a cut line all the way through the mesh.
Once the cut line is created, you can select the half of the model you want to remove by using Face Selection mode, clicking one face on the half you want gone, then pressing Ctrl + L to select all connected faces. Press Delete to remove the half, and you’re left with a clean cut.
When to Choose Knife Project Over Boolean
Knife Project has a few key advantages over the boolean method for certain use cases:
- It works well for irregular cut lines: If you want a curved cut, a notched cut for joining two halves later, or an angled cut, you can edit the cutting plane’s shape to match your desired cut line before running Knife Project.
- It often creates cleaner geometry for complex models: For high-poly models with lots of fine details, Knife Project can create a cleaner cut edge than boolean, which sometimes struggles with complex overlapping shapes.
- It gives you more control: You can see and edit the cut line before you delete any geometry, so you can adjust the line without starting the whole process over.
The main downside of Knife Project is that it requires a few more steps than boolean, and it’s not as automatic. For a simple straight cut down the middle, boolean is still faster and easier. But for custom cuts, Knife Project is hard to beat.
Cleaning Up and Preparing Your Cut Model for Use
Once you’ve cut your model in half, you’ll need to do a little clean-up work to get it ready for 3D printing, rendering, or further editing. Even a perfect boolean or Knife Project cut leaves small issues that can cause problems later, so taking 5 minutes to clean up your mesh is always worth it.
Fill the Cut Face and Remove Sharp Edges
After cutting, you’ll have an open, empty edge where you removed half the model. For most use cases, you’ll want to fill this in to create a solid, flat face. To do this, switch to Edit Mode, go to Edge Selection mode by pressing 2 on your number pad, then select all the edges around the open cut.
Once all the edges are selected, press F to fill the face. Blender will automatically create a new flat face to close the open edge. If you’re 3D printing the model, this creates a solid base that will print cleanly on your print bed.
Many designers prefer to add a small bevel to the cut edge to avoid sharp, brittle edges that are prone to breaking when 3D printed, or that look unnatural in a render. To add a bevel, select the outer edge of your cut face, then add a Bevel modifier. Set the width to a small value (1-2mm for most 3D prints) and the segments to 3-4 to get a smooth rounded edge that’s much more durable.
Check for Errors After Cutting
After cutting and filling the face, run another check for non-manifold geometry, just like you did before cutting. Adding the new face can sometimes create overlapping edges or loose vertices that need to be fixed. To do this, follow the same steps as before: switch to Edit Mode, go to Select > Select All by Trait > Non-Manifold, then fix any selected issues by merging vertices or recalculating normals.
If you plan to 3D print your cut model, it’s also a good idea to check that the model is solid. In Blender’s Edit Mode, select all faces, then check the bottom toolbar for the “Check Solid” option. This will tell you if your model has any open edges that would cause it to be non-printable. Most slicer programs will catch these errors too, but fixing them in Blender first saves time when you go to print.
Adding Alignment Pins for 3D Printing
If you’re cutting a large model in half to 3D print it, you’ll need a way to glue the two halves together accurately after printing. Adding small alignment pins and holes to the cut face makes assembly much easier, and ensures your two halves line up perfectly. Here’s how to do it quickly:
- On the cut face of your first half, add two or three small cylinder meshes, 5-10mm long depending on the size of your model.
- Use the boolean tool with the “Difference” operation to cut matching holes in the cut face of the second half, using the cylinders as your cutting objects.
- When you print both halves, the cylinders on one half will fit perfectly into the holes on the other half, so you can glue them together without misalignment.
This simple trick eliminates one of the biggest frustrations of gluing split 3D prints, and it only takes a couple of extra minutes to add to your model after cutting.
Advanced Tips for Special Use Cases
Once you’ve mastered the basic cutting methods, these advanced tips will help you handle more complex use cases and get even better results.
Cutting a Model Into Multiple Halves or Sections
If you need to cut a very large model into more than two sections for 3D printing, you can use the same boolean method repeated for each cut. Simply add a new cutting cube for each cut line, position each cube to cover the section you want to remove, and add a new boolean modifier for each cut. Blender can handle multiple boolean modifiers on one model, just make sure you keep each cutting cube separate and aligned correctly.
For a more non-destructive workflow, you can use the Split tool to separate sections after creating the cut lines. Once you’ve created all your cut lines with Knife Project, you can select each section and separate it into its own object by pressing P and selecting “Selection”. This gives you separate objects for each section that you can export individually for 3D printing.
Cutting a Hollow Model or Model With Internal Details
If you’re cutting a hollow model, such as a vase or a container with internal components, the basic boolean method still works, but you need to make sure you fill both the outer and inner edges of the cut. After cutting, you’ll have two open edges: one around the outside of the model and one around the inside hollow. Select both sets of edges and fill them both to create a solid closed cut face. For hollow models that you plan to 3D print, this also helps you avoid having unwanted extra material inside the print that wastes filament.
Mirroring a Cut Half to Create a Full Symmetrical Model
One of the most common reasons to cut a model in half is to fix an asymmetrical model or create a full model from a scanned half. After cutting your model, you can easily mirror it to create a full symmetrical model using Blender’s Mirror modifier:
- After cutting, add a Mirror modifier to your half model
- Select the axis you cut along (usually X)
- Check the “Merge” box to merge the center vertices of the two halves
- Apply the modifier when you’re happy with the result
This creates a seamless, symmetrical full model from your cut half in just a couple of clicks, and it’s a core technique used by 3D character artists and product designers every day.
Conclusion
Cutting a 3D model in half in Blender doesn’t have to be complicated. For most beginners and most use cases, the simple boolean method gives you a fast, clean cut as long as you take the time to prep your model and fix non-manifold geometry first. If you need a custom or irregular cut, Knife Project gives you the control to get exactly the cut line you want. After cutting, a few minutes of clean-up work ensures your model is ready for 3D printing, rendering, or further editing, and adding small details like alignment pins makes assembling split prints much easier.
Whether you’re new to Blender or a seasoned artist, mastering this skill opens up a huge range of creative possibilities: from 3D printing large objects that don’t fit on your print bed to creating perfectly symmetrical models to editing existing designs to fit your needs. With practice, you’ll be able to cut a model in half in less than five minutes, and you’ll have a reliable process to get clean results every time.