
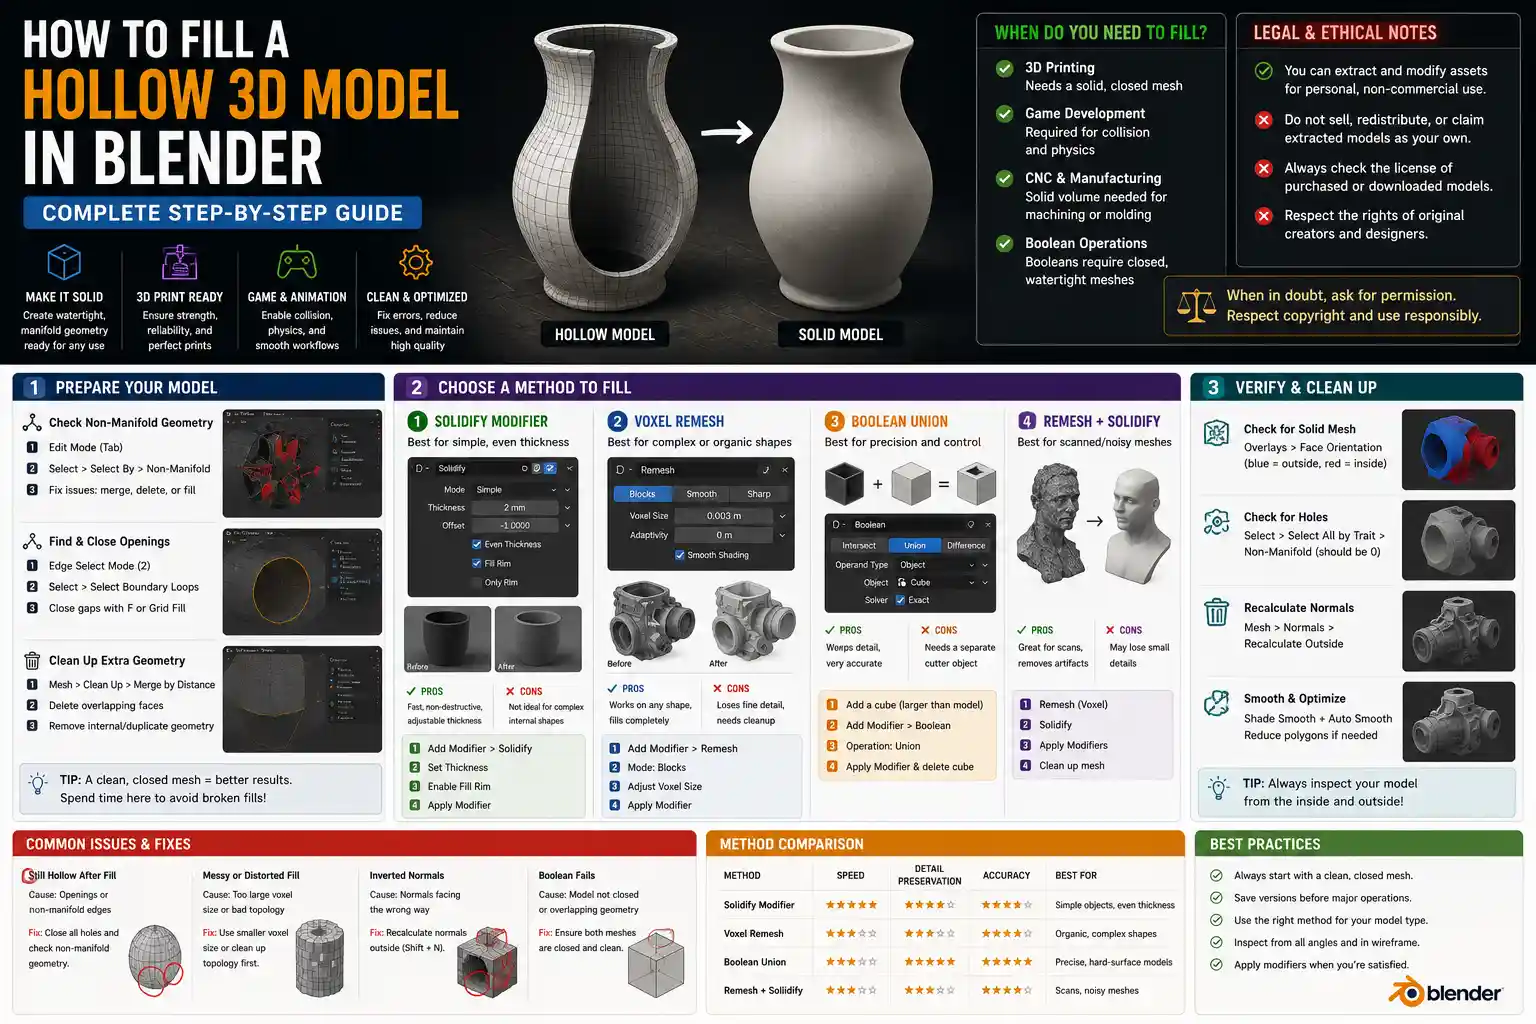
If you’ve ever downloaded a 3D model from a marketplace like Sketchfab or Turbosquid, or finished modeling a complex object in Blender and ended up with a hollow mesh, you know how frustrating it can be. A hollow 3D model might work perfectly for rendering or digital display, but if you want to 3D print it, use it for 3D animation with collision detection, or even just solidify it for manufacturing, that empty interior becomes a major problem. Filling a hollow 3D model in Blender isn’t as complicated as it sounds, though. Blender has several built-in tools that can turn an empty shell into a solid mesh, with options for every use case, from quick 3D print prep to high-poly work for visual effects. In this guide, we’ll walk through the most common methods, break down their pros and cons, and share troubleshooting tips to avoid common mistakes that ruin your mesh.
When and Why You Need to Fill a Hollow 3D Model
Before we jump into the step-by-step methods, it’s helpful to understand why models become hollow in the first place, and when filling them is actually necessary. Many 3D artists intentionally create hollow models to reduce polygon count and speed up render times, especially for objects that are never going to be viewed from the inside. Product designers often create hollow models to save material when 3D printing, but if you need a solid, sturdy part, you’ll have to fill that empty space first. Similarly, scanned 3D models often come out hollow because 3D scanners only capture the outer surface of an object, leaving the interior completely empty.
There are a few common scenarios where filling a hollow model becomes a requirement:
- 3D printing: Most slicer software will reject a hollow model that has no closed surfaces, or will try to fill it automatically, leading to inconsistent results. Even if your slicer accepts it, a fully hollow print will be fragile and structurally weak, so filling it creates a solid, usable part.
- Game development and collision detection: Hollow meshes cause errors when you add collision physics to game assets. A solid closed mesh ensures that objects interact correctly with player characters and other in-game items.
- CNC machining or injection molding: Manufacturing processes require a solid volume to generate toolpaths. A hollow model won’t work for these workflows, as the machine needs to know where the solid material is to cut it correctly.
- Boolean operations: If you want to cut or combine your model with another mesh, Blender’s boolean tools only work reliably on closed, solid meshes. A hollow open mesh will produce messy, broken results when you try to run boolean operations.
It’s important to note that not all hollow models need to be filled. If you’re just creating a background asset for a render or a visual that will never be interacted with, leaving it hollow is perfectly fine and keeps your file size smaller. But for the use cases above, a solid filled mesh is non-negotiable.
Preparing Your Hollow Model for Filling
No matter which method you use to fill your model, you’ll get the best results if you prepare the mesh first. Skipping this step is one of the most common reasons people end up with broken, non-manifold geometry after filling. Blender’s filling tools work best with clean, closed meshes, so taking 10 minutes to fix errors upfront will save you hours of troubleshooting later.
Check for Non-Manifold Geometry
Non-manifold geometry is any edge or face that breaks the rules of a solid mesh. For example, an edge that connects three or more faces, a face with zero area, or an open edge where the model has a gap. Non-manifold geometry will break almost every filling method in Blender, so it’s critical to find and fix it before you start.
To check for non-manifold geometry in Blender:
- Switch to Edit Mode by pressing Tab.
- Open the Select menu, hover over Select By, then click Non-Manifold.
- Blender will automatically select all problematic parts of your mesh.
Common fixes for non-manifold geometry include merging overlapping vertices (press M then select By Distance), deleting extra faces that are overlapping, and filling small gaps with the Face Fill tool. For larger gaps, you can use the Grid Fill tool to create a clean set of faces that close the opening.
Check for Gaps and Openings
Most hollow models have at least one opening where the mesh isn’t closed. For example, a hollow vase will have an open top, or a downloaded character model might have open sockets where limbs attach. All openings need to be closed before you can create a solid fill. Blender can’t fill an interior if the mesh has a gap that connects the empty inside to the outside world.
To find open edges quickly, switch to Edge Select mode in Edit Mode, open the Select menu, and click Select Boundary Loops. This will automatically select all open edges that form the perimeter of any gap. From there, you can close the gap: for simple openings, just press F to fill the face. For more complex openings with irregular shapes, use the Grid Fill tool to create a clean quad-based mesh that closes the gap evenly.
Clean Up Extra Geometry
If you’ve got multiple overlapping faces or duplicated parts of your mesh, delete those before you start filling. Extra geometry will confuse Blender’s voxel and boolean tools, leading to messy outputs. You can use the Remove Doubles (now called Merge By Distance in newer Blender versions) tool to get rid of overlapping vertices automatically, and manually delete any faces that you don’t need.
The Most Common Methods to Fill a Hollow Model in Blender
Blender has four main methods for filling a hollow model, each suited for different use cases and model types. We’ll break down each method step by step, so you can pick the one that works best for your project.
Method 1: Solidify Modifier (Fastest for Simple Shapes)
The Solidify modifier is the easiest way to add thickness to a hollow shell, and if you want to convert a hollow shell to a fully solid model, it works great for simple shapes. Unlike other methods that add a lot of extra geometry, the Solidify modifier is non-destructive, so you can adjust the thickness at any time without permanently changing your original mesh.
Step-by-step for the Solidify modifier method:
- Select your hollow closed mesh in Object Mode.
- Go to the Modifiers tab (the wrench icon) in the Properties panel and click Add Modifier, then select Solidify from the Generate menu.
- Adjust the Thickness value until it fills the entire interior of your hollow model. For a fully solid model, you just need to set the thickness high enough that the inner and outer walls meet, completely filling the empty space.
- If you only want the outer shape to remain and the solid interior to be one solid mesh, check the Even Thickness box to get consistent results. If your model has complicated concave areas, you can adjust the Offset slider to move the inner wall so it fills the entire hollow space evenly.
- Once you’re happy with the result, click the Apply button on the modifier to permanently convert it to a solid mesh.
The main downside of the Solidify modifier is that it works best for simple, convex shapes. If your hollow model has complex interior cavities or irregular shapes, the inner wall created by Solidify can overlap or leave small empty gaps. It’s also not ideal if you need a perfectly uniform solid volume for 3D printing, because it doesn’t create a true solid volume—it just adds an inner wall to your existing outer shell.
Method 2: Voxel Remeshing (Best for Complex Irregular Shapes)
Voxel remeshing is Blender’s most powerful tool for filling complex hollow models, especially scanned models or models with lots of irregular cavities. Voxel remeshing converts your entire mesh into a grid of 3D pixels (voxels), then reconstructs a new clean solid mesh from the outer volume. This automatically fills any hollow interior, and leaves you with a clean, manifold mesh that’s ready for 3D printing or further editing.
Voxel remeshing doesn’t just fill your model—it rebuilds it from scratch, so it’s one of the most reliable ways to fix messy geometry while you fill a hollow model. Even if your original mesh has small errors or gaps, voxel remeshing will often correct them automatically.
Step-by-step for voxel remeshing:
- Make sure your hollow mesh is closed (all gaps filled) and clean of non-manifold geometry, as we covered in the preparation section.
- Switch to Object Mode, select your mesh, then go to the Sculpting workspace.
- In the Remesh panel on the right side of the screen, select Voxel as the remeshing type.
- Adjust the Voxel Size slider to control the detail of the output. A smaller voxel size will preserve more fine detail from your original model, while a larger voxel size will create a lower-poly mesh. For most 3D printing projects, a voxel size between 0.5mm and 2mm works well, depending on the overall size of your model.
- Check the Remove Floating Pieces box to get rid of any extra small geometry that’s created during remeshing.
- Click the Remesh button. Blender will process your model and output a new, completely solid mesh that fills the entire original hollow volume.
The biggest benefit of voxel remeshing is that it works on almost any complex shape, no matter how irregular the original hollow cavity is. It also automatically fixes most small geometry errors, so it’s a great choice for messy scanned models. The downside is that it can increase your polygon count significantly if you use a very small voxel size, and it will smooth out very fine detail from your original model if you use a larger voxel size. It’s also destructive, so you can’t go back and adjust the original mesh after remeshing unless you saved a copy.
Method 3: Boolean Union with a Primitive (Most Accurate for Simple Bounded Shapes)
If your hollow model is a simple closed shell, you can fill it by creating a solid primitive that’s larger than the entire model, then using a boolean union to merge the primitive and the hollow shell into one solid mesh. This method is very accurate for models with clear outer boundaries, and it doesn’t alter the original outer surface of your model at all, which is great if you need to preserve fine detail.
Step-by-step for the boolean primitive method:
- Make sure your hollow mesh is closed and clean, with all gaps filled.
- Create a solid primitive (like a cube or sphere) that is large enough to completely enclose the entire hollow model. If your model is irregular, a cube that’s bigger than the model on all axes works best.
- Select the primitive object, go to the Modifiers tab, add a Boolean modifier.
- Set the Boolean operation to Union, then set the Object field to your hollow mesh.
- Click Apply. Blender will merge the solid primitive and the hollow outer shell into one single solid mesh. Because the primitive completely fills the interior of the hollow shell, the result is a fully solid model that preserves the original outer shape exactly.
- After applying the boolean, you can check for non-manifold geometry to make sure the operation worked correctly, and clean up any extra vertices if needed.
One of the biggest advantages of this method is that it preserves 100% of the original detail on the outer surface of your model, unlike voxel remeshing which can smooth out fine details. It also produces a clean manifold mesh that works perfectly for 3D printing. The main downside is that it only works if your hollow mesh is completely closed—any small gaps will cause the boolean operation to fail, producing a broken mesh. It also doesn’t work well for very large or complex models with lots of fine detail, because boolean operations can sometimes produce messy geometry on complex shapes.
Method 4: Manually Fill with the Fill Tool and Extrusion (For Small Open Models)
If you have a small hollow model with a single large opening, like a bowl or a hollow box, you can fill it manually without using any modifiers. This method gives you full control over the result, and it’s great for simple models where you don’t want to alter the original geometry.
Step-by-step manual filling:
- Select your model and switch to Edit Mode.
- Select all the open edges around the opening of your hollow model.
- Press F to create a new face that closes the opening. If the opening is irregular, use Grid Fill instead (press Shift-F) to create a clean set of faces.
- Once the opening is closed, select all the faces of the new closing face you just created.
- Extrude the face inward along the normal axis (press E then S to scale it down slightly as you extrude) until it fills the entire hollow cavity. For a fully solid model, you can extrude it all the way to the opposite inner wall of the model.
- Merge the extruded vertices with the opposite inner wall to close the mesh, then check for non-manifold geometry to clean up any errors.
This method is great for simple, open hollow models, but it’s not practical for large or complex models with multiple cavities, because it requires a lot of manual work. It’s also easy to make mistakes that leave small gaps or non-manifold edges if you’re not careful with merging vertices.
Troubleshooting Common Problems When Filling Hollow Models
Even if you follow all the steps correctly, you can run into common issues when filling a hollow model in Blender. Here are the most frequent problems, and how to fix them quickly:
Non-Manifold Geometry After Filling
It’s very common to end up with non-manifold edges after using boolean operations or the Solidify modifier. The fix is simple: just switch to Edit Mode, select all non-manifold edges using the Select By > Non-Manifold tool, then merge overlapping vertices with Merge By Distance. For most cases, this will fix 90% of non-manifold errors. If you still have open edges, just select them and fill any remaining gaps with the Face Fill tool.
Small Gaps or Empty Spots Left in the Interior
If you used the Solidify modifier and still have small empty gaps in concave areas of your model, the fix is to increase the thickness slightly, or adjust the Offset slider to move the inner wall further into the cavity. If you’re using the boolean method, make sure your enclosing primitive is large enough to completely cover the entire outer shape of the hollow model—if part of the hollow model sticks out past the primitive, you’ll end up with a gap. For voxel remeshing, reduce the voxel size to get a more detailed result that fills all small cavities.
Original Fine Detail Is Lost After Filling
If you used voxel remeshing and notice that fine details like engravings or surface texture are smoothed out, you’re probably using too large a voxel size. Reduce the voxel size to increase the detail level, and remesh again. If you still lose detail, try the boolean primitive method instead, which preserves the original outer surface intact. You can also reproject the detail from your original high-poly mesh onto the new filled mesh using the Data Transfer modifier to get the detail back.
Boolean Operation Fails or Produces a Broken Mesh
Boolean operations are very sensitive to bad geometry. If your boolean union fails, go back and check your original hollow mesh for non-manifold geometry and gaps. Make sure all openings are completely closed, and merge all overlapping vertices before trying the boolean again. You can also try recalculating the normals of both meshes (select all faces in Edit Mode, press Shift-N) to make sure all normals are pointing outward, which fixes many boolean errors. If it still fails, try using the BoolTool add-on that comes pre-installed with Blender, which has more robust boolean processing for complex meshes.
Polygon Count Is Too High After Filling
Voxel remeshing can sometimes produce a very high-poly mesh that’s slow to work with. If your polygon count is too high, you can use Blender’s Decimate modifier to reduce the polygon count while preserving the overall shape. For 3D printing, you don’t need more polygons than your printer can resolve, so decimating to a reasonable polygon count will make your file easier to handle in your slicer software.
Conclusion
Filling a hollow 3D model in Blender doesn’t have to be a frustrating process. The key is to start with a clean, closed mesh, fix any non-manifold geometry before you begin, and pick the right method for your model type and project goals. For simple shapes, the Solidify modifier is fast and non-destructive. For complex irregular models like 3D scans, voxel remeshing is the most reliable option. If you need to preserve fine surface detail, the boolean union method gives you an accurate result that keeps your original mesh intact. And for small open models, manual filling gives you full control over the final result.
No matter which method you choose, always double-check your final mesh for non-manifold geometry before exporting it for 3D printing or manufacturing. Taking a few extra minutes to prepare and clean up your mesh will save you hours of wasted time and failed prints down the line. With these methods, you can turn any hollow mesh into a solid, ready-to-use model in Blender in just a few minutes.