
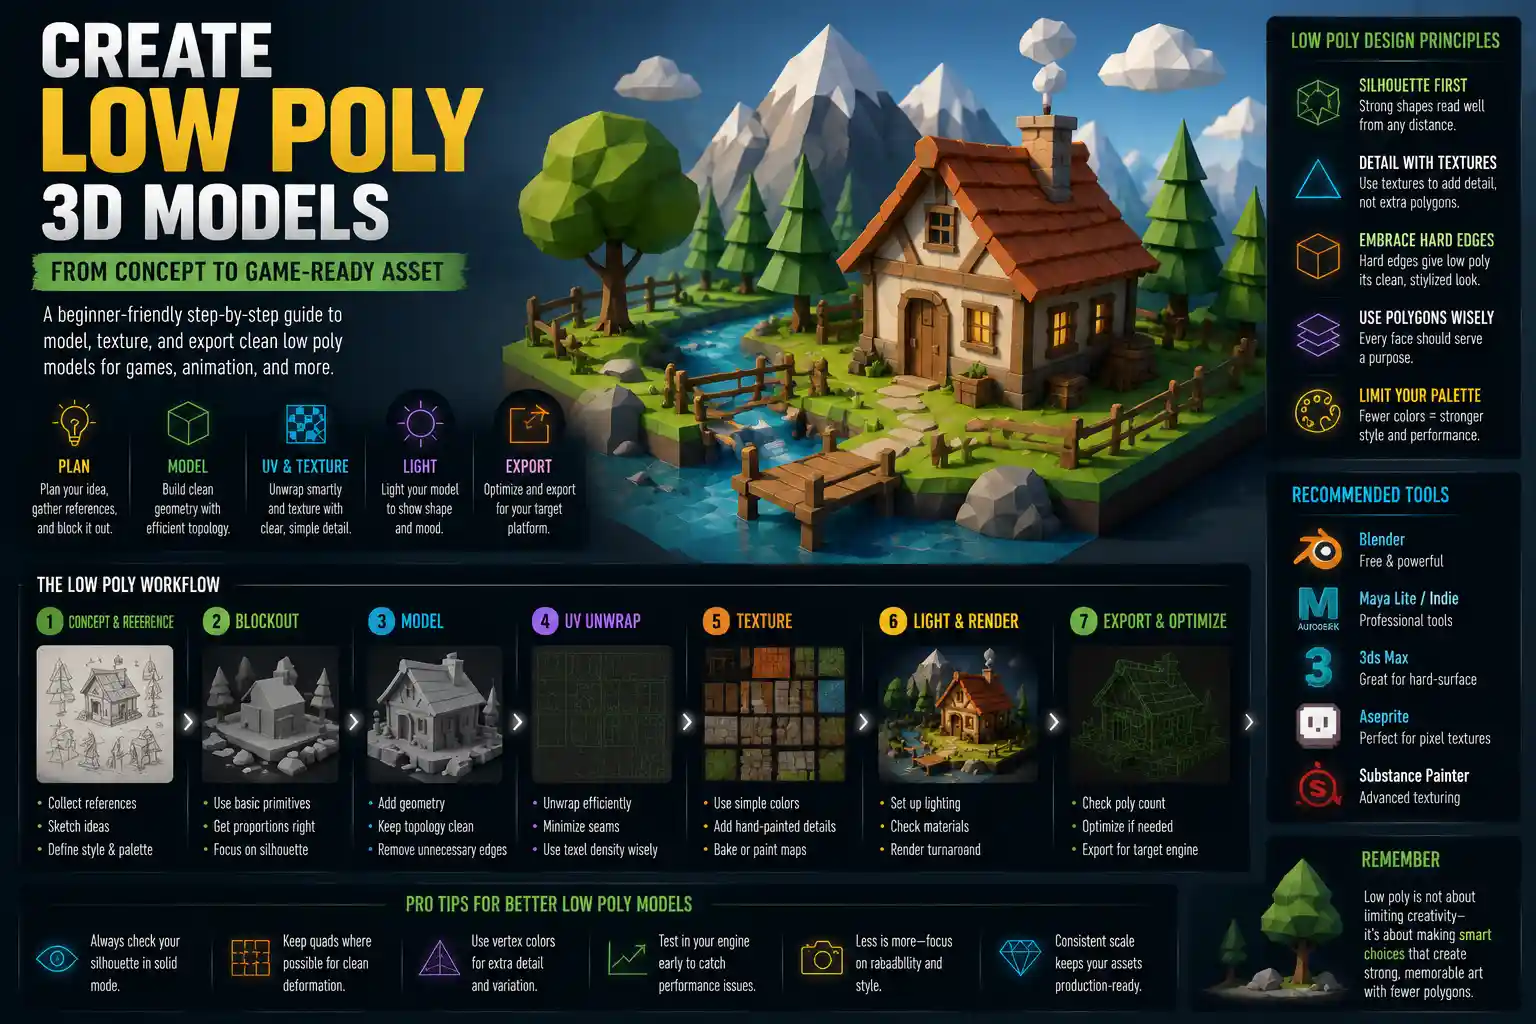
If you’ve ever browsed indie video games, minimalist 3D art, or tabletop terrain design, you’ve likely encountered low poly models: charming, stylized 3D assets defined by their extremely low triangle count. Once a necessity of early 3D graphics hardware, low poly has evolved into a beloved artistic style that prioritizes shape, color, and creativity over hyper-realistic detail. Whether you’re a game developer building a performance-friendly open world, an indie artist looking to break into 3D, or a hobbyist designing assets for 3D printing, learning to create clean, effective low poly models is a valuable skill that doesn’t require expensive hardware or years of training. This guide breaks down the entire process, from planning your first model to exporting a finished asset ready for use.
Understanding the Core Principles of Low Poly Design
Before you open your 3D modeling software, it’s important to understand what makes a good low poly model, beyond just “fewer polygons.” Unlike high poly modeling, which aims for realistic surface detail and smooth curves, low poly design celebrates simplicity and intentionality. Every triangle (or polygon) in your model should serve a purpose: defining a key shape, silhouette, or edge. Unnecessary polygons waste processing power and clutter the clean aesthetic that defines the style.
Low poly didn’t start as an artistic choice. In the 1990s, early game consoles and desktop computers could only render a few thousand polygons per frame, so 3D artists had no choice but to simplify their designs. As hardware improved, however, artists began to embrace the nostalgic, expressive qualities of low poly. Today, it’s common to see low poly assets in everything from mobile games to modern indie titles like Minecraft and Untitled Goose Game, where performance and art direction take priority over photorealism.
Key Principles to Guide Your Work
- Prioritize silhouette over detail: A good low poly model reads clearly even from far away, because its overall shape is strong. If removing a polygon doesn’t change the silhouette or core shape of your model, it’s safe to delete it.
- Use texture for detail, not geometry: One of the most common mistakes new low poly artists make is adding tiny details like crevices, logos, or surface texture to the geometry itself. Instead, add those details to your 2D texture map. This keeps your polygon count low and maintains the clean low poly aesthetic.
- Embrace hard edges: Soft, rounded curves require dozens of extra polygons, which defeat the purpose of low poly. Most iconic low poly models rely on hard, flat edges to define shape, giving the style its characteristic blocky charm.
- Match polygon count to use case: A small prop like a cup can have as few as 8–16 polygons, while a main character might need 500–2,000 polygons to convey expression. There’s no magic number—what counts as “low poly” depends entirely on how you plan to use the asset.
For example, a low poly tree might use just 12 triangles for the trunk and 8 triangles for the leaves, with bark and leaf detail added via a simple hand-painted texture. Compare that to a photorealistic high poly tree, which can require hundreds of thousands of polygons to capture every bark crevice and individual leaf. The low poly version gets the point across just as clearly for many use cases, while being 1000x faster to render.
Planning Your First Low Poly Model
Good low poly modeling starts before you ever create a new file in your software. Planning your model will save you hours of cleaning up unnecessary geometry later, and help you end up with a cleaner, more intentional final product. This step is especially important for beginners, who often jump into modeling without a clear idea of what they want to create.
Choose a Simple Subject to Start
If this is your first time creating a low poly model, don’t start with a complex character or a detailed building. Stick to simple, geometric objects that are easy to break down into basic shapes. Great beginner subjects include a mug, a house, a tree, a chair, or a apple. These objects have clear, recognizable silhouettes and don’t require hundreds of polygons to look right.
Gather Reference Images
Even for simple objects, reference images keep your proportions accurate and help you identify which details are essential and which can be cut. You don’t need a professional reference sheet—three or four photos from different angles (front, side, top) pulled from a search engine are enough for a simple model. If you’re working from a specific art style, save a few examples of low poly models you like to reference as you work.
Break Your Subject Down Into Basic Shapes
The easiest way to approach any 3D model, especially low poly, is to break it into primitive shapes: cubes, spheres, cylinders, and planes. This process is called blocking out, and it helps you get the overall proportions right before you start adding detail. For example, a chair can be broken into five basic cubes: one for the seat, one for the backrest, and four for the legs. A tree is a cylinder for the trunk and a few flat planes for the leaves. This approach keeps your polygon count low from the start, because you’re only adding geometry where you need it.
“Low poly is not about how few polygons you can use—it’s about how few polygons you need to use to tell the story. The best low poly models are the ones where you don’t notice what’s missing, only what’s there.”
Choose Your Modeling Software
You don’t need to spend hundreds of dollars on professional software to create great low poly models. There are free, powerful options that work perfectly for beginners and professionals alike:
- Blender: The most popular free open-source 3D software, with all the tools you need for low poly modeling. It’s supported by a massive global community, and there are thousands of free tutorials for beginners. This is the best starting point for most new artists.
- Autodesk Maya: A professional industry standard used by major game studios, available for a monthly subscription. Great if you already know how to use it, but overkill for beginners just learning low poly.
- SketchUp: A simple, intuitive tool great for architectural low poly models and environmental assets. The free version works well for most hobbyist projects.
- MagicaVoxel: A free voxel-based modeling tool that creates natural low poly style by default. Perfect if you want to create blocky, pixelated 3D art without learning complex polygon modeling.
For the purposes of this guide, we’ll assume you’re using Blender, since it’s free and accessible for most users, but the core principles apply to any 3D modeling software.
Step-by-Step Low Poly Modeling Workflow
Once you’ve planned your model and set up your software, you’re ready to start modeling. This step-by-step workflow is designed to keep your polygon count low and your geometry clean from start to finish, resulting in a professional low poly asset.
- Set up your reference and start blocking
Import your reference images into your modeling software as background images in the front, side, and top viewports. This lets you trace your shape directly from the reference, keeping your proportions accurate. Next, add a basic primitive (cube, cylinder, etc.) that matches the largest part of your model. For example, if you’re modeling a house, start with a cube for the main structure. Resize it to match the overall proportions from your reference, then add additional primitives for other key parts: a triangular prism for the roof, a smaller cube for the door, and a couple of small cubes for windows. Don’t worry about detail at this stage—just focus on getting the overall size and shape of each part right.
- Refine your shape by deleting unnecessary geometry
Once your basic blocks are in place, it’s time to simplify. The easiest way to keep your poly count low is to delete any faces you can’t see. For example, if your house is sitting on the ground, you can delete the bottom face of the main structure, since it will never be visible. If the back of your house is against a hill and will never be seen by the player, you can delete the entire back face. This alone can cut your polygon count by 20-30% with no impact on the final model. Next, look for edges that don’t change the silhouette of your model. Can you remove an edge loop without altering the overall shape? Delete it. Blender has a built-in decimate modifier that automatically reduces polygon count, but it’s better to remove geometry manually at first so you learn to see what’s necessary and what isn’t.
- Combine separate objects and clean up your mesh
Once you’re happy with the shape of each block, you can leave them as separate objects if you want to animate them later (for example, a door that needs to open). If they’re all static, you can combine them into a single mesh to keep your file organized. After combining, check for non-manifold geometry—edges that are connected to more than two faces, or faces with no area. These issues can cause problems when you export your model or add textures, so most software has tools to automatically find and fix them. Also check for overlapping vertices: if two vertices are in the same spot, merge them to keep your mesh clean.
- Add bevels or hard edges for definition (optional)
While low poly models are typically defined by hard edges, you can add subtle definition by beveling edges if you have a little extra polygon budget to spare. A bevel cuts a tiny new face along a sharp edge, creating the illusion of a rounded corner without adding dozens of extra polygons. For example, beveling the edges of a wooden table can make it look more realistic without pushing your polygon count too high. If you prefer the classic blocky low poly look, you can skip this step entirely—both styles are valid.
When you’re done modeling, count your polygons to see how you did. A simple static prop like a chair should be under 200 polygons, while a small environmental asset like a tree should be under 500. Even a fully rigged playable character can be under 5,000 polygons for most mobile or indie game use cases. If your model is over these benchmarks, go back through and look for extra geometry you can remove. Remember: if you can’t see the detail when the model is in its intended use, it doesn’t need to be there.
Texturing and Exporting Your Low Poly Model
One of the defining characteristics of great low poly art is how artists use texture to add detail without adding geometry. Texturing is where your simple blocky model comes to life, with color, shadow, and small details that make it feel complete. The low poly style lends itself well to a range of texturing approaches, from flat solid colors to hand-painted detail, so you can choose a style that matches your project.
UV Unwrapping 101 for Low Poly
Before you can add a texture to your model, you need to unwrap its UVs. UV unwrapping is the process of flattening your 3D mesh into a 2D map, so your software knows how to wrap your 2D texture image around the 3D shape. For low poly models, UV unwrapping is much simpler than it is for high poly models, because you don’t need to worry about hiding seams or matching complex detail.
The biggest rule for low poly UVs is to maximize the space you have. Each face of your model should get enough space in the UV map that your texture doesn’t look blurry. You can unwrap each part of your model automatically in most software, then move and scale the UV islands to fill the entire texture space. Don’t worry about overlapping UV islands if they’re the same color—overlapping saves space and makes your texture resolution higher, which is a common trick in low poly game art.
Choosing and Creating Your Texture
Low poly textures are almost always small, which helps keep file sizes low and load times fast. Common texture sizes for low poly assets are 256x256 pixels, 512x512 pixels, or 1024x1024 pixels for higher-resolution assets. You don’t need a 4K texture for a 200-polygon model—it’s overkill, and it wastes memory.
There are three common texturing styles for low poly models:
- Flat solid colors: The simplest approach, where each material on your model gets a single solid color. This creates a very clean, minimalist low poly look, and it’s perfect for beginner projects. For example, a tree might have a solid brown texture for the trunk and a solid green texture for the leaves.
- Hand-painted detail: The most popular style for artistic low poly models. You can paint shadows, highlights, and small details like wood grain, brick patterns, or facial features directly onto your texture in a program like Photoshop, GIMP, or Procreate. This lets you add all the detail you want without adding any extra polygons to your model.
- Cell shading: A common style in animation and games that uses sharp, hard-edged shadows instead of soft gradients. This complements low poly geometry perfectly, and enhances the stylized, non-photorealistic aesthetic.
When you paint your texture, don’t be afraid to exaggerate shadows and highlights to define shape. Since your model is low poly and doesn’t have a lot of surface detail, the texture has to do a lot of the work to sell the form. For example, adding a dark shadow along the bottom of a cube makes it look more three-dimensional, even if the cube itself is just six flat faces.
Exporting Your Model for Use
Once your model is modeled, UV unwrapped, and textured, you’re ready to export it. The right export settings depend on what you’re using the model for:
- For game development: Export as an FBX or GLB file. These formats support embedded textures and rigging if you’re working with an animated character. Make sure to check the “export embedded textures” box if your software has that option, to keep your file organized.
- For 3D printing: Export as an STL file. Make sure your mesh is solid and has no holes or non-manifold geometry before exporting, as these will cause errors when slicing your model for printing.
- For web or AR use: GLB or glTF are the best formats, as they’re compressed and load quickly in web browsers.
Always test your exported model in your target software before you consider it finished. Import it into your game engine, slicer, or viewer to check that your textures load correctly, your polygon count is low enough, and your shape looks right in context. It’s common to spot small issues like misaligned textures or extra geometry that you didn’t notice in your modeling software, so this step is worth the extra five minutes.
Common Mistakes to Avoid as a Beginner
Even with a solid workflow, new low poly artists often fall into a few common traps that result in messy, overly complex models. Being aware of these mistakes will help you spot and fix them early, and speed up your learning process.
The first and most common mistake is adding too much geometry. New artists often want to capture every little detail of their subject in the 3D mesh, instead of adding that detail to the texture. For example, if you’re modeling a mug with a logo, you might be tempted to extrude the logo out from the surface of the mug. That adds dozens of extra polygons for a detail that could easily be painted onto the texture, with no impact on how the model looks. If you’re working on a game, those extra polygons add up quickly, and can even cause your game to run slowly on mobile devices or lower-end computers.
Another common mistake is not cleaning up extra vertices and faces after modeling. It’s easy to leave tiny hidden faces or overlapping vertices in your mesh, especially when you’re just starting out. These issues don’t usually cause problems in your modeling software, but they can create glitches when you export your model or import it into another program. Getting into the habit of running a mesh check after you finish modeling will save you hours of debugging later.
Many beginners also ignore the silhouette and focus too much on close-up detail. A model that looks great up close but doesn’t read clearly from far away is a bad low poly model. The silhouette is what people see first, and if it’s not clear what your model is supposed to be, all the small texture detail in the world won’t fix it. Before you add any texture to your model, switch to solid shaded view, zoom it out to the size it will be in your final project, and see if you can immediately tell what it is. If you can’t, go back and adjust the shape until the silhouette is clear.
Finally, many new artists get too hung up on hitting an arbitrary low polygon count. It’s true that low poly is about simplicity, but a 500-polygon model that looks great is better than a 100-polygon model that’s unrecognizable. The goal isn’t to use as few polygons as possible—it’s to use as few as you need. If adding 10 extra polygons makes your model look dramatically better, there’s no shame in adding them.
Conclusion
Creating low poly models is a skill that rewards simplicity and intentionality over complex technical knowledge. By starting with a clear plan, breaking your subject down into basic shapes, prioritizing silhouette over unnecessary detail, and using texture to add depth, you can create clean, professional low poly assets even as a beginner. The best way to improve is to practice: start with simple objects, work your way up to more complex subjects like characters and buildings, and don’t be afraid to experiment with different styles. Over time, you’ll develop an eye for what works, and you’ll be able to create beautiful, performance-friendly low poly models for games, art, 3D printing, or any other project you have in mind.