
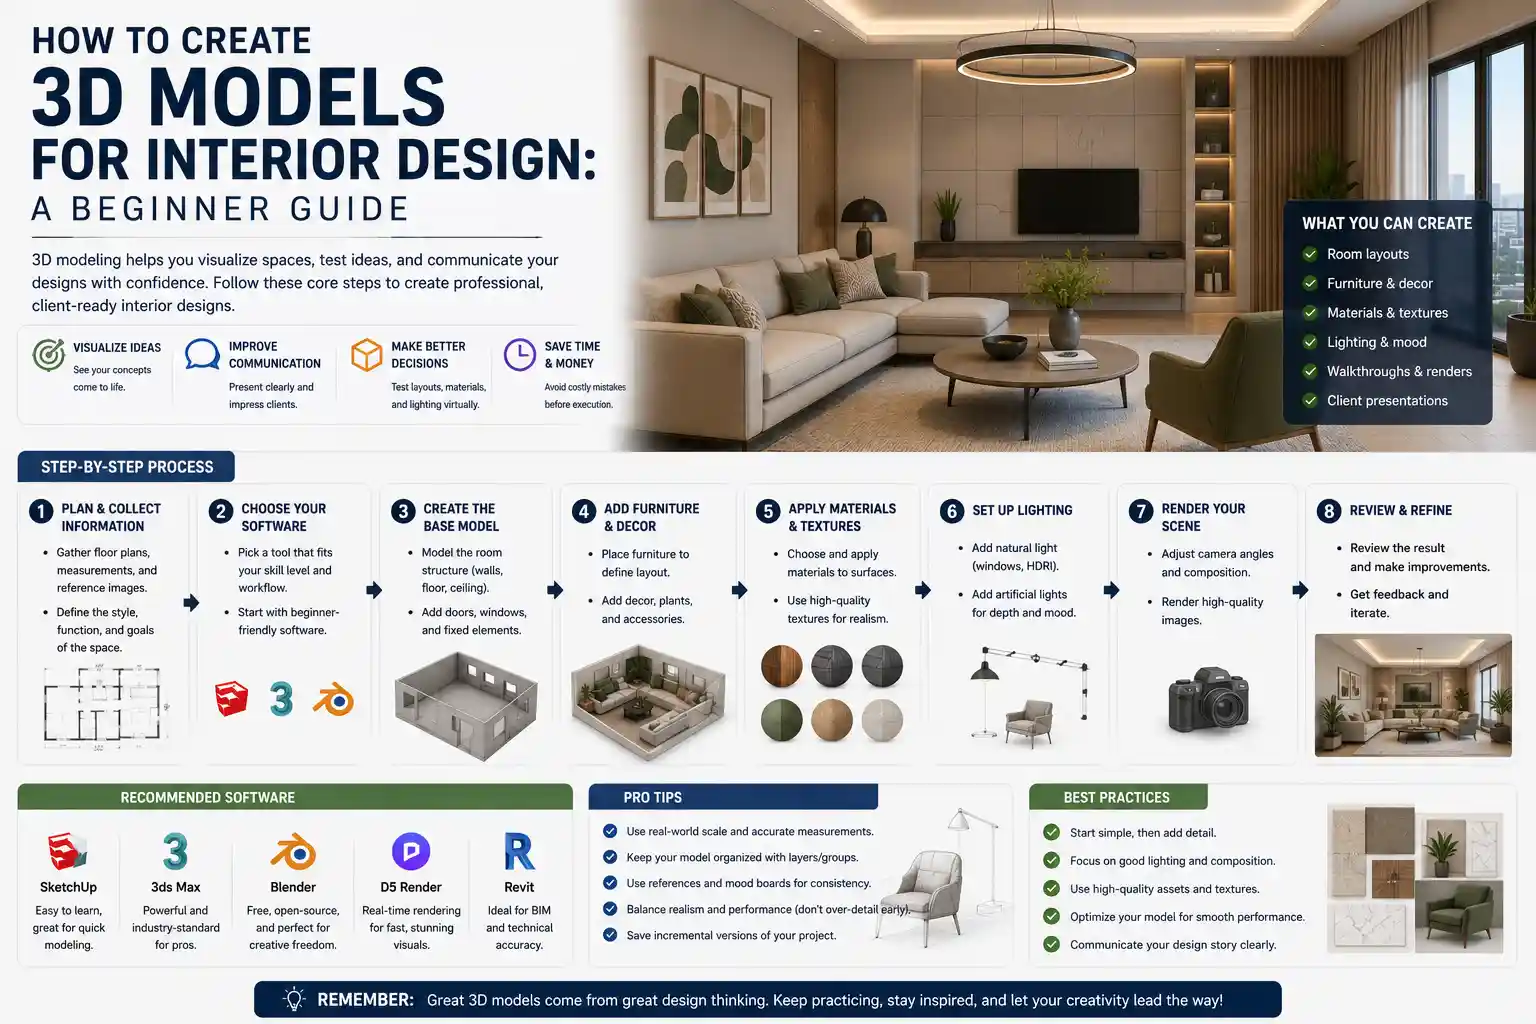
Imagine walking through a client’s future living room before a single can of paint is opened, rotating the space to check how natural light hits a custom sofa at 3 p.m., or swapping out a hardwood floor for marble tile in 10 seconds. For modern interior designers, 3D modeling isn’t just a fancy add-on to impress clients—it’s a core tool that cuts down on miscommunication, prevents costly renovation mistakes, and helps sell your vision faster than any 2D floor plan or mood board. Whether you’re a freelance designer just starting out or a seasoned professional looking to update your workflow, creating accurate, beautiful 3D models for interior design is easier and more accessible than ever before. This guide breaks down the entire process, from planning your space to exporting a final render clients will love.
Pre-Design Planning & Measurement Gathering
Before you open any 3D modeling software, the most important work happens in the planning stage. A beautiful 3D model that doesn’t match the actual dimensions of a room is useless—even minor measurement errors can lead to ill-fitting furniture, blocked doorways, or costly reworks during construction. Taking the time to gather accurate data upfront will save you hours of rework later.
Measuring the physical space (or working from architectural plans)
If you’re working on an existing space, the first step is to take your own measurements. Don’t rely solely on old blueprints, as many homes have undocumented modifications or construction inconsistencies. Start with the outer dimensions of the room: length and width, measured at both the floor and ceiling to check for uneven walls. Next, note the position and dimensions of every fixed element: doors, windows, HVAC vents, electrical outlets, radiators, and built-in features like fireplaces or crown molding. Don’t forget to measure ceiling height, as this dramatically impacts the feel of a space and the scale of furniture.
For new construction projects, you’ll usually work from architectural drawings provided by the contractor or architect. Cross-check key dimensions like door widths and window openings to confirm they match your client’s needs, and note any tolerances the architect has included for finishing work. Many modern architects share CAD files of their plans, which you can import directly into your 3D software as a reference layer.
Technology has simplified measurement dramatically in recent years. Laser measures can capture accurate dimensions in seconds, and tools like the Matterport 3D scanner can create a complete point cloud of an existing space that you can import directly into your modeling software. For designers on a budget, even smartphone apps like RoomScan Pro can generate reasonably accurate floor plans by just moving your phone along each wall.
Gathering reference materials and defining project goals
Once you have your dimensions, collect all the reference materials you’ll need to build an accurate model. This includes:
- Photos of the existing space from multiple angles, to note texture, trim details, and fixed features
- Product specifications for any furniture, fixtures, or materials the client has already selected, including exact dimensions and finish swatches
- Mood boards or inspiration images that define the design style (modern, farmhouse, minimalist, etc.) to keep your model aligned with the client’s vision
- Clear notes on the client’s priorities: are they focused on maximizing storage for a small apartment, testing open-concept renovation layouts, or just visualizing how a new paint color will look?
Defining clear project goals at this stage also helps you decide how detailed your model needs to be. If you’re just testing layout options for a initial client consultation, you can use generic placeholder furniture and skip small details like outlet covers. If you’re creating a final render for marketing or to confirm all finishes before construction, you’ll need to include every texture and detail to give the client an accurate sense of the finished space.
Choosing the Right 3D Modeling Software
There are dozens of 3D tools on the market today, ranging from free browser-based options for beginners to professional-grade software used by top design studios. The right tool for you depends on your skill level, budget, project type, and whether you need to create simple conceptual models or hyper-realistic final renders. Below is a breakdown of the most popular options for interior designers.
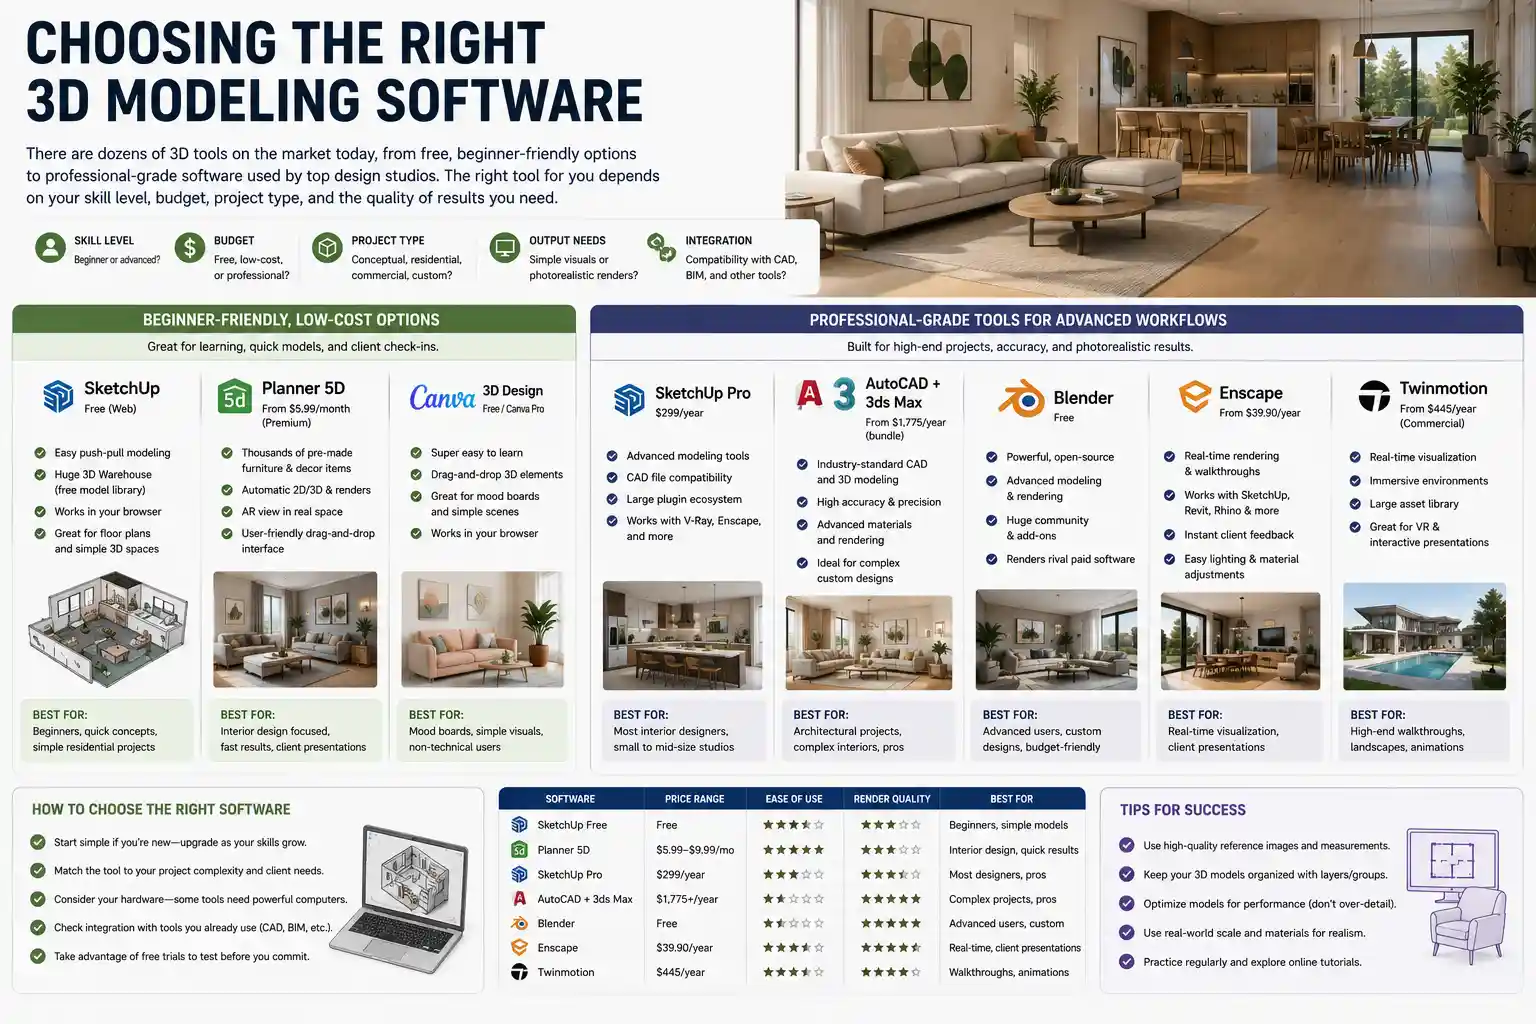
Beginner-friendly, low-cost options
If you’re new to 3D modeling or just need to create quick models for client check-ins, you don’t need to invest in expensive software or spend months learning complex tools. Options like SketchUp Free and Canva’s 3D design tools run right in your browser, with intuitive drag-and-drop interfaces that let you build a basic room model in an afternoon. SketchUp is particularly popular among new interior designers because its push-pull tool makes it easy to turn 2D floor plans into 3D spaces, and there’s a massive free library of pre-made 3D models of furniture, fixtures, and decor from the SketchUp community.
Another popular option for beginners is Planner 5D, which is specifically built for interior design. It includes thousands of pre-made products, automatic render generation, and even AR features that let clients view the model in their actual space using a smartphone. For under $10 a month for a premium plan, it’s an affordable way to create professional-looking 3D models without a steep learning curve.
Professional-grade tools for advanced workflows
For full-time interior designers who create high-end custom projects, professional software offers more flexibility, accuracy, and rendering quality. SketchUp Pro is the industry standard for many designers, offering advanced modeling tools, compatibility with CAD files, and integration with rendering plugins like V-Ray that create photorealistic outputs. A perpetual license costs around $300, with affordable annual upgrades, making it a solid investment for most small design studios.
Autodesk 3ds Max and AutoCAD are another common combination for interior designers working with architects and contractors. AutoCAD is ideal for creating accurate 2D plans that translate directly to 3D models, while 3ds Max offers advanced modeling and rendering capabilities for complex custom designs. Blender, the free open-source 3D software, has also grown in popularity in recent years, with a huge community of developers adding new interior design-focused features. It’s completely free to use, and can produce renders that rival paid professional software if you’re willing to put in the time to learn it.
For designers who focus on real-time visualization and interactive client walkthroughs, tools like Enscape and Twinmotion are game-changers. These tools integrate with popular modeling software like SketchUp and Revit, and let you walk through the 3D space in real time, adjusting finishes, furniture, and even lighting on the fly to show clients multiple options during a consultation.
“The biggest mistake new designers make is choosing software based on what’s trending instead of what fits their workflow. You don’t need a $1,000 annual license for 3ds Max if you’re just creating quick layout models for small residential clients. A tool that lets you work quickly and communicate clearly is always better than a fancy tool that takes you three times as long to use.”
Building Your 3D Model Step-by-Step
Once you have your measurements and your software set up, it’s time to start building the model. Following a consistent, logical process will help you avoid mistakes and keep your file organized, especially as you add more details. Below is a step-by-step workflow that works for most interior design projects, regardless of the software you use.
- Import or draw the 2D floor plan as a reference
Start by importing your measured floor plan into the software as a background reference layer. If you don’t have a digital floor plan, draw the basic outline of the room directly in your software using your measurement data. Lock the reference layer so you don’t accidentally move it as you build the 3D structure.
- Extrude walls, add openings and fixed features
Extrude your 2D wall outline to the correct ceiling height to create 3D walls. Then cut out openings for doors and windows, matching their exact dimensions and positions from your measurements. Add all fixed features next: baseboards, crown molding, built-in shelves, fireplaces, stairs, and kitchen or bathroom cabinetry that will stay in the space. It’s best to get all the permanent elements of the room in place before you add any movable furniture or decor.
- Import or place furniture, fixtures, and decor
Most designers don’t build every furniture model from scratch—there’s no need to reinvent the wheel when thousands of free and paid 3D models of sofas, tables, lighting, and decor are available online. The SketchUp 3D Warehouse, 3DExport, and TurboSquid are all popular sources for pre-made models. Always check the dimensions of any imported model to confirm it matches the actual product—even a 2-inch difference can make a sofa look out of scale in a room.
If you’re working with custom furniture or a specific product that doesn’t have a pre-made 3D model, you can build a simple proxy model with the correct dimensions, then add the correct texture or finish when you render. For conceptual layouts, you can even use simple primitive shapes (boxes, cylinders) to represent furniture if you just need to test flow and scale.
- Apply textures and materials to match your design
Once all objects are in place, it’s time to apply materials and textures. This is what will make your model feel realistic and give clients an accurate sense of the finished space. Be sure to match the finish of every material: matte vs. glossy paint, the grain pattern of hardwood flooring, the veining of natural stone, and the texture of fabric upholstery. Most software comes with a built-in library of common materials, and you can also import custom texture maps for specific products from manufacturer websites.
A common mistake new designers make is overloading the model with too many high-resolution textures early on, which can slow down your software as you work. Keep textures low-resolution while you’re still adjusting the layout, and swap in high-resolution textures only when you’re ready to render the final image.
- Set up lighting for accurate visualization
Lighting is one of the most important elements of a realistic 3D interior model, and it’s often overlooked by beginners. Start by adding natural light that matches the orientation of the room: if the main windows face south, you’ll get bright, warm light for most of the day, while north-facing rooms have cooler, softer light. Most 3D software lets you set the time of day and time of year to show clients how light will hit the space at different times, which is especially useful for spaces like home offices or dining rooms where lighting at specific times matters.
Next, add artificial lighting: overhead fixtures, table lamps, accent lighting, and under-cabinet lighting in kitchens. Match the brightness and color temperature of each light to the actual bulb you’ll be using—warm 2700K bulbs for living spaces, cooler 4000K for work areas, for example. Adding shadows correctly will make your model feel far more realistic; soft shadows from natural light and sharp, small shadows from small artificial fixtures will help ground the objects in the space.
Once your model is built, take a step back and check all dimensions again. Confirm that door swings don’t block furniture, that there’s enough clearance between sofa and coffee table (usually 18 inches is ideal), that walkways are at least 36 inches wide for accessibility, and that all fixtures align correctly. Catching a scaling error here is much easier than fixing it after you’ve spent hours rendering final images.
Refining and Rendering Your 3D Model for Clients
Building the model is only half the job—refining it and creating a render that clearly communicates your vision to the client is what will help you get approval and close projects. A well-rendered 3D model can help a client understand why your design works, and avoid the miscommunication that leads to change orders down the line.
Optimizing your model for performance
Before you render, optimize your file to keep it from slowing down your software or crashing mid-render. Remove any hidden geometry that you don’t need—extra lines, duplicate objects, or parts of the building outside the room you’re designing that don’t appear in your final renders. Simplify complex models where possible; for example, a carved picture frame doesn’t need every tiny carved detail to look good in a final render, and simplifying it will speed up render time dramatically. If you’re working with a large project with multiple rooms, you can separate each room into its own layer or file so you only work on one at a time.
Choosing the right render settings
Renders can range from simple conceptual sketch-style outputs to hyper-realistic images that are almost indistinguishable from a photo of the finished space. The right style for your project depends on what stage you’re at and what you’re trying to communicate. For initial layout concepts, a simpler sketch render or even a real-time screenshot can be enough to show the client the overall flow of the space, and it’s much faster to produce.
For final client approval, you’ll want a photorealistic render that shows all finishes, lighting, and details. Most modern rendering tools use path tracing, a rendering technique that simulates how light bounces off surfaces in real life, producing incredibly realistic results. The tradeoff is that it can take anywhere from a few minutes to a few hours to render a high-resolution image, depending on the complexity of your model and the power of your computer.
When setting up your render, include a mix of camera angles to show the space from multiple perspectives:
- A wide eye-level shot from the entrance of the room, to give clients an overall sense of the space
- Close-up shots of key focal points, like a kitchen island, fireplace, or custom built-in
- A top-down 3D perspective shot, to show how the layout flows and how furniture is arranged
- Shots from multiple viewpoints, to show how natural light changes throughout the space if that’s a key selling point
Adding extra value with interactive features
Static renders are great, but many modern designers are offering interactive 3D models to clients to give them a more immersive experience. Tools like SketchUp Viewer, Enscape, and Matterport let you export your model as a web-based interactive walkthrough that the client can explore on their own time, zooming in on details and moving through the space just like they would in person. You can also add clickable hotspots that link to product pages for furniture and finishes, so the client can see exactly what each item is and purchase it directly.
AR (augmented reality) is another popular feature that lets clients view your 3D model in their actual physical space using their smartphone. They can walk around the virtual sofa, see how it fits next to their existing wall, and check the scale relative to their own body. This is a particularly powerful tool for e-commerce interior design and furniture retailers, as it cuts down on return rates by helping customers visualize products before they buy.
Common Mistakes to Avoid
Even experienced designers make common 3D modeling mistakes that can undermine the accuracy and impact of their work. Being aware of these pitfalls will help you avoid them and create more professional, useful models.
One of the most common mistakes is incorrect scale. It’s easy to import a sofa model that’s 10% too big or too small, and this can completely change how the room feels. A sofa that looks proportional in your 3D model but is actually too small for the space will leave the client disappointed when the real furniture arrives. Always double-check the dimensions of every object against the manufacturer’s specifications before you add it to your model.
Another common mistake is over-modeling too early in the process. New designers often spend hours adding tiny details like throw pillows, decor, and intricate trim work before the client has even approved the basic layout. If the client decides to change the entire layout after you’ve finished detailing, all that work is wasted. Follow the principle of progress from general to specific: get approval on the overall layout and fixed elements first, then add details and finishes once the big picture is confirmed.
Unrealistic lighting and textures are another frequent issue. Many new designers use overly bright, flat lighting that doesn’t match how the space will actually look, or use generic textures that don’t match the actual materials. For example, a generic marble texture that repeats every 12 inches will look fake, because real marble slabs have large, unique veining patterns. Always source accurate textures from manufacturer websites when possible, and test your lighting to make sure it matches the actual conditions of the space.
Ignoring the rules of interior design in favor of a pretty render is another mistake. It’s easy to arrange furniture in 3D that looks good on screen but doesn’t work in real life—for example, a dining table that leaves only 12 inches of clearance for chairs instead of the 36 inches needed to walk around them. Always confirm that your 3D layout follows standard interior design clearance guidelines and accessibility rules, because the model will be used as a reference for construction.
Finally, not saving versions of your model is a critical mistake. If you make a big change that you end up not liking, or your file becomes corrupted, having multiple saved versions of your model at different stages of the process will save you from having to start over from scratch. Most design software has an auto-save feature, but it’s still a good habit to save a new version of the file every time you make a major change, and back up your files to the cloud regularly.
Conclusion
Creating 3D models for interior design is a skill that gets easier with practice, and it doesn’t require a huge investment of time or money to get started. By starting with accurate measurements, choosing the right software for your workflow, building your model from the big picture down to small details, and refining your render to communicate your vision clearly, you can create 3D models that impress clients, cut down on costly mistakes, and speed up your design process. Whether you’re creating a simple conceptual layout for a small living room or a hyper-realistic render for a luxury custom home, 3D modeling helps you turn your vision into something clients can see, understand, and get excited about before any work begins.