
When you’re creating 3D models, designing game assets, editing photos, or preparing textures for 3D printing, one decision can make or break the final result: choosing the right texture resolution. Get it wrong, and you might end up with blurry, pixelated details that ruin a professional design, or massive file sizes that slow down render times, crash game engines, and bloat project storage. Get it right, and you balance visual clarity, performance, and file size perfectly for your use case. But with common resolutions ranging from 512x512 pixels all the way up to 8K and beyond, how do you know which one to pick? This guide breaks down everything you need to know to make an informed choice every time, regardless of whether you’re an indie game developer, graphic designer, or 3D artist.
What Is Texture Resolution, And Why Does It Matter?
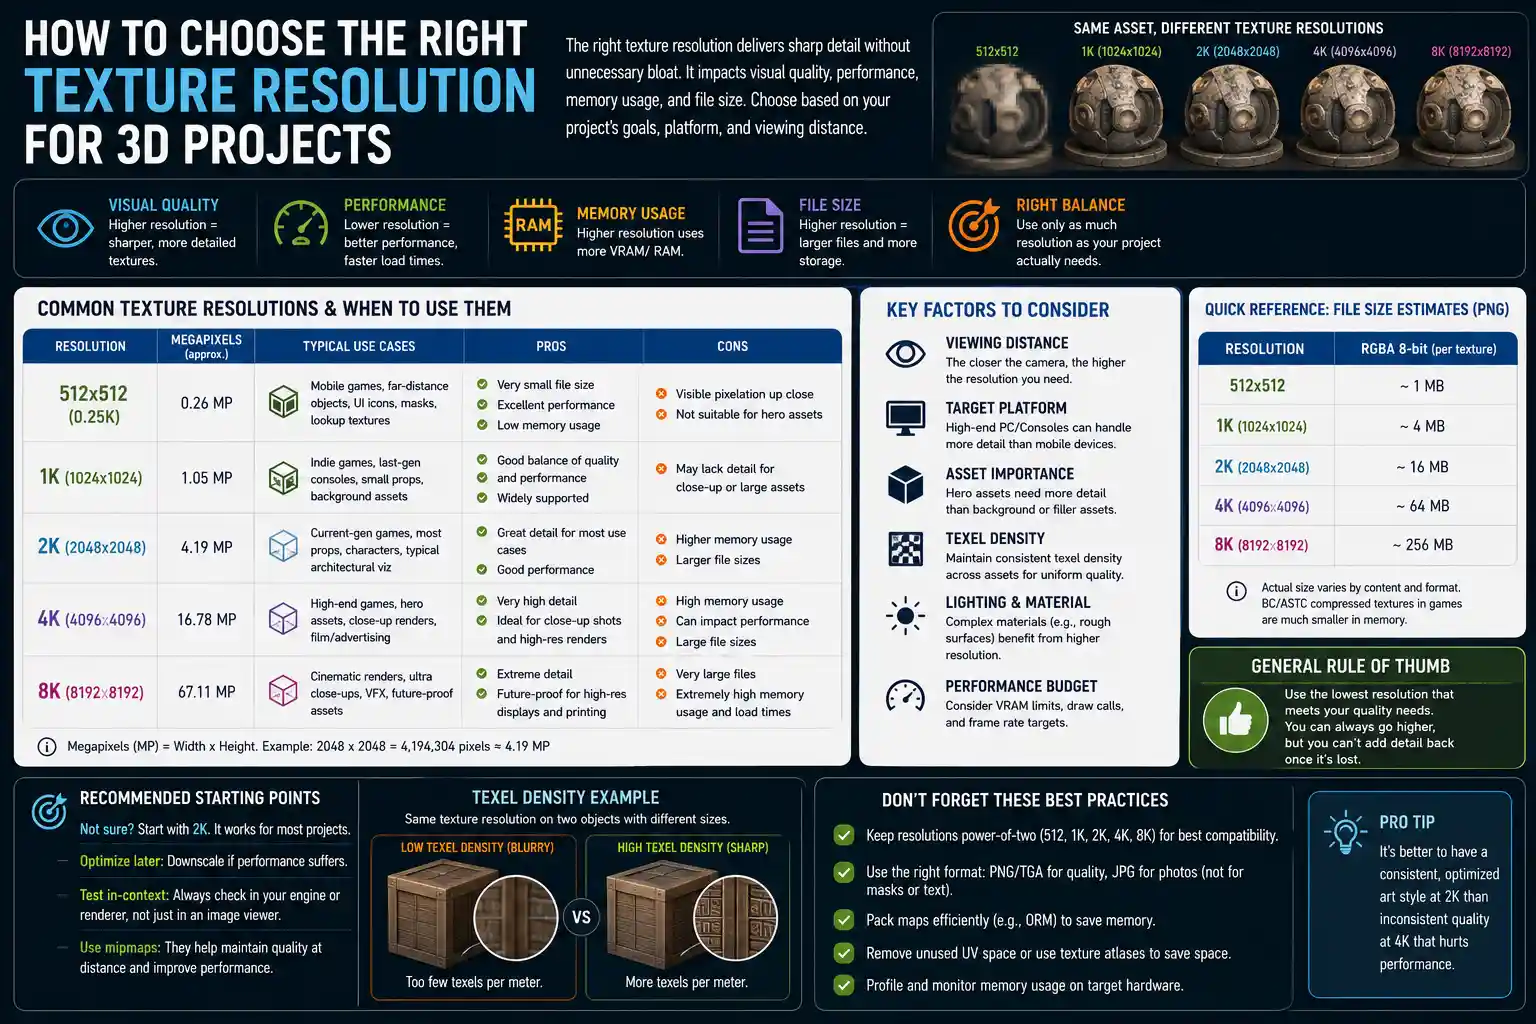
Before diving into how to choose, it’s important to clarify what texture resolution actually means. Put simply, texture resolution is the number of pixels that make up a 2D texture map applied to a 3D model or used in a 2D design. It’s almost always expressed as width × height in pixels, and for most use cases, textures are square with power-of-two dimensions: 128x128, 256x256, 512x512, 1024x1024 (often called 1K), 2048x2048 (2K), 4096x4096 (4K), and 8192x8192 (8K). Non-power-of-two textures are supported in some modern tools, but power-of-two remains the standard for compatibility with older game engines and graphics hardware.
Texture resolution directly impacts two critical outcomes: visual quality and performance. Higher resolution textures hold more detail, so fine features like wood grain, stitching on leather, or small text on a surface stay sharp even when viewed up close. But that extra detail comes at a cost: higher resolution textures take up more storage space, require more memory (VRAM) on graphics cards to display, and increase processing times for rendering, loading, and editing. Lower resolution textures are lightweight and fast, but they can look blurry or pixelated when scaled up or viewed up close.
How resolution relates to texel density
To understand why resolution matters for specific projects, you need to grasp the concept of texel density. A texel is a single pixel in a texture map, and texel density measures how many texture pixels fit into a given unit of 3D space (usually pixels per meter or pixels per centimeter). For example, if you have a 1K (1024x1024) texture mapped to a 1-meter-wide wall, you have 1024 texels per meter. If the same texture is mapped to a 4-meter-wide wall, your texel density drops to 256 texels per meter, and the texture will look much blurry.
Texel density is the reason two projects using the same resolution texture can look drastically different: the same 2K texture works perfectly for a 1-meter character model in a game, but will look terrible on a 10-meter-wide outdoor billboard. When choosing resolution, you’re not just picking a number—you’re matching your texture size to the required texel density for how the texture will be used.
Key Factors To Consider When Choosing Texture Resolution
There is no one-size-fits-all “best” texture resolution. The right choice depends on four core factors that vary from project to project. Assessing each of these before you start texturing will save you hours of rework later.
1. The end use and viewing distance
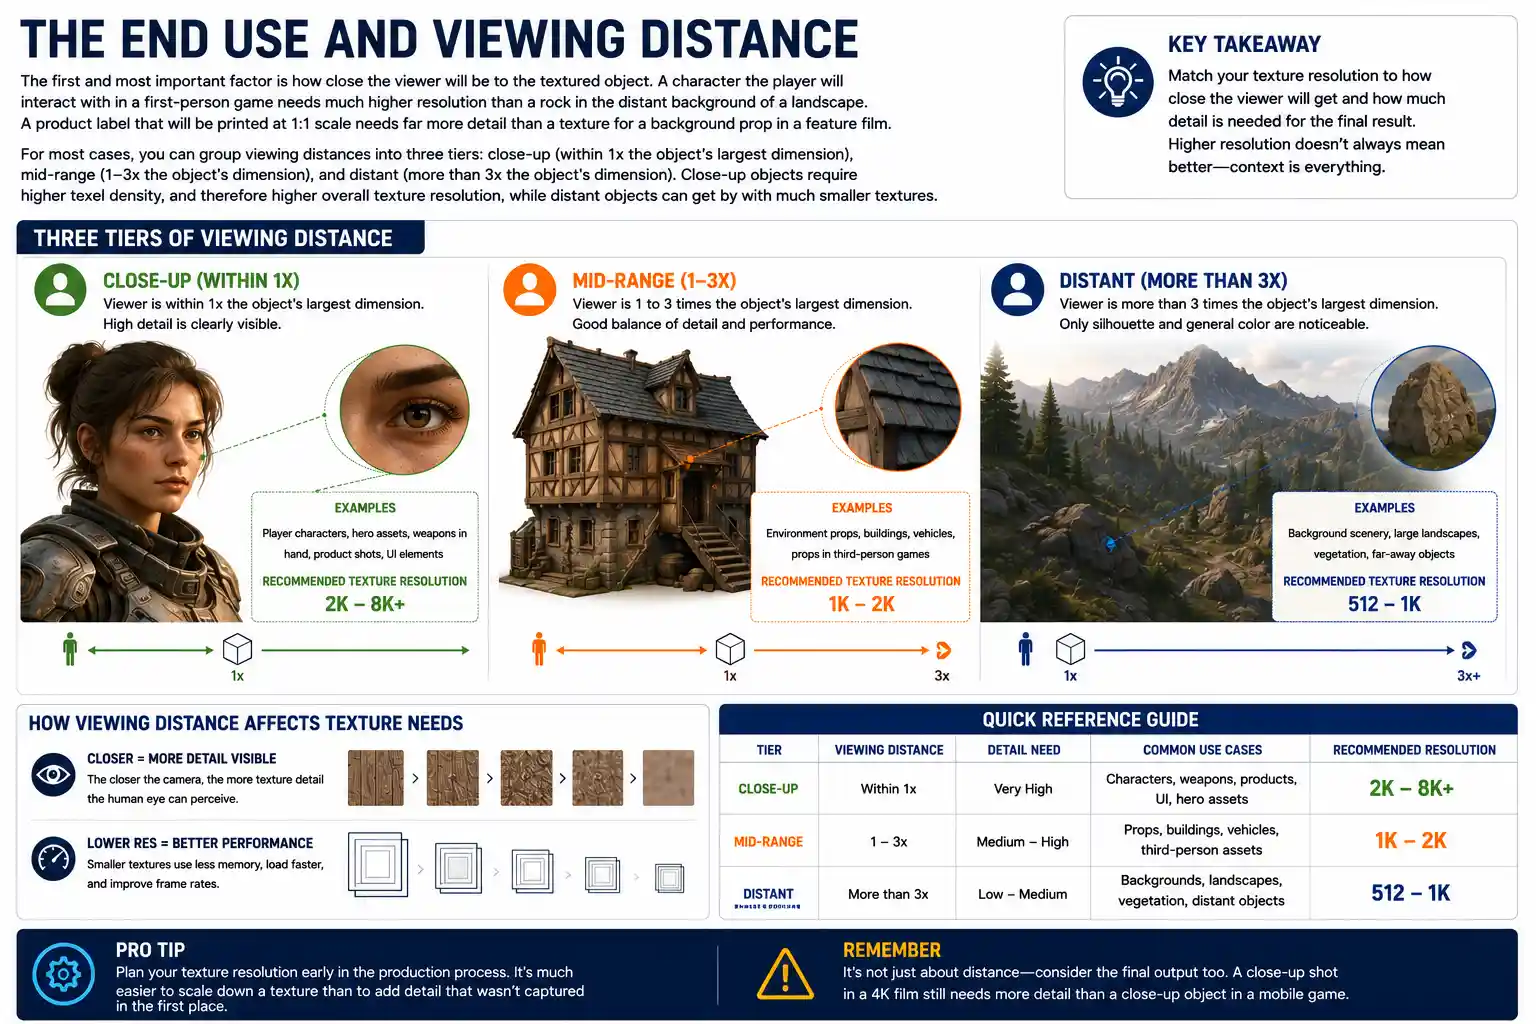
The first and most important factor is how close the viewer will be to the textured object. A character the player will interact with in a first-person game needs much higher resolution than a rock in the distant background of a landscape. A product label that will be printed at 1:1 scale needs far more detail than a texture for a background prop in a feature film.
For most cases, you can group viewing distances into three tiers: close-up (within 1x the object’s largest dimension), mid-range (1–3x the object’s dimension), and distant (more than 3x the object’s dimension). Close-up objects require higher texel density, and therefore higher overall texture resolution, while distant objects can get by with much smaller textures.
2. Hardware and platform constraints
Where your final project will run or be displayed determines the maximum resolution you can use. A mobile game for low-end smartphones has much stricter VRAM limits than a desktop AAA game running on a high-end graphics card. A 3D render for a print brochure has different resolution requirements than a real-time interactive architectural visualization.
For example, most mid-range gaming GPUs sold today have between 8GB and 12GB of VRAM. A single 8K uncompressed texture takes up over 256MB of VRAM just for the base color map; if you add normal maps, roughness maps, metallic maps, and other PBR texture sets, that jumps to over 1GB for a single object. That’s not feasible for mobile or even most mid-range PCs, so you have to scale resolution back to fit the target hardware.
3. File size and performance budget
Even if your target hardware can handle high-resolution textures, large file sizes create other problems. For web-based projects like interactive 3D product configurators, large textures increase load times, leading to higher bounce rates for users with slow internet connections. For game developers, larger texture sizes increase the overall game download size, which can turn off potential players with limited data plans or storage space on their consoles.
Most professional studios work with a performance budget that allocates a specific amount of VRAM and storage to textures, and you have to choose your resolutions to stay within that budget. For example, an indie game targeting the Nintendo Switch might have a total VRAM budget of 4GB for all textures, so high-resolution 4K textures can only be used for key assets, with smaller resolutions for everything else.
4. Level of required detail
Some textures naturally need more resolution than others. A concrete wall with subtle cracks and aggregate needs more detail than a flat, solid-colored wall. A character’s face, with fine pores and stubble, needs much higher resolution than a character’s shirt. If your texture doesn’t have fine details, there’s no benefit to using a higher resolution—you’re just wasting space.
Standard Resolution Recommendations By Use Case
To make your decision easier, we’ve compiled standard resolution guidelines for the most common use cases, based on industry best practices. These are starting points, and you should adjust them based on the factors we covered earlier, but they’ll work for 90% of common projects.
- Video game development
Games rely on balancing visual quality and performance, so resolutions vary by asset type:
- Small props, background objects, and distant foliage: 256x256 to 512x512
- Mid-sized environment assets (crates, doors, small furniture): 1K to 2K
- Player characters, first-person weapons, key interactive assets: 2K to 4K
- AAA main characters, hero assets for next-generation consoles/PC: 4K to 8K
- Mobile games: Reduce all resolutions by half (e.g., 512x512 for key characters, 256x256 for props) to fit mobile VRAM constraints
- Architectural visualization and real-time design
Architectural projects often involve large surfaces like walls and floors, so texel density is more important than absolute resolution. A common standard is 1024 to 2048 texels per meter for close-up views of interiors, which translates to:
- Small fixtures (door handles, light switches): 1K to 2K
- Walls, floors, and large furniture: 2K to 4K for a 3–4 meter wide surface
- Hero assets for interactive client walkthroughs: 4K
- Exterior background buildings: 512x512 to 1K
- Print and physical production (including 3D printing with color textures)
For print, resolution is measured in DPI (dots per inch) rather than pixel dimensions, but your source texture needs enough pixels to hit the target DPI. For most professional print, you need 300 DPI at the final printed size. To calculate your required resolution: multiply the final width in inches by 300, and multiply the final height in inches by 300. For example, a 10x10 inch printed texture needs a 3000x3000 pixel source file, which rounds up to a 4K (4096x4096) texture for some extra headroom. 3D colored prints follow the same rule, based on the final size of the printed object.
- Off-line 3D rendering for film and advertising
Off-line renders don’t have real-time performance constraints, so you can use higher resolutions to avoid any blurriness in the final output. Most feature film assets use 4K to 8K textures for close-up shots, while background assets use 1K to 2K. If your final render is 4K resolution, a 4K texture on a foreground object will match the output resolution perfectly, with no blurriness.
- 2D graphic design and digital art
For 2D work, the required resolution depends on the final display resolution. If you’re creating a texture for a website banner that will be displayed at 1920x1080, your source texture should match that size for 1:1 display. For digital art that will be viewed on 4K monitors, a 4096x4096 texture is sufficient for most cases.
“The biggest mistake new 3D artists make is using 8K textures for every asset just because their hard drive can hold them. 90% of the time, that extra detail is never seen by the user, but it adds minutes to load times, increases project sizes by gigabytes, and makes your work unplayable on all but the most high-end hardware. Resolution should always serve the user experience, not just your desire to show off every tiny pore on a character’s face.”
It’s important to remember that mipmapping can reduce the need for extremely high resolution textures for distant objects. Mipmapping is a technique where game engines and graphics cards automatically generate lower-resolution versions of a texture for objects that are farther away. This saves VRAM and improves performance without any visible loss in quality, so you only need to set the base resolution for the closest viewing distance the object will ever be seen at.
Common Mistakes To Avoid
Even experienced artists sometimes make mistakes when choosing texture resolution that hurt their final project. Here are the most common pitfalls and how to avoid them.
Overloading projects with unnecessarily high resolution
As the quote above mentions, this is the most common mistake, especially for new artists who have access to high-resolution texture packs online. It’s easy to think “more is better” and drop an 8K texture into a project where a 1K texture would look identical to the end user. The result is a project that loads slowly, crashes on lower-end hardware, and takes up far more storage than it needs to.
A good rule of thumb to test this: if you downscale your texture by 50% and can’t tell the difference in the final output at the intended viewing distance, use the smaller version. There’s no benefit to carrying around extra pixels no one will ever see.
Using too low resolution for close-up assets
The opposite mistake is underestimating the resolution you need for assets that will be viewed up close. A common example is putting a 1K texture on a first-person weapon that fills a large portion of the player’s screen. Even 1K can look blurry in that scenario, and you’ll need at least 2K, often 4K, to keep the edges sharp. For product visualization, where the user can zoom in to inspect details, low resolution will make the entire product look cheap and unprofessional.
Ignoring UV unwrapping and texel density consistency
Many new artists pick a resolution based on the asset size, then unwrap their UVs unevenly, leading to inconsistent texel density across the model. For example, if you make a character’s head take up 10% of the UV map and the character’s arms take up 50%, the head will have much lower texel density and look blurry, even if you used a 4K texture. The problem isn’t the resolution—it’s how you arranged the UVs.
To fix this, always unwrap your UVs so that parts of the model that need equal detail have equal texel density. Most 3D tools have built-in texel density checkers that will show you exactly how many pixels per meter you’re getting for each part of your model, so you can adjust your UVs and resolution before you start texturing.
Forgetting about multiple texture maps
When people calculate how much VRAM a texture set will use, they often only count the base color (albedo) map. But most modern PBR workflows require at least four or five separate maps for each asset: base color, normal, roughness, metallic, and ambient occlusion. Each of these maps takes up just as much VRAM space as the base color map. A 4K base color map plus four other 4K maps adds up to five times the memory usage of just one 4K map. That’s why even high-end games usually compress texture maps and reserve 8K resolutions only for the most important hero assets.
Not using texture compression
Texture compression lets you reduce the file size and VRAM usage of a texture with minimal visible quality loss, and it’s supported by every modern game engine and graphics card. Many artists skip compression and use uncompressed textures, which wastes huge amounts of memory for almost no gain in quality. Modern texture compression algorithms like BC7 for opaque textures and BC3 for transparent textures deliver nearly identical visual quality to uncompressed textures at a quarter of the file size. Always use compression unless you have a specific reason not to.
Practical Tips For Optimizing Your Texture Resolution Workflow
Once you’ve chosen a base resolution, there are a few workflow tricks you can use to get the best of both worlds: great visual quality and good performance.
- Use tiled textures for large surfaces: Instead of using one massive 8K texture for a 10-meter wall, use a 1K or 2K tileable texture repeated across the surface. This gives you much higher texel density at a fraction of the file size. For variation, you can add a second detail layer with a small normal map to break up repetition.
- Use procedural textures to add detail without increasing resolution: Procedural textures generated in real-time by the GPU can add fine detail like noise, scratches, or grain without requiring any additional texture resolution or memory. This is especially useful for large surfaces where adding detail with a bitmap texture would require a huge resolution.
- Use level-of-detail (LOD) for 3D assets: LOD systems automatically swap out high-resolution textures for lower-resolution versions when an object is far away from the camera. Combined with mipmapping, this lets you keep high detail for close-ups while saving VRAM for distant objects.
- Test on your target hardware before finalizing: Always load your project with your chosen textures on the lowest-end hardware your project targets to see if it runs smoothly. If you’re building a mobile game, test it on a mid-range phone to see how long it takes to load and if it framerate drops when multiple high-resolution assets are on screen. It’s much easier to adjust resolutions early than to rework dozens of assets after you’ve finished the entire project.
- Use texture atlases for small assets: A texture atlas packs multiple small textures into one larger texture, which improves rendering performance and reduces memory overhead. For example, instead of 100 separate 512x512 textures for 100 small props, you can pack all 100 into a single 4K texture atlas, which is more efficient for the GPU to render.
Another useful tip is to work at a higher resolution during the texturing process, then downscale when you export. This gives you more flexibility if you later need to use the asset in a project that requires higher resolution. For example, if you know you need a 2K texture for a current project, you can texture at 4K, save the source file, and export a 2K version for the current project. If you need to reuse the asset in a higher-end project later, you already have the 4K source ready to go.
Conclusion
Choosing the right texture resolution doesn’t have to be complicated. It all comes down to balancing the needs of your project: matching the detail your audience will see with the performance and storage constraints of your target platform. Start by identifying your intended viewing distance and the hardware your audience will use, then use the standard recommendations as a starting point, adjust for your specific asset’s detail requirements, and test to make sure your choice works in practice.
Remember that the goal isn’t to use the highest possible resolution—it’s to use the minimum resolution that still delivers the visual quality you need. That approach keeps your projects fast, accessible to the widest possible audience, and free of the performance issues that come from unnecessary bloat. By keeping texel density, project constraints, and common optimization tricks in mind, you’ll be able to choose the perfect resolution for any texture, every time.