
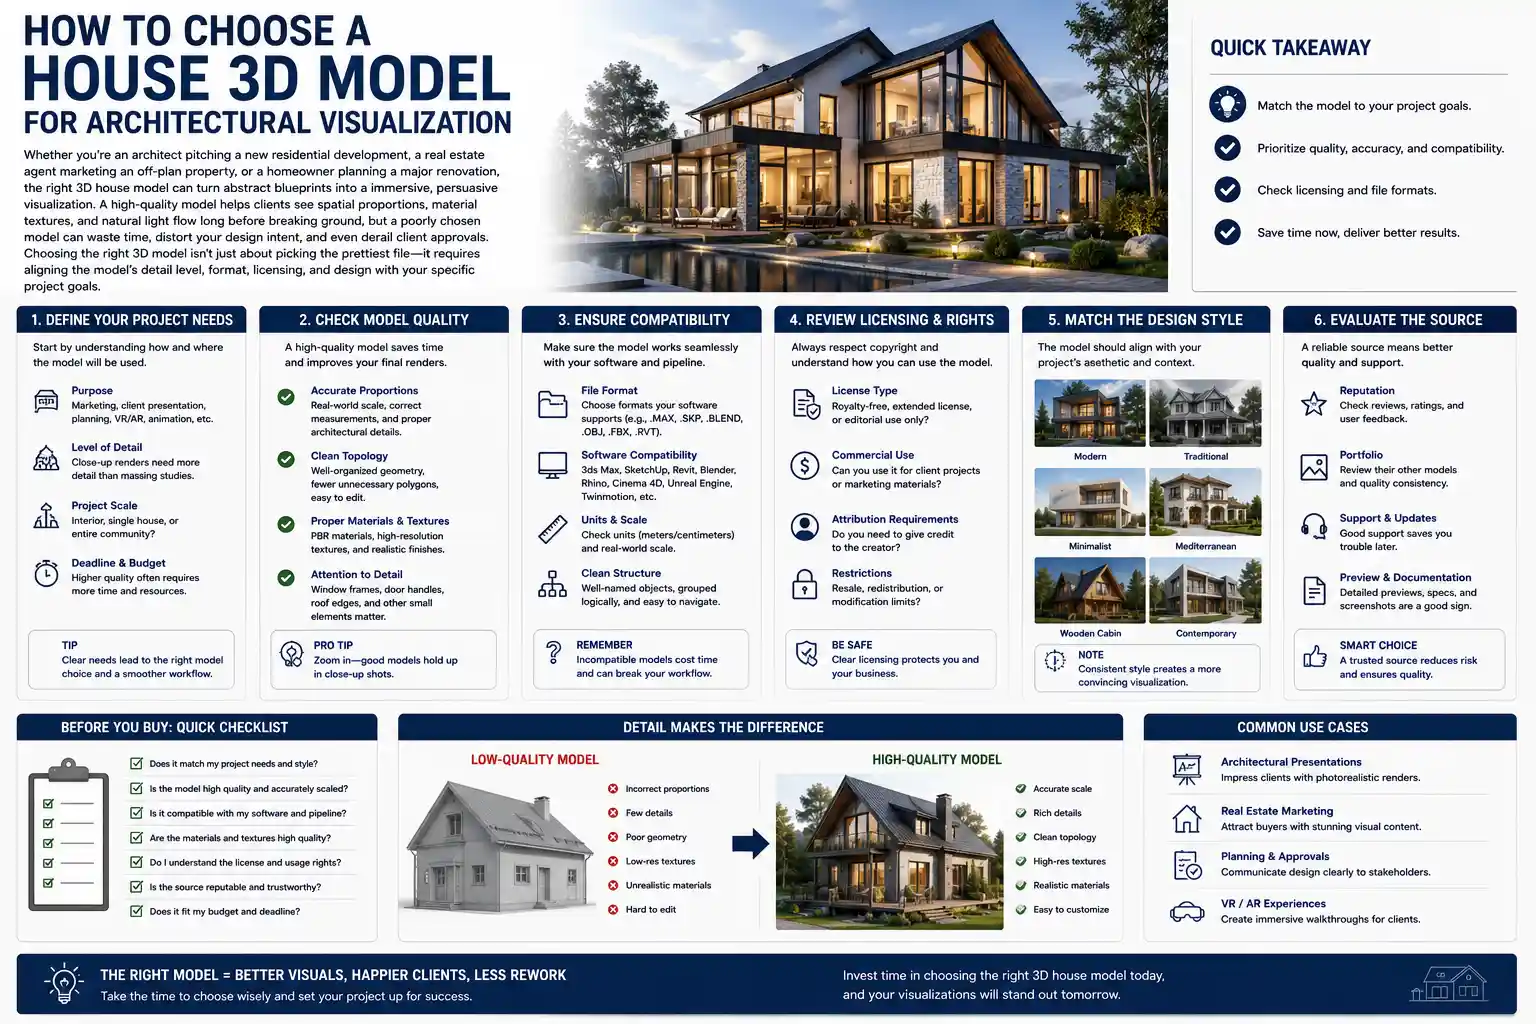
Whether you’re an architect pitching a new residential development, a real estate agent marketing an off-plan property, or a homeowner planning a major renovation, the right 3D house model can turn abstract blueprints into a immersive, persuasive visualization. A high-quality model helps clients see spatial proportions, material textures, and natural light flow long before breaking ground, but a poorly chosen model can waste time, distort your design intent, and even derail client approvals. Choosing the right 3D model isn’t just about picking the prettiest file—it requires aligning the model’s detail level, format, licensing, and design with your specific project goals.
Clarify Your Project Requirements First
Before you start browsing marketplaces or downloading free 3D models, take time to define exactly what you need the model for. A 3D model intended for a quick social media reel has wildly different requirements than one used for a 4K architectural marketing brochure or a VR walkthrough for a multi-million dollar custom home. Skipping this step often leads to wasting hours editing a model that doesn’t fit your use case, or overpaying for detail you’ll never use.
Define the Use Case and Output Medium
The output your visualization will be viewed on directly dictates the level of detail and file size you need. For example, if you’re creating a 10-second TikTok clip to showcase a new subdivision, a low-poly model with basic materials will load faster and render in half the time of a hyper-detailed model with 10 million polygons. On the other end of the spectrum, if you’re creating a large-format print for a luxury development sales center, you need a high-poly model with physically accurate texture maps to hold up when printed at 300 DPI.
Common use cases and their core requirements include:
- Concept sketching/early design reviews: Basic massing models with clean, editable geometry to iterate on room layouts and facade designs quickly
- Social media marketing: Optimized, medium-poly models with pre-applied materials that render quickly for short-form video
- Client approvals: Fully detailed models with accurate material textures, furniture, and landscape context to help clients visualize the finished home
- VR/AR interactive walkthroughs: Topologically optimized models with compressed textures to run smoothly in real-time without lag
- Large-format print marketing: High-poly models with 4K+ resolution textures to avoid pixelation at large print sizes
Measure Your Required Level of Detail (LOD)
Level of Detail, or LOD, is one of the most overlooked factors when choosing a 3D house model. Many new architectural visualization artists automatically gravitate toward the highest-poly model available, but that extra detail comes at a cost: longer render times, larger file sizes, and more strain on your computer’s processing power. For example, a massing model for urban planning only needs to show the overall shape and height of the house—detailed window trim or doorknob geometry will never be seen at that scale, so it’s just unnecessary clutter.
If you’re working on a custom home design where the client will zoom in to examine facade materials and kitchen fixtures, you’ll need a high LOD model with individual components that you can edit. Many 3D marketplaces label models by LOD, so you can filter your search to match your needs from the start.
Confirm Budget Parameters
3D house models range from completely free to several hundred dollars for fully customized, high-resolution models. Free models can be a great fit for early-stage concept work or personal projects, but they often come with restrictive licensing, missing texture files, or messy geometry that requires hours of cleanup. Commercial models from reputable marketplaces typically cost between $20 and $150 for a single-family home model, with premium custom models costing more. When setting your budget, factor in the time you’ll spend fixing a low-quality free model—for commercial projects, that time often costs more than just purchasing a clean, ready-to-use model upfront.
Evaluate Model Compatibility and File Format
Even the most beautiful 3D house model is useless if it won’t work with the software you use for architectural visualization. Different 3D tools use native file formats that don’t always play nicely with each other, so compatibility should be one of your first checks after narrowing down your options.
Match the Model Format to Your Workflow
Most 3D modeling and rendering software supports multiple common file formats, but some formats preserve more editable information than others. For example, if you work primarily with SketchUp, a native .skp file will keep all layers and components intact, so you can easily edit wall heights or swap out windows without rebuilding the model from scratch. If you work with 3ds Max or Blender, you’ll want to look for formats like .fbx or .obj that preserve UV mapping and texture assignments. If you’re using Revit for BIM (Building Information Modeling), you’ll need a model that supports the .rvt format to retain structural and construction data, not just visual geometry.
“A 3D model isn’t just a picture—it’s a working file. If you can’t edit walls, move doors, or change materials to match your design, that model is more of a liability than an asset.”
— Alex Chen, Lead Architectural Visualization Artist at Visual ArchStudio
Check for Clean, Non-Destructive Geometry
Compatibility isn’t just about file extension—you also need to make sure the model’s geometry is clean. Bad geometry (things like overlapping faces, inverted normals, disconnected edges, and unnecessary hidden polygons) causes rendering glitches, long render times, and crashes that can derail your workflow. When evaluating a pre-made model, most reputable marketplaces include wireframe previews that let you see how the model is constructed.
Key things to look for in a clean 3D house model:
- All external and internal walls are solid objects with no missing faces or overlapping geometry
- Components like windows, doors, and fixtures are grouped or layered so you can hide or edit them easily
- Unnecessary polygon detailing that doesn’t contribute to the final render is removed (this is called “retopologizing”)
- UV mapping is properly unwrapped so textures display correctly without stretching or warping
- No hidden orphaned geometry (leftover vertices or faces from previous edits) that bloats the file size
Verify BIM Compatibility If Needed
If you’re working on a commercial or construction project that requires Building Information Modeling, not all 3D house models will work for your needs. Traditional visualization models only include visual geometry, but BIM models include actionable data like material specifications, structural load information, and MEP (mechanical, electrical, plumbing) layouts. If you need the model for more than just visualization—for example, coordinating with contractors or generating construction documents—make sure you choose a BIM-compliant model that works with your BIM software of choice, whether that’s Revit, ArchiCAD, or Vectorworks.
Assess Design Accuracy and Flexibility
Most pre-made 3D house models are based on existing architectural designs, so you’ll almost certainly need to make edits to match your project’s specific layout, size, and style. Choosing a model that’s built to be edited will save you hours of work down the line.
Match Architectural Style to Your Project
Start by narrowing your search to models that match the core architectural style of your project. A modern minimalist open-concept home will have very different layout and facade details than a traditional craftsman bungalow or a Mediterranean villa. Starting with a model that already matches your base style means you’ll only need to tweak details rather than reworking the entire facade and floor plan.

It’s also important to check that the design follows standard spatial proportions. A common issue with low-quality pre-made models is unrealistic room sizes—for example, a 12-square-foot kitchen that can’t fit standard appliances, or 10-foot ceilings in a small cottage. If the base proportions are wrong, you’ll spend far more time adjusting the model than if you’d started with one built to standard architectural dimensions. Most reputable model creators include floor plan previews with dimensions, so you can check proportions before downloading.
Check for Editable Components and Layers
A good 3D house model is organized into editable groups and layers so you can modify individual elements without disrupting the entire model. For example, if you want to swap out a set of double windows for a picture window, you should be able to select just the window component and delete or replace it without having to rebuild the entire wall. For interior visualizations, furniture and fixtures should also be separate components so you can rearrange them to match your design brief.
If you’re working with a SketchUp model, this means components should be properly nested. For Revit, this means families should be editable rather than imported as static geometry. Always check the model description to confirm that the model is fully editable—some low-cost pre-made models are locked to prevent editing, which makes them useless for any project that requires customization.
Confirm Inclusion of Interior and Site Context
Depending on your use case, you may need more than just the exterior shell of the house. If you’re creating a full walkthrough or marketing a custom home, clients will expect to see interior layouts, finished rooms, and even surrounding landscape. Many budget 3D models only include the exterior massing, with empty, unfinished interiors that you’ll have to build from scratch. That’s fine for early-stage urban planning, but it adds significant work for client-facing visualizations.
Similarly, if your visualization includes the surrounding property, look for models that include basic site context—driveways, landscaping, patios, and fencing. Even if you plan to customize the landscape, starting with a base that matches the home’s scale will cut down on your workflow time.
Understand Licensing and Usage Rights
Licensing is one of the most overlooked aspects of choosing a 3D house model, but using a model without the right license can lead to copyright claims, legal fees, and lost revenue for commercial projects. Not all licenses are created equal, so it’s critical to read the fine print before you use a model in your visualization.
Differentiate Between Personal and Commercial Licensing
Most free 3D models are only available for personal, non-commercial use. That means you can use them for school projects or personal design practice, but you can’t use them in client work, marketing materials, or any project that generates revenue. If you’re working on a commercial project—even a small one for a local client—you need a model that comes with a commercial license.
Commercial licenses vary by creator and marketplace, but most standard commercial licenses let you modify the model and use it in marketing materials, client presentations, and public-facing content. Some licenses require you to credit the original creator, while others are royalty-free and don’t require attribution. Always check the license terms to confirm what you’re allowed to do—some high-end models have restrictions on redistributing the model itself (even modified versions), which is standard, but that doesn’t prevent you from using it in your visualizations.
Avoid Copyright Risks With Third-Party Content
Even if the model itself is licensed for commercial use, you need to check that any embedded textures or components are also legally cleared for commercial use. A low-quality free model might include texture maps for brick, wood, or marble that the creator pulled from a random website without permission. If you use that model in your visualization, you could be held liable for copyright infringement even if you didn’t know the textures were unlicensed.
Reputable marketplaces like TurboSquid, SketchFab, and the SketchUp Warehouse all require creators to confirm that all content included in a model is original or properly licensed, so you’re far less likely to run into copyright issues when purchasing from a trusted platform. If you do download a free model, always scan the description to confirm that all textures and components are cleared for commercial use.
Check for Exclusive vs. Non-Exclusive Licensing
For most architectural visualization projects, non-exclusive licensing is perfectly fine. This means the creator can sell or distribute the same model to other users, which keeps the cost low. If you’re working on a one-of-a-kind custom home development and you don’t want the same 3D model appearing in another project in the same region, you can purchase an exclusive license, which gives you sole rights to use the model. Exclusive licenses are significantly more expensive, but they’re worth it for high-stakes unique developments.
Source Your Model From Reputable Providers
The source of your 3D house model has a huge impact on its quality, compatibility, and licensing safety. There are dozens of places to find 3D house models, but they’re not all equal. Understanding the pros and cons of each source will help you choose the right one for your project.
Commercial Marketplaces
Commercial 3D marketplaces are the most popular option for ready-made 3D house models for architectural visualization. These platforms curate models from independent creators, vet them for quality, and offer clear commercial licensing. Popular options include SketchFab, TurboSquid, 3DExport, and the SketchUp Extension Warehouse.
The biggest advantage of commercial marketplaces is that you can filter searches by file format, LOD, style, and price, so you can quickly narrow down options that match your requirements. Most models also include multiple preview images and wireframe previews, so you can check quality before purchasing. Prices are generally reasonable, with most single-family home models falling between $30 and $100, and you get a clear license that protects you from copyright claims. The main downside is that you’ll still need to customize the model to match your exact design, but that’s true of almost any pre-made model.
Architectural Manufacturer Libraries
Many building product manufacturers offer free, high-quality 3D models of their products, including complete house components and even whole prefab home models. For example, prefab home manufacturers often provide full 3D models of their standard home plans that are already dimensioned correctly and include accurate material data for the products they use. This is an ideal option if you’re working on a prefab construction project, because the model is guaranteed to match the actual finished home.
Even if you’re not working with a prefab design, many manufacturers offer free 3D models of windows, doors, cabinets, and fixtures that you can add to your base house model, and these models are always accurate to the actual product dimensions and materials.
Custom Model Creation
If you can’t find a pre-made model that matches your exact design, or if you need a fully customized model for a high-end project, commissioning a custom 3D model from a freelance architectural 3D artist is the best option. Custom models are built to your exact blueprints, so they match your dimensions, layout, and material specifications perfectly. This is more expensive than purchasing a pre-made model—custom single-family home models typically cost between $500 and $2,000 depending on detail level—but it saves you the time of editing a pre-made model to fit your needs, and you get a guaranteed high-quality result that matches your design intent exactly.
Free Model Repositories
Free repositories like Google’s 3D Warehouse, BlendSwap, and SketchFab’s free section offer thousands of free 3D house models. These can be a great option for early-stage concept work, personal projects, or when you’re on a very tight budget. However, it’s important to proceed with caution: many free models have messy geometry, missing textures, restrictive non-commercial licenses, and even unlicensed third-party content. Always check the license, inspect the wireframe preview, and be prepared to spend time cleaning up the model before you can use it for a client project.
Conclusion
Choosing the right 3D house model for architectural visualization doesn’t have to be overwhelming when you break the process down into clear steps. Start by defining your use case, required detail level, and budget to narrow your search from the start. Verify that the model’s file format and geometry are compatible with your workflow, and confirm that it’s organized for easy editing to match your specific design. Always read the licensing terms carefully to avoid copyright issues, and source your model from a reputable provider that fits your project’s scope and budget. Whether you choose a low-cost pre-made model for a quick social media render or a fully custom model built to your blueprints, the right 3D model will help you create a compelling, accurate visualization that brings your design to life and wins client approvals.