
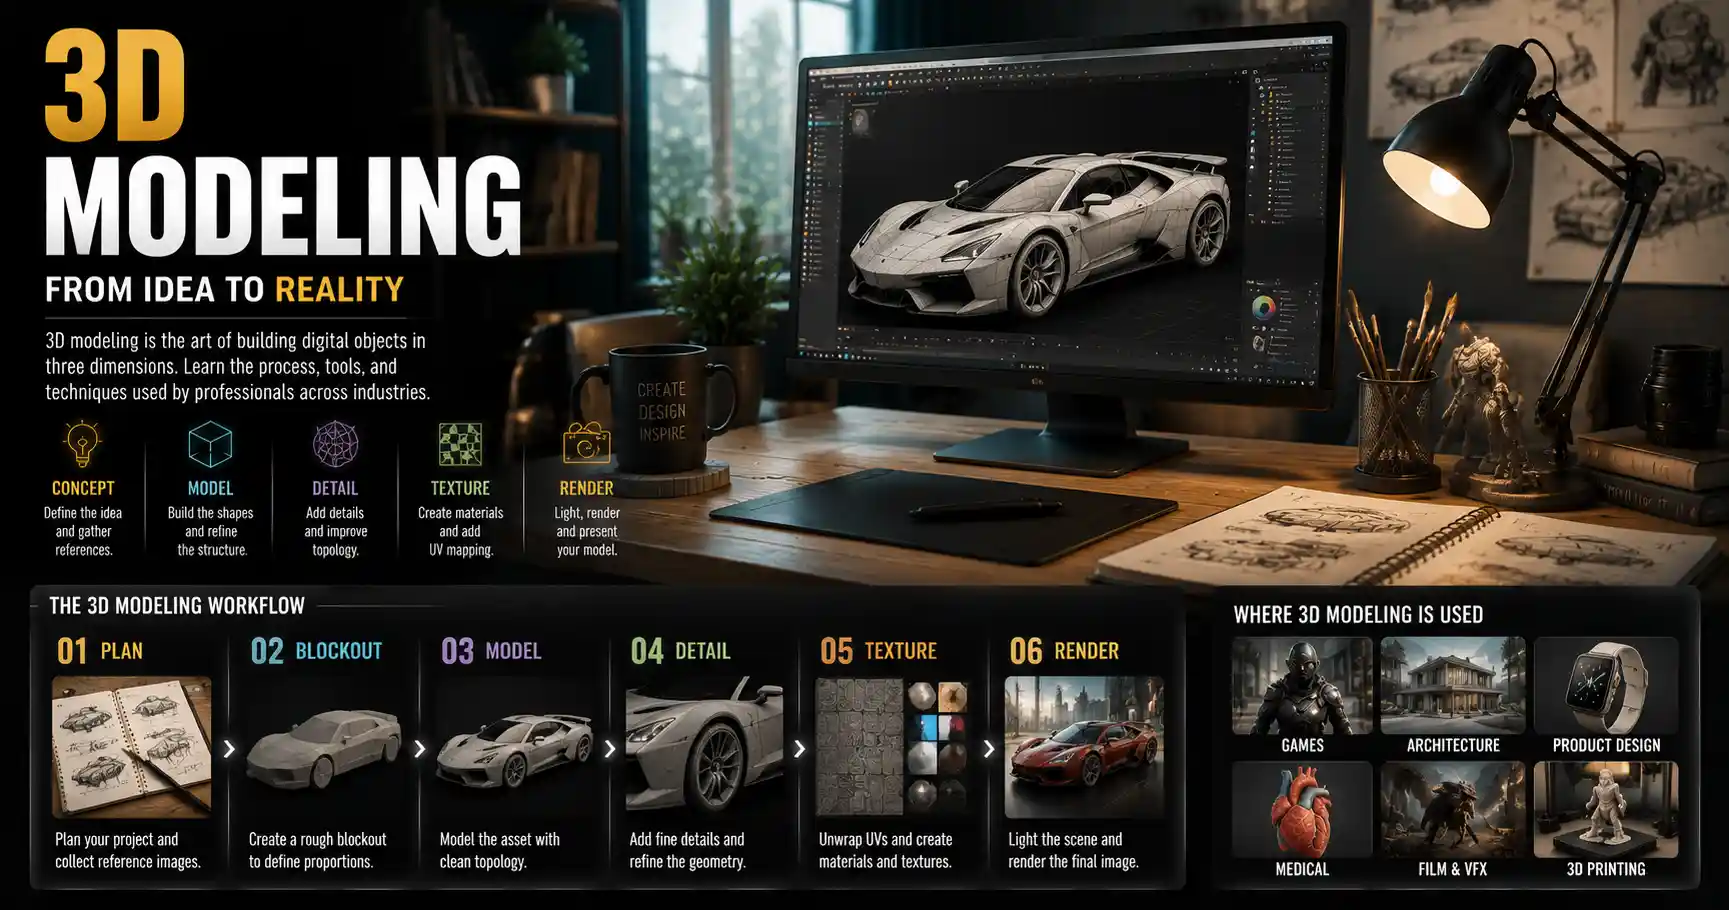
Next time you scroll through a video game cutscene, order a custom-printed phone case, or admire the latest Hollywood superhero film, you’re interacting with the results of 3D modeling. What began as a niche tool for industrial engineers and computer graphics researchers has become an invisible foundation of modern life, from architecture to medicine to entertainment. But how does 3D modeling actually work, and what do beginners need to know to get started? We’re breaking down this powerful technology in simple terms, no advanced math or computer science degree required.
What Is 3D Modeling, Exactly?
At its core, 3D modeling is the process of creating a mathematical representation of any three-dimensional object or surface using specialized software. Unlike 2D art, which only has height and width, a 3D model exists in three dimensions: it has height, width, and depth. You can rotate it, move it around, look at it from above or below, and even pull it apart to see how it works on the inside.
Think of it like sculpting with digital clay. A physical sculptor starts with a block of clay and adds or removes material to create a statue. A 3D artist does the exact same thing, but entirely on a computer. Every object you see in 3D animated films, every part designed for a new car, every prototype of a medical device starts as a 3D model on someone’s screen.
It’s important to distinguish 3D modeling from related 3D technologies that people often mix up:
- 3D modeling vs 3D rendering: Modeling is building the object. Rendering is adding lighting, textures, and shadows to turn the model into a finished image or video. A model is like a blank mannequin; rendering is like dressing it, putting it in a room, and taking a photo.
- 3D modeling vs 3D printing: 3D printing is a process that takes a digital 3D model and turns it into a physical object by printing layer upon layer of material. Without a 3D model, a 3D printer has nothing to make.
- 3D modeling vs computer-aided design (CAD): CAD is a specific type of 3D modeling used for engineering and manufacturing, with extra tools for measuring, testing fit, and adhering to industrial standards. All CAD is 3D modeling, but not all 3D modeling is CAD.
Today, 3D modeling is used across almost every industry. Architects use it to walk clients through building designs before construction starts. Video game developers build entire worlds and characters out of 3D models. Surgeons use custom 3D models of patients’ organs to plan complex operations. Product designers prototype new furniture, toys, and electronics without having to cut a single piece of physical material. Even archaeologists use 3D modeling to document fragile artifacts and share them with researchers around the world without risking damage to the original object.
The Core Types of 3D Modeling (And What They’re Used For)
Not all 3D modeling is the same. Different use cases require different approaches, and over the decades, several standard types of modeling have emerged to fit different needs. You don’t need to master all of them as a beginner, but understanding the differences will help you choose the right path when you start out.
Primitive Modeling
Primitive modeling is the most basic starting point for almost every 3D project. It builds objects by combining simple, predefined 3D shapes called primitives: cubes, spheres, cylinders, planes, and cones. If you’ve ever played with wooden blocks as a kid, you already understand the concept. You stack cubes to make a house, add a cylinder for a chimney, and round off a sphere to make a doorknob.
Primitive modeling is rarely the end result for complex projects, but it’s almost always the first step. Even the most detailed character model in a video game starts as a simple cube that artists then shape into the final form. For beginners, starting with primitive modeling is a great way to learn how 3D space works before moving on to more advanced techniques.
Polygon Modeling
Polygon modeling is the most common type of 3D modeling for entertainment and product design. All 3D objects on a computer screen are made of small flat shapes called polygons, usually triangles or quads (four-sided shapes). These polygons are connected at their edges and vertices (the corner points where edges meet) to form the surface of your 3D object.
The more polygons you use, the more detail you can add to your model. A high-poly model (one with millions of polygons) can have smooth curves, fine textures, and tiny details like wrinkles on skin or scratches on metal. A low-poly model (one with hundreds or thousands of polygons) is simpler and lighter, which makes it ideal for video games, where the computer has to render hundreds of objects in real time.
"The magic of 3D modeling is that thousands of tiny flat polygons can come together to look like a perfectly smooth, organic human being. It’s all an illusion, but it’s an illusion that works so well we forget we’re looking at nothing but a collection of triangles on a screen."
Polygon modeling gives artists a lot of control over detail and shape, which is why it’s the go-to for everything from game assets to animated movies. It’s also one of the most accessible types of modeling for new artists to learn, with thousands of free tutorials available for popular software.
NURBS and Spline Modeling
NURBS (which stands for Non-Uniform Rational B-Splines) and spline modeling are based on curves rather than polygons. Instead of building shape from hundreds of small flat polygons, you draw smooth curves that define the surface of your object, then the software stretches a smooth surface between those curves.
The big advantage of NURBS is that they’re infinitely smooth. No matter how much you zoom in on a NURBS surface, it stays perfectly smooth, unlike polygon models which start to look jagged when you zoom in close. This makes NURBS ideal for CAD and industrial design, where smooth, precise surfaces for car bodies, airplane parts, or medical devices are critical.
Scanned 3D Modeling (Photogrammetry)
Not all 3D models are built from scratch by hand. Photogrammetry is a process that creates 3D models by stitching together dozens or hundreds of 2D photos of an existing object. You take photos of an object from every possible angle, then special software analyzes the photos to map out the object’s 3D shape and automatically generate a model.
You can even use photogrammetry with a smartphone. A hobbyist can walk around a tree, take 100 photos with their iPhone, and generate a detailed 3D model of that tree in less than an hour. This makes it incredibly popular for archaeology, heritage preservation, and game design, where artists need realistic real-world objects quickly. Some 3D artists also use photogrammetry as a starting point, then clean up and refine the scanned model for their final project.
Organic vs Hard-Surface Modeling
Another common way to categorize 3D modeling is by the type of object you’re creating:
- Organic modeling: Used to create living or naturally shaped objects like people, animals, plants, and rocks. This type of modeling focuses on smooth, flowing curves and irregular shapes, and requires a good understanding of anatomy and natural form.
- Hard-surface modeling: Used to create man-made objects with hard edges and regular shapes like cars, furniture, buildings, and tools. This type of modeling focuses on precise measurements, clean edges, and consistent geometry.
Many 3D artists specialize in one or the other, but most learn the basics of both to be more versatile.
How 3D Modeling Works: A Step-by-Step Breakdown
Every 3D project follows a similar general workflow, regardless of the software or end use. If you’ve never built a 3D model before, understanding this workflow will help you see how all the pieces fit together. We’ll walk through the process of creating a simple 3D model of a chair to show how it works.
- Blockout the basic shape: You start by pulling primitive shapes to block out the overall proportions of your chair. You add four long cubes for the legs, a flat square for the seat, and a taller rectangle for the backrest. At this stage, you’re not worrying about details—you just want to get the size and overall shape right.
- Refine the geometry: Next, you refine each part of the chair. You round the edges of the legs to keep them from looking sharp, add a slight curve to the seat for comfort, and cut a hole in the backrest if it’s a modern design. For polygon modeling, you’ll add more polygons to areas that need more detail, and remove polygons from areas that don’t need them to keep the model light.
- Add texture mapping: A plain gray 3D model doesn’t look like much. Next, you add textures to give it color and detail. You might add a wood texture to the frame, a fabric texture to the seat cushion, and a small metal texture to the screws holding it together. Modern workflows also use special texture maps to add detail like roughness (how shiny or matte the surface is), normal maps (to add small bumps and scratches without adding extra geometry), and ambient occlusion (to add subtle shadows in crevices that make the model look more realistic).
- Add rigging (if needed): If your model needs to move—like a character in a game or an animated chair in an advertisement—you’ll add a rig next. A rig is a digital skeleton that you place inside the model. You connect the vertices of the model to the bones of the skeleton, so when you move a bone, the model bends with it. For our chair example, you’d only need rigging if it was going to move in an animation; a static model for a 3D print doesn’t need it.
- Test and export: Finally, you test your model to make sure it works for its intended purpose. If it’s for 3D printing, you check that all the surfaces are closed (no gaps that will confuse the printer) and that the measurements are correct. If it’s for a video game, you check that the polygon count is low enough to run smoothly. Once it’s ready, you export it in the correct file format: .OBJ and .STL are common for 3D printing, .FBX is common for games and animation, and .STEP is common for CAD.
That’s the basic process for any 3D model, from a simple chair to a full 3D environment for a blockbuster movie. More complex projects just repeat this process at a larger scale: you build individual models for each object, then assemble them into a full scene, add lighting, and render the final result.
Common Tools for Beginners (And What to Look For)
Thirty years ago, 3D modeling software cost thousands of dollars and only ran on expensive, specialized workstations. Today, there are options for every budget and skill level, even for complete beginners who just want to try it out for free.
Free Options for Beginners
If you’re just starting out and don’t want to invest money before you know you like it, there are several high-quality free options that can do almost everything professional software can do:
- Blender: Blender is the undisputed king of free 3D modeling software. It’s open source, which means it’s completely free to download and use for any purpose, even commercial projects. It has tools for modeling, animation, rendering, VFX, and even video editing. It’s used by independent game developers, freelance artists, and even some large studios. The only downside is that it has a steep learning curve, but there are thousands of free tutorials online to help you learn.
- SketchUp Free: SketchUp is designed to be intuitive for beginners, especially for architectural modeling and product design. It’s often used by woodworkers and DIYers who want to design projects before they start cutting wood. The free web version is perfect for beginners who want to start making simple models right away without downloading a large program.
- Tinkercad: Tinkercad is a browser-based 3D modeling tool from Autodesk designed specifically for beginners and kids. It’s extremely simple to use, with a drag-and-drop interface that’s perfect for learning the basics of 3D design. It’s especially popular for creating simple models for 3D printing.
Professional Paid Tools
Once you outgrow beginner tools or need specialized features for work, there are several industry-standard options:
- Autodesk AutoCAD and Fusion 360: Fusion 360 is the go-to for product design and CAD for hobbyists and small businesses, with a reasonable monthly subscription price. AutoCAD is the classic CAD tool used by architects and engineers for industrial design and construction.
- Maya and 3ds Max: Also from Autodesk, Maya and 3ds Max are the industry standards for 3D animation and modeling for film and games. Maya is more commonly used for character animation, while 3ds Max is popular for environment modeling and architectural visualization.
- ZBrush: ZBrush is the industry standard for digital sculpting. It’s designed to let artists sculpt incredibly detailed organic models, like character faces and creatures, with the same freedom as physical sculpting. Most high-end character models are sculpted in ZBrush before being retopologized (optimized) for games or animation.
What to Look For When Choosing Your First Tool
It’s easy to get overwhelmed by all the options when you’re starting out. Here’s what matters most for beginners:
- Start with a tool that matches your end goal. If you want to design models for 3D printing DIY projects, start with Tinkercad or Fusion 360. If you want to make game models or animated shorts, start with Blender. If you want to design house extensions, start with SketchUp.
- Prioritize availability of learning resources. Blender is popular for a reason: there are more free tutorials for Blender than any other tool, which means if you get stuck, you can almost always find a solution online.
- Don’t worry about mastering the "best" tool right away. The fundamentals of 3D modeling translate across every program. Once you understand how 3D space, vertices, and polygons work, you can switch to a different tool in a few weeks. It’s far more important to start practicing than it is to pick the perfect tool on your first try.
Top Tips for Beginner 3D Modelers
Learning 3D modeling can feel intimidating at first. It’s a new skill that requires thinking in three dimensions, which takes practice for most people. These practical tips will help you avoid common beginner mistakes and progress faster.
Start small and simple. It’s tempting to want to jump straight into building a detailed character model of your favorite fantasy hero as your first project. But that’s a surefire way to get frustrated and give up. Start with simple objects: a mug, a chair, a table, a house. Master the basics of moving objects, editing polygons, and exporting your model before you move on to complex projects. Small wins build confidence and help you learn the fundamentals without overwhelm.
Learn the basics of 3D space before you worry about details. Many beginners spend hours adding textures to their model before they fix the basic proportions. The shape of your model is always more important than the textures. If your chair’s legs are uneven or your mug is lopsided, even the best wood texture in the world won’t make it look good. Get your blockout and basic shape perfect before you move on to adding detail.
Keep your polygon count as low as possible. It’s tempting to add thousands of extra polygons to your model to make it as smooth as possible, but that just makes your file slow and bloated. Learn to use edge loops and efficient geometry to add detail only where you need it. This is especially important if you’re modeling for games or 3D printing, where excess geometry can cause problems.
Use reference images. Even professional 3D artists don’t work from memory. If you’re modeling a car, find 2-3 photos of the car from different angles and import them into your modeling software to use as a reference. If you’re modeling a person, find reference photos of real people to get the proportions right. Reference images help you avoid mistakes and make your final model more accurate and realistic.
Don’t be afraid to start over. Every 3D artist has had that moment: they’ve spent 4 hours working on a model, but it just isn’t working. The proportions are off, the geometry is messy, and fixing it would take longer than starting over. It’s frustrating to throw away hours of work, but starting over is almost always faster and gives you a better result. It’s also great practice—you’ll get it right the second time, now that you know what mistakes to avoid.
Conclusion
3D modeling is a powerful, versatile skill that opens up opportunities in everything from game design to manufacturing to art. What seems complex at first glance really just boils down to building shapes in a digital 3D space, one step at a time. Whether you want to design your own 3D printed toys, build worlds for video games, or just learn a new creative skill, 3D modeling is more accessible today than it has ever been before.
The biggest barrier for most beginners is just getting started. It’s normal to feel overwhelmed by the new interface and the need to think in three dimensions at first. But by starting small, choosing the right tool for your goals, and focusing on mastering the fundamentals before moving on to complex projects, you can go from complete beginner to creating your own models in a matter of weeks. The digital clay is waiting—all you have to do is start shaping it.