
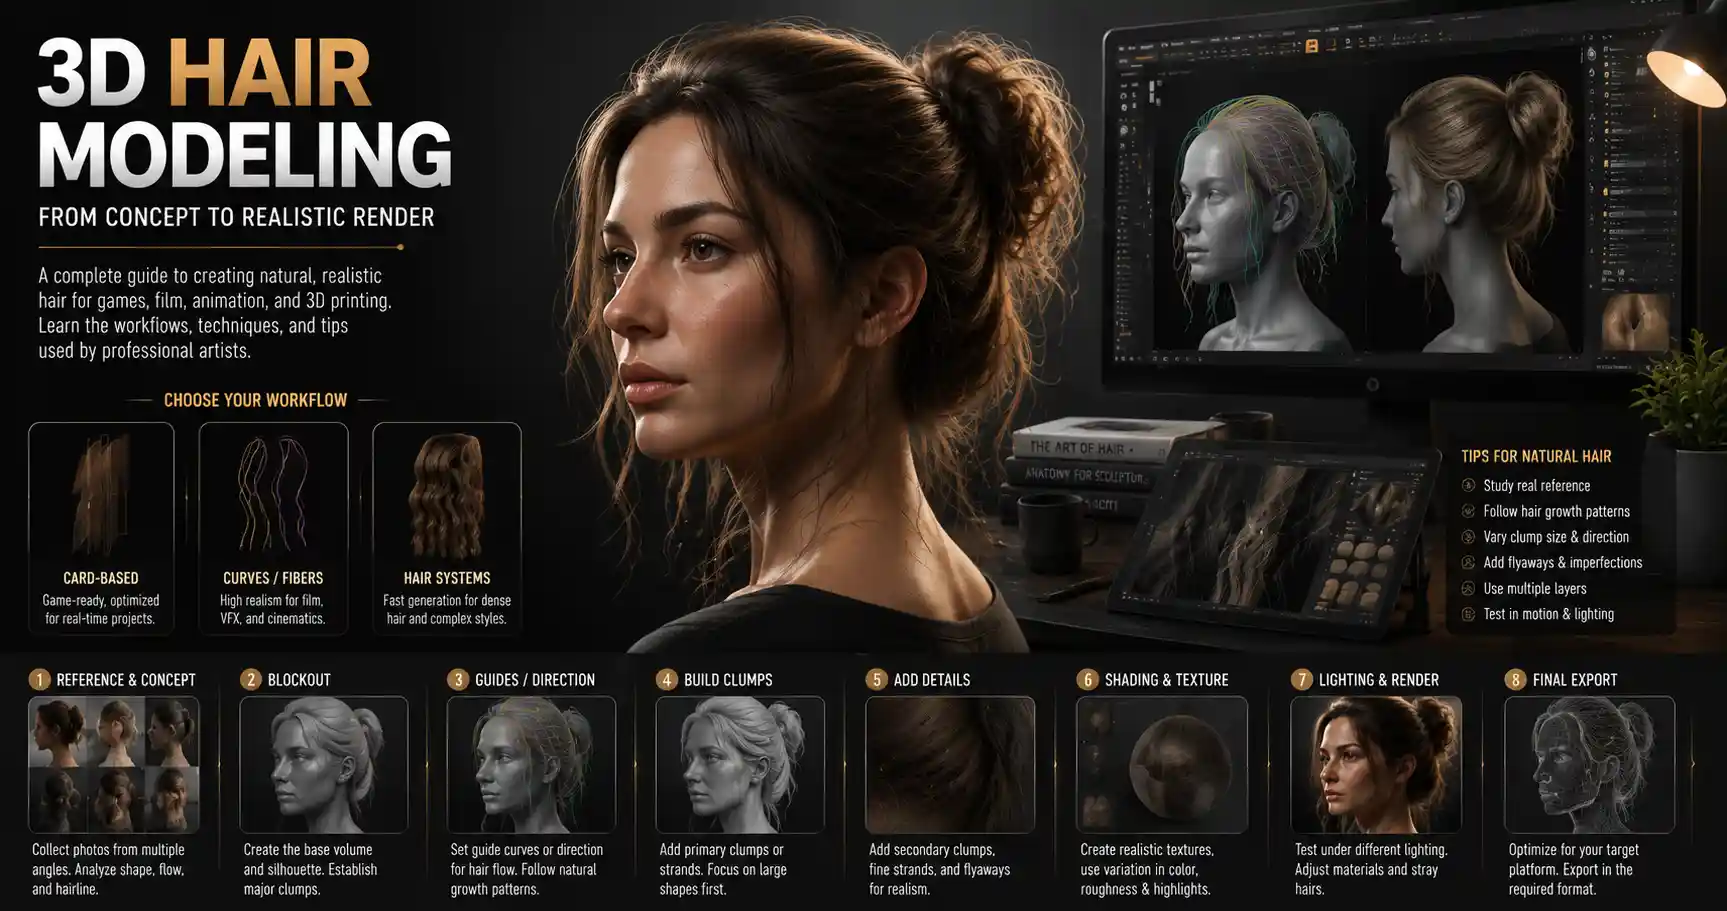
3D hair modeling is one of the most challenging skills in character art, but it’s also one of the most rewarding. A lifelike hair model can turn a flat, uncanny digital character into a believable person that audiences connect with, while a poorly executed hair piece can break immersion faster than any other flaw. Whether you’re working on a AAA video game, an independent animated short, or a 3D printed collectible, understanding the core techniques of 3D hair modeling will help you create natural, performant results that fit your project’s needs. This guide breaks down the entire process from planning to final rendering, covering multiple workflows for different skill levels and project requirements.
Planning and Reference Gathering
Before you open your 3D modeling software, you need to lay the groundwork for a successful hair model. Hair is an incredibly diverse feature—varying in texture, length, style, thickness, and curl pattern—so skipping the planning step almost always leads to a model that looks generic or unnatural. The goal of this phase is to build a clear reference pack that captures every detail of the hair you want to create.
Choosing the Right Style for Your Project
First, you need to match your hair style to your character’s backstory and the project’s technical constraints. A 10,000-polygon braided style that works for a 3D print won’t work for a real-time mobile game, just as a loose, wavy casual style won’t fit a 19th century aristocratic character. Consider your character’s age, ethnicity, lifestyle, and personal aesthetic to narrow down your choices. For example, a character who works outdoors every day will likely have more messy, wind-swept strands than a character who works in an office and styles their hair every morning.
Building a Reference Pack
A good reference pack includes multiple angles and close-ups of your target hair style. If you’re modeling a real person, you’ll need front, side, back, and ¾ view photos, plus close-ups of the hairline, part, and any texture details like curls or flyaways. If you’re creating an original style, source references from multiple people with similar hair types to capture natural variation. Avoid relying solely on 3D art references—real photos will help you avoid the generic “3D hair” look that plagues many beginner projects.
- Include at least one reference photo of the hair in motion, if possible, to understand how strands fall and interact with each other
- Add close-up photos of the hair roots and ends to get natural color and texture variation
- Note the hair’s density: fine hair lies flatter and has more transparent strands, while coarse, thick hair has more volume and less transparency
- Save reference photos of the hair under different lighting conditions to plan for your later shading and rendering work
It’s also helpful to block out the basic shape of the hair directly on your character’s head before you start adding strands. This block-in should match the overall volume and silhouette of your reference, and it will act as a guide as you add more detail. Many artists use a simple polygon sphere or sculpted mesh to get this basic shape right early on, avoiding the common mistake of making hair too small or too flat against the skull.
Core 3D Hair Modeling Workflows
There are three primary workflows for creating 3D hair models, each with its own advantages and ideal use cases. Most artists use a combination of these techniques depending on their project’s requirements for realism, render time, and polygon budget. Understanding how each works will help you pick the right approach for your work.
Polygon Mesh Modeling (Card-Based and Solid Mesh)
Polygon mesh modeling is the traditional approach to 3D hair, and it’s still widely used for real-time games, 3D printing, and stylized projects. This method involves creating individual planes (called cards) or solid mesh shapes to represent clumps of hair, rather than individual strands. For many projects, this is the most performant option, as it keeps polygon counts low while still allowing for detailed silhouettes and styling.
Beginner artists often start with the card method, which is relatively straightforward. You start with your basic hair block-out, then add large cards for major clumps, then smaller cards for medium clumps, then tiny cards for individual flyaways around the hairline and edges. Each card is transparent with an alpha texture that creates the soft, strand-like edges of the hair clump. This method is ideal for real-time games because it renders very quickly, and it’s easy to get a clean, intentional shape.
Solid polygon mesh hair is often used for 3D printing or stylized characters where hair is meant to look more like a solid shape than individual strands. For example, the blocky hair on a Lego character or the smooth sculpted hair on a collectible figurine is almost always created as a single solid polygon mesh. This method is also popular for very short hair styles, like buzz cuts, where individual strands don’t need to be visible.
Curves-Based Fiber Modeling
Curves-based fiber modeling is the go-to method for high-quality realistic hair, used in film, VFX, and high-end cinematics. In this workflow, you use 3D software curves to represent individual hair strands or small groups of strands, then you can adjust the shape, thickness, and density of each curve to build up the full style. Software like Blender, Maya, ZBrush, and Ornatrix all have built-in tools for curves-based hair modeling that simplify the process of placing and adjusting hundreds of thousands of strands.
The biggest advantage of curves-based hair is that it allows for a huge amount of control and realism. You can individually adjust the placement of flyaways, tweak the curl pattern of specific sections, and create natural variation between strands that looks far more lifelike than card-based hair for realistic projects. It’s also easier to adjust the entire style later—if you need to change the part or move a large clump, you can just adjust a few curves rather than reworking dozens of individual cards.
“The difference between good hair and great hair is always in the variation. If every strand is the same length, same thickness, and same curl, it looks like a plastic wig. Real hair has broken strands, split ends, strands that grow in different directions, and little flyaways that don’t fit the main shape. That’s what curves-based hair lets you capture that older methods can’t.”
The main downside of curves-based hair is that it can be computationally heavy. A full realistic head of hair can have 100,000 or more curves, which can slow down your viewport and increase render times. For this reason, it’s most often used for offline rendered projects like film and cinematics, though modern real-time engines like Unreal Engine 5 have made high-density curves-based hair feasible for next-generation games.
Procedural and XGen Hair
Procedural hair modeling uses automated tools to generate strands based on a set of rules you define, rather than placing every strand or clump by hand. Autodesk Maya’s XGen is the most popular procedural hair tool, though Blender’s Hair Particle System and Unreal Engine’s Groom system also offer powerful procedural options. This workflow is a huge time-saver for artists, as it can generate thousands of strands in seconds based on your grooming guides.
To create procedural hair, you first place a small number of guide curves that define the overall shape and flow of the hair. The software then automatically fills in the space between the guides with additional strands, varying their length, thickness, and curl based on the parameters you set. You can add noise to the position and shape of strands to create natural variation, and you can mask specific areas like the hairline to add more flyaways or adjust density.
Procedural hair is especially useful for creating furry creatures or very thick, voluminous hair styles where placing every strand by hand would take too long. It’s also great for creating natural variation between multiple characters—if you need to make 10 different background characters with similar hair styles, you can use the same set of guides and just adjust the procedural parameters to get unique results each time.
Step-by-Step Grooming for Natural-Looking Hair
No matter what workflow you choose, the grooming process is what turns a collection of strands or cards into a natural, believable hair style. Grooming involves shaping the hair, adding natural variation, and making sure the hair flows correctly around the character’s head and face. Follow this step-by-step process to get consistent results:
- Start with the roots and hairline. The hairline is the most visible part of any hair model, so it’s important to get it right first. Map out where each hair grows from the scalp, following the natural whorl pattern at the back of the head. Add a few irregular, shorter strands along the hairline to avoid a sharp, plastic-looking edge. Avoid making the hairline perfectly straight—natural hairlines are uneven, with stray hairs that stick out around the forehead and temples.
- Block in major clumps and overall shape. Once the hairline is done, build out the largest sections of hair first. For curves-based or procedural hair, this means placing your main guide clumps to match the silhouette from your reference. For card-based hair, this means adding your largest clump cards. Focus on getting the overall volume and silhouette right before you add any small details—it’s much easier to adjust a large shape early on than it is to fix it after you’ve added dozens of small strands.
- Add mid-sized clumps and flow. Next, break your large clumps into smaller mid-sized clumps. Natural hair doesn’t fall as one solid mass—it groups into smaller clumps that move and separate from each other. Pay attention to how gravity pulls the hair down: clumps should get narrower toward the ends, and strands should separate more the further they are from the scalp. If your character has curly hair, each large clump will break down into smaller curls, so work from largest to smallest to keep the shape consistent.
- Add fine detail and flyaways. Once the main shape is done, add small individual strands and flyaways around the edges. These small details add realism and break up the silhouette, making the hair look less uniform. Focus on areas around the hairline, the nape of the neck, and around the face—strays in these areas catch light and add movement to the model. For curly or coily hair, add fine baby hairs around the edges to match natural texture.
- Check for common mistakes. Before you move on to texturing, check your model from every angle to catch issues. Common mistakes include uniform strand length (all strands end at exactly the same point, which looks unnatural), roots that don’t follow the scalp shape (strands grow straight out rather than following the curve of the skull), and too much symmetry (left and right sides of the hair are identical, which never happens in real life).
One of the most important tips for natural grooming is to follow the direction of hair growth. Every part of the scalp has a natural direction that hair grows in, and if your strands go against that growth pattern, the hair will look wrong even if all the other details are correct. For example, hair at the nape of the neck grows downward, hair at the crown grows in a spiral pattern, and hair along the sideburn grows downward along the jaw. Your reference photos will help you match these growth patterns correctly.
Texturing and Shading for Realism
Even a perfectly groomed hair model will look flat and unnatural if it’s not textured and shaded correctly. Hair has unique optical properties—it’s semi-transparent, it reflects light in a specific way, and it has natural color variation from root to tip. Getting these details right will make your hair model look lifelike instead of like a plastic wig.
Root and Tip Color Variation
Natural hair is not a single solid color. Even people with no graying and no dyed hair have natural variation between roots and tips, and between different strands. Roots are usually slightly darker than the ends, because they’re protected from sun exposure, while the ends get lighter from sun bleaching over time. You can add this variation by using a gradient map that darkens the color near the root and lightens it toward the tip, or by adding a random color variation texture that shifts the hue of individual strands slightly.
For people with dyed hair or gray hair, you’ll need to add more complex color variation. For example, someone with dyed blonde hair will have darker roots, and you’ll need to mask the root area to apply the darker color. For gray hair, you’ll randomly scatter lighter gray strands throughout the hair to match natural graying patterns.
Alpha and Transparency for Card-Based Hair
If you’re using the card-based modeling workflow, your alpha textures are the most important part of your texturing process. The alpha defines the edge of each hair clump, so a soft, irregular alpha will look far more natural than a hard, uniform edge. Many artists use scanned hair alpha textures from real hair clumps, which have natural irregular edges that look far better than hand-painted alphas.
When creating textures for card-based hair, it’s also important to adjust the transparency of the cards based on the clump size. Large major clumps are thicker and less transparent, so they’ll have a higher opacity, while small flyaway cards are thinner and more transparent, so they’ll have a lower opacity. Stacking multiple cards of different opacity creates the illusion of depth that makes card-based hair look much more realistic.
Shading for Real-Time and Offline Rendering
Modern hair shaders are designed to handle the unique way light interacts with hair. The most common shading model for hair is the Kajiya-Kay model, which accounts for the cylindrical shape of hair strands and creates the characteristic specular highlight that runs along the length of each strand. Newer shading models like the Marschner model add even more detail for photorealistic renders, accounting for multiple light reflections and absorption inside the hair strand.
For real-time rendering in engines like Unreal Engine or Unity, there are several optimized hair shaders available that provide a good balance between quality and performance. The Unreal Engine 5 Groom shader, for example, supports direct and indirect lighting, transmission (light passing through hair), and ambient occlusion, which all add up to a realistic result without excessive performance cost. For card-based hair, most real-time shaders support alpha clipping or alpha blending to get soft edges on hair clumps.
One common shading mistake that beginners make is making hair too opaque. Even very thick dark hair lets some light through, especially when backlit. Adding transmission to your hair shader will make the hair glow slightly when light shines through it from behind, which adds a huge amount of realism. This is especially noticeable for blonde or light brown hair, which is much more transparent than dark brown or black hair.
- Add ambient occlusion between hair clumps to create depth and shadow, which keeps the hair from looking flat
- Adjust the specular color based on hair color: dark hair has a darker specular highlight, while blonde hair has a brighter, more saturated highlight
- Add a subtle roughness variation to strands: some strands are smoother and reflect more light, while others are rougher, creating natural variation
- For curly hair, add more variation in roughness and thickness to match the naturally uneven texture of curly strands
Optimization for Different Use Cases
Once your hair model is fully groomed and textured, you need to optimize it for its final use case. A hair model that works perfectly for a high-end offline render will be too slow for a real-time game, just as a hair model optimized for mobile will be too low-quality for a cinematic. The key optimization steps depend on your project:
Optimization for Real-Time Games
For real-time projects, the main goal is to keep polygon counts and draw calls low while maintaining as much quality as possible. For card-based hair, this means merging multiple cards into as few mesh objects as possible to reduce draw calls, and using mipmapping to reduce the detail of the hair alpha when the character is far away from the camera. For curves-based groom hair in Unreal Engine 5, you can adjust the strand count based on the camera distance—using a higher strand count for close-ups and a lower strand count for when the character is far away, a technique called level of detail (LOD).
Another common optimization for real-time hair is to use a combination of cards and strands. Use cards for the main bulk of the hair to keep polygon counts low, then add a small number of individual strands around the edges for detail. This gives you the better performance of cards with the improved realism of strands around the most visible areas.
Optimization for 3D Printing
3D printed hair has very different optimization requirements than digital hair. For 3D printing, hair needs to be a solid mesh with overhangs that are supported by the printer, and no separate strands that are too thin to print. Most 3D printed hair is sculpted as a single solid mesh with recessed lines to represent hair clumps, or as a series of solid clumps that are thick enough to print. You’ll need to check the minimum feature size of your 3D printer and make sure all individual strands or clumps are thicker than that minimum size to avoid printing failures.
Optimization for Offline Rendering
For offline rendering, optimization is less about performance and more about reducing render times without losing quality. One common technique is to use a lower strand count in areas that are not visible to the camera, or in areas that are out of focus. You can also use instancing for repeated strand shapes to reduce memory usage, and use render proxies for viewport work to keep your software responsive while you work on other parts of the character.
Conclusion
Creating a great 3D hair model takes patience and practice, but it’s a skill that will dramatically improve the quality of your character work. The core process is consistent no matter what workflow you use: start with careful planning and reference gathering, build your shape from large to small, add natural variation and detail, then texture and optimize for your specific project. Don’t get discouraged if your first few attempts don’t look natural—even experienced character artists spend hours refining hair models, and the best way to learn is to study real hair and practice regularly.
As 3D software and real-time engines continue to improve, creating high-quality 3D hair is becoming more accessible to artists of all skill levels. Whether you’re a beginner working on your first character or an experienced artist working on a AAA project, focusing on natural shape, variation, and correct lighting will help you create hair models that bring your characters to life.