
Whether you’re a homeowner planning a renovation, an interior designer pitching a concept to a client, a renter trying to visualize new furniture, or a hobbyist building a virtual replica of your favorite space, creating an accurate 3D model of a room unlocks a level of planning and creativity that 2D sketches just can’t match. A good 3D room model lets you test paint colors, move sofas around, check how natural light flows through windows at different times of day, and even catch costly measurement mistakes before you pick up a hammer. You don’t need a million-dollar motion capture rig or a computer science degree to pull it off, either. Modern tools have made 3D room modeling accessible to complete beginners, as long as you follow a clear, step-by-step process. This guide walks you through every stage, from initial measurements to exporting a finished model you can use for whatever project you have in mind.
Plan and Measure Your Room Accurately
The foundation of any great 3D room model is accurate, detailed measurements. Even a 1-inch error in your wall length can throw off the entire layout, leading to ill-fitting furniture or misaligned renovations when you bring the plan into the real world. Taking the time to measure correctly at the start will save you hours of reworking your model later.
Gather the right measurement tools
You don’t need fancy gear to get precise measurements, but using the right tools will make the process much faster and more accurate. A standard 25-foot tape measure works for most rooms, but a laser measure is a game-changer for larger spaces or high ceilings—these tools can measure distance in seconds with an accuracy of 1/8 of an inch, even across long rooms. Other essential tools include a notebook or a notes app on your phone, a pencil to sketch a rough hand-drawn layout, and a level to check if walls or floors are out of plumb (a common issue in older homes that can throw off your model). For extra accuracy, you can also use a 3-foot ruler to check small details like window sill depth or baseboard height.
How to take consistent, reliable measurements
Start by sketching a rough overhead outline of the room on your paper or phone. Don’t worry about getting the proportions right at this stage—this is just a reference to label your measurements. Next, follow this step-by-step process to capture every important dimension:
- Measure the total length and width of the room at floor level, and again at ceiling level. Older homes often have walls that bow or shift over time, so these two measurements may differ, and it’s important to capture both if you want an accurate model.
- Measure the height of the wall from finished floor to ceiling. If you have crown molding or baseboards, note those heights separately so you can add them as details later.
- Work your way around each wall, marking and measuring every opening: doors, windows, and closets. For each opening, measure the distance from the nearest corner to the edge of the opening, then the full width of the opening, then the height from the floor to the top of the opening. Don’t forget to note the depth of window sills and the thickness of door frames.
- Add measurements for fixed features that can’t be moved: radiators, fireplace mantels, built-in shelves, plumbing outlets, electrical outlets, and light switch boxes. Note how far each is from the nearest wall and the floor.
- Check for any irregularities: sloped ceilings, alcoves, columns, or uneven walls. Note the angle of sloped ceilings and the dimensions of any protruding or recessed areas.
Once you’ve taken all your measurements, double-check the sum of all wall segments. The total of all opening and wall segments should match the overall wall length you measured at the start. If there’s a discrepancy of more than 1 inch, re-measure to find the error. It’s also a good idea to take photos of every wall and feature from multiple angles—these will be a helpful reference when you’re building your model later, so you don’t forget small details.
Choose the Right 3D Modeling Tool for Your Needs
Once you have your measurements, the next step is to pick a 3D modeling tool that matches your skill level, project goals, and budget. There are dozens of options on the market today, ranging from free beginner-friendly apps to professional-grade software used by architects and interior designers. Your choice will depend on what you plan to do with your finished model.
Beginner-friendly tools for casual projects
If you’re a homeowner planning a small renovation or just want to test out new furniture arrangements, you don’t need to pay for expensive software. These beginner tools are designed for non-professionals and require little to no prior 3D experience:
- SketchUp Free: This is the free web-based version of the popular SketchUp modeling software. It’s intuitive for beginners, has a huge library of pre-made 3D furniture models you can drag and drop into your room, and exports standard 3D files if you need to share your model or use it in other tools. The free version has some limitations, but it’s more than enough for most room modeling projects.
- Planner 5D: A mobile and web-based tool that lets you build a 2D floor plan first, then convert it automatically to a 3D model. It has a huge library of real furniture and decor brands, so you can test out exact products you’re thinking of buying, and it lets you render photorealistic images of your finished design.
- Homestyler: Another free browser-based tool that’s specifically built for interior design. It lets you upload a photo of your actual room and build a 3D model over it, which is great for beginners who don’t want to start from scratch.
Professional tools for commercial or advanced projects
If you’re an interior designer, architect, or contractor who needs to create high-quality models for clients or construction, a professional tool will give you more flexibility and precision. These options are industry standards:
- SketchUp Pro: The paid version of SketchUp adds advanced features like custom dimensioning, unlimited cloud storage, integration with CAD software, and advanced rendering options. It’s still relatively easy to learn compared to other professional tools, and it’s the most popular choice for interior designers working on residential projects.
- AutoCAD: The industry standard for architectural drafting, AutoCAD lets you create precise 2D plans and 3D models with exact measurements. It has a steeper learning curve than SketchUp, but it’s ideal if you need to create construction-ready plans for renovations.
- Revit: BIM (Building Information Modeling) software like Revit is designed for large-scale construction projects. It lets you add metadata to your model, like material specifications and cost information, which is useful for full room remodels or new construction.
- Blender: A free, open-source professional 3D modeling tool that’s great if you want to create photorealistic renderings or animations of your room. It has a steep learning curve, but it’s completely free and extremely powerful for creative projects.
3D scanning apps for fast, automated modeling
If you don’t want to measure manually, you can use a 3D scanning app on your smartphone to create a model automatically. Apps like Polycam, RoomScan, and Qlone use your phone’s camera and LiDAR sensor (available on most newer iPhones and high-end Android phones) to scan the entire room in a few minutes and generate a 3D model automatically. This is the fastest method, but the accuracy can vary depending on your phone and lighting conditions, and you may need to clean up the model after scanning to fix errors. It’s a great option if you need a quick model for reference, but it’s less reliable for construction or renovation projects that require exact measurements.
The biggest mistake new 3D modelers make is choosing the most complex tool on the market before they understand their own project needs. A free app that lets you finish your model in an hour is far better than a professional tool that leaves you stuck for a week learning the interface.
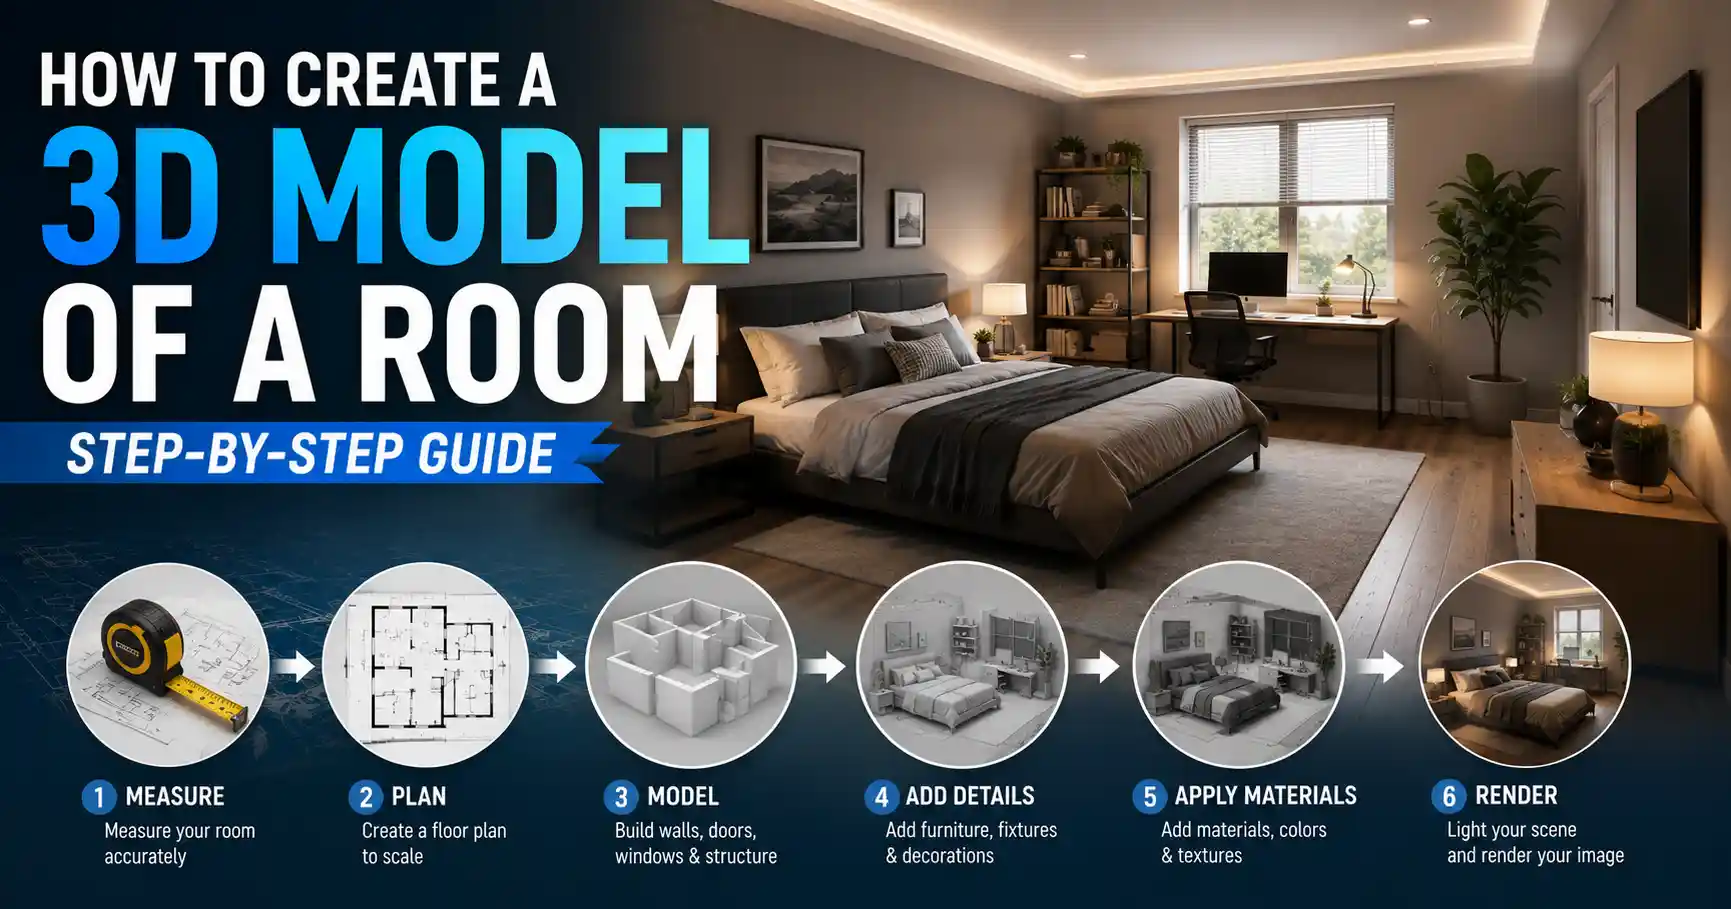
Build Your 3D Model Step-by-Step
Once you have your measurements and your tool of choice, it’s time to start building the model. While the exact steps will vary depending on which software you use, the core process is the same across most tools: start with the basic room structure, add openings and fixed features, then fill the space with furniture and decor.
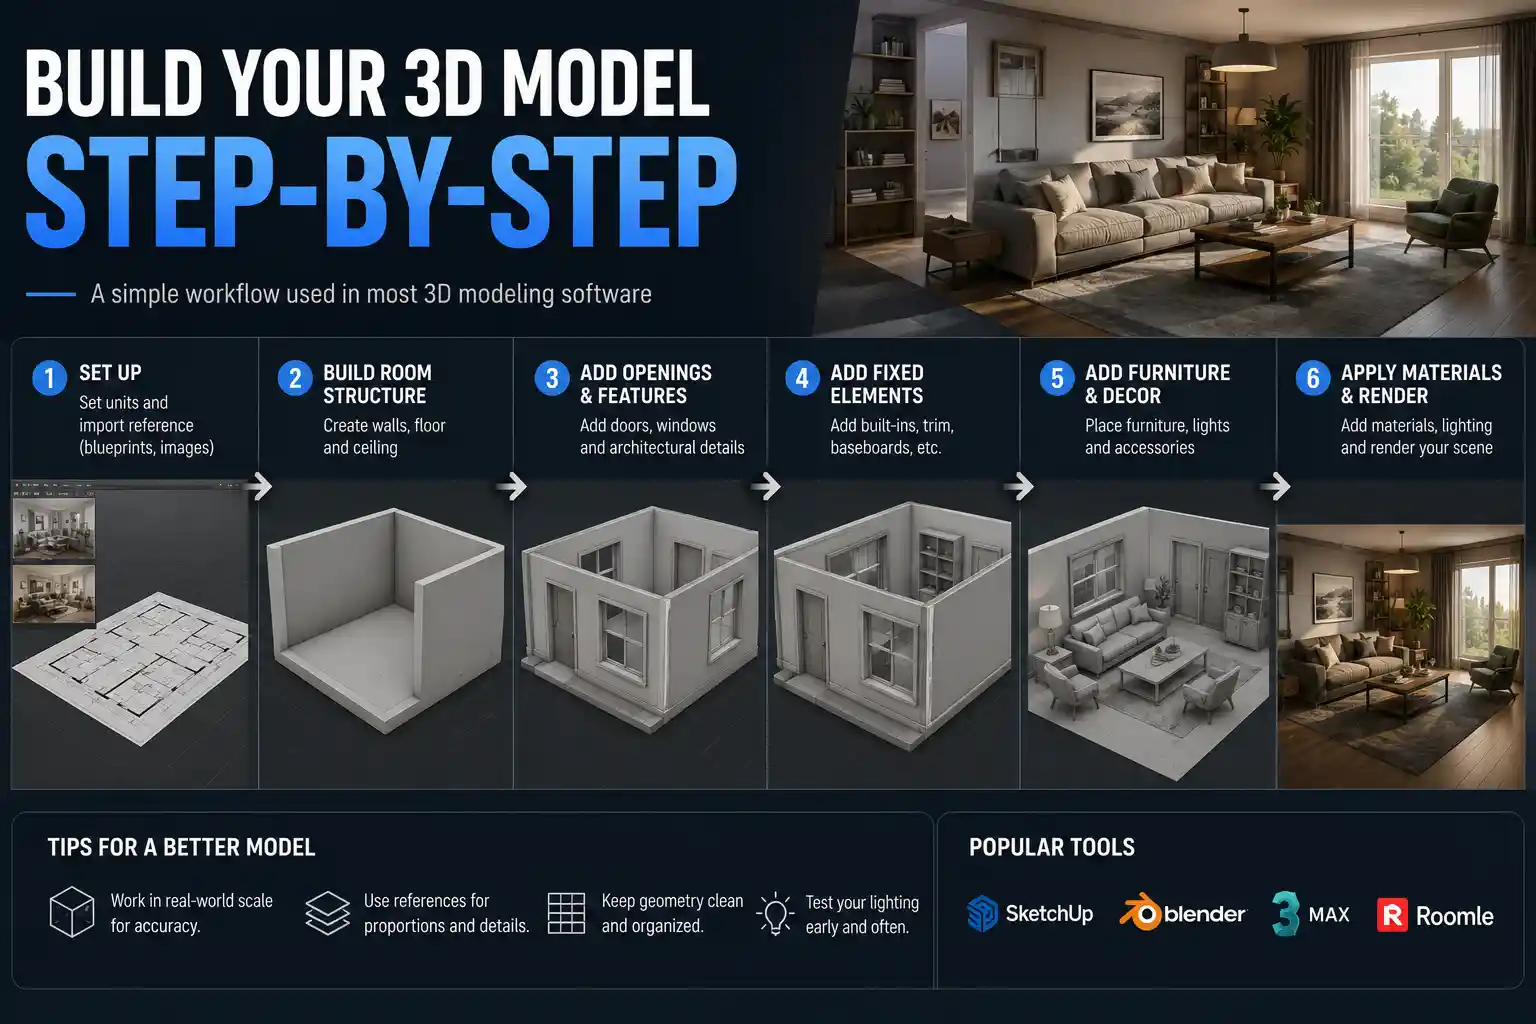
Start with the basic room structure
Most 3D modeling tools let you start by creating a 2D floor plan that you can extrude into 3D, so start by importing or drawing your overall room shape using the measurements you took. If you measured your room as 12 feet by 14 feet, draw a rectangle that matches those exact dimensions. Next, add your wall height: if your ceiling is 8 feet, set the wall height to 8 feet. If you have irregular features like alcoves, sloped ceilings, or columns, add those next, adjusting the shape of the walls or ceiling to match your measurements.
At this stage, pay attention to wall thickness—a common mistake new modelers make is forgetting to account for the actual thickness of your walls, which is usually 4 to 6 inches for interior walls. If you’re modeling just the inside of the room, you can usually set your wall thickness in the software settings and the tool will generate it automatically. If you’re modeling the exterior of the room as part of a larger building plan, you’ll need to add the thickness manually.
Add openings and fixed features
Next, cut out openings for doors, windows, and closets. Using your measurements, mark the position of each opening on the corresponding wall, then cut the opening out of the wall geometry. Add door and window frames, window sills, and trim to match your measurements—these small details make the model look much more realistic. Then add all fixed features: fireplaces, radiators, built-in shelves, electrical outlets, light switches, and any other permanent features in the room.
Once your walls and fixed features are done, add your floor, ceiling, and baseboards or crown molding. Most tools have pre-made profiles for moldings that you can drag and drop along the top or bottom of your walls, which saves you from modeling them from scratch.
Add furniture, decor, and materials
Now that your room structure is complete, it’s time to fill it with furniture and decor. Unless you need a fully custom model, you don’t have to model every piece of furniture from scratch. Most tools have built-in libraries of thousands of pre-made 3D models of sofas, tables, chairs, lamps, and decor that you can drag and drop into your room. If you’re using SketchUp, the 3D Warehouse has free user-uploaded models of almost any product you can think of, from specific IKEA sofas to designer lighting. If you’re buying new furniture, many brands offer free 3D models of their products that you can download and import directly into your model.
After arranging your furniture to match your planned layout, apply materials and textures to every surface to make the model realistic. You can choose from pre-made materials like hardwood flooring, paint, tile, fabric, and wood, or upload custom textures if you’re using a specific paint color or material. Adjust the scale of textures (like the pattern on a tile or the grain of hardwood) to match real-world sizes—this makes a huge difference in how realistic the final render looks.
Refine Details and Check for Accuracy
Once your basic model is complete, it’s time to refine it and check for errors that could cause problems later. This step is especially important if you’re using the model for a renovation or construction project, where small errors can lead to costly mistakes.
Check measurements and clearances
Go through every dimension in your model and compare it to your original measurements. Double-check the width of doorways to make sure your new furniture will actually fit through them, and check clearances around key pieces: you need at least 30 inches of clearance for walkways next to sofas, 36 inches for dining table aisles, and 24 inches of clearance in front of drawers and cabinets to open them fully. If you’re planning to add a new appliance like a refrigerator or washing machine, double-check the space you’ve allocated to make sure it matches the product’s exact dimensions.
If you scanned your room with a phone app, this step is even more important. 3D scans can often miss small details or create distorted geometry in corners, so compare the overall dimensions of the scanned model to your manual measurements and adjust the model to correct any errors.
Add lighting for realistic visualization
Adding accurate lighting to your model lets you test how natural and artificial light will look in the space, which is one of the biggest benefits of 3D room modeling. Start by adding natural light: most tools let you set the geographic location of your room and the time of day and year, so you can see exactly how sunlight will enter through your windows at different times. For example, if you have a west-facing living room, you can check how the evening sun will hit your sofa and TV screen to plan for window treatments.
Next, add your artificial light fixtures: overhead lights, table lamps, floor lamps, and accent lighting. Adjust the brightness and color temperature of each light to match the actual bulbs you plan to use—warm white 2700K bulbs create a cozy feel for living rooms, while cool 4000K or 5000K bulbs work better for kitchens and home offices. Once your lighting is set, you can render a preview of the room to see how all the elements come together.
Clean up your model
If you plan to share your model, use it for 3D printing, or export it to another tool, you’ll want to clean up any extra geometry that can slow down the file or cause errors. Delete any hidden or overlapping objects, merge connected geometry where possible, and remove any extra details you don’t need. For example, if you downloaded a 3D model of a sofa that has extra details on the bottom that you can’t see in your room, you can delete those to reduce the file size. If you’re sharing the model with a contractor or client, you can also add annotations to label key features, like the location of electrical outlets or the type of tile you plan to use.
Export and Use Your Finished 3D Model
Once your model is complete and refined, you can export it in a range of formats depending on what you plan to use it for. Different projects require different file types, so it’s important to choose the right one for your needs.
Common export formats for different uses
If you just want to share your design with a friend, contractor, or client, the easiest option is to export a high-resolution image or a 4K video render. Most tools let you do this in one click, and you can share the file via email or social media. If you want to let someone else explore the model interactively, you can export a 360-degree panoramic render or a shareable web link that lets them walk through the room in their browser.
If you need to share the actual 3D model with another designer or contractor, the most common universal formats are:
- OBJ: A universal 3D format that preserves geometry and textures, compatible with almost all 3D software.
- FBX: A format that preserves animations and materials, ideal if you’re creating a walkthrough animation of the room.
- SKP: The native SketchUp format, which is the most common format for sharing interior design models with other professionals.
- STL: The standard format for 3D printing, if you want to print a physical miniature model of your room.
If you’re using the model for a renovation, you can also export 2D technical drawings from your 3D model that your contractor can use for construction. Most professional tools let you automatically generate dimensioned floor plans, elevation drawings, and section views from your 3D model, which saves you from redrawing the plans in 2D.
Ideas for using your 3D room model
A finished 3D room model has dozens of practical uses beyond just visualization. Many homeowners use them to get accurate quotes from contractors, since contractors can see exactly what work needs to be done and give a more precise estimate. Interior designers use them to create photorealistic concept boards for clients, so clients can see exactly what the finished room will look like before any work starts. If you’re staging your home to sell, you can use a 3D model to create virtual staging of empty rooms, which is cheaper than physical staging and lets potential buyers visualize the space. If you’re moving, you can use your 3D model to plan your furniture layout in your new home before you move in, so you know exactly where everything will go on moving day.
Conclusion
Creating a 3D model of a room used to be a complicated process reserved for professional designers and architects, but modern tools have made it accessible to anyone willing to spend a few hours on the project. The core process is simple: start by taking accurate measurements, choose a tool that matches your skill level and project goals, build up your model from the basic structure to the smallest details, check for accuracy, then export your model for whatever use you have in mind. Whether you’re planning a small refresh of your living room or a full gut renovation, a 3D model helps you avoid costly mistakes, test different design ideas, and see exactly what your finished room will look like before you spend any money on materials or labor. With a little practice, you’ll be able to create accurate, realistic 3D room models that help you bring your design vision to life.