
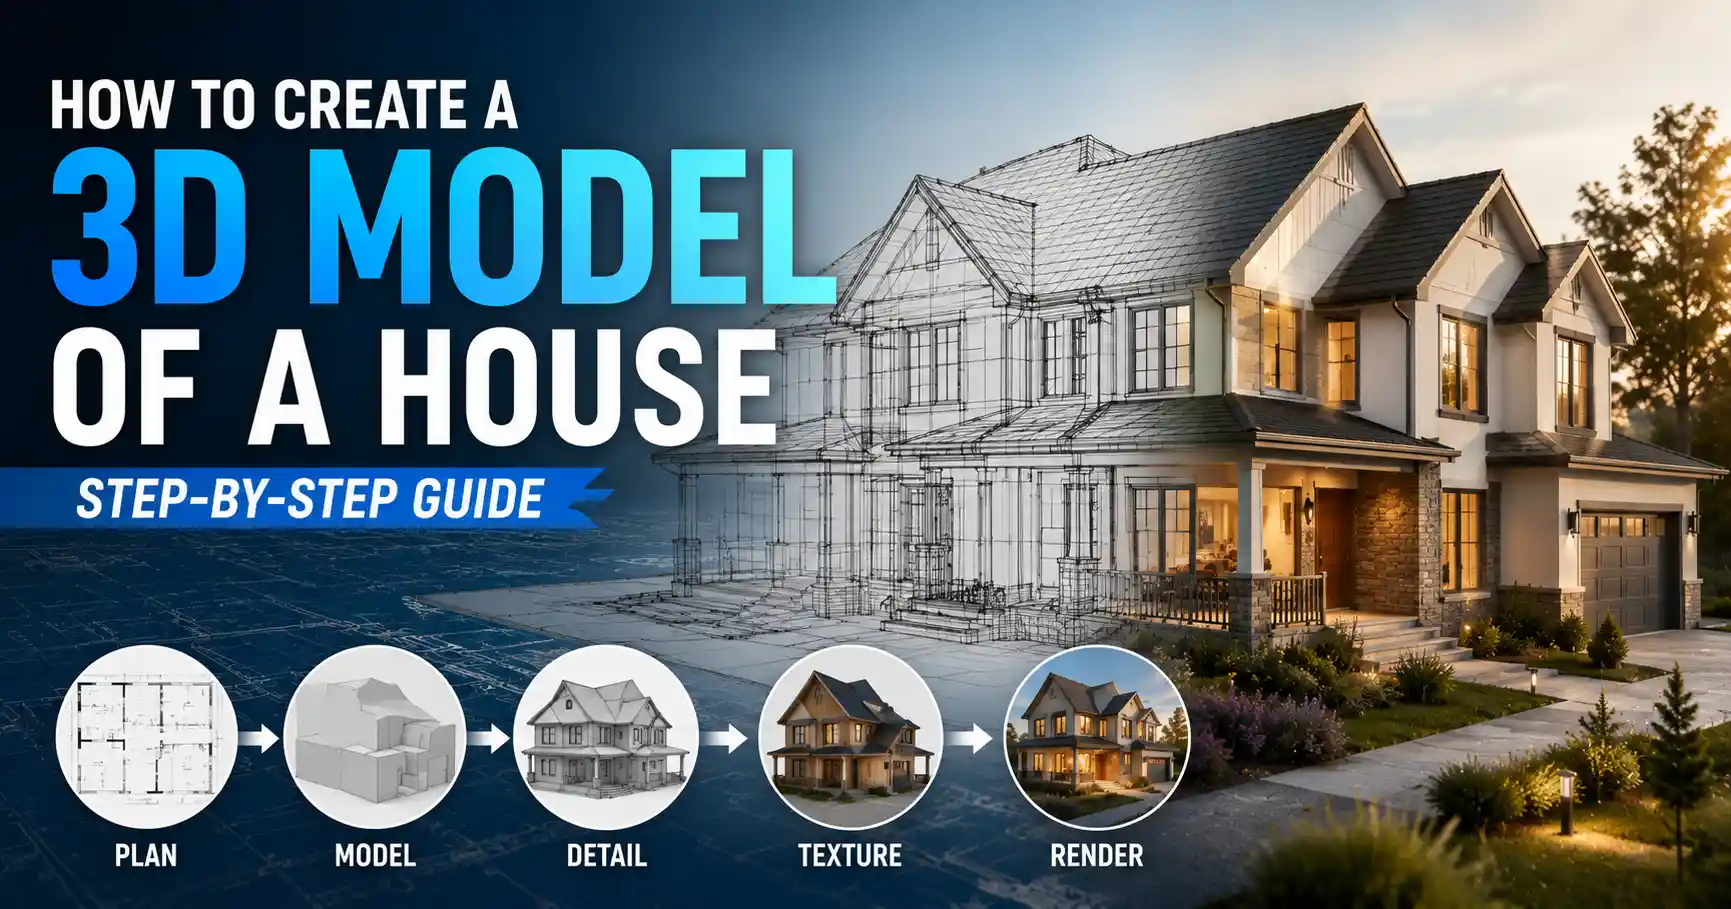
Whether you’re a homeowner planning a renovation, an architecture student working on your first project, or a hobbyist designing your dream tiny home, creating an accurate 3D model of a house has never been more accessible. Gone are the days when professional CAD software and years of training were required to produce a detailed, usable model. Today, free tools, smartphone cameras, and cloud-based platforms let anyone build a 3D house model that matches the real thing or brings a hypothetical design to life. The key to a successful model lies in following a structured process, from gathering accurate initial measurements to refining details for your intended use. This step-by-step guide walks you through every stage, from planning to final export, so you can end up with a model that works for your needs.
Pre-Design Planning and Data Gathering
Before you open any 3D modeling software, you need to lay the groundwork for an accurate model. Skipping this step almost always leads to incorrect proportions, missing features, and hours of rework later. The information you gather depends on whether you’re modeling an existing house or designing a new one from scratch, but the core planning process is similar for both projects.
Clarify Your End Goal
Your intended use for the 3D model will dictate how much detail you need to include, which saves you time and effort. A 3D model created for a real estate listing doesn’t need detailed electrical wiring plans, just accurate room layouts and exterior features. If you’re planning a kitchen renovation, you’ll need precise measurements of existing walls, windows, and plumbing to test new cabinet layouts. If you’re a game developer building a virtual environment, you might prioritize visual appeal over perfect structural accuracy, and can simplify minor details to keep the model lightweight.
Define your goal early to avoid overworking your model. Common end goals include:
- Renovation planning and permit applications
- Real estate marketing and virtual tours
- Architectural design and client presentations
- 3D printing a physical scale model
- Virtual reality or video game environment creation
Gather Existing Documentation
If you’re modeling an existing house, start by collecting any existing blueprints, building permits, or floor plans from the previous owner or local building department. These documents give you a baseline for overall dimensions that you can verify with your own measurements. If no plans exist, don’t worry – you can measure the house yourself with basic tools, or use 3D scanning technology to capture the entire space automatically. For new construction projects, you’ll start with a plot plan that shows your property boundaries, setbacks, and any natural features like trees or slopes that will impact your house design.
Take Accurate Measurements
For manual measurement of an existing house, all you need is a tape measure (a 100-foot retractable tape works best for exteriors), a notepad or smartphone app to record measurements, and a helper to hold the other end of the tape. Start with the exterior: measure the overall length and width of the house, then the position and size of every window, door, and bump-out like a garage or porch. Move inside and measure each room wall by wall, noting the location of interior doors, closets, stairs, and fixed elements like fireplaces or plumbing pipes. Don’t forget to measure ceiling height, as this is a common detail people miss that makes the model feel unrealistic.
“The most common mistake new 3D modelers make is relying on estimated measurements instead of verifying dimensions on site. Even a 2-inch error in a wall length can throw off an entire renovation plan when you start ordering cabinets or fixtures.”
If you prefer a faster, high-tech approach, you can use a 3D scanner or a LiDAR-enabled smartphone (most modern iPhones and high-end Android phones have built-in LiDAR) to scan the entire house in a fraction of the time. Apps like Polycam or RoomScan LiDAR can automatically generate a rough 3D model from your scan, which you can then refine in your modeling software. This method is especially useful for older homes with uneven walls or unconventional layouts that are hard to measure manually.
Choosing the Right 3D Modeling Software
There are dozens of 3D modeling tools on the market today, ranging from free browser-based apps to professional-grade software that costs thousands of dollars. The right tool for you depends on your skill level, your budget, and what you plan to do with the finished model. Here’s a breakdown of the most popular options for different use cases.
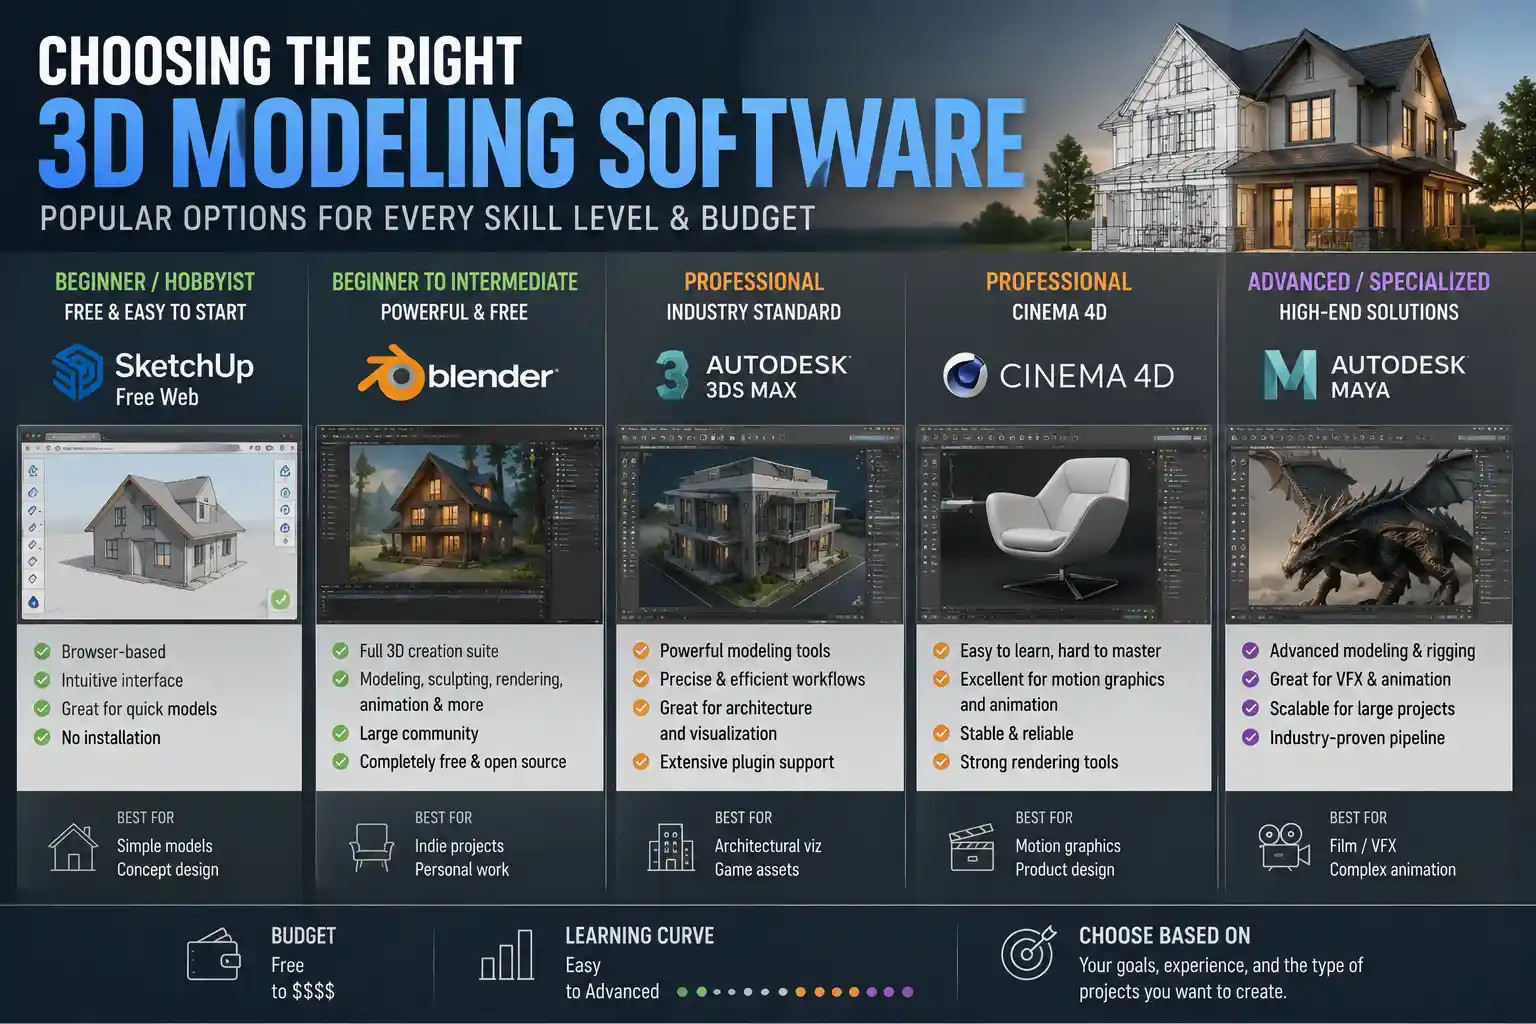
Beginner-Friendly Free and Low-Cost Options
If you’re new to 3D modeling or working on a personal project, you don’t need to invest in expensive software. Many free tools are powerful enough for most home modeling projects:
- Sweet Home 3D: A free, open-source tool designed specifically for interior design and house modeling. It lets you draw floor plans, arrange furniture, and generate realistic 3D renderings with almost no learning curve. It’s ideal for homeowners planning renovations or simple design projects.
- SketchUp Free: The free browser-based version of SketchUp, one of the most popular 3D modeling tools for architecture. SketchUp is known for its intuitive push-pull interface that makes it easy to turn 2D floor plans into 3D models. The free version is sufficient for most personal projects, and you can upgrade to SketchUp Pro for $300 a year if you need advanced features.
- Homestyler: A free browser-based tool from AutoDesk that focuses on interior design and realistic renderings. It has a large library of pre-made furniture and fixture models, so you can furnish your house model quickly without building everything from scratch.
- Tinkercad: A free beginner-friendly tool from AutoDesk that’s great if you want to create a simple 3D model of a house for 3D printing. It’s very basic, so it’s not ideal for detailed architectural plans, but it’s perfect for hobbyist projects.
Professional-Grade Options for Advanced Projects
If you’re an architecture professional, contractor, or working on a complex project that requires detailed plans and exports for construction, you’ll need a more powerful tool:
- SketchUp Pro: The paid version of SketchUp adds advanced features like dynamic components, import/export for CAD files, and realistic rendering tools. It’s still far more intuitive than full CAD software, making it a favorite among small architecture firms and custom home builders.
- AutoCAD: The industry standard for 2D and 3D architectural drafting. It’s extremely powerful but has a steep learning curve, and it’s expensive (around $200 a month for a subscription). It’s the best choice if you need to create construction-ready drawings that comply with building code requirements.
- Revit: Also from AutoDesk, Revit is a BIM (Building Information Modeling) tool that doesn’t just create a 3D model – it embeds metadata like material types, cost, and structural information into every component. It’s the standard for large commercial construction projects, and many residential architects use it for custom home design as well.
- Blender: A free, open-source professional 3D creation suite that’s ideal for creating photorealistic renderings and animations of your house model. It’s very powerful but has a steep learning curve, so it’s best for users who already have some 3D modeling experience or need high-quality visualizations for marketing or presentations.
For most beginners and personal projects, SketchUp Free or Sweet Home 3D is more than enough to get started. Both tools have large online communities with free tutorials and pre-made models you can use, so you don’t have to learn everything from scratch.
Building the 3D Model Step-by-Step
Once you have your measurements and have chosen your software, you can start building your model. The process is similar across most tools, whether you’re using a free browser app or professional CAD software. Follow these steps to build a logical, accurate model.
Step 1: Create the 2D Floor Plan Base
Start by importing your scanned blueprint or drawing your 2D floor plan from scratch using your measurements. Draw the outer exterior walls first, using your overall exterior dimensions, then add interior walls to divide the space into rooms. Most software will automatically snap lines to 90-degree angles, which works for most conventional homes, but you can adjust angles if you have an open floor plan or unconventional layout. Make sure to label each room as you go to keep your organized, and double-check that all of your dimensions match your measurements before moving on. A 1-foot error in your base floor plan will throw off your entire 3D model, so this is an important check.
Step 2: Add Doors, Windows, and Openings
Next, add openings for doors and windows to your 2D floor plan. Start by marking their position from the nearest corner, then add their width, matching your measurements. Most modeling software has pre-made door and window components you can insert automatically, which saves you from drawing them from scratch. For example, if you have a 36-inch wide exterior front door, you can just select a pre-made door of that size and drop it into the opening. Don’t worry about adding detailed trim or glass textures at this stage – you can add those details later. For now, focus on getting the size and position right.
Step 3: Extrude Walls and Add the Roof
Once your 2D floor plan is complete, it’s time to turn it into a 3D model. In most intuitive tools like SketchUp, this is as simple as using the push-pull tool to pull your 2D walls up to your ceiling height. For a two-story house, you’ll repeat this process for the second floor, adding the first floor ceiling/second floor between the two levels.
The next step is adding the roof, which is the most challenging part for many new modelers. Start by identifying your roof type: gable, hip, shed, gambrel, or flat. Most software has roof tools that can automatically generate a roof based on your exterior walls, all you need to do is input the pitch (slope) of the roof. If you’re modeling an existing house, you can calculate the pitch by measuring the vertical rise over 12 inches of horizontal run – for example, a 4/12 pitch means the roof rises 4 inches for every 12 inches horizontal. If you’re designing a new house, you can choose a pitch based on your climate: steeper pitches shed snow and rain better, while flatter pitches are cheaper to build and work well in dry climates.
Step 4: Add Stairs, Floors, and Fixed Interior Features
With the basic structure complete, add stairs for multi-story homes, again using pre-made components to save time. Make sure to check that your stairs meet local building codes for width and riser height if you’re creating a model for construction. Next, add fixed features like fireplaces, built-in cabinets, closets, plumbing fixtures, and electrical panels. For renovation projects, this step is critical: marking the exact location of existing plumbing and wiring will help you avoid costly mistakes when you start construction.
Step 5: Add Exterior Details
Don’t forget to add exterior details that impact the look and function of your house. Add porches, decks, garages, chimneys, and gutters to the exterior of your model. If you’re creating a model for marketing or visualization, you can also add landscaping features like driveways, walkways, trees, and patios to make the model feel more complete. If you’re modeling for construction, you’ll want to add the foundation type (slab, crawl space, or basement) at this stage, so you can include it in your structural plans.
- Verify all wall, door, and window dimensions against your original measurements
- Check that ceiling and roof heights are consistent across the model
- Confirm that doors and windows open in the correct direction and don’t clash with furniture or walls
- Check that stairs and hallways are wide enough for code compliance (if needed)
- Make sure the roof pitch and overhang match your design or existing house
Taking 15 minutes to complete this check will save you hours of rework later when you realize a wall is 6 inches too short or a door doesn’t fit.
Adding Details, Textures, and Rendering
Once your basic structural model is complete and checked for accuracy, it’s time to add details that make the model useful and visually appealing. The level of detail you add depends on your end goal: if you’re creating a model for construction permits, you’ll need to add structural and MEP (mechanical, electrical, plumbing) details, while if you’re creating a model for a real estate virtual tour, you’ll focus on textures and visual details.
Applying Materials and Textures
Most 3D modeling software comes with a library of pre-made materials you can apply to different surfaces. For example, you can add wood texture to hardwood floors, tile to bathroom walls, brick to the exterior, and shingles to the roof. Applying the right materials makes it much easier to visualize the finished house, whether it’s an existing home or a new design. For existing homes, try to match the materials you actually have to make the model as accurate as possible. For new construction, you can test different material options to see what looks best before you commit to buying materials.
If you’re creating a model for 3D printing, you don’t need to add textures – you just need to make sure all your parts are solid and correctly sized for your printer. But if you’re creating renderings or virtual tours, textures are what make the model feel realistic.
Adding Furniture and Fixtures
One of the biggest advantages of 3D modeling is that you can test furniture layouts before you buy or move anything. Most modern modeling tools have large libraries of pre-made furniture models in standard sizes that you can drag and drop into your rooms. You can test different sofa sizes, cabinet layouts, or bed positions to see what fits and what looks good. For kitchen or bathroom renovations, you can insert exact models of the new cabinets, appliances, and fixtures you’re planning to buy, so you can see how they fit in the existing space before you start demolition.
Creating Photorealistic Renderings and Animations
If you need to share your model with others – whether it’s a contractor, a client, or a real estate audience – you’ll want to create high-quality renderings or a walkthrough animation. A rendering is a static high-resolution image of your model that looks like a real photo, while a walkthrough is an animated video that shows the model from multiple angles, including a room-by-room tour of the interior.
Most modern tools have built-in rendering engines that can create photorealistic images automatically. For example, SketchUp has V-Ray and Enscape, which are popular plugins that produce high-quality renderings in minutes. Blender has a powerful built-in renderer called Cycles that can create extremely realistic images for free. When creating renderings, pay attention to lighting: add natural light from windows and artificial light from lamps and overhead fixtures to make the space feel like a real home.
Preparing the Model for Its End Use
Once your model is complete, you need to export it in the right format for how you plan to use it:
- For construction documents: Export 2D floor plans and elevations as PDF files that you can share with your contractor or submit for permit approval.
- For 3D printing: Export the model as an STL file, which is the standard format for 3D printing. Make sure to check that the model is watertight (no gaps in the surfaces) before exporting, as this will cause printing errors.
- For virtual tours or real estate: Export the model as a glTF or OBJ file that you can upload to a virtual tour platform, or use a tool like Matterport to create an interactive 3D tour that potential buyers can explore online.
- For presentations or client meetings: Export a short animated walkthrough video as an MP4 file that you can play to show off the entire design.
Common Mistakes to Avoid
Even experienced modelers make mistakes that can derail a project. Knowing these common pitfalls ahead of time helps you avoid them and save time.
The first and most common mistake is ignoring measurement accuracy. It’s tempting to estimate a wall length or window size if you’re in a hurry, but even a small error will compound as you build your model, leading to misaligned doors, ill-fitting cabinets, and an end result that doesn’t match the real world. Always verify measurements twice, whether you’re measuring manually or using a LiDAR scan.
Another common mistake is adding too much detail too early. New modelers often spend hours adding detailed trim or custom furniture before they check that the basic wall dimensions are correct. If you then have to adjust a wall size, you lose all that work on the details. Always build the basic structure first, check for accuracy, then add details incrementally. This workflow saves you hours of frustration.
Overcomplicating the model is another pitfall. If you’re a homeowner planning a simple bathroom renovation, you don’t need to model every electrical outlet or every stud in the wall. You only need enough detail to test your new layout and confirm everything fits. Adding unnecessary detail slows down your software and makes the model harder to edit.
Finally, many new modelers forget to save versions of their work as they go. It’s not uncommon to accidentally delete a wall or mess up the roof and not be able to undo the change. Save a new version of your model every time you make a major change, so you can always go back to an earlier version if something goes wrong.
Conclusion
Creating a 3D model of a house is no longer a task reserved for professional architects and CAD technicians. With modern free tools, accessible measurement technology, and a structured process, anyone can build an accurate, useful 3D model that meets their needs. The key steps are simple: start by gathering accurate measurements and clarifying your end goal, choose a software tool that matches your skill level and budget, build the basic structure first before adding details, and check for accuracy at every stage. Whether you’re planning a small renovation, designing your dream home, or creating a 3D model for real estate marketing, following this process will help you end up with a model that matches your vision and works for your intended purpose. The best way to get started is to start small: try modeling a single room first to get used to your software, then expand to the entire house once you’re comfortable with the process.