
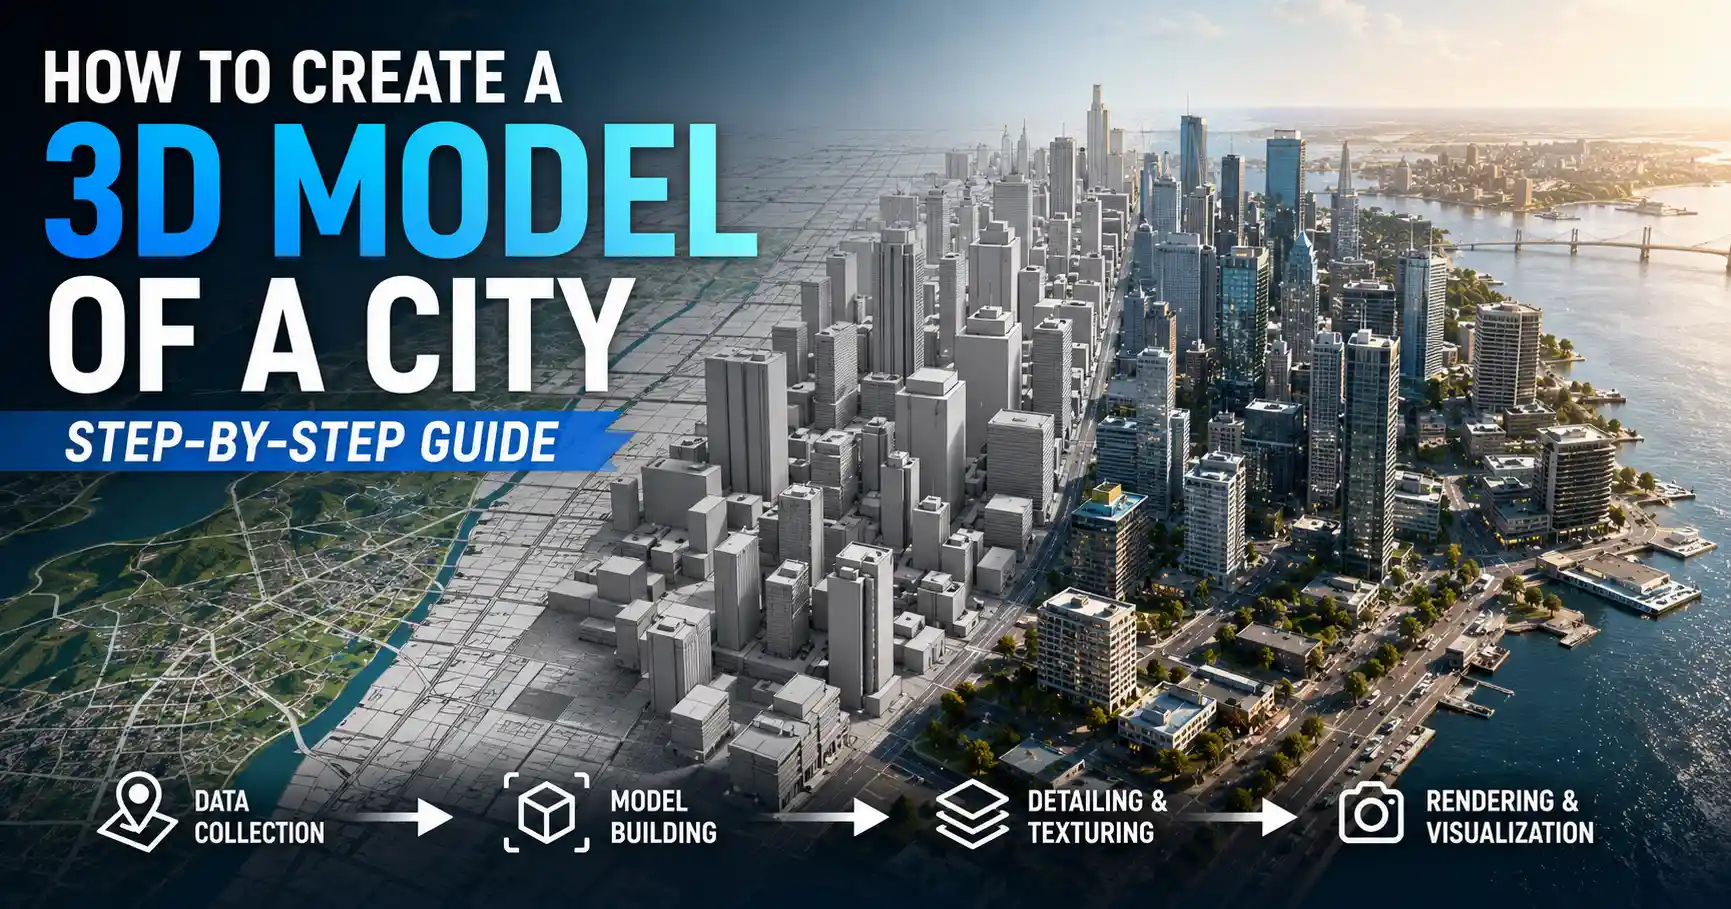
From urban planning projects to immersive video game settings, from historical reconstructions to disaster preparedness simulations, 3D city models have become an indispensable tool across dozens of industries. Whether you’re a architecture student looking to visualize your hometown’s redevelopment, a game designer building an open-world map, or a municipal government creating a digital twin for infrastructure management, building an accurate, usable 3D city model is more accessible today than it ever has been. With free open-source tools, open geographic data, and cloud-based processing, you don’t need a multi-million dollar budget or a team of GIS specialists to create a model that meets your needs. This guide will walk you through every step of the process, from defining your project scope to refining your final model for its intended use.
Step 1: Define Project Scope and Requirements
Before you open a single 3D modeling tool or download any geographic data, you need to clearly define what you want your 3D city model to achieve. The level of detail, accuracy, and scope of your model will vary dramatically based on its end use, and skipping this step can lead to wasted time working on unnecessary details or ending up with a model that lacks the information you actually need.
Common use cases and their requirements
Different projects demand different specifications. For example, a mobile game developer building a fictional city loosely inspired by real-world San Francisco only needs approximate building shapes and generic textures, while a municipal digital twin for flood modeling requires centimeter-accurate elevation data and exact building footprints to predict water flow correctly. Below are the most common use cases and their core requirements:
- Urban planning and infrastructure development: Requires accurate building heights, terrain elevation, road networks, and utility infrastructure data. Models typically cover the entire city or a large district, with LOD2 (level of detail 2) accuracy for most buildings, and higher detail for proposed development sites.
- Video game and immersive media: Prioritizes visual aesthetics and performance over geospatial accuracy. Most projects rely on simplified geometry, optimized polygon counts, and custom textures, with only key landmarks receiving high-detail modeling.
- Historical reconstruction: Needs accurate historical maps and archival data to recreate cities as they existed at a specific point in time. This often combines archaeological data with educated guesswork for unrecorded structures, with varying levels of detail depending on available research.
- Digital twins for smart city management: The most demanding use case, requiring real-time data integration, centimeter-accurate terrain and building data, embedded metadata for infrastructure, and compatibility with IoT sensor inputs.
- Education and public outreach: Prioritizes accessibility and visual clarity over extreme accuracy, with simplified geometry that makes it easy for non-technical users to navigate and understand urban design proposals.
Choose your area of interest (AOI)
Once you know your use case, narrow down the geographic area you need to model. A common mistake for new modelers is attempting to recreate an entire major city when they only need a 5-square-kilometer downtown district for their project. Larger areas require more processing power, more storage, and longer workflow times, so stick to the smallest area that meets your needs. For reference, a 10-square-kilometer city district with moderate detail will take up roughly 1-5 GB of storage, while an entire major city with high detail can exceed 100 GB.
Finally, decide on your level of detail (LOD), a standard classification system used in 3D urban modeling. LOD0 is a simple 2.5D terrain model with no building detail, while LOD1 is block-shaped buildings with flat roofs, LOD2 includes separate roof structures, LOD3 adds architectural details like windows and balconies, and LOD4 includes fully detailed interior models. Most projects fall between LOD1 and LOD3, so matching your LOD to your use case will save you hours of unnecessary work.
Step 2: Gather Source Data
Accurate 3D city models depend on high-quality source data. Fortunately, most countries around the world provide free access to open geographic data that you can use to build your model, and commercial data is available for areas where open data is limited. The key data you need includes terrain elevation, building footprints, building heights, road networks, and texture reference imagery.
Open data sources for geographic information
For most users, open data is the best starting point, as it is free, legal to use for most purposes (always check the license), and easily downloadable. Some of the most reliable open sources include:
- OpenStreetMap (OSM): The gold standard for open geographic data, OSM includes free building footprints, road networks, land use data, and point of interest information for almost every city on Earth. Data quality varies by region, but most major cities in North America, Europe, and Australia have extremely detailed building data available.
- NASA SRTM and ALOS World 3D: Free global elevation data with 30-meter or better resolution, perfect for creating base terrain models. For higher-resolution elevation data, many national governments provide free LIDAR-derived elevation data through their geological survey agencies.
- USGS National Map (United States): Provides high-resolution elevation, imagery, and geographic data for all U.S. territories, free for public use.
- Ordnance Survey OpenData (United Kingdom): Free topographic and geographic data for the UK, including accurate building and terrain information.
- Sentinel-2 and Google Satellite imagery: Free aerial imagery that you can use as a reference for texturing and verifying building shapes.
Commercial data sources for higher accuracy
If you need higher resolution data or are working in an area with poor open data coverage, commercial sources like Maxar, Airbus, and local geospatial companies provide high-resolution satellite imagery, LIDAR elevation data, and pre-processed building footprints. For most professional projects like digital twins, commercial data is often worth the investment to ensure accuracy.
Data collection for custom or historical projects
If you are recreating a historical city that no longer exists, or a custom city that has not been mapped in existing databases, you will need to create your own source data. This can involve: scanning historical maps and georeferencing them to align with modern geographic coordinates, using drone photogrammetry to capture new aerial data of an existing area, or creating custom building footprints and heights from scratch based on historical records. Drone photogrammetry has become particularly accessible in recent years, with entry-level drones and software like RealityCapture or Agisoft Metashape able to produce centimeter-accurate 3D data of small to medium-sized areas for less than $2,000 total investment.
"The quality of a 3D city model is only as good as the source data you start with. Even the most advanced modeling software can’t fix bad building footprints or inaccurate elevation data. Spend the extra time to verify your source data before you start modeling, and you’ll save days of rework later."
— Dr. Sarah Chen, geospatial researcher at the University of California, Berkeley
Step 3: Choose Your 3D Modeling Workflow and Tools
There are three main workflows for creating a 3D city model, each suited to different skill levels, project needs, and budgets. The right choice depends on whether you are working from existing open data, building a model from scratch, or prioritizing speed versus custom control.
Procedural automatic generation from open data
The fastest and most accessible workflow for most users is automatic generation from existing geographic data like OpenStreetMap. Dozens of tools can pull OSM data and automatically generate a full 3D city model in minutes, with no manual modeling required. This is ideal for users who need a geographically accurate base model quickly, for uses like urban planning, visualization, or game development.
The most popular tools for this workflow include:
- Blender with the Google Maps 3D Importer or OSM2World add-on: Blender is a free open-source 3D modeling program, and community-developed add-ons let you pull data directly from OpenStreetMap or Google Maps and generate a 3D model with one click. This is the best free option for most hobbyists and students.
- CityEngine: Esri CityEngine is the industry standard for professional procedural city modeling, with advanced rules-based generation that lets you automatically generate detailed buildings from building footprints and height data. It is designed specifically for urban planning and GIS applications, with seamless integration with Esri’s other geospatial tools, but requires a paid subscription.
- OpenStreetMap to 3D (OSM2World): A free standalone tool that converts OpenStreetMap data to standard 3D model formats like OBJ or GLB, which you can then import into any 3D editor for refinement.
- ArcGIS Pro / QGIS 3D: If you are already working with GIS data, both ArcGIS Pro and the open-source QGIS have built-in 3D visualization tools that let you generate 3D city models directly from your existing GIS datasets.
Photogrammetry from aerial or drone imagery
If you need a highly accurate model of an existing city or district and don’t have access to pre-existing building data, photogrammetry is a great option. Photogrammetry software stitches together hundreds or thousands of overlapping photos to create a single 3D mesh of the entire area, capturing every building, tree, and terrain feature automatically. This workflow is particularly popular for digital twins, historical site documentation, and construction progress monitoring.
For large city areas, you can use public aerial imagery from sources like Google Earth or national government surveys, or collect your own imagery with a drone for smaller areas. Popular photogrammetry tools include Agisoft Metashape, RealityCapture, and the free open-source Meshroom. The biggest downside of photogrammetry is that it produces very large, high-polygon models that can be difficult to run on consumer hardware, so you will need to optimize the model after generation for most use cases.
Manual modeling from scratch
If you are creating a fictional city, a historical reconstruction, or a high-detail model of a specific district for film or games, you will likely need to do manual modeling. This involves building each building and terrain feature by hand in a 3D editor like Blender, 3ds Max, or Maya. Manual modeling gives you full control over every detail, letting you adjust architecture, add custom landmarks, and optimize geometry for your specific use case. The downside is that it is the most time-consuming workflow, requiring skilled 3D artists and weeks or months of work for large areas.
Many creators use a hybrid workflow, combining automatic generation from open data for the bulk of the city, then manually refining key areas and landmarks to add higher detail. This balances speed and quality, letting you get a base model up and running in hours, then focus your time on the areas that matter most for your project.
Step 4: Process and Refine Your 3D Model
Once you have generated your base 3D city model, you will need to process and refine it to meet your project’s requirements. Automatic generation from OSM or photogrammetry almost always produces errors, extra geometry, or inconsistent detail that needs to be fixed before you can use the model.
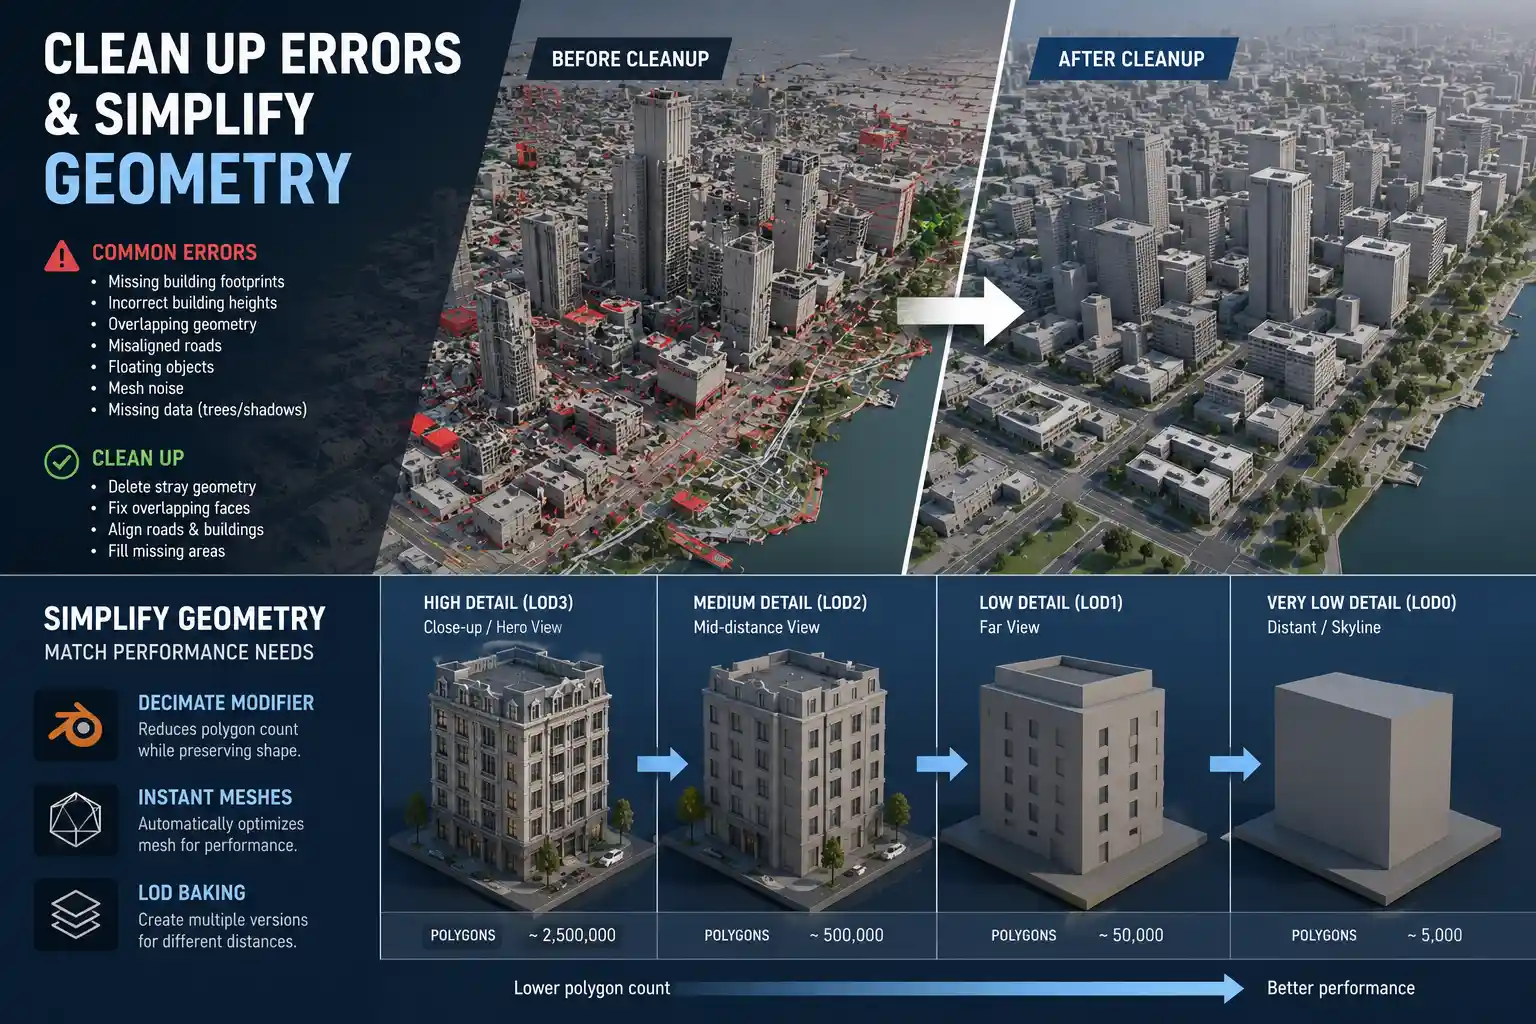
Clean up errors and simplify geometry
The first step is to clean up common errors in base data. For OSM-derived models, this can include missing building footprints, incorrect building heights, overlapping geometry, and misaligned roads. For photogrammetry models, common errors include floating objects, noise in the mesh, and missing data in areas covered by trees or shadows. Use your 3D editor’s selection and cleanup tools to delete stray geometry, fix overlapping faces, and fill in missing data.
Next, simplify your geometry to match your performance needs. If you are creating a model for a video game or a web-based 3D viewer, you need to keep the total polygon count low to ensure smooth performance. For example, a LOD1 model with flat roof blocks will have far fewer polygons than a LOD3 model with detailed windows and facades. Tools like Blender’s Decimate Modifier or Instant Meshes can automatically reduce polygon count while preserving the overall shape of buildings and terrain. For larger models, you can also use level-of-detail baking, where you create multiple versions of the same model with different polygon counts: high-polygon versions for close-up views, and low-polygon versions for distant views, which improves performance without hurting visual quality.
Add textures and materials
After cleaning up geometry, add textures and materials to give your model a realistic look. For geographically accurate models, you can automatically drape satellite or aerial imagery over the terrain and building meshes to create a basic texture. For higher quality results, you can use PBR (physically based rendering) materials that replicate real-world surface properties like brick, asphalt, concrete, and glass. Many asset marketplaces sell pre-made urban texture packs that are optimized for different use cases, so you don’t have to create every texture from scratch.
For key landmarks, you will usually want to add custom textures and higher detail geometry to match the real building. This can involve taking your own reference photos of the building, or sourcing texture images from public archives to create a realistic replica.
Add metadata and extra data layers
If your model is for professional uses like urban planning or digital twins, you will need to add metadata to your model. This can include information like building construction year, material type, utility line locations, ownership data, or energy use data. Most 3D GIS tools let you embed this metadata directly into the model, so users can click on a building to pull up all relevant information. For smart city digital twins, you can also set up integration with real-time IoT data, so your model updates live with information like traffic flow, energy use, or air quality.
Step 5: Export and Deploy Your Model
Once your model is complete, you need to export it in a format that works for your intended deployment. The right export format depends on how you plan to use and share your model:
- Web-based visualization: Use standard open 3D formats like glTF/GLB or USDZ, which are optimized for web loading and streaming. Tools like Three.js, Google Maps 3D, or ArcGIS Online let you host and share your 3D city model directly in a web browser, so users can access it without installing any special software.
- Game development: Export your model in FBX or OBJ format, which can be imported directly into Unity, Unreal Engine, or other game engines. Make sure to optimize polygon counts and pack textures into texture atlases to improve in-game performance.
- 3D printing or architectural visualization: Use STL for 3D printing, or FBX/OBJ for rendering in tools like Enscape or V-Ray. For architectural visualizations, you will usually want to export separate layers for terrain, buildings, and infrastructure to make it easy to adjust lighting and materials.
- GIS and professional planning: Use standard 3D city model formats like CityGML, which is designed specifically for storing 3D urban data with embedded metadata. CityGML is supported by all major GIS tools, so your model can be shared and used by other urban planners and geospatial professionals.
Before you finalize your export, always do a final test import into your target platform to check for errors. Common issues include missing textures, incorrect scale, and polygon count that is too high for the target platform. Making adjustments at this stage is much easier than reworking the entire model later.
Conclusion
Creating a 3D model of a city has never been more accessible, with free open data, user-friendly tools, and streamlined workflows that make it possible for anyone from hobbyist game designers to professional urban planners to build a model that meets their needs. The key to success is starting with a clear definition of your project scope, gathering high-quality source data, and choosing a workflow that balances speed, accuracy, and control for your specific use case. Whether you start with an automatically generated base model from OpenStreetMap or build a custom historical city from scratch, the process follows a logical structure that you can adapt to any project: plan, gather data, build, refine, and deploy. With the steps outlined in this guide, you have all the information you need to start building your own 3D city model today.