
Whether you’re an architecture student preparing a presentation, a real estate developer marketing a new construction project, or a hobbyist restoring a historic home, a high-quality 3D building model can turn abstract plans into an immersive, tangible experience. Unlike 2D blueprints that require specialized training to interpret, 3D models let you walk through hallways, test material finishes, adjust natural lighting, and spot design flaws before any ground is broken. Creating a 3D model of a building sounds technically daunting, but with modern software and a structured approach, even beginners can produce professional-grade results. This guide breaks the process down into clear, actionable steps that work for everything from small residential additions to large commercial developments.
Pre-Project Planning and Data Collection
Before you open any 3D modeling software, the quality of your final model depends entirely on the accuracy of the source data you gather upfront. Skipping this step often leads to time-consuming corrections later, or a final model that doesn’t match the actual building’s dimensions. Whether you’re modeling an existing structure or a design that hasn’t been built yet, your planning process will follow a similar core framework.
Modeling an Existing Building: On-Site Data Gathering
If you’re recreating a building that already stands, your first task is to capture accurate dimensions and spatial details. For small residential structures, this can be done manually with basic tools, but larger or more complex buildings benefit from modern scanning technology.
- Start with basic manual measurements: Use a tape measure, laser distance measurer, and notepad (or a mobile measurement app) to record the length of exterior walls, ceiling heights, window and door openings, and the position of interior partitions. Don’t forget to note sloped roofs, overhangs, stairs, and unique features like fireplaces or built-in cabinetry. Measure multiple times to cross-check for errors—even a 5-centimeter mistake can throw off an entire model’s proportions.
- Collect existing documentation: Most properties have old 2D blueprints, building permits, or as-built drawings on file with local government offices or previous owners. These are invaluable for confirming foundation layouts and structural dimensions that are hidden behind walls.
- Use photogrammetry for rapid capture: For hobbyists or small projects on a budget, photogrammetry is a game-changer. This process uses dozens (or hundreds) of overlapping photos taken from every angle of the building to automatically generate a 3D mesh. All you need is a smartphone camera and free software like Meshroom or Capture One to process the images. For higher accuracy, professional drones can capture exteriors of large buildings, while 360° cameras work well for complex interior spaces.
- Consider LiDAR scanning for professional accuracy: If you’re working on a historic preservation project or commercial development, a portable LiDAR scanner can capture millions of data points in minutes, creating a point cloud that maps every surface of the building within millimeters of accuracy. Many survey companies offer scan services for a fraction of the cost of purchasing a scanner, making this accessible even for mid-sized projects.
Modeling a New Design: Organizing 2D Source Files
If you’re creating a 3D model from a design that hasn’t been built yet, your source material will be 2D architectural drawings. Start by gathering all relevant files: floor plans for every level, elevation drawings showing exterior views from each side, cross-section drawings that show interior vertical dimensions, and structural or MEP (mechanical, electrical, plumbing) plans if you plan to include those systems in your model. Organize these files by layer and level to avoid confusion when you import them into your 3D software. Check that all drawings use a consistent unit of measurement—whether that’s feet and inches or millimeters—before you start modeling to avoid scaling errors later.
“The biggest mistake new 3D modelers make is jumping into modeling before verifying their source data. An extra hour of measuring or cross-checking drawings at the start saves 10+ hours of rework down the line.”
— Sarah Chen, licensed architect and 3D visualization specialist
Choosing the Right 3D Modeling Software
There are dozens of 3D modeling tools on the market, ranging from free browser-based options to high-end professional suites that cost thousands of dollars. The best choice for you depends on your use case, budget, and level of experience. Matching your tool to your project goal will save you time and frustration.
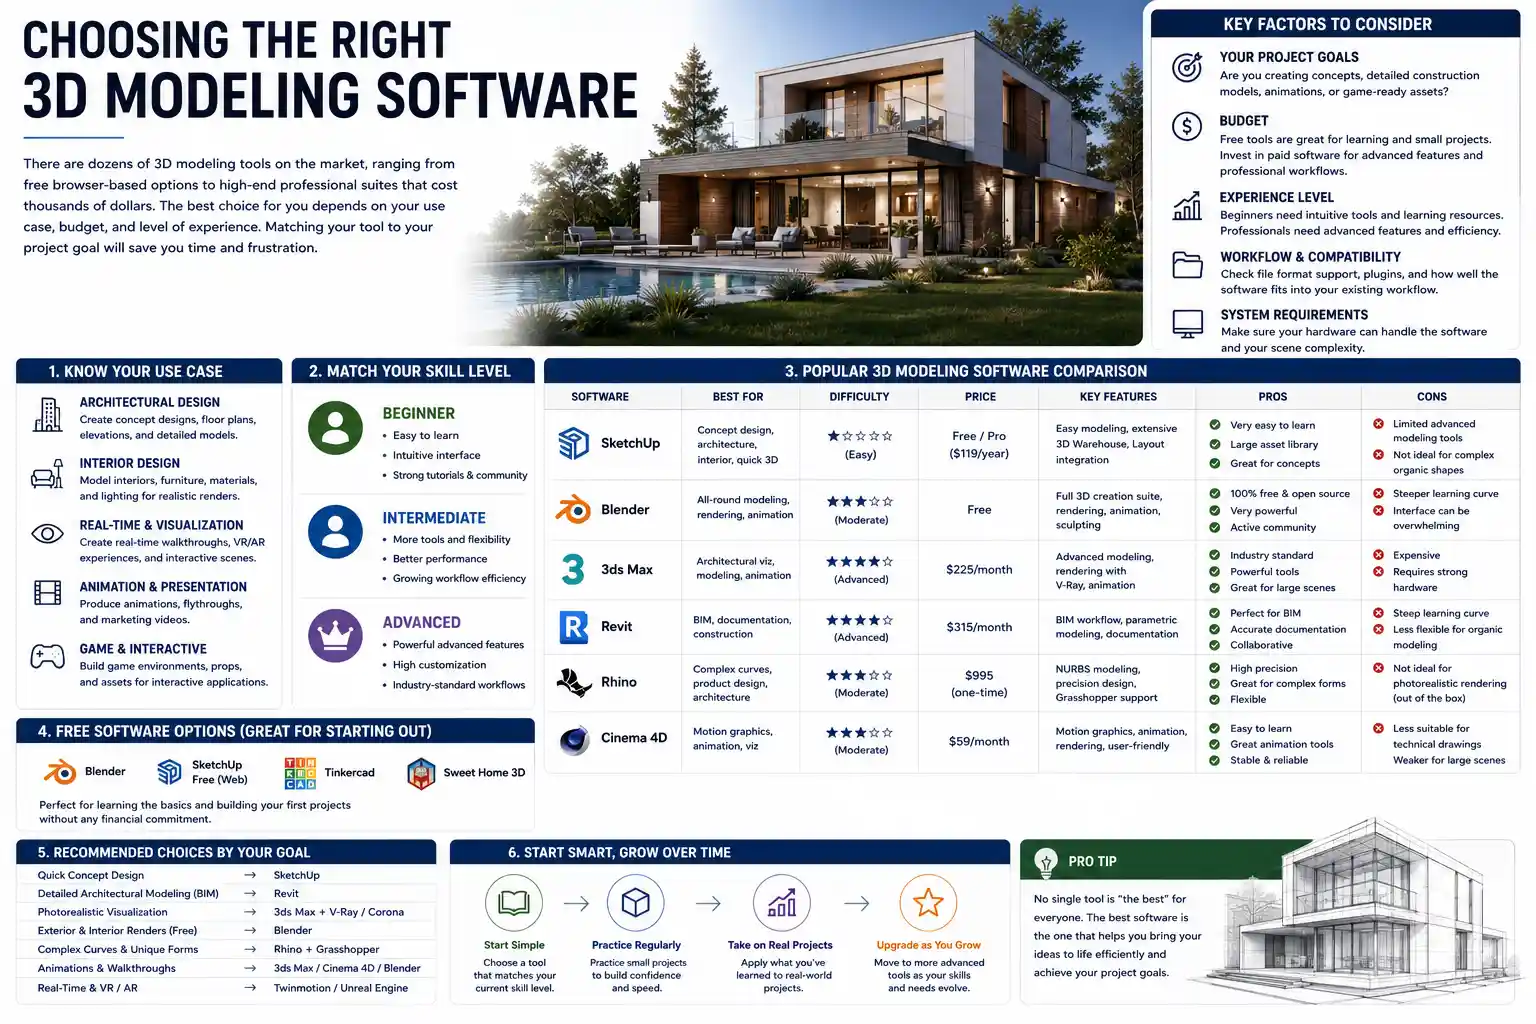
Beginner-Friendly Options for Hobbyists and Students
If you’re new to 3D modeling or working on a personal project, these tools balance ease of use with enough functionality to create a solid building model:
- SketchUp Free: The free browser-based version of SketchUp is widely considered the best starting point for architectural modeling. Its push-pull tool lets you turn 2D shapes into 3D volumes in one click, and there’s a massive public library of pre-made components (doors, windows, furniture) you can drop into your model for free. The paid Pro version adds export options for CAD files and photorealistic rendering, making it a great step up as you gain experience.
- Blender: Blender is a free, open-source 3D creation suite with powerful modeling and rendering tools. While it has a steeper learning curve than SketchUp, there are thousands of free tutorials for architectural modeling online, and it can produce professional-level visualizations without any subscription cost. It’s especially popular for hobbyists creating 3D printable building models.
- Homestyler: If you’re modeling a residential interior renovation, this browser-based tool is designed specifically for non-professionals. It has a library of real brand-name furniture and finishes, and you can generate a 3D walkthrough in minutes without learning complex modeling workflows.
Professional Tools for Architects and Commercial Projects
For professional use cases like construction documentation, client presentations, or coordinated design projects, these industry-standard tools offer advanced functionality and compatibility with other construction software:
- Autodesk Revit: Revit is the global standard for architectural BIM (Building Information Modeling). Unlike basic modeling tools that just create a visual 3D shape, Revit embeds data into every component: a wall doesn’t just look like a wall—it knows what material it’s made of, its fire rating, its cost, and how it connects to other building elements. This makes Revit ideal for full architectural projects, as all consultants (structural engineers, MEP designers) can work on the same model simultaneously to avoid coordination conflicts.
- ArchiCAD: ArchiCAD is another popular BIM tool, favored by many small architectural firms for its intuitive interface and flexible documentation tools. It offers similar BIM functionality to Revit, with a focus on streamlining the design process from sketch to construction document.
- Rhino 3D: Rhino is especially popular for modeling complex, non-standard building shapes, like the curved facades of contemporary design or organic architectural forms. It pairs well with the Grasshopper plug-in for parametric design, which lets you create designs that adjust automatically when you change parameters like building height or window spacing.
When choosing software, don’t forget to check compatibility with other tools you’ll use. If you need to share your model with a construction team or render it for a marketing presentation, a BIM tool like Revit will export files that work with almost every industry standard platform. For 3D printing, STL export is a non-negotiable feature that most modern tools support.
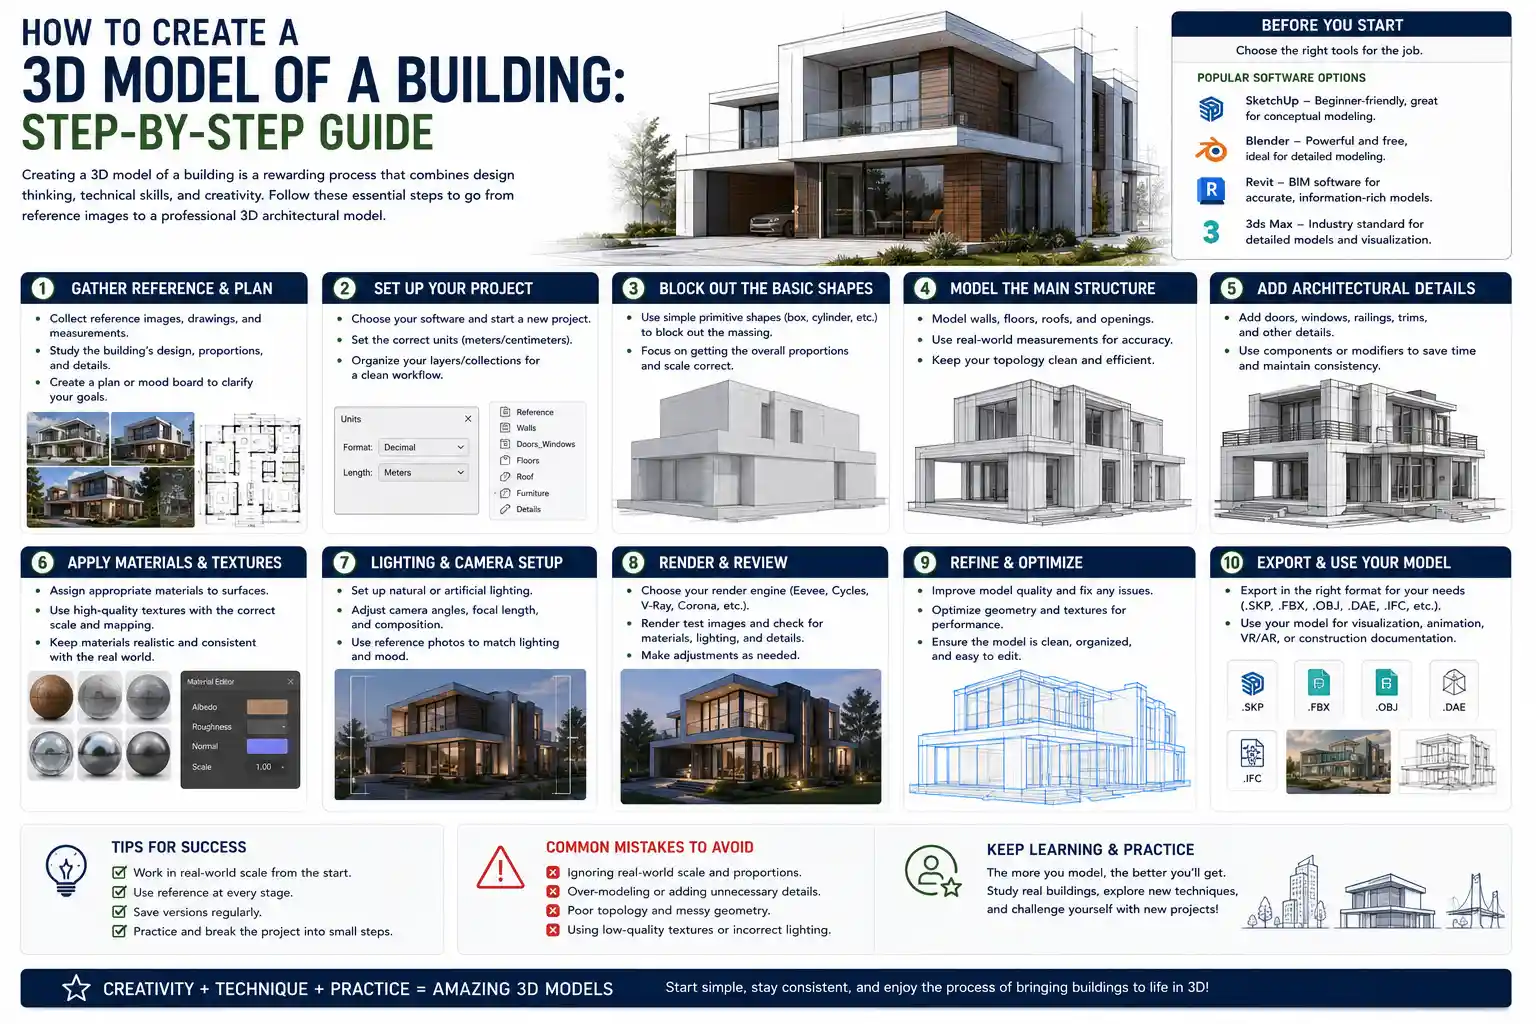
Step-by-Step 3D Modeling Workflow
Once you have your source data and software set up, follow this consistent workflow to build your model efficiently and accurately. This process works for both existing buildings and new designs, with minor adjustments for each use case.
1. Import and Scale Your Reference Drawings
Start by importing your 2D floor plans, elevations, and section drawings into your 3D modeling software as reference images or CAD files. The most critical step here is scaling the reference to match real-world dimensions. If you imported a scanned blueprint, use a known dimension (like a 10-foot exterior wall) to adjust the scale of the image so it matches the actual measurement. Most software lets you lock the reference image in place on a separate layer so you can trace over it without accidentally moving it. For multiple-story buildings, arrange each floor plan on a separate vertical level, spaced according to your ceiling height measurements.
2. Block Out the Core Building Massing
Before adding fine details like windows or doorknobs, start with massing: creating basic 3D volumes that represent the overall shape and size of the building. For a simple rectangular building, this means drawing the outline of the exterior footprint, then pulling it up to the correct overall height. For complex buildings with multiple wings, setbacks, or sloped roofs, block each section out separately. This step lets you check that the overall proportions of the building look correct before you invest time into detailed modeling. If you’re working from point cloud data from a LiDAR scan, you can use the point cloud as a reference to trace your massing directly, rather than working from 2D drawings.
3. Add Walls, Doors, and Windows
Once your massing is approved, add the core architectural components. If you’re using a BIM tool, you can insert pre-configured walls, doors, and windows that automatically cut openings in the walls and update when you adjust their size. If you’re using a general modeling tool like Blender or SketchUp, you’ll draw the wall outlines first, then pull them up to height, then cut openings for doors and windows before adding the door and window components. For interior models, add interior partitions, stairs, and floor levels at this stage. Pay close attention to the thickness of exterior and interior walls—forgetting to account for wall thickness is one of the most common beginner mistakes, which can leave your interior rooms 10-20 centimeters smaller than they should be.
4. Add Detailed Features and Context
Next, add secondary details that bring your model to life. This includes things like roof slopes, gutters and downspouts, chimneys, built-in furniture, countertops, crown molding, and exterior features like porches, walkways, and landscaping. You don’t have to model every single screw or nail unless your model is for 3D printing or construction coordination—focus on details that are visible in your final use case. For example, if you’re creating a model for an exterior marketing render, you don’t need to model the layout of interior electrical outlets. If you’re creating a BIM model for construction, you will need to add MEP components like pipes, wiring, and HVAC ducts at this stage to coordinate with other systems.
Don’t forget to add context around your building: site topography, neighboring buildings, roads, trees, and landscaping. This makes the model feel grounded and realistic, which is especially important for client presentations or planning applications. Most software has free libraries of pre-made landscape components that you can import instead of modeling from scratch.
5. Check for Errors and Validate Dimensions
Before you move on to rendering or exporting, do a full check of your model for common errors. Common issues include:
- Walls that don’t meet at corners, leaving small gaps
- Overlapping components that cause rendering glitches
- Incorrect ceiling heights or room dimensions that don’t match source data
- Missing openings for doors or windows that leave solid walls where they shouldn’t be
If you’re working with a BIM model, run a clash detection test to identify conflicts between different systems—for example, a structural beam that overlaps with a HVAC duct. Catching these errors in the 3D model avoids costly rework during construction.
Adding Materials, Textures, and Rendering
A raw 3D model with plain gray geometry is useful for planning, but if you need to present your model to clients, market a property, or create a realistic visualization, you’ll need to add materials and render a final image or walkthrough. Rendering is the process of calculating how light interacts with the surfaces of your model to create a photorealistic image or video.
Applying Materials and Textures
Every surface in your model needs a material assigned to it that defines how it looks and how it interacts with light: brick, wood, glass, concrete, paint, carpet, and so on. Most modern 3D software comes with a built-in library of physically based materials that are pre-configured to look realistic. For example, a glass material will be transparent, reflect light, and refract it slightly, just like real glass. You can adjust the color, roughness, and texture of each material to match your design: for example, you can switch from a matte painted wall to a glossy subway tile backsplash with a few clicks.
For even more realism, you can add texture maps: high-resolution images that add surface detail like the grain of wood, the uneven pattern of brickwork, or the bumps of a stucco wall. Free resources like Poly Haven and TexturingXYZ offer thousands of high-quality, free textures you can download and use in your model.
Setting Up Lighting and Camera Angles
Good lighting is the key to a realistic render. Start with natural light: set your model’s geographic location, date, and time of day to get accurate sun positioning. This is especially useful for testing how much natural light a room will get at different times of year, or how shadows fall on neighboring properties. Add artificial lighting for interior spaces: overhead lights, lamps, and accent lighting to match the design of the building.
Next, set up your camera angles. For architectural renders, use a natural field of view (between 35mm and 50mm for full-building shots, 24mm for wide interior shots) to avoid distortion that makes the building look warped. Plan your camera angles to highlight the best features of the design: for example, a wide exterior shot that shows how the building fits into its site, or a close-up of a custom kitchen for a residential renovation. For interactive models, you can create a 360° panorama or a walkthrough animation that lets viewers move through the building from room to room.
Rendering Your Final Output
Rendering times can range from a few minutes for a single low-resolution image to several hours for a high-resolution photorealistic render or a full walkthrough video. Cloud rendering services like V-Ray Cloud or Enscape let you offload the rendering process to remote servers, so you don’t tie up your own computer for hours. For fast previews while you’re working, real-time rendering tools like Enscape or Lumion update your view instantly as you adjust materials or camera angles, making it easy to iterate on your design quickly.
For interactive use cases, you can export your model as a web-based 3D object that anyone can view and rotate in their browser, or as a VR (virtual reality) model that lets clients walk through the building with a VR headset. This is becoming increasingly common for real estate marketing and architectural client presentations, as it gives a much more immersive experience than still images.
Exporting and Sharing Your 3D Model
The final step is exporting your model in the correct format for its intended use. Different use cases require different file types, so choosing the right one will ensure your model works correctly wherever it’s used.
Common export formats for different use cases:
- 3D Printing: Export as an STL or OBJ file. These formats preserve the 3D mesh geometry that 3D printing software requires. Make sure your model is a closed, watertight mesh (no gaps or overlapping faces) before exporting to avoid 3D printing errors.
- Construction and BIM Coordination: Export as an IFC (Industry Foundation Classes) file. IFC is an open standard that lets BIM models be shared between different software platforms, so structural engineers or contractors can open and work on your model regardless of what tool they use. RVT (Revit) or PLA (ArchiCAD) native files are also common for in-house projects.
- Web Sharing and AR/VR: Export as a GLB or GLTF file. These are compact, efficient 3D formats that load quickly in web browsers and work with most augmented reality tools, so you can embed the model on a website or view it in AR on a smartphone.
- Rendering and Visualization: If you’re sending your model to a 3D artist for rendering, export as an FBX or OBJ file with all materials and textures embedded.
Before sharing your model with third parties, it’s a good idea to clean it up to reduce file size: remove any hidden geometry or unused components, and simplify very complex meshes if they don’t need to be high-resolution. A smaller file loads faster and is easier to share, especially for web or interactive use.
Conclusion
Creating a 3D model of a building is a process that rewards careful planning and a step-by-step approach, regardless of your skill level or the size of your project. Starting with accurate source data, choosing software that matches your goals, and building up your model from basic massing to detailed components will help you avoid common mistakes and save time in the long run. Whether you’re a student working on your first architectural project, a professional creating a BIM model for construction, or a homeowner planning a renovation, modern tools have made 3D modeling more accessible than ever before. With the workflow outlined in this guide, you can turn a set of 2D drawings or a physical existing building into an accurate, immersive 3D model that meets your needs.