
Whether you’re an urban planner visualizing a new development, a game designer building an immersive open world, a student working on a geography project, or a hobbyist creating a miniature of your hometown, building a 3D city model is a rewarding process that blends technical skill, creative problem-solving, and attention to real-world detail. Modern tools have made this once-exclusive project accessible to creators of all skill levels, but a structured approach will help you end up with a model that’s accurate, functional, and visually striking. This guide walks you through every step of the process, from initial planning to final polish, regardless of your experience level.
Step 1: Define Your Project Scope and Goals
Before you open any 3D modeling software or download a single geospatial dataset, you need to narrow down what exactly you want to build. 3D city models can range from a tiny block of 10 historic buildings to an entire metropolitan area spanning hundreds of square kilometers, and your goals will shape every decision you make later in the process.
Clarify Your Core Purpose
Your intended use for the model dictates its level of detail, scale, and file type. For example, an architectural visualization for a public presentation needs high-resolution textures and accurate building heights to communicate design intent to stakeholders. A 3D model for a mobile game, by contrast, needs to be optimized for low processing power, with simplified geometry that won’t cause lag. A historical recreation of a lost city may prioritize aesthetic accuracy over geospatial precision, while a civil engineering project for flood modeling requires centimeter-level elevation data to predict water flow correctly.
Set Your Boundaries and Scale
Even experienced modelers can get overwhelmed by trying to model an entire major city all at once. Define clear geographic boundaries for your project: are you modeling the central business district, a residential neighborhood, or the entire urban area? Decide on your scale, too: a 1:1000 physical 3D print of a city block requires different detail than a 1:1,000,000 digital model for a regional planning document.
To avoid scope creep, consider creating a short project brief that answers these questions before you start:
- What is the primary use of the finished 3D model?
- What geographic area do I need to cover?
- What level of detail is required (do I need individual windows, or just building footprints and heights)?
- What is my budget, and how much time can I dedicate to the project?
- What file format do I need to deliver the final model in?
For example, a hobbyist creating a 3D printable model of their hometown’s downtown might set a scope of 2 square kilometers, with enough detail to recognize individual landmarks, a 3-month timeline, and a budget under $100 for software and textures. A professional urban planner working on a new transit line might scope a 10-square-kilometer area with high-detail terrain and building data, a 6-week timeline, and a budget for premium geospatial data.
Step 2: Gather Source Data and Reference Materials
Accurate 3D city models rely on high-quality source data. Even if you’re creating a fictional city, reference materials help you build a layout that feels realistic and logical. For real-world cities, there are dozens of free and paid sources for geospatial data that fit every budget.
Free Data Sources for Hobbyists and Students
You don’t need an expensive professional subscription to get high-quality base data for your project. For most non-commercial projects, these free sources work extremely well:
- OpenStreetMap (OSM): OSM is a community-led open-source map project that includes free, downloadable data for building footprints, road networks, park boundaries, and point of interest locations for almost every city on Earth. Tools like OsmAnd or Overpass Turbo let you export exactly the area you need in a GIS-friendly format.
- NASA and USGS Elevation Data: For terrain and topographical data, NASA’s SRTM (Shuttle Radar Topography Mission) and USGS’s 3D Elevation Program (3DEP) provide free global elevation data with resolution up to 1 meter for most of North America, and 30 meters for the rest of the world. For regions outside the US, the European Space Agency’s Copernicus program offers similar free high-resolution data.
- Satellite and Aerial Imagery: Google Maps, Google Earth, and Bing Maps provide free high-resolution aerial imagery that you can use as a reference for building shapes, textures, and colors. For non-commercial projects, you can even export base maps directly from Google Earth Pro for free.
- Open Government Data Portals: Most major cities in North America, Europe, and Australia publish free open data that includes building footprints, height data, and zoning information. Check your city’s official website for an open data portal to access this information.
Paid Data Sources for Professional Projects
If you need higher resolution or more accurate data for commercial work, premium sources offer greater precision. Companies like DigitalGlobe (Maxar) provide satellite imagery with resolution as high as 30 centimeters, while local surveying companies can provide LiDAR data that captures elevation and building details with centimeter-level accuracy. LiDAR is especially useful for modeling complex terrain or dense urban areas with lots of tall buildings.
Reference Materials for Fictional Cities
If you’re building a fictional city for a game, film, or art project, you’ll still need reference materials to keep your design consistent. Study similar real-world cities to understand how road networks are laid out, how buildings are spaced, and how terrain shapes development. For example, a medieval fantasy city will have narrow, winding streets centered on a castle or cathedral, while a modern planned city will have a grid layout with wide arterial roads and separated zoning for residential, commercial, and industrial areas. Collect reference photos of building styles, street furniture, and landscape features to keep your design cohesive.
"The best 3D city models aren’t just collections of buildings – they’re reflections of how real cities work. Garbage in, garbage out: if you start with bad source data, even the most skilled modeling work can’t fix a flawed foundation."
Step 3: Choose the Right Tools for Your Project
There is no one “best” tool for building a 3D city model – the right choice depends on your budget, your skill level, and what you plan to do with the finished model. Tools range from free beginner-friendly options to high-end professional software used by major architecture and engineering firms.
Beginner and Free Tools
If you’re new to 3D modeling or working on a tight budget, these tools are a great starting point:
- Blender: Blender is a free, open-source 3D modeling suite that has all the features you need to build a detailed city model. It supports importing OSM data via add-ons like BlenderGIS, which lets you pull in building footprints and elevation data automatically. It’s also great for texturing, rendering, and exporting models for 3D printing or game use. The only downside is that it has a steep learning curve for complete beginners, but there are thousands of free tutorials online to help you get started.
- SketchUp Free: SketchUp is known for its intuitive, easy-to-learn interface that’s perfect for beginners. The free web version lets you build small to medium city models, and the 3D Warehouse has thousands of pre-made 3D models of buildings, trees, cars, and other city objects you can drop into your scene. It’s ideal for architectural visualizations and student projects.
- CityEngine (Trial Version): Esri CityEngine is a professional tool built specifically for procedural city modeling, which means it can automatically generate 3D cities from 2D map data. The free non-commercial trial version is powerful enough for most hobbyist projects, and it integrates seamlessly with OSM and GIS data.
Procedural Generation Tools for Large Cities
If you’re building a large city with thousands of buildings, manually modeling each one would take months or years. Procedural generation tools automatically create 3D buildings from 2D footprint and height data, saving you hundreds of hours of work. Tools like CityEngine, ArcGIS Pro, and SideFX Houdini use procedural rules to generate different building types based on zoning data: for example, you can set a rule that all residential parcels get 2-3 story single-family homes, while commercial parcels get 10-20 story apartment buildings with ground-floor retail.
For game developers, tools like Unity’s Mapbox or Unreal Engine’s City Sample can automatically generate entire game-ready 3D cities from real-world map data in minutes. These tools also handle LOD (level of detail) optimization automatically, so your model runs smoothly even in real-time game engines.
Professional Tools for Commercial Projects
For architectural firms, civil engineering companies, and urban planning departments, industry-standard tools include Autodesk AutoCAD Civil 3D for terrain and infrastructure modeling, Autodesk Revit for detailed building modeling, and Esri ArcGIS for geospatial analysis. These tools integrate with each other to support complex projects like infrastructure planning or disaster risk modeling, but they require a paid subscription and advanced training to use effectively.
Step 4: Build and Refine Your Base Model
Once you have your data and your tools set up, it’s time to start building your model. Most projects follow a layered workflow, starting with the base terrain and adding details from the ground up.
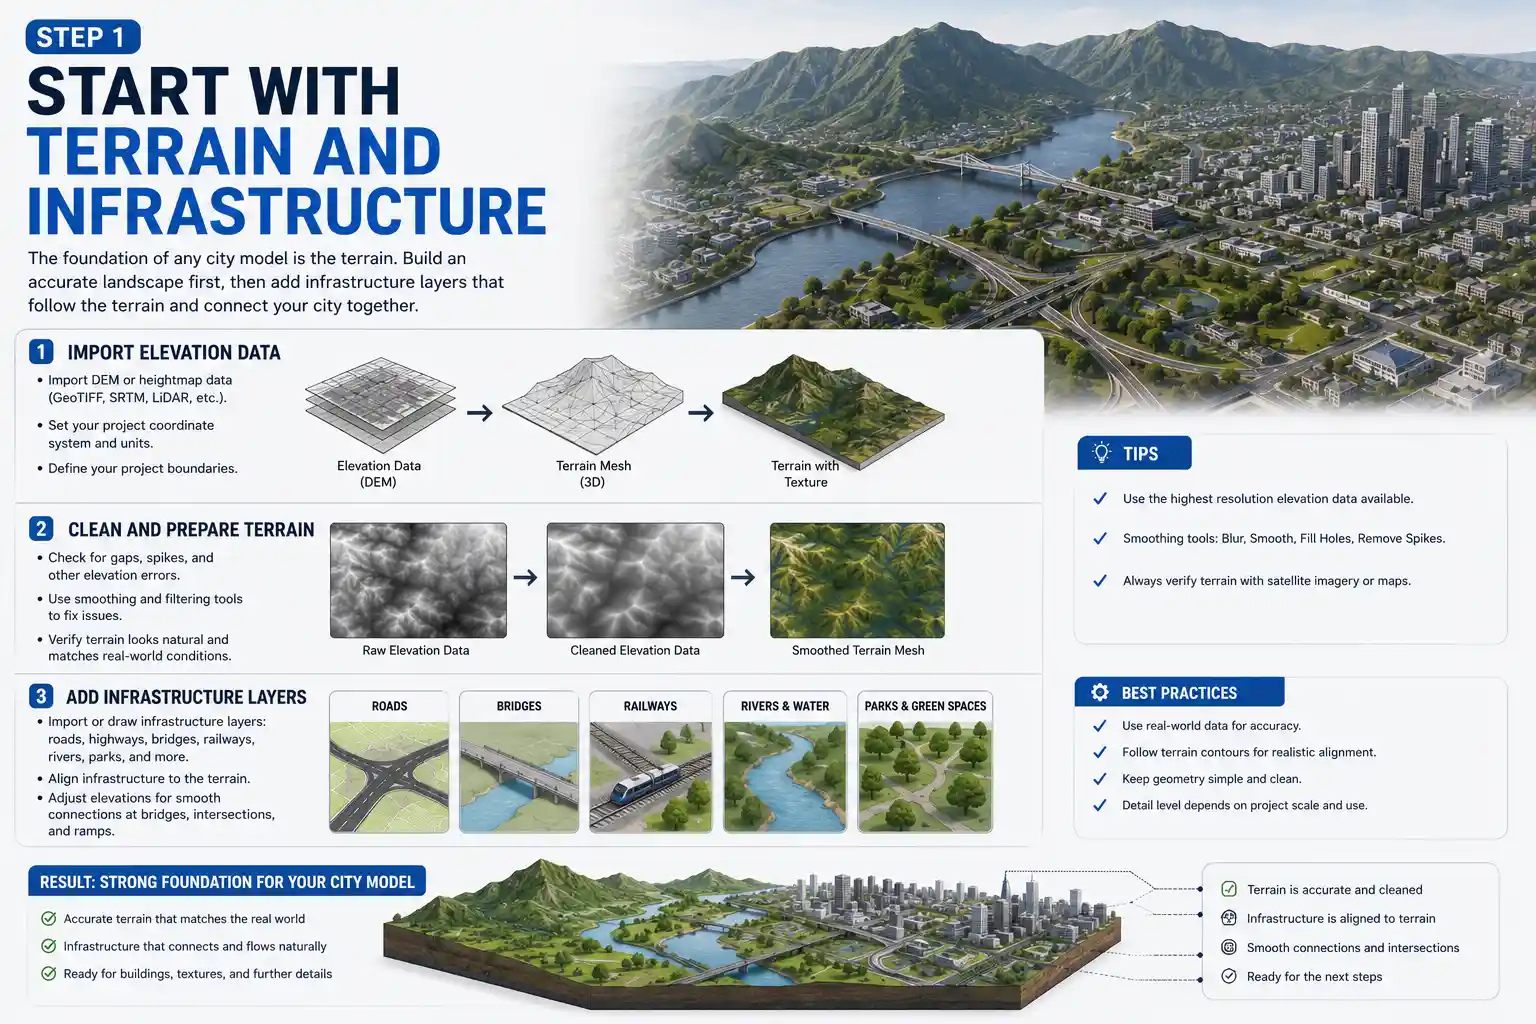
Start with Terrain and Infrastructure
The foundation of any city model is the terrain. Import your elevation data into your modeling software, and generate a 3D terrain mesh that matches your project boundaries. Clean up any errors in the elevation data: for example, if you have gaps or spikes in the data from cloud cover or sensor errors, use smoothing tools to fix them before moving on.
Next, add your infrastructure layers: roads, bridges, railways, rivers, and parks. Use your road network data to align roads correctly with the terrain, and adjust elevations to make sure roads connect smoothly to bridges and intersections. For most projects, you don’t need to model every pothole or crack in the road unless you’re creating a close-up visualization – a simple flat road surface with the correct width and texture is enough for most use cases.
Add Buildings
How you add buildings depends on the level of detail you need and the tools you’re using. If you’re using procedural generation, you can automatically extrude building footprints to the correct height, and add roofs and basic textures in a single step. This is the fastest method for large projects with hundreds of buildings.
For important landmarks or projects that require high detail, you’ll need to model individual buildings by hand. Start by tracing the building footprint from your aerial reference, then extrude it to the correct height. Add details like windows, doors, cornices, and roof shapes based on reference photos. If you’re working on a 3D printable model, make sure all building geometry is solid and has no non-manifold edges that will cause printing errors.
One common time-saving trick is to use instancing for repeated elements like windows or row houses. Instead of modeling each window individually, model one window and copy it across the building facade. Most 3D software lets you instance copies, which don’t add extra file size to your final model, keeping it lightweight and easy to work with.
Add Small-Scale Details
It’s the small details that make a 3D city model feel alive. Once you have your main buildings and infrastructure in place, add secondary elements like:
- Street furniture: streetlights, traffic signs, benches, bus stops
- Vegetation: trees, shrubs, grass in parks and along sidewalks
- Vehicles and people (for visualizations and games)
- Street textures: asphalt, concrete, brick sidewalks
- Landmarks: monuments, statues, unique public spaces
Keep your scope in mind when adding details: if you’re creating a regional model for planning, you don’t need to add every streetlight. If you’re creating a close-up architectural visualization of a city square, these details are critical for making the scene feel realistic.
Clean Up and Optimize Your Model
Raw imported data almost always has errors that need to be fixed. Common issues include overlapping building footprints, missing heights, misaligned roads, and duplicate geometry. Take the time to clean up these errors before you add textures – it’s much easier to fix issues with the base model than it is to fix them after you’ve added textures and details.
Optimization is also critical, especially for digital models that will be used in games or interactive presentations. Reduce polygon count on distant objects by using level of detail (LOD) groups: high-poly details for close-up objects, and low-poly simplified versions for objects that are far from the camera. Remove any hidden or duplicate geometry that adds unnecessary file size. For 3D printing, combine multiple small objects into a single mesh where possible, and make sure all surfaces are closed and manifold.
Step 5: Add Textures, Lighting, and Final Polish
Texturing and lighting turn a plain blocky base model into a realistic, immersive scene. The right approach to texturing depends on whether your model is digital or physical, but the core principles are the same: match real-world colors and materials, and add variation to avoid a sterile, uniform look.
Texturing for Digital Models
For large city models, using PBR (physically based rendering) textures will give you consistent, realistic results across different lighting conditions. PBR textures are available for free from sites like Poly Haven or TexturingXYZ, and they include common city materials like asphalt, brick, concrete, glass, and grass. For a more realistic look, add subtle variation: don’t use the same brick texture for every building, and add dirt or weathering to older buildings to make them look lived-in.
One of the most common mistakes new modelers make is using uniform, saturated colors for everything. Real cities have subtle color variation: asphalt is not pure black, brick is not uniform red, and concrete ranges from light gray to off-white depending on age and weathering. Use reference photos from your city to match colors correctly.
Lighting and Rendering
Lighting has a huge impact on how your final model looks. For architectural visualizations, a soft overcast sky lighting setup gives even illumination that shows off all the details of your model. For dramatic effect, you can set your lighting to golden hour (the hour just after sunrise or before sunset) to create long shadows that highlight the height and shape of your buildings. For interactive models or games, add dynamic lighting that changes with time of day to create a more immersive experience.
When rendering your final output, adjust the resolution to match your use case: print outputs need at least 300 DPI, while digital web outputs only need 72 DPI. For high-resolution still renders, use a path tracer like Cycles (built into Blender) for photorealistic results.
Preparing for 3D Printing
If you’re building a physical 3D printed city model, the final polish step is different. Instead of texturing, you’ll need to orient your model correctly for printing, add support structures for overhangs like bridges and balconies, and split large models into multiple printable parts if your 3D printer has a small build volume. Many modelers choose to paint their 3D printed cities after printing, so you can leave the model as raw plastic and add color with paint after it’s assembled.
Conclusion
Building a 3D model of a city is a complex project, but breaking it down into structured steps makes it accessible to creators of all skill levels. By starting with clear scope and goals, gathering high-quality source data, choosing the right tools for your project, building your model layer by layer, and adding final polish, you can create a 3D city model that meets your needs, whether you’re a student working on a class project, a hobbyist 3D printing a model of your hometown, or a professional creating a visualization for urban planning. The key is to start small, focus on accuracy first, and add details gradually – there’s no need to model every window in the entire city on your first day. With patience and practice, you’ll end up with a finished model that you can be proud of, and that serves its intended purpose perfectly.