
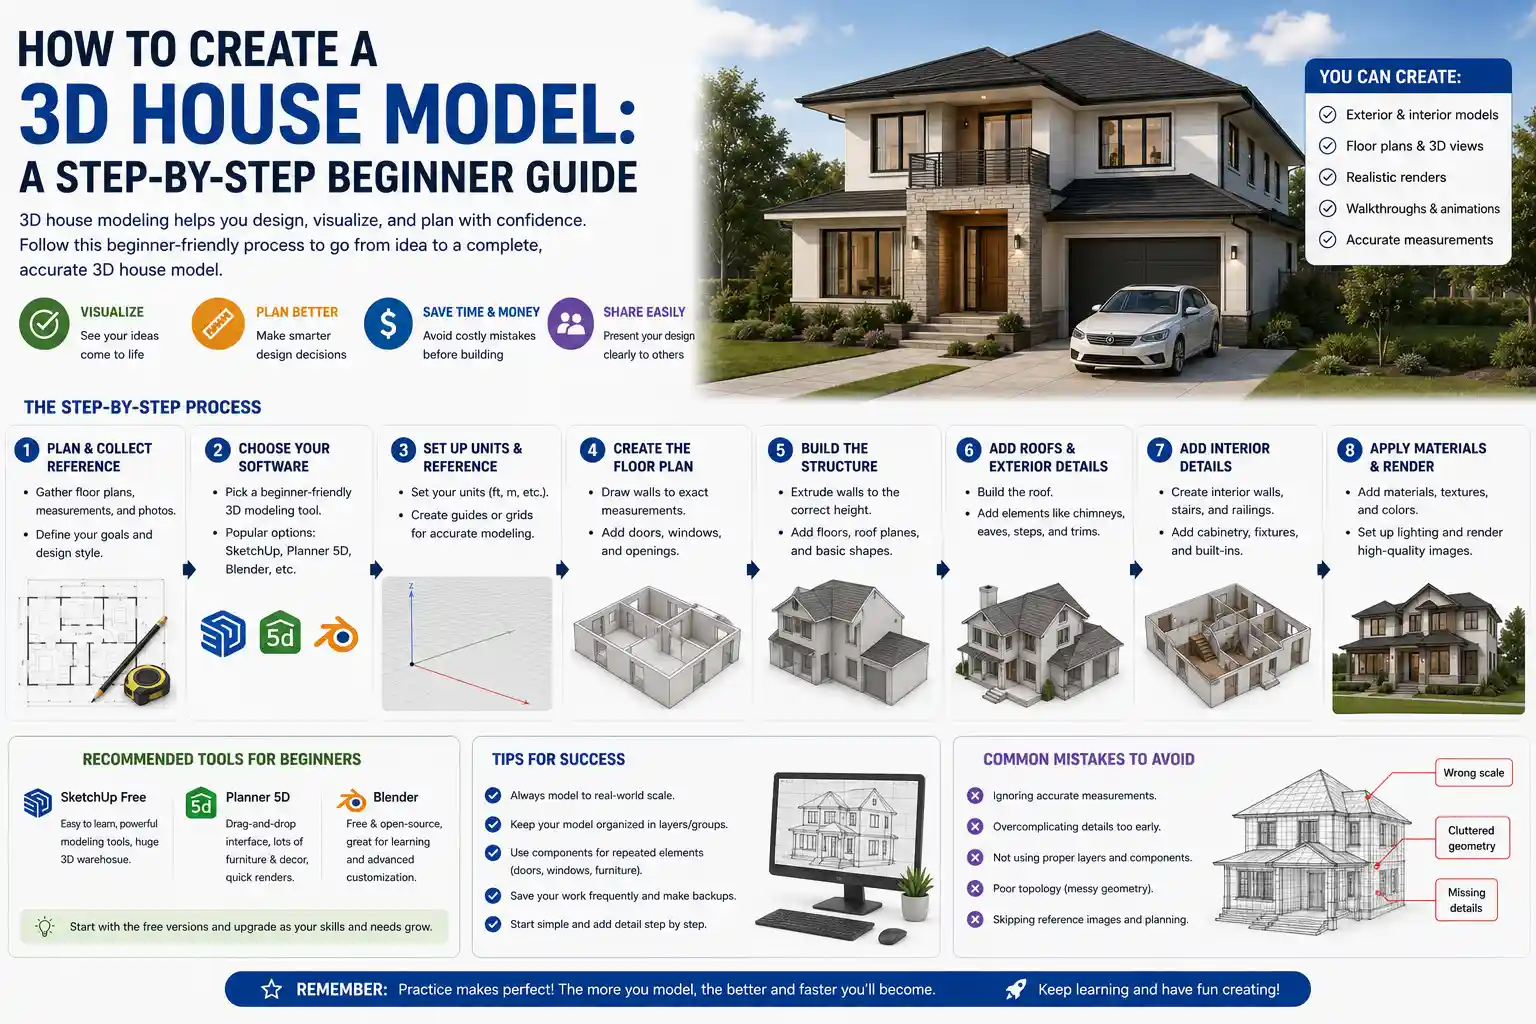
Whether you’re a prospective homeowner planning a renovation, an architecture student working on your first project, or a hobbyist who wants to visualize your dream space before breaking ground, creating a 3D house model is an incredibly valuable skill. Gone are the days when 3D modeling required expensive professional software and years of technical training. Today, intuitive tools and step-by-step workflows make it accessible to anyone with a computer and a bit of patience. A well-made 3D model doesn’t just show you what your house will look like—it helps you catch costly design flaws, experiment with different layouts, and share your vision clearly with contractors, architects, or family members. In this guide, we’ll walk through every stage of the process, from initial planning to final rendering, so you can create an accurate, useful 3D house model regardless of your experience level.
Pre-Modeling Planning & Preparation
Before you open any 3D modeling software, you need to lay the groundwork for an accurate model. Skipping this step often leads to messy, incorrect models that require hours of rework later. The goal of planning is to gather all the key dimensions and design details you need, so you don’t have to pause your modeling work to hunt for missing information.
Gather Existing Documentation
If you’re modeling an existing house or working from a set of architectural plans, start by collecting all available documentation. This includes 2D floor plans, elevation drawings, section views, and property site plans. If you don’t have official plans (for example, if you’re modeling a home you already own to plan a renovation), you’ll need to take your own measurements.
When measuring an existing house, work room by room, and write down every dimension: wall lengths, ceiling heights, window and door sizes, and the location of permanent features like fireplaces, stairs, and built-in cabinets. Don’t forget to note the thickness of exterior and interior walls—this is a common detail new modelers miss, and it can throw off your entire layout if ignored. For most residential construction, exterior walls are 15cm (6 inches) thick, and interior walls are 10cm (4 inches), but always confirm with actual measurements if possible.
Define Your Modeling Goals
What do you want to get out of your 3D model? Your goal will determine how detailed you need to be, what software you choose, and how much time you’ll spend on the project. Common goals include:
- A basic massing model to show the overall size and shape of the house on a lot, for planning permission or site design
- A fully detailed interior model to experiment with furniture layout, paint colors, and renovation designs
- A photorealistic exterior rendering to market a home for sale or share a custom home design with a client
- A 3D model ready for 3D printing, which requires clean, closed geometry to print correctly
If you just want to plan a new kitchen layout, you don’t need to model every electrical outlet or shingle on the roof. But if you’re creating a model for a contractor to bid on a build, accurate details for structural elements and fixtures are non-negotiable. Defining your scope early keeps you from wasting time on details that don’t matter for your project.
Choose the Right 3D Modeling Software
One of the biggest advantages of modern 3D modeling is the range of tools available for every skill level and budget. Your choice of software will depend on your goals, how much experience you have, and how much you’re willing to spend. Here’s a breakdown of the most popular options:
- Beginner-friendly, low-cost options: SketchUp Free, Planner 5D, Homestyler, and Sweet Home 3D are all designed for casual users and new modelers. They have intuitive drag-and-drop interfaces, pre-made libraries of doors, windows, and furniture, and most offer free basic plans. These are ideal for renovation planning and simple interior or exterior models.
- Professional, mid-range options: SketchUp Pro, ArchiCAD, and Revit LT offer advanced features for architects and designers, with tools for generating construction documents and accurate 2D drawings from your 3D model. They have steeper learning curves than beginner tools but are more powerful for custom home design.
- High-end professional options: 3ds Max, Blender, and Rhino are used for photorealistic rendering and complex custom designs. Blender is completely free and open-source, though it has a steep learning curve for new users. These are best if you need advanced rendering or a 3D printable model.
For most new users, SketchUp Free is an excellent starting point. It’s powerful enough for most residential projects, has a huge community of users creating free pre-made components, and is easy to learn the basics of in a few hours.
Building the Core 3D Structure
Once you have your plans, measurements, and software set up, it’s time to start building the core structure of your model. The best approach is to work from the outside in, starting with the overall footprint and then adding interior walls, openings, and structural elements. This ensures your proportions stay consistent from the start.
Set Up Your Project Workspace
Start by setting your project units to match your measurements. If you took measurements in feet and inches, set your workspace to imperial units; if you used metric, set it to centimeters or meters. Most software will default to one or the other, so double-check this early—an incorrect unit setting will leave you with a model that’s 12 times too big or too small, which is a frustrating mistake to fix later.
Next, import your 2D floor plan as a reference image if you have one. Most 3D tools let you import a JPG or PNG of your plan and scale it to match your actual dimensions. This gives you a background to trace over, which saves a lot of time compared to drawing every wall from scratch. If you don’t have a digital floor plan, just start drawing the exterior footprint based on your measured dimensions.
Draw Walls and Floors
The core of your model is the exterior and interior walls. For most tools, you’ll start by drawing the outline of the house footprint on the ground plane. Each line you draw becomes a wall, which you can pull up to your ceiling height. Don’t forget to add thickness to your walls—many beginner tools automatically add wall thickness based on standard construction dimensions, but if you’re working with a general 3D tool like Blender, you’ll need to adjust this manually.
Once the exterior walls are done, add the interior walls to divide the space into rooms. Match the location and dimensions exactly to your measurements, and double-check that door openings align correctly between rooms. After walls, add the floor and ceiling. For a basic model, a flat floor slab at ground level and a flat ceiling at the correct height is enough. If you’re modeling a multi-story house, repeat the process for each level, making sure the walls align vertically between floors.
Add Doors, Windows, and Openings
After walls are in place, cut out openings for doors and windows, then add the pre-made components for these features. Most beginner and professional tools come with libraries of standard door and window sizes, so you can just pick the size that matches your measurements and place it directly into the wall. If you have a custom size, you can easily adjust the dimensions to fit.
This is where tracing over a reference floor plan saves the most time—you can just click the location of each window and door directly on the reference image to place it correctly. Double-check that the rough opening in the wall matches the size of the door or window; a gap here will show up in your final render and look unprofessional.
Add the Roof
The roof is one of the more challenging parts of a 3D house model, especially for complex designs like hip roofs or multi-gable roofs. Most modern tools have automatic roof generation tools: you just select the exterior walls, input your roof pitch (the angle of the slope), and the software generates the roof automatically. For simple gable roofs, this works perfectly almost every time.
If you have a more complex roof or are using a general 3D tool, you can model the roof manually by drawing each roof plane and connecting them at the ridges and eaves. Don’t forget to add overhangs (the part of the roof that extends past the exterior walls)—most residential overhangs are 30 to 45cm (12 to 18 inches), and leaving them out makes your model look flat and unrealistic. For added detail, you can add roof features like chimneys, skylights, or gable vents once the main roof structure is done.
Adding Detail and Interior/Exterior Features
Once the core structure is complete, it’s time to add the details that bring your 3D model to life. How much detail you add depends entirely on your original project goal. If you’re just creating a massing model for site planning, you can stop after the core structure is done. If you’re creating a model to visualize your interior design, this is where you’ll spend most of your time.
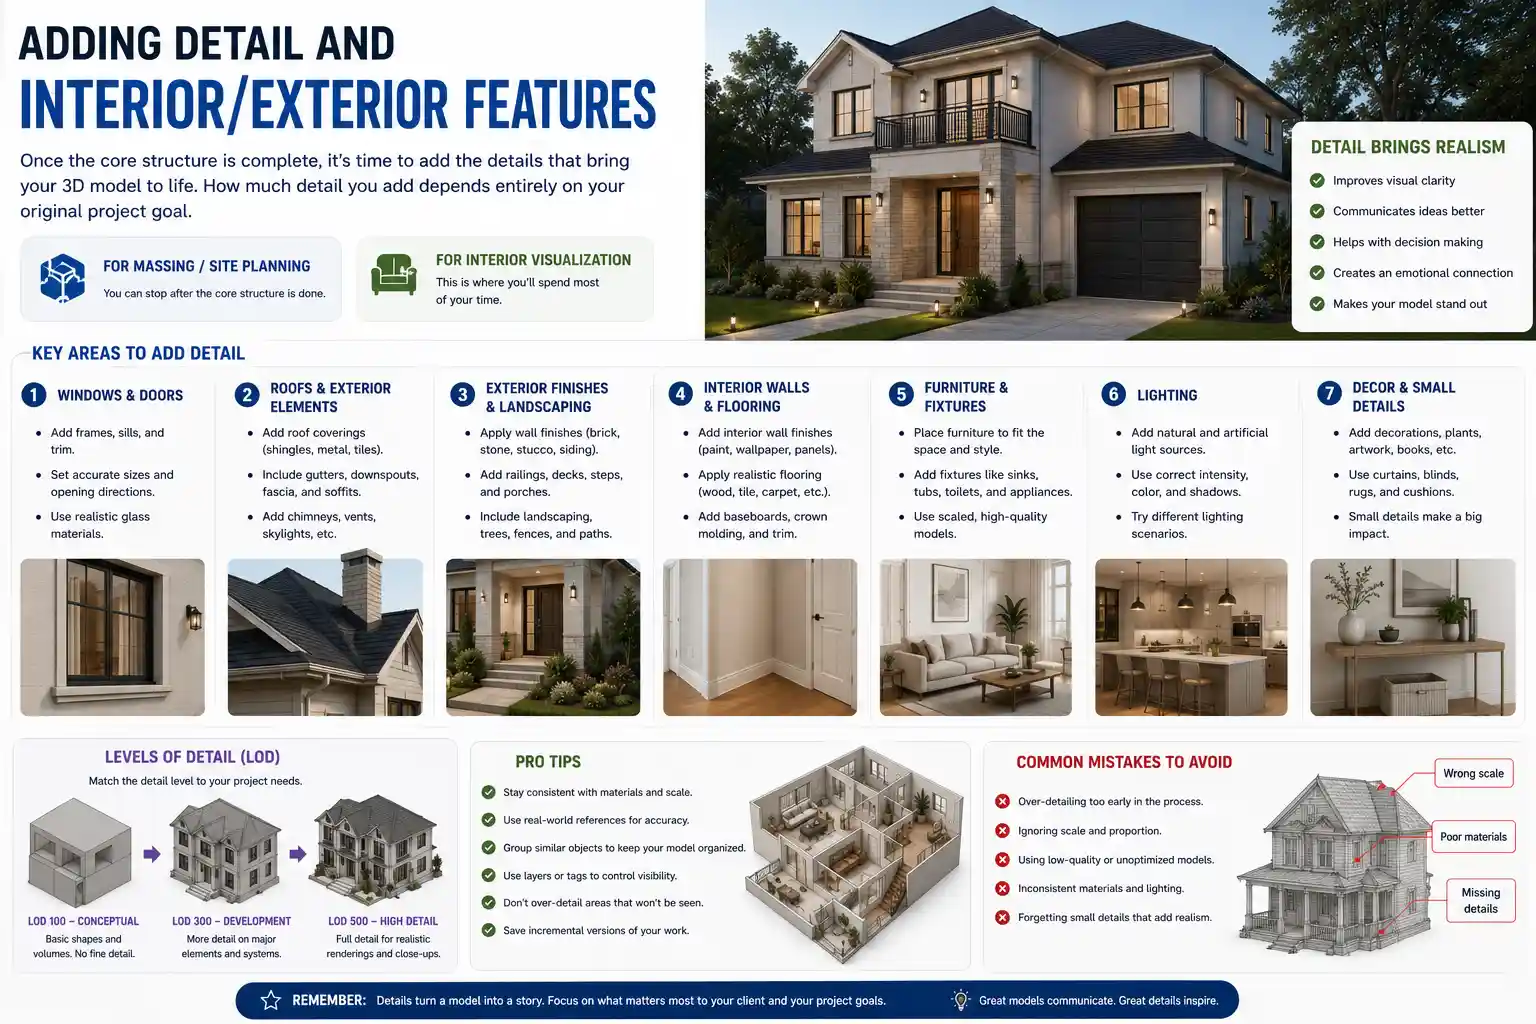
Interior Details
Start with permanent interior features that are part of the structure: stairs, fireplaces, built-in cabinets, countertops, and plumbing fixtures like sinks, tubs, and toilets. Almost all 3D home design tools have extensive libraries of pre-made 3D components for these features, so you don’t have to model them from scratch. This saves hours of work and ensures your fixtures are proportioned correctly.
Next, add movable furniture and decor. Again, pre-made components are your friend here—you can find free 3D models of sofas, tables, beds, art, and even kitchen appliances sites like SketchUp’s 3D Warehouse, which is free to use for any project. Experiment with different layouts to see what fits best in the space. One of the biggest benefits of 3D modeling is that it helps you see how much space you actually have—many people are surprised to find that a 3m x 4m bedroom is too small for the king-sized bed they wanted, which is much better to learn before buying furniture or knocking down walls.
Finally, add finishes like paint, wood flooring, tile, and wallpaper. Most tools let you apply different materials to any surface, so you can swap out a gray sofa for a blue one or change your kitchen tile in a single click. This is a great way to experiment with different design styles before committing to any purchases.
Exterior Details
For exterior models, add cladding, roofing materials, and exterior features like porches, decks, driveways, and landscaping. Start with the main exterior materials: apply siding, brick, stucco, or stone to your exterior walls, and add shingles or metal roofing to your roof. Then add details like gutters, downspouts, exterior light fixtures, and front doors.
Landscaping is a great way to make your model feel more realistic. Add a ground plane for your lot, then add grass, pathways, trees, shrubs, and any outdoor features like patios or swimming pools. Most 3D home design libraries include pre-made landscaping components that are easy to place and adjust.
“The difference between a good 3D model and a great one isn’t the number of details—it’s the right details. You don’t need to model every screw in a cabinet, but you do need to get the proportions of the room and the scale of the furniture right. Bad proportions make even the most detailed model look wrong, while good proportions make a simple model look accurate and useful.”
This advice from professional architectural modeler Maria Gonzalez, who has worked with custom home builders for over 15 years, highlights a common mistake new modelers make: focusing on tiny decorative details before getting the core proportions right. Always double-check your dimensions and scale before spending time adding decorative features.
Check for Common Errors
Before you move on to rendering, take some time to check your model for common errors that can ruin your final result. Some of the most common issues to look for include:
- Missing or misaligned walls: Check each floor from above to make sure all walls connect correctly, with no gaps or overlapping sections. Gaps let light leak through your model in renders, and overlapping geometry can cause weird glitches.
- Incorrect scale: Compare the size of common objects to your room dimensions to make sure everything is scaled correctly. A standard front door is 2m (80 inches) tall—if your door is half the height of your wall, your scale is off.
- Floating objects: Make sure all furniture, fixtures, and features sit flush on the floor or wall. A floating sofa an inch above the floor looks obviously wrong in a final render.
- Hidden duplicate geometry: Sometimes when you place objects, you end up with two overlapping objects in the same spot. This can cause rendering glitches, so delete any duplicates you don’t need.
Taking 15 minutes to fix these issues early saves hours of frustration when you’re ready to create your final images or export your model for 3D printing or construction use.
Texturing, Lighting, and Rendering Your Model
Texturing, lighting, and rendering turn a basic wireframe model into a realistic, usable image that you can share with others. Rendering is the process where the software calculates how light interacts with all the surfaces and materials in your model to create a final 2D image or 3D walkthrough. Even a simple model can look great with good lighting and texturing, while a detailed model can look flat and unrealistic with bad settings.
Apply Textures and Materials Correctly
A texture is the image that defines what a surface looks like—for example, a wood grain texture for a floor or a brick texture for exterior walls. A material defines how the surface interacts with light: for example, glass is transparent and reflective, while matte paint is not. Most pre-made components come with default materials, but you’ll likely want to adjust them to match your design.
When applying materials, pay attention to the scale of the texture. A brick texture that’s 10 times too big will make your wall look like it’s made of giant bricks, which looks obviously unrealistic. Most software lets you adjust the texture tiling (how many times the texture repeats across a surface) to get the scale right. Also, adjust the reflectivity and roughness of materials to match real life: matte walls should be mostly non-reflective, while glass and polished stone should be more reflective.
Set Up Realistic Lighting
Lighting is the most important factor in creating a realistic render. Most 3D tools let you add natural light from the sun and sky, as well as artificial indoor lights like lamps, ceiling fixtures, and recessed lighting. Start with natural light: set the location of your house and the time of day to get the correct sun angle. This is especially important for checking how sunlight moves through your space over the course of the day—many homeowners are surprised to find that a new addition blocks sunlight to their living room, which a good 3D model with accurate lighting will show clearly.
For interior renders, add artificial lighting to match the actual light fixtures you plan to install. Most tools let you adjust the brightness and color temperature of lights—warm white light (2700K to 3000K) is standard for most residential interiors, while cool white light (4000K to 5000K) is common for kitchens and bathrooms. Avoid overly bright or overly dark lighting; most new modelers make the mistake of making their interiors too dark, because they forget that light bounces off walls and illuminates the whole room. Modern rendering software uses global illumination to simulate this bounced light automatically, so make sure this setting is turned on for the most realistic results.
Render Your Final Images or Walkthrough
Once your texturing and lighting are set up, it’s time to render your final output. The type of output you need depends on your goal:
- Still images: High-resolution JPG or PNG images are perfect for sharing on social media, showing to contractors, or printing out to hang on your wall. For most uses, a resolution of 1920x1080 is enough, but if you plan to print large images, render at 300 DPI to get a sharp result.
- 360° panoramic renders: These let you view the entire room from a central point, and you can share them with others so they can “walk around” the space in a web browser or VR headset. This is a great option for real estate marketing or showing off a full interior design.
- Animated walkthroughs: A video that moves through the house from the front door through every room lets you show the flow of the space clearly. This is more time-consuming to create than still images, but it’s very effective for custom home designs or large renovation projects.
- 3D model exports: If you need to share your model with an architect or contractor, or prepare it for 3D printing, export it as a universal 3D file format like OBJ, STL, or FBX that can be opened in other software.
For beginners, rendering can take some trial and error. If your first render comes out too dark, too grainy, or the colors look wrong, adjust your lighting settings and try again. Most modern cloud-based rendering tools let you adjust settings and re-render in a few minutes, so you don’t have to wait hours for a result like you did with older software.
Tips for Success for First-Time Modelers
Creating your first 3D house model can feel overwhelming, but small, smart choices will help you avoid common frustrations and finish with a model you’re happy with. Here are some practical tips to keep in mind:
Start small. If you’ve never modeled anything before, don’t start with a full 3,000 square foot, four-bedroom house. Start with a single room—your kitchen, for example—to learn the software and get comfortable with the workflow before moving on to a larger project. This lets you make mistakes on a small scale that are easy to fix, instead of getting overwhelmed by a huge project you can’t finish.
Use pre-made components instead of modeling from scratch. There’s no prize for modeling every cabinet or sofa from scratch. The 3D communities for most popular tools have millions of free pre-made components that are already correctly scaled and textured. Using these saves hours of work and gives you better results than most new modelers can get from modeling from scratch. Only model things from scratch if you can’t find a pre-made component that matches what you need.
Save versions of your project as you go. Save a new version of your project every time you make a big change, like adding a new floor or changing the layout. This way, if you make a mistake you can’t undo, you can always go back to an earlier version instead of starting over from scratch. Most software has an auto-save feature, but manually saving versioned copies is a good habit to avoid losing work.
Don’t chase perfection on your first try. Your first model will not be perfect, and that’s okay. The goal of your first model is to learn the process and get a usable result for your project, not to create a professional-quality architectural render that belongs in a magazine. Even a simple, slightly imperfect 3D model is far more useful than no model at all for planning your project.
Conclusion
Creating a 3D house model is no longer reserved for professional architects and 3D artists. With modern tools, a systematic approach, and a little practice, anyone can create an accurate, useful 3D model of their home, dream house, or renovation project. Start with thorough planning and measurements, choose software that matches your skill level and project goal, build the core structure first, and then add details, textures, and lighting to bring your model to life. By focusing on accurate proportions and the right details for your goal, you’ll avoid common mistakes and end up with a model that helps you visualize your design, catch costly errors early, and share your vision clearly with others. Whether you’re planning a small renovation or building a custom home from scratch, a 3D model is an invaluable tool that turns vague ideas into a clear, tangible vision you can work with.