
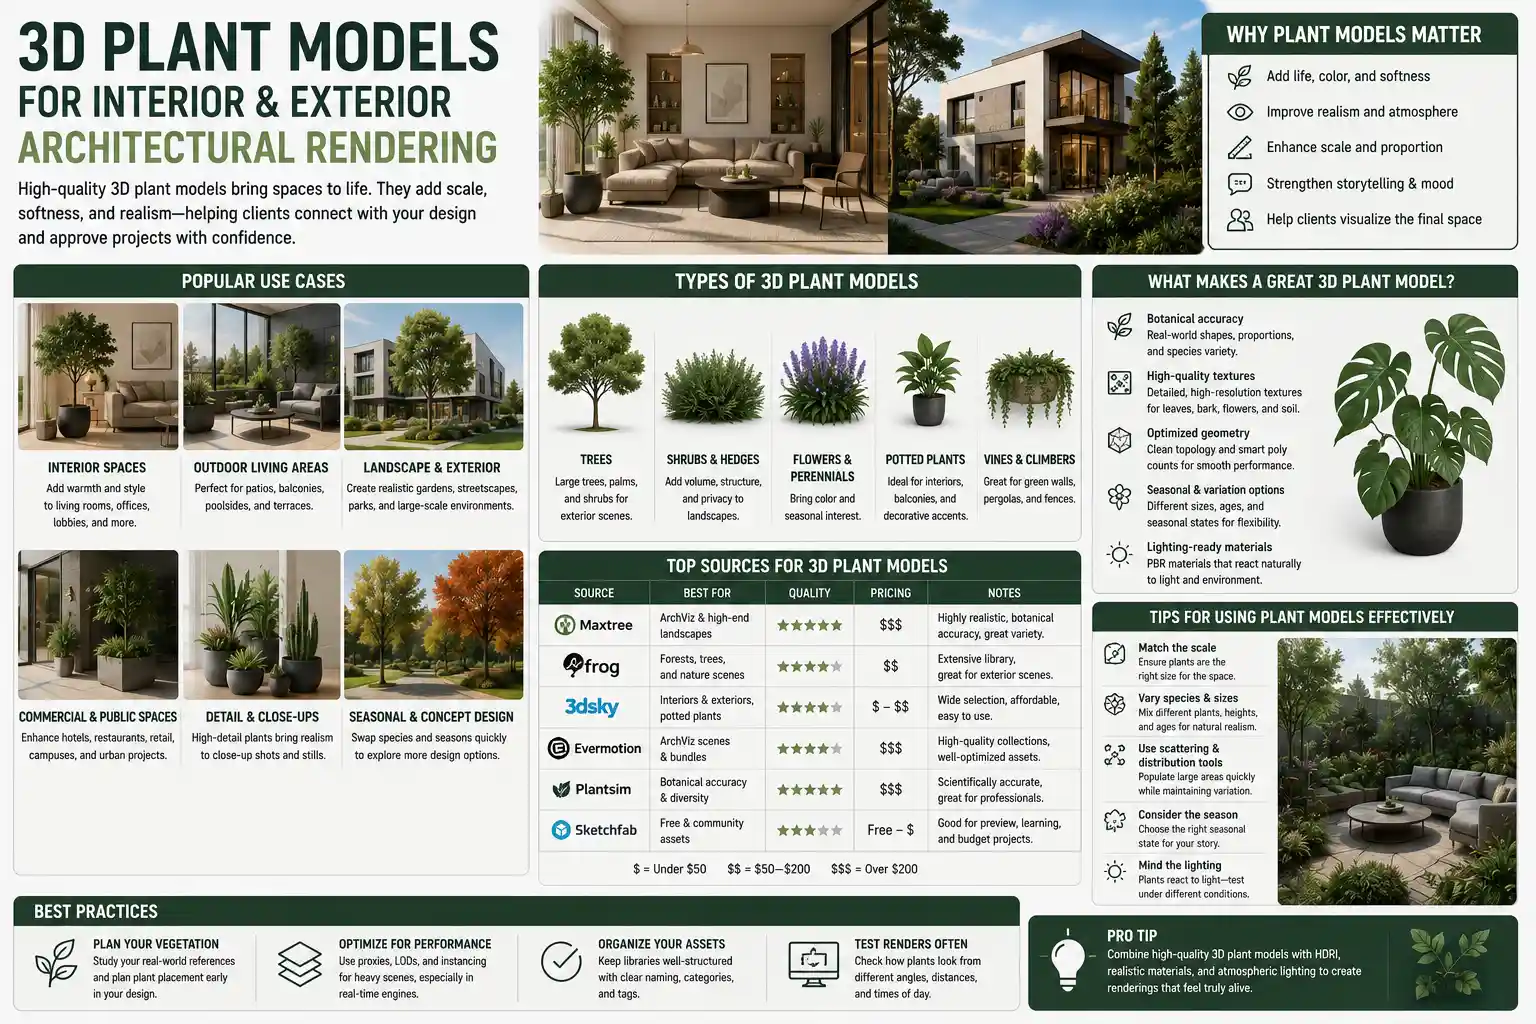
When architects, interior designers, and landscaping professionals present their concepts to clients, few elements make an impact like lifelike greenery. A 3D render of a sleek modern living room can feel cold and unfinished without a potted fiddle-leaf fig in the corner, just as a suburban backyard design loses its charm without textured tree canopies and blooming flower beds. Today, high-quality 3D plant models have become an indispensable tool for creating immersive, realistic interior and exterior renderings that help clients visualize completed spaces and sign off on projects faster. But not all 3D plant assets are created equal, and understanding how to select, use, and integrate them effectively can mean the difference between a render that feels authentic and one that looks obviously artificial.
What Are 3D Plant Models, and Why Do They Matter for Rendering?
At their core, 3D plant models are digital recreations of specific plant species, built with polygon geometry and detailed textures to mimic the appearance of real vegetation. Unlike simple 2D cutouts that rely on flat images pasted onto planes, 3D models can be rotated, scaled, lit, and integrated seamlessly into any digital scene. For rendering professionals, they solve a longstanding problem: how to accurately represent the soft, organic shapes and natural variation of plants without waiting for photoshoots or arranging live greenery on physical build sites.
The evolution of 3D plant assets for architectural visualization
Early 3D plant models were basic, low-poly creations suited only for background context. As processing power increased and rendering technology improved, asset creators began building highly detailed models that capture every leaf vein, bark texture, and petal fold. Today, 3D plant assets range from small houseplants for interior scenes to mature oak trees and sprawling rose bushes for large-scale exterior landscaping projects. The rise of real-time rendering engines like Unreal Engine and Blender Eevee has also increased demand for optimized 3D plants that look detailed without slowing down scene performance.
Key benefits for interior and exterior design projects
For designers and architects, the benefits of integrating high-quality 3D plant models go far beyond aesthetics. One of the biggest advantages is client communication: a photorealistic render with well-placed greenery helps clients understand how a space will feel, not just how it will look. A client who can see a mature privacy hedge blocking a street view or a cluster of pothos softening the edge of a minimalist office is far more likely to approve a design than one who has to imagine the plants from a 2D floor plan.
3D plant models also offer practical workflow benefits. Designers can test multiple plant species, sizes, and arrangements in minutes without purchasing or moving live plants. For exterior projects, they can show how trees will look at 5 years, 10 years, and full maturity, helping clients understand long-term landscaping impact. They can also adjust for seasonal changes, showing a garden in full summer bloom versus bare winter branches without waiting for the right time of year to shoot reference photos.
Finally, for marketing and sales teams, 3D plant models elevate the quality of promotional materials. Brochures, website landing pages, and social media content featuring photorealistic rendered spaces with natural greenery perform better than flat, plant-free designs, as audiences respond emotionally to the presence of nature.
Key Differences Between Interior and Exterior 3D Plant Model Requirements
While 3D plant models serve the same core purpose for both interior and exterior rendering, the unique constraints of each space require different asset attributes. A small pothos for a living room corner has very different geometry, texture, and lighting needs than a 50-foot pine tree for a residential development site.

Interior 3D plant model considerations
Interior scenes typically place plants closer to the camera, so detail is non-negotiable. Clients notice if a fiddle-leaf fig’s leaves have unnatural uniform shapes or blurry texture when it’s sitting front and center in a living room render. Common interior plants include potted houseplants like monstera, snake plants, fiddle-leaf figs, and ZZ plants, as well as smaller accent plants like succulents, hanging pothos, and herb garden planters for kitchens.
Beyond detail, interior 3D plant models need to work with artificial lighting scenarios. Most interior scenes are lit by soft overhead lights, table lamps, or natural light filtering through windows, so the model’s material shaders need to respond realistically to these light sources. Translucent leaves, for example, should let soft warm light pass through them just like real foliage, rather than appearing solid and opaque. Optimized polygon counts are also important: even a close-up plant should not have so many polygons that it slows down render times, so good assets balance detail and performance.
Exterior 3D plant model considerations
Exterior scenes have different priorities. Large-scale projects like housing developments or commercial parks can include dozens of trees, shrubs, and groundcover plants, so performance optimization is critical. A single high-poly 3D tree might not strain a system, but 50 of them can bring even a powerful workstation to a halt. For background trees, lower-poly models with baked high-resolution textures are often sufficient, while foreground trees that sit close to the camera can have more detail.
Exterior plants also need to withstand different lighting and weather conditions. A 3D plant model for a sunny residential backyard needs to cast realistic shadows and respond to directional sunlight, with appropriate translucency for leaves hit by direct light. For seasonal projects, many asset libraries offer variations of the same species: summer green, autumn foliage, bare winter branches, and spring blooming versions. Scale is another key factor: exterior plants often need to be scaled to fit large site plans, so the model’s texture resolution needs to hold up at larger sizes without looking pixelated.
"The biggest mistake new 3D artists make is using the same 3D plant model for both interior close-ups and background exterior rows. If the camera is 100 feet away from a row of hedges, you don’t need every leaf modeled – you just need the right overall shape and texture. Save the high-poly assets for the plants that will actually be seen by the viewer."
How to Choose High-Quality 3D Plant Models: A Practical Guide
With hundreds of 3D plant model libraries available online, from free marketplaces to premium subscription services, it can be hard to know which assets are worth using. A bad 3D plant model can pull the viewer out of an otherwise perfect render, so knowing what to look for saves time and improves final results.
Check for botanical accuracy
Botanical accuracy matters more than many new artists realize. A client who knows their landscaping will immediately notice if you’ve misidentified a species or rendered it with the wrong growth habit. For example, a Italian cypress should have a narrow, columnar shape, not a broad, spreading canopy. A monstera deliciosa should have distinctive holes in its leaves, not solid oval shapes. Even clients without botanical knowledge will notice subconsciously if something looks "off" about a plant, which can reduce their confidence in your overall design.
When evaluating a 3D plant model, compare it to reference photos of the real species. Check the growth pattern, leaf shape, bark texture, and flower structure to confirm it matches. Good asset creators work with horticulturists to ensure their models are accurate to real-world species, so prioritize creators that highlight this attention to detail.
Evaluate polygon count and optimization
One of the biggest tradeoffs in 3D asset creation is between detail and performance. A model with every single leaf individually modeled will look incredible, but it can also drastically increase render times and make it hard to work on large scenes. When choosing 3D plant models, look for assets that use optimization techniques to balance both:
- Level of Detail (LOD) systems that switch between lower-poly and higher-poly versions based on camera distance, which is especially useful for real-time rendering and large exterior scenes
- Alpha clipping and baked textures for dense foliage, which reduces the number of polygons needed while retaining realistic detail
- Instancing support, which lets you place multiple copies of the same plant in a scene without increasing file size dramatically
For interior close-ups, higher polygon counts are acceptable because you’ll usually only have a handful of plants in the scene. For exterior projects with dozens of plants, prioritize optimized assets with LODs to keep your workflow smooth.
Verify texture and shader quality
Even a perfectly modeled 3D plant will look artificial if its textures and shaders are low quality. Look for models that come with PBR (Physically Based Rendering) textures, which are designed to respond realistically to different lighting conditions. Key texture maps to check for include:
- Albedo (base color) maps with natural variation: no two leaves are exactly the same color, so good textures have subtle variations in hue and saturation to avoid a uniform, artificial look.
- Normal and displacement maps that add surface detail: these create the illusion of texture on leaf surfaces, bark, and flower petals without adding extra polygons.
- Opacity and translucency maps: these let light pass through thin leaves and petals, which is critical for realistic lighting, especially when sunlight is hitting foliage from behind.
- Roughness and metallic maps that replicate real plant surface properties: leaves are slightly rough rather than shiny, while flower petals may have a subtle waxy sheen, and bark has an uneven, coarse roughness.
A quick test to check shader quality is to render the plant with a backlight. If the leaves look solid black instead of glowing softly with transmitted light, the shader is missing the translucency setting that makes plants look real.
Look for variation in asset packs
Natural spaces have variation: no two monstera plants are exactly the same shape, and no two oak trees have identical branch structures. If you use the same 3D plant model multiple times in a single scene, viewers will notice the repetition, which makes the render look artificial. Good 3D plant packs include multiple variations of the same species, with different heights, shapes, leaf arrangements, and even slight texture variations to create natural diversity. Some libraries also include adjustably growing options, letting you change the size and shape of a plant to fit your specific scene.
Best Practices for Integrating 3D Plants Into Your Renders
Even the highest quality 3D plant model can look out of place if it’s not integrated correctly into your scene. Following these best practices will help you create seamless, photorealistic results that feel natural.
Scale plants correctly for the space
Incorrect scaling is one of the most common mistakes new artists make with 3D plants. A fiddle-leaf fig that’s twice the size of a sofa or a maple tree that’s shorter than a front door will immediately look wrong, even if everything else in the scene is perfect. Always reference real-world sizes when placing plants: a small potted houseplant is usually between 1 and 3 feet tall, while a mature fiddle-leaf fig can reach 6 to 10 feet indoors. A mature oak tree can grow to 50 to 70 feet tall, so scaling it to 10 feet for a front yard will look off.
A good rule of thumb is to place a common reference object (like a door or a person) in your scene while you’re scaling plants, to double-check that the proportions make sense. For potted interior plants, don’t forget to account for the pot size in your total scale calculation.
Match lighting and shadows to your scene
Plants interact with light in very specific ways, so matching your plant’s lighting to the rest of the scene is critical for seamless integration. For interior scenes with soft artificial light, avoid plants that were pre-rendered with harsh directional shadows that don’t match your scene’s light source. For exterior scenes with directional sunlight, make sure the cast shadow from your tree matches the angle and softness of other shadows in the scene. If the sun is coming from the left, all plant shadows should fall to the right, just like every other object in the scene.
Don’t forget about self-shadowing: dense foliage should cast soft shadows on itself, with darker areas inside the plant where light can’t reach. This adds depth and makes the plant look three-dimensional instead of flat. For plants near windows, add subtle translucency to leaves hit by incoming sunlight to replicate the natural glow that real foliage has in this scenario.
Add context and natural wear
Real plants exist in context, not as perfect, isolated objects. Adding small details to your 3D plants will make them feel like part of the space: for a potted interior plant, add a few fallen leaves on the floor next to the pot, or subtle water stains on the pot surface. For an outdoor garden, add small weeds between pavers, or a layer of mulch around the base of a tree. For a mature tree, add subtle texture variation on the bark to represent natural wear and weathering.
You can also adjust the color of your plants slightly to match the color grading of your overall scene. If your exterior render has a warm golden hour color grade, tint your plant foliage slightly warm to match, rather than leaving it a flat, neutral green that looks out of place.
Avoid overcrowding your scene
It’s easy to get carried away adding greenery to a render, but overcrowding makes a space feel cluttered and can distract from the design you’re trying to showcase. In interior design, plants are usually used as accents to soften hard lines and add life, so stick to one or two statement plants per room, plus small accents if the space is large. In exterior landscaping, follow the design’s planned layout, and remember that mature plants need space to grow – don’t pack trees and shrubs so close together that they look unnatural.
Another common mistake is placing all plants at the same depth. Layer plants to create depth: place larger plants in the background, medium plants in the midground, and small accent plants in the foreground to draw the eye through the scene. This creates a natural, organic feel that matches how real greenery is arranged.
Popular Sources for 3D Plant Models
Whether you’re looking for free assets for a student project or premium assets for a high-end client presentation, there are options to fit every budget and need. Here are some of the most popular sources used by rendering professionals:
Premium subscription libraries
Premium libraries offer the highest quality, most botanically accurate 3D plant models, with regular updates and optimized assets for all major rendering engines. Popular options include:
- Maxtree Plants: One of the most widely used libraries, with thousands of interior and exterior plant species, optimized for 3ds Max, Blender, and other popular tools. Models come with PBR textures and multiple variations per species.
- Poly Haven: A hybrid free/premium library with high-quality, CC0 licensed 3D plants that work for all rendering engines. The premium subscription adds new assets monthly, and all assets are optimized for PBR rendering.
- Sketchfab: While not exclusively for plants, Sketchfab has a huge library of user-uploaded 3D plant models, with premium options from professional creators that include PBR textures and LOD optimization.
- SpeedTree: The industry standard for large-scale exterior projects, SpeedTree lets you generate customizable 3D trees and plants, with options for adjusting shape, size, and seasonality. It’s widely used for architectural visualization and game development.
Free and open-source options
If you’re working on a budget or a personal project, there are many high-quality free options available:
- Blender Market has a large selection of free 3D plant models uploaded by creators, ranging from small houseplants to large trees.
- TurboSquid has a free section with hundreds of 3D plant assets, though quality varies, so you’ll need to check models carefully before use.
- Poly Haven’s free library includes dozens of high-quality CC0 3D plants that can be used commercially without attribution.
The main downside of free assets is that they often lack the optimization and botanical accuracy of premium assets, so they’re best suited for personal projects or background plants where detail is less critical.
Conclusion
3D plant models have transformed the way architects, interior designers, and landscaping professionals present their work, turning flat 2D plans into immersive, lifelike experiences that help clients connect with a design before it’s built. Whether you’re working on a small interior renovation or a large-scale residential development, choosing the right 3D plant models and integrating them correctly can elevate your renders from good to extraordinary.
By prioritizing botanical accuracy, matching asset detail to camera distance, and following best practices for scaling, lighting, and composition, you can create renders that feel natural and authentic, highlighting your design while adding the emotional benefits of greenery that viewers respond to. With more high-quality 3D plant assets available than ever before, it’s easier than ever to find the right assets for your project, no matter your budget or scope. As rendering technology continues to improve, 3D plant models will only become more detailed and accessible, helping professionals create more compelling, sustainable, and nature-focused design visions for the future.