
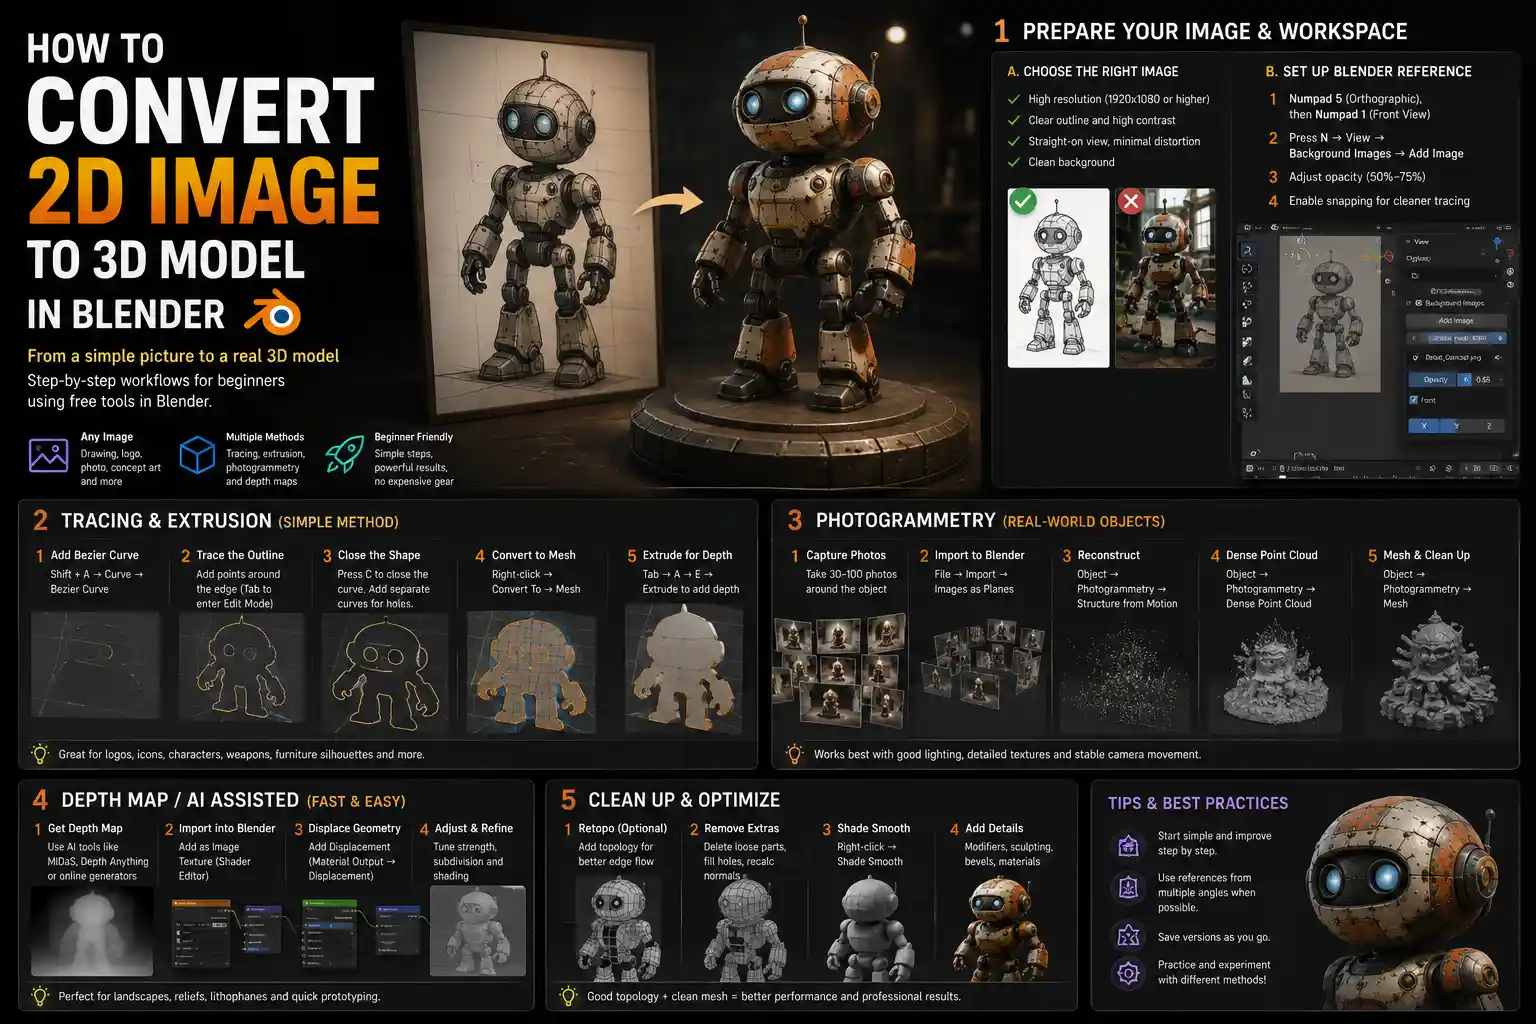
Whether you’re a 3D artist looking to turn a hand-drawn sketch into a game asset, a product designer needing to replicate a physical object for 3D printing, or a hobbyist wanting to bring a favorite photo to life in a virtual scene, converting a 2D image to a 3D model in Blender is an incredibly useful skill. Blender, the free open-source 3D creation suite, offers multiple workflows to fit every project, from simple traced silhouettes to detailed photogrammetry reconstructions. You don’t need an expensive 3D scanner or years of experience to get great results—all you need is a clear source image and a step-by-step approach to match your goals.
Preparing Your Source Image and Blender Workspace
Before you jump into modeling, the quality of your final 3D model depends almost entirely on the preparation you do at this stage. A blurry, poorly cropped source image will lead to a blurry, inaccurate 3D model, no matter how skilled you are at Blender. Taking the time to clean up your image and set up your workspace correctly will cut down on frustration and produce a far better end result.
Choose the Right Source Image for Your Project
Not all images are created equal when it comes to 3D conversion. The best source image depends on what type of model you want to create: if you’re making a simple 2.5D cutout or a flat-based model, a single high-contrast image works perfectly. If you want a fully rounded 3D object, you’ll need multiple images from different angles. For most beginners starting with a single image, follow these basic guidelines:
- Aim for a resolution of at least 1920x1080 pixels—higher resolution gives you more detail to trace, especially for complex edges.
- Choose an image with a clear, high-contrast outline of your object against a plain background. A plain white or solid-colored background makes it much easier to distinguish edges in Blender.
- Avoid heavy distortion, lens blur, or skewed perspectives if you’re tracing. A straight-on orthographic photo or a flat drawing will give you the most accurate proportions.
- If you’re creating a symmetrical object (like a cup, character face, or piece of furniture), use an image that shows the object straight-on to make symmetric modeling easier later.
Once you’ve selected your image, clean it up in a free tool like GIMP or Photoshop if needed: remove any unwanted background elements, adjust brightness and contrast to make edges pop, and crop it so your object fills most of the frame. Save the cleaned image as a JPEG or PNG file that Blender can read easily.
Set Up Your Blender Reference Workspace
Blender makes it simple to load your image as a background reference that you can trace over. Start by opening Blender and deleting the default cube that appears in the new scene—press X or Delete to remove it. Next, you’ll add your image as a background to the viewport:
- Switch to the Orthographic Top View by pressing Numpad 5 (to turn off perspective) then Numpad 7 (for top view). If you’re tracing a side profile, use Numpad 3 for side view instead.
- Open the side panel by pressing N to bring up the viewport toolbar. Find the Background Images section and check the box to enable it.
- Click Add Image, then select your cleaned source image from your computer files. It will appear as a transparent background in your viewport.
- Adjust the transparency (opacity) of the background image so you can see your modeling lines over it clearly. Most artists prefer an opacity between 50% and 75% for tracing.
For symmetrical objects, you can enable snapping along the X or Y axis to ensure your tracing stays perfectly aligned. To do this, click the magnet icon in the top toolbar to enable snapping, then select Edge or Vertex snapping from the dropdown menu. This small setup step saves hours of adjusting uneven proportions later.
Method 1: Tracing for Simple Extruded 3D Models
The easiest and most beginner-friendly method for converting a single 2D image to a 3D model in Blender is tracing and extrusion. This workflow works perfectly for logos, 2D art, silhouettes, hand-drawn characters, and any object that can start as a flat 2D shape before being given depth. It requires no special add-ons and just a few basic Blender tools that most new users can master in an afternoon.
Step-by-Step Tracing Workflow
With your reference image loaded in the background, you’re ready to start tracing. The most flexible tool for this job is the Bezier Curve tool, which lets you draw smooth, adjustable lines around your object’s outline. Follow these steps:
- Press Shift + A to open the Add menu, then select Curve > Bezier Curve. This adds a new curve to your scene. Enter Edit Mode by pressing Tab.
- Delete the two default control points that come with the new curve by selecting them and pressing Delete. Now you can start drawing your own outline.
- Click to add control points one by one around the edge of your object in the reference image. For curved edges, click and drag to create a smooth curve; for sharp corners, just click without dragging. Don’t worry if your first pass isn’t perfect—you can adjust control points later.
- When you get back to your starting point, press C to close the curve and complete the outline. If you have internal cutouts (like the hole in a donut or the center of a letter O), add a new separate closed curve for each cutout.
- Switch back to Object Mode by pressing Tab. Adjust the size of your traced curve to match the reference image if needed by pressing S and dragging to scale.
- Convert the curve to a mesh by right-clicking the object in the Outliner panel and selecting Convert to Mesh. This lets you modify the shape like a standard 3D object.
Once you have a closed 2D mesh outline, adding depth is as simple as using the Extrude tool. Press Tab to enter Edit Mode, select all the faces of your flat mesh by pressing A, then press E to extrude. Drag your mouse to pull the shape out to your desired depth, then click to confirm. You now have a basic 3D model from your image! For logos, 2D character art, or signs, this is often all you need to get a model ready for 3D printing or rendering.
Refining Your Extruded Model
To make your model look more polished than a basic flat extrusion, you can add simple details and smooth edges. For example, if you traced a coffee mug silhouette, you can add a rounded edge to the top and bottom by selecting the outer edge loop, pressing Shift + B to bevel it, and dragging to adjust the bevel size. For organic shapes like a hand-drawn character, you can use the Sculpt tool to push and pull the extruded surface into a more natural shape. Add a subdivision surface modifier to smooth out any jagged edges from your tracing, and your model is ready for materials, lighting, and rendering.
Method 2: Photogrammetry for Full 3D Reconstruction from Multiple Images
If you have multiple photos of a physical object taken from different angles, you can use photogrammetry to automatically generate a full 3D model directly from your images in Blender. Photogrammetry works by analyzing overlapping points in multiple photos to calculate the 3D position of every surface on the object, creating a detailed mesh that matches the original object exactly. This is the method professional product designers and archaeologists use to replicate physical objects without an expensive 3D scanner—and Blender has free add-ons that make it accessible to hobbyists too.
“Photogrammetry turns every phone into a 3D scanner. You don’t need fancy equipment to capture an accurate 3D model—just 20 minutes and a willingness to take a lot of good photos.”
Preparing Your Photos for Photogrammetry
Just like single-image tracing, photogrammetry relies on good source photos. To get a usable model, you need to capture photos that cover every angle of your object with lots of overlapping detail. Follow these tips for the best results:
- Take 20 to 50 photos of your object, walking all the way around it in a circle. Move the camera, not the object—keep the object still on a flat surface while you shoot.
- Make sure every part of the object is visible in at least 3 to 5 different photos from different angles. Don’t forget the top, bottom, and any crevices or hard-to-reach spots.
- Use good, even lighting to avoid harsh shadows or overexposed spots. Natural diffused daylight (like on a cloudy day) works better than direct sunlight that creates dark blurry areas.
- Don’t use a moving zoom or change your focus mid-shoot. Keep the object in focus and your camera settings consistent across all photos.
- Avoid shiny or transparent objects if you’re just starting out. Reflective surfaces confuse photogrammetry software because it can’t find consistent reference points between photos. Start with a matte, textured object like a plant pot or a stuffed toy to practice.
Once you have all your photos, import them into Blender using the popular free add-on Meshroom or the built-in Photogrammetry Utility add-on. Meshroom is the most popular open-source option for beginners, and it integrates seamlessly with Blender. Enable the add-on in Blender’s preferences, then open the Meshroom tab in the sidebar to start your project.
Processing Your Photos and Cleaning Up the Model
Once you upload your photos to the photogrammetry add-on, the software will automatically process them to detect common features, generate a point cloud, and turn that point cloud into a 3D mesh. Processing can take anywhere from a few minutes to an hour depending on how many photos you have and how powerful your computer is. When it’s done, you’ll get a rough 3D model that you can clean up in Blender.
Raw photogrammetry models almost always have extra floating geometry, holes, and unwanted background from your photos. To clean up your model:
- Delete any stray points or floating mesh parts that aren’t part of your object. You can select these in Edit Mode and delete them with a single keystroke.
- Fill any holes in the mesh using Blender’s Fill Hole tool. Select the border edges of the hole, right-click, and select Fill to close it.
- Reduce the polygon count if your model is too heavy for your scene. Use the Decimate modifier to lower the number of faces without losing too much detail—this is especially important if you plan to use the model in a game or 3D print it.
- Unwrap the UVs and export the texture that the photogrammetry software generated. This texture is automatically pulled from your source photos, so it will match the colors and details of your original object perfectly.
The result is a fully textured, accurate 3D model created entirely from your phone photos, with no manual tracing required. For replicating physical artifacts, creating scan assets for games, or preparing objects for 3D printing, this method is unbeatable.
Method 3: Displacement Modeling for Detailed Height-Based 3D Models
If you have a heightmap or a grayscale image that represents elevation, you can use Blender’s displacement tools to turn it into a detailed 3D terrain, character normal map, or embossed design. This method is also perfect for turning 2D landscape photos into 3D terrains or turning black and white logos into raised 3D engravings. Displacement modeling uses the brightness of each pixel in your image to determine how high or low the 3D surface should be: white pixels are raised, black pixels are lowered, and gray pixels are in between.
Creating a Displacement Model from a Grayscale Image
To get started, you’ll need a grayscale heightmap of your desired shape. If you’re starting with a color image, you can convert it to grayscale in Blender or an external image editor. For example, if you want to make a 3D terrain from a satellite photo, you can find a free grayscale heightmap of the area online, or you can generate one from a color photo using Blender’s color adjustment tools.
Follow this step-by-step workflow to add displacement to your model:
- Start with a base mesh. For a terrain, add a plane by pressing Shift + A > Mesh > Plane, then subdivide it multiple times to get enough geometry for detail. Go to the Edit Mode, select all vertices, and press W > Subdivide 3 to 4 times to get a dense grid of faces.
- Go to the Shading workspace to open the shader editor. Add a new Displacement node to your material, then connect your image texture to the height input of the displacement node. Connect the displacement output to the displacement input of the Material Output node.
- Switch your material from Dispose Only to Displacement and Bump in the material settings. This tells Blender to actually modify the mesh geometry instead of just faking the detail with lighting.
- Go back to the Object Mode, then select your base mesh and click Object > Apply > Displacement. Blender will generate the 3D shape based on the brightness values in your image, automatically raising and lowering the mesh to match.
Adjust the strength of the displacement in the node to control how dramatic the elevation changes are. A higher strength value will make hills taller and valleys deeper, while a lower strength gives more subtle detail. For example, if you’re making an embossed logo, a strength of 0.1 to 0.5 will give you a nice subtle raised effect, while for a large-scale terrain, you may need a strength of 10 or more to get visible elevation changes.
Common Uses for Displacement Conversion
Displacement modeling is incredibly versatile. Game level designers use it to turn heightmaps into detailed 3D terrains for open world games. Jewelry designers use it to turn 2D drawings into detailed 3D printable engravings. Product designers use it to add texture and surface detail to models that started as flat 2D designs. Unlike tracing, it automatically generates thousands of polygons of detail based on your image, so you don’t have to manually add every bump or crevice.
Tips for Fixing Common Issues
No matter which method you choose, you’ll likely run into a few common issues when converting an image to a 3D model in Blender. Knowing how to fix these problems quickly will save you hours of frustration and help you get a clean, usable model at the end.
Jagged or Inaccurate Edges After Tracing
If your traced outline has jagged edges or doesn’t match your reference image perfectly, the easiest fix is to go back into Edit Mode and adjust your control points one by one. If you used a Bezier curve, the curves are still editable before you convert them to a mesh—you can move control points, adjust the curve handles, and add extra points to smooth out jagged sections. If you’ve already converted to a mesh, use the Smooth tool to soften sharp jagged edges, or use the proportional editing tool to pull vertices back into alignment with the reference image.
Holes in Photogrammetry Models
It’s extremely common to get holes in your model after photogrammetry processing, especially if you missed a section of the object when taking photos. For small holes, you can use Blender’s built-in Fill Hole tool, which automatically closes the hole with a new face. For large holes, you can bridge the gap between edges with the Bridge Edge Loops tool, then sculpt the new section to match the surrounding shape of the model. If you have a lot of holes, you can also use the Remesh modifier to rebuild the entire mesh with a clean, consistent topology that fills gaps automatically.
Model is Too Polygon-Heavy
A common mistake new users make is ending up with a model that has millions of polygons, which makes Blender run slowly and can cause issues when 3D printing or exporting to game engines. The fix here is simple: use the Decimate modifier to reduce the polygon count. Blender’s decimate tool preserves the shape of your model while cutting down the number of faces, and you can adjust the ratio to get exactly the level of detail you need. For 3D printing, you usually don’t need more than 500,000 polygons for a medium-sized object, and for game assets, 10,000 to 50,000 polygons is more than enough for most use cases.
Distorted Proportions
If your final model has distorted proportions, the issue almost always comes down to bad reference setup. When you’re using a single image, make sure you’re working in orthographic view instead of perspective view—perspective view will naturally skew your tracing if your reference image is not aligned correctly. If you’re working with multiple images for photogrammetry, make sure your object didn’t move between photos, and that you took enough overlapping photos from every angle to help the software calculate accurate proportions. For displacement models, double-check that your base mesh is scaled correctly before applying displacement, as an incorrectly scaled base will lead to incorrectly scaled height changes.
Conclusion
Converting an image to a 3D model in Blender doesn’t have to be complicated, and you don’t need expensive tools or advanced experience to get great results. The right method for your project depends on what you’re trying to create: simple extrusion works for logos and 2D art, photogrammetry gives you accurate full 3D models from physical objects, and displacement modeling turns heightmaps into detailed terrains and embossed designs. By starting with a clean source image, setting up your workspace correctly, and following a step-by-step workflow that matches your project goals, you can turn any 2D image into a usable 3D model in an afternoon or less. As you practice, you’ll develop a feel for which methods work best for different projects, and you’ll be able to adjust your process to fix common issues quickly. Blender’s flexible toolset makes it easy to experiment, so don’t be afraid to try different approaches to find what works for you.