
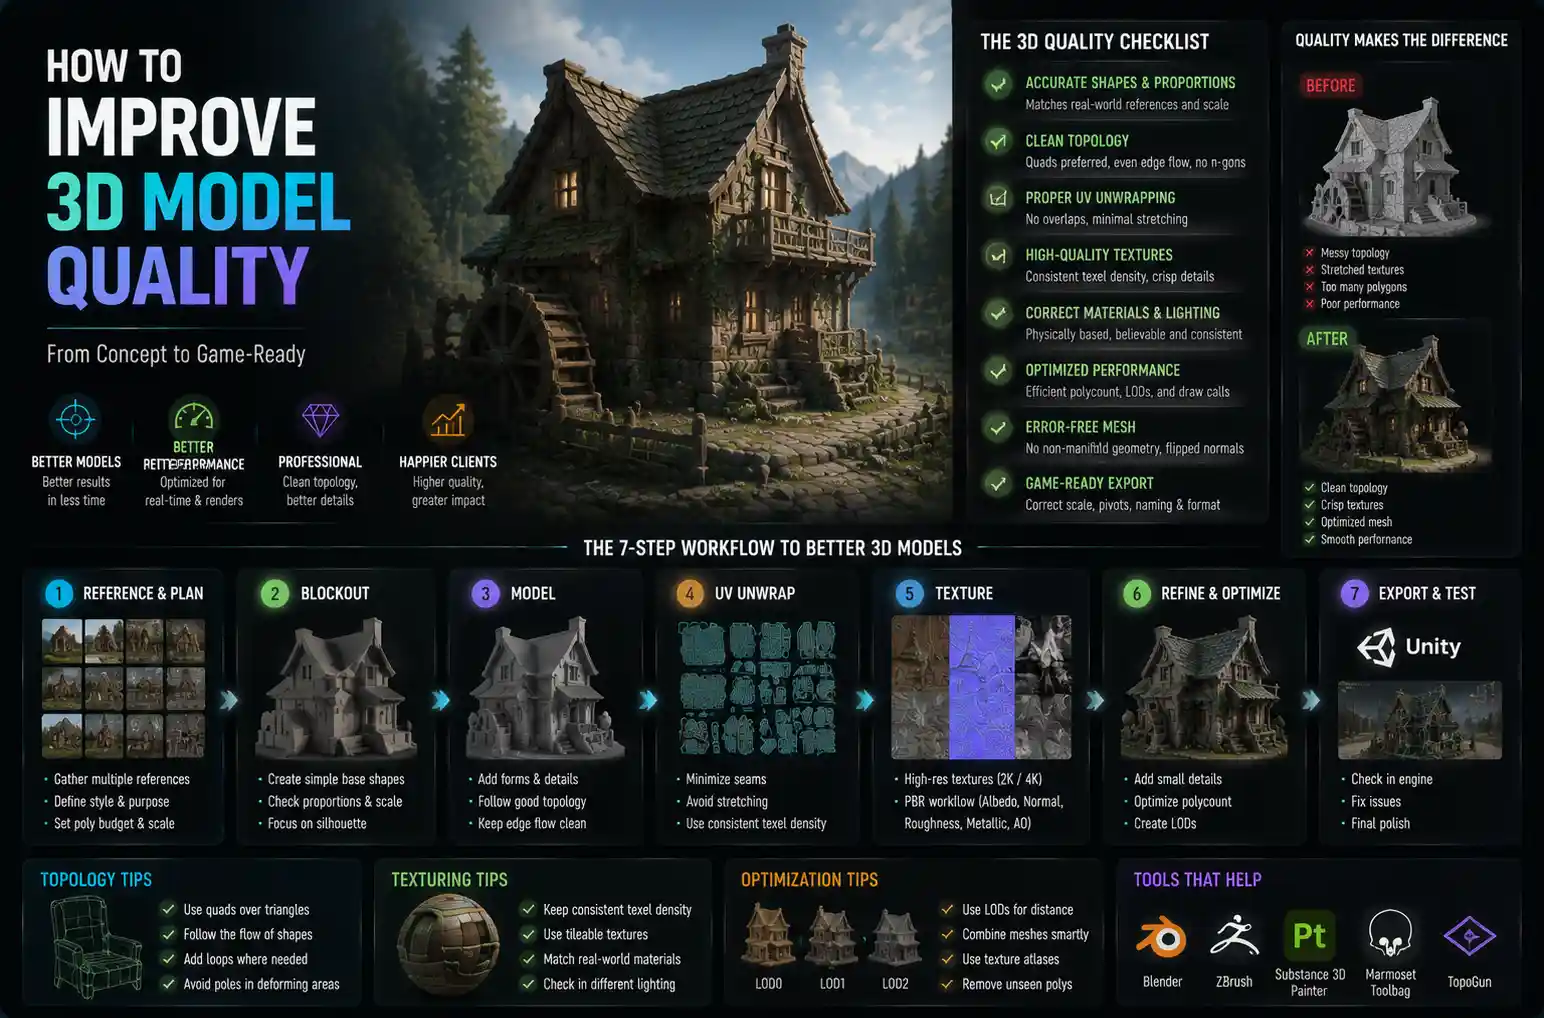
Whether you’re working on a AAA video game, a 3D-printed custom part, a architectural visualization, or a product prototype for a client, the quality of your 3D model can make or break the final result. A low-poly, messy model with stretched textures and inconsistent topology might work for a quick concept sketch, but it will cause frustrating issues down the line: long render times, broken 3D prints, jagged animations, and disappointing client feedback. Improving 3D model quality isn’t just about mastering advanced software tricks—it’s about building good habits from the first sketch to the final export. In this guide, we’ll break down practical, actionable steps to raise the bar on your 3D work, regardless of your skill level or chosen niche.
Start With Strong Reference Gathering and Planning
Even the most skilled 3D artists can’t create a high-quality model from a vague idea. Poor reference material is one of the most common causes of low-quality 3D work, leading to incorrect proportions, inconsistent details, and hours of rework later. Taking the time to gather references and plan your model before you start modeling will save you time and result in a far more polished final product.
Collect multiple types of reference
Don’t rely on a single photo or a rough sketch to build your model. For organic models like characters or animals, you need references from multiple angles: front, side, back, and close-ups of key details like skin texture, wrinkles, or eye structure. For hard-surface models like machinery or furniture, you need measurements, engineering drawings if available, and photos that show how different parts connect. Even for abstract or stylized models, mood boards that clarify shape, texture, and overall scale help keep your work consistent.
Many artists use free tools like PureRef or Miro to organize references in one place, so you can keep them open alongside your 3D modeling software without switching windows. This constant reference cuts down on guesswork, which is the root of most proportional errors that ruin model quality.
Define your poly budget early
One of the biggest mistakes new 3D artists make is adding unnecessary detail that bloats the model and causes performance issues. A high-quality model isn’t just one with a million polygons—it’s one that has the right number of polygons for its intended use. Before you start modeling, define your poly budget: the maximum number of polygons your model can have for its final application.
- A mobile game character might only need 1,500 to 5,000 triangles
- A AAA game cinematic character could range from 50,000 to 200,000 triangles
- A 3D-printable part usually requires a clean mesh under 1 million polygons, depending on printer resolution
- A static architectural visualization render can handle several million polygons, as performance is less of a concern
Defining this budget early forces you to prioritize detail where it matters most, rather than wasting time adding tiny features that will never be seen in the final product. This intentional approach is one of the easiest ways to improve overall model quality without learning advanced techniques.
Master Topology for Clean, Functional Meshes
Topology—the arrangement of vertices, edges, and faces that make up your 3D mesh—is the foundation of model quality. A model with bad topology will have smoothing issues, deformation problems when animated, texture stretching, and long processing times, even if the overall shape is correct. Learning to create clean, functional topology is one of the most impactful steps you can take to improve your 3D model quality.
Follow core topology rules for every model
While topology requirements vary slightly between organic and hard-surface modeling, there are universal rules that apply to almost every project:
- Keep polygons as quadrilaterals (four-sided faces) wherever possible. Triangles (three-sided faces) are fine for small areas or low-poly models, but n-gons (faces with five or more sides) almost always cause issues with subdivision, smoothing, and Boolean operations. Most 3D software can automatically convert n-gons to quads or triangles, but it’s better to build them correctly from the start.
- Maintain even edge distribution. Avoid placing multiple vertices extremely close together or creating long, stretched triangles or quads. Uneven edges cause inconsistent smoothing and weird texture stretching, even when your overall shape is correct.
- Add edge loops only where you need them. Edge loops (continuous lines of edges around a mesh) control sharpness in subdivision modeling, but too many unnecessary edge loops bloat your poly count and make the mesh harder to edit.
- Align edge loops to the natural flow of the model. For organic characters, this means following the muscle flow: edge loops around the eyes, mouth, and joints should match how the body deforms when moving. For hard-surface models, edge loops should follow the contour of the shape to maintain clean, predictable sharp edges.
Fix common topology errors
Even experienced artists end up with common topology errors that hurt model quality. Take the time to check for these issues before you move on to texturing or exporting:
- Non-manifold geometry: This is any mesh where edges are connected to more than two faces, or faces are flipped inside out. Non-manifold geometry breaks 3D printing, Boolean operations, and export to other software. Most modern 3D tools like Blender, Maya, and ZBrush have automatic tools to find and fix non-manifold geometry, so run this check every time you finish blocking out your mesh.
- Overlapping faces: When two faces occupy the same space, they cause rendering glitches and issues with Boolean operations. This often happens when you duplicate parts of a mesh and forget to delete the original faces. A quick merge or delete of overlapping faces fixes this issue in seconds.
- Unnecessary vertices: Many new 3D artists add more vertices than needed to create a shape. Use tools like the "decimate" modifier in Blender or "reduce" command in Maya to remove extra vertices where they don’t add detail, keeping your poly budget on track.
"Topology is not about following a bunch of rules for their own sake. It’s about creating a mesh that does what you need it to do—deforms well when animated, subdivides cleanly, and textures without stretching. Good topology is invisible; bad topology causes problems you can’t fix any other way."
For artists still struggling with topology, the best practice is to study clean existing models. Sites like Sketchfab have thousands of free, downloadable 3D models from professional artists that you can inspect to see how they arrange edge loops and vertices. Comparing your work to professional examples will help you develop an eye for what good topology looks like.
Refine Details and Fix Geometry Issues
Once you have a clean base mesh with good topology, it’s time to refine details and fix small errors that drag down overall quality. This stage is where good models become great models, and it’s often the difference between amateur and professional work.
Use subdivision modeling strategically
Subdivision modeling is the process of dividing your base mesh into smaller polygons to create smooth, curved surfaces. It’s one of the most common modeling techniques, but it’s also frequently misused. Many artists either subdivide too early, leading to a bloated mesh that’s hard to edit, or don’t use edge loops to control sharpness, leading to soft, blurry edges that look unprofessional.
To get the best results from subdivision modeling, keep your base mesh low-poly and clean, and only add edge loops where you need to sharpen edges or add major detail. Subdivide incrementally: test how your model looks at each subdivision level before adding more geometry. For hard-surface models, this approach will give you crisp, clean edges that look manufactured, rather than the soft, blobby edges that come from too much early subdivision.
Retopologize high-poly sculpts for performance
If you’re working with a high-poly sculpt from ZBrush or Nomad Sculpt, you almost never need to use the raw high-poly model for the final product. Retopology—the process of creating a new clean low-poly mesh over the high-poly sculpt—gives you all the detail of the original sculpt with a fraction of the polygon count, and a clean topology that works for animation, games, or 3D printing.
Many new artists skip retopology because it feels tedious, but modern tools have made it much faster. Automatic retopology tools like ZBrush’s ZRemesher or Blender’s Remesh can create a clean base mesh in minutes, and you only need to manually adjust edge loops around important areas like joints or facial features. Once you have your clean low-poly mesh, you can bake all the high-poly detail into normal maps, ambient occlusion maps, and displacement maps that add all the fine detail without the performance cost of a high-poly mesh.
Check for scale and proportion errors
Even a mesh with perfect topology will look low-quality if the proportions are off. Take a step back from your model regularly and compare it to your references to check for proportional errors. A common trick is to flip your model horizontally—this breaks your muscle memory and helps you see proportion errors you didn’t notice before. For models that will be used in the real world, like 3D-printed parts or architectural models, always double-check your scale. A 1cm error in your 3D model becomes a 10cm error in a 1:10 scale print, which can render the entire model useless.
Optimize Texturing for Realism and Consistency
Even a perfectly modeled mesh can look low-quality with bad texturing. Texturing adds color, detail, and realism to your model, and small inconsistencies here are very noticeable to viewers. Improving your texturing workflow will have a huge impact on the perceived quality of your final model.
UV unwrap properly to avoid stretching
UV unwrapping is the process of flattening your 3D mesh into a 2D map so you can apply 2D textures to it. The most common texturing issue is UV stretching, where parts of the texture are stretched or squashed to fit the mesh, leading to blurry or distorted details. Avoiding this starts with good UV unwrapping habits:
- Unwrap your model in logical chunks, rather than trying to unwrap the entire model as a single piece. For example, unwrap a character’s head, torso, arms, and legs separately to give more UV space to high-detail areas like the face.
- Use the UV stretch checker in your software to identify stretched areas. Most tools color-code stretched UVs, making it easy to spot and fix problem areas before you add textures.
- Allocate more UV space to areas that are close to the camera or have fine detail. A character’s face gets more UV space than the back of their torso, for example, because viewers will see the face up close.
- Align UV shells to texture pixels to avoid blurring. This is especially important for game assets, where resolution is limited.
Use PBR workflows for consistent, realistic results
Physically Based Rendering (PBR) has become the industry standard for texturing because it creates consistent, realistic results across different lighting conditions and render engines. PBR textures separate surface information into different maps: albedo (base color), roughness, metallic, normal, and ambient occlusion. Following PBR guidelines ensures your model will look correct in any environment, whether it’s a game engine, a architectural render, or a AR application.
One common mistake new artists make with PBR is adding incorrect values for metallic and roughness. For example, most metals have a metallic value of 1 (100% metallic) and most non-metals have a metallic value of 0, rather than intermediate values that look unrealistic. Taking the time to study real-world surface properties will help you get more realistic results. For example, fresh skin is more rough than you might think, while polished plastic is much smoother than default texture presets often set it.
Add subtle detail to avoid a flat look
Many new artists create textures that are too uniform, leading to a flat, artificial look. High-quality models have subtle imperfections that make them look real: tiny scratches on metal, slight color variation in skin, dust in crevices, or small dents on plastic. You don’t need to add these details by hand—most PBR texture sources include subtle variation, and you can add extra detail with a light ambient occlusion pass that darkens crevices to add depth.
Even for stylized models, subtle variation in color and roughness keeps the model from looking flat. A completely uniform red texture on a stylized character’s shirt will look boring, but adding 2-3% variation in hue and brightness across the mesh adds depth and makes it look more natural.
Test and Validate Your Model for Its Intended Use
Quality is relative: a model that’s perfect for a 3D print might not work for a real-time game, and a model that works for a quick concept might not be good enough for a client render. The only way to confirm your model meets quality standards is to test it for its specific intended use before you finalize it.
Test for common application-specific issues
Different uses have different quality requirements, so tailor your testing to what you’re creating:
For 3D printing: Check for wall thickness, non-manifold geometry, and overhangs that will require support material. Use tools like Meshmixer to analyze your model for printability before exporting. Minimum wall thickness for most FDM printers is 1.5mm, so make sure all parts of your model meet this requirement to avoid printed parts that break or don’t print at all.
For real-time games: Test your model in the game engine (Unity, Unreal, etc.) to check frame rates, deformation during animation, and how the model looks in different lighting. A model that looks great in your modeling software might cause a 20fps drop in-game if your poly count or texture resolution is too high.
For architectural visualization: Check that all objects are to scale, that materials match the real-world products you’re representing, and that there are no hidden gaps between walls or floors that show up in final renders. A single tiny gap between a wall and a floor can ruin an otherwise perfect render.
For animated characters: Bind your model to its rig and test a full range of motion to check for deformation issues. Bad topology will often show up when you bend a character’s arm or open their mouth, creating weird pinching or stretching that you can’t fix without reworking the topology. Catching this early saves you from having to redo texturing work after you find the issue.
Get feedback from other artists
It’s almost impossible to see all the flaws in your own work, because you’ve been staring at it for hours. Getting feedback from other 3D artists is one of the fastest ways to improve your model quality. Even a quick second opinion can spot proportion errors or texture issues you completely missed.
There are dozens of active 3D artist communities on Reddit, Discord, and ArtStation where you can share your work for constructive feedback. When asking for feedback, be specific: tell people what the model is for, so they can give you relevant feedback about poly count, topology, and other quality factors that matter for your use case.
Conclusion
Improving 3D model quality isn’t about buying the most expensive software or learning a hundred advanced tricks—it’s about building consistent, good habits from the start of your project. Starting with solid references, planning your poly budget, creating clean topology, refining details, texturing intentionally, and testing for your intended use will turn a mediocre model into a professional-quality one. The best part is that these habits compound: every time you follow this process, you develop a better eye for quality, and your work gets faster and better over time. Whether you’re a new artist just learning the basics or a professional looking to refine your workflow, focusing on these core areas will help you consistently create 3D models you can be proud of.