
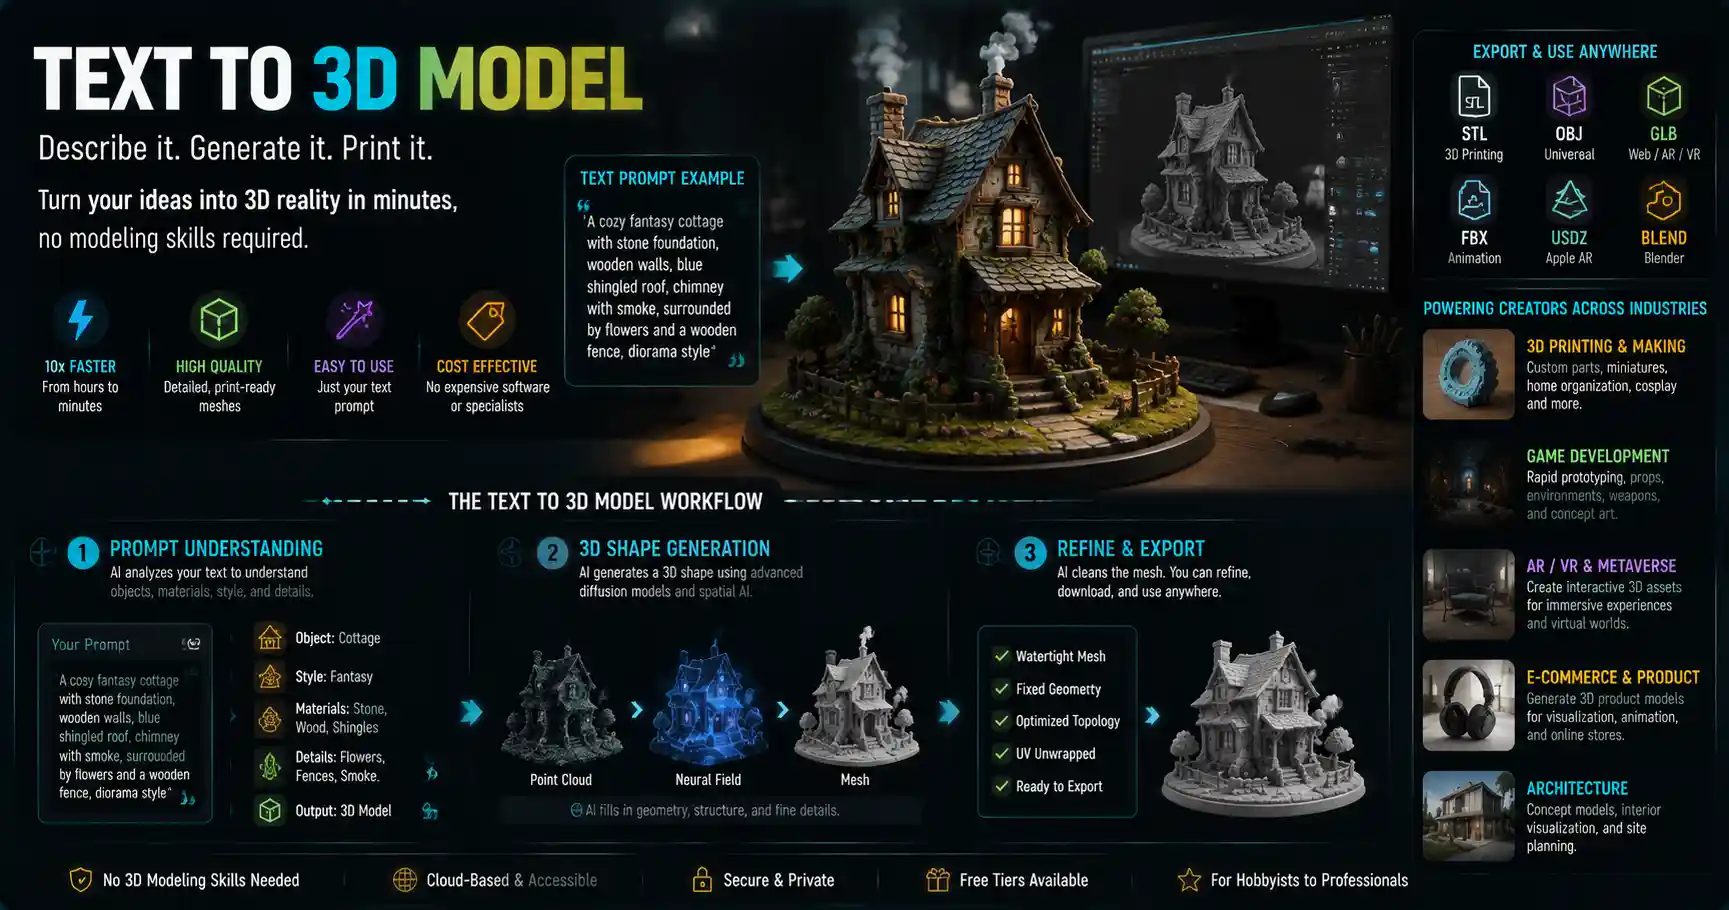
Just a few years ago, turning a written description into a 3D printable model required years of technical training, expensive software, and hours of meticulous manual work. Today, text to 3D model tools are democratizing 3D design, letting anyone from a hobbyist to a professional product designer generate a ready-to-use 3D model from a simple sentence or paragraph. What started as an experimental AI research project has quickly become a mainstream tool, opening up 3D printing, game development, and industrial design to creators who never thought they had the skills to participate. As the technology improves at a staggering pace, it’s worth breaking down how these tools work, what they’re already being used for, and how to choose the right one for your next project.
How Text to 3D Model Technology Works
At their core, modern text to 3D model tools are powered by generative AI, specifically large language models (LLMs) and diffusion models adapted for 3D output. Early attempts at text-controlled 3D generation date back to the mid-2010s, but those systems relied on pre-built 3D asset libraries and could only generate very basic shapes matching simple keywords. The breakthrough came around 2022, when researchers adapted 2D image diffusion models—popularized by tools like DALL-E and MidJourney—for 3D environments, creating far more detailed and accurate outputs than ever before.
The Core Pipeline for Text to 3D Generation
Nearly all consumer-facing text to 3D tools follow a similar three-step process to turn text prompts into usable 3D models:
- Prompt understanding: A large language model first parses your text prompt to break down the key elements: object type, size, texture, style, spatial relationships, and any specific features you’ve requested. For example, if your prompt is “a minimalist ceramic coffee mug with a pine tree engraving, 10cm tall,” the LLM identifies that the base object is a mug, it has specific dimensions, a ceramic material, and a carved decorative feature.
- 3D shape generation: Next, a generative 3D diffusion model creates a point cloud or neural radiance field (NeRF) that matches the description. Point clouds are collections of 3D coordinates that define the surface of an object, while NeRFs are better for creating realistic, viewable 3D objects that work well for AR/VR applications. For 3D printing, most tools convert these outputs into a watertight mesh, which is the standard file format for 3D printable models.
- Refinement and export: Finally, the tool automatically cleans up the model to fix common issues like non-manifold geometry, floating polygons, or gaps in the mesh that would break 3D printing. Users can then tweak the model directly in the tool’s editor or export it as a standard file like STL, OBJ, or GLB for use in other software.
The most advanced tools on the market today use a method called Score Distillation Sampling (SDS), which lets the 3D model learn from 2D image training data to match your text prompt more accurately. Instead of training the AI exclusively on millions of 3D models—there are far fewer open-source 3D datasets than 2D images—SDS uses pre-trained 2D diffusion models to guide the 3D generation process, resulting in more detailed outputs that align closely with what you actually asked for. That’s why text to 3D tools got so much better so quickly: they can leverage the massive amounts of 2D image and text training data that already exists for 2D generative AI.
“Text to 3D doesn’t just lower the barrier to entry for 3D design—it reimagines the entire creative process. Instead of spending hours modeling every detail from scratch, you can iterate through 10 different design ideas in 10 minutes, focusing on creativity instead of technical skill.”
That quote from 3D printing industry expert and educator Chuck Hellebuyck sums up the biggest shift brought by text to 3D tools: they’re not just for people who can’t use Blender or AutoCAD. Even professional designers are using them to speed up ideation and iterate through concepts faster than ever before.
Common Use Cases for Text to 3D Tools
Text to 3D model tools are being used across nearly every industry that works with 3D assets, but some use cases have already become mainstream. These tools fit especially well where speed, customization, or accessibility is a priority, replacing more complex traditional workflows for many creators.
3D Printing and Custom Manufacturing
For hobbyist 3D printing enthusiasts and small-scale manufacturers, text to 3D is a game-changer. Instead of spending hours searching through free STL libraries for a specific part or custom item, you can generate exactly what you need in minutes. Common examples include custom replacement parts for household appliances, custom jewelry, personalized figurines, or custom tool organizers that fit perfectly in a specific drawer. A homeowner with a broken plastic bracket for a curtain rod, for example, can describe the exact dimensions and shape and generate a 3D printable STL file in minutes, instead of ordering a custom part from a machinist or waiting for a replacement to ship. For small custom goods businesses, text to 3D lets them offer fully personalized products to customers without hiring a team of 3D designers.
Game Development and AR/VR Content Creation
Independent game developers and AR/VR creators are another group that has embraced text to 3D early. Building a 3D game from scratch requires hundreds or thousands of unique assets—props, environment elements, furniture, character accessories—and hiring 3D artists to create every asset is prohibitively expensive for small teams. With text to 3D, a solo developer can generate hundreds of unique assets in a fraction of the time, then refine them to fit their game’s art style. For AR experiences, like virtual furniture placement apps or interactive museum exhibits, text to 3D lets creators quickly generate accurate 3D models of objects to add to the experience without 3D scanning every item. Even large game studios use text to 3D for rapid prototyping of level designs and asset concepts before moving to full production.
Product Design and Industrial Prototyping
Industrial designers and product development teams use text to 3D to speed up the prototyping phase. Before creating a final product, designers often iterate through dozens of different concepts to test form, function, and ergonomics. With text to 3D, a designer can generate 10 different variations of a new bottle design or kitchen tool in an afternoon, 3D print them, and test them physically, instead of spending weeks modeling each version by hand. For startups with limited design resources, this cuts down product development timelines from months to weeks, letting them get to market faster.
Education and STEM Outreach
Text to 3D tools are also making 3D design and 3D printing accessible to K-12 and college STEM programs. Many schools have 3D printers now, but most students and even many teachers don’t have the training to use complex 3D modeling software. With text to 3D, students can jump straight into the creative process: they can design a model of a cell for biology class, a historical artifact for social studies, or a custom robot part for a robotics competition, just by describing what they want. That lets schools focus on teaching problem-solving and design thinking, instead of spending weeks teaching students how to navigate complex CAD software.
Top Text to 3D Tools Compared for Different Use Cases
Today’s text to 3D tools range from free, browser-based options for beginners to professional-grade tools for enterprise design teams. No single tool is best for every use case, so it helps to understand the strengths and weaknesses of the most popular options available in 2024.
- Meshy: Meshy is one of the most popular consumer-facing text to 3D tools, with a free tier that lets you generate up to 10 models per month, and paid tiers starting at $10 per month for unlimited exports. It specializes in generating watertight, 3D-printable STL files directly from text prompts, and includes a built-in editor to tweak your model, repair errors, and resize it for 3D printing. It’s a great option for beginners and 3D printing hobbyists, with a very gentle learning curve. The main downside is that complex high-poly models for game development can hit resolution limits on the lower-priced tiers.
- 3DFY.ai: 3DFY.ai positions itself as a professional-grade tool for product designers and game developers, with the ability to generate high-quality text-based 3D models up to 4K resolution. It supports both standard STL/OBJ exports for 3D printing and GLB/GLTF exports for AR/VR and game development. It offers a pay-as-you-go model starting at $0.30 per model, which is good for users who only need to generate a few models a month, but enterprise subscriptions for high-volume use start at $99 per month. Its outputs are generally more detailed than many consumer tools, but it has a steeper learning curve for new users.
- Luma AI: Luma AI is best known for text to 3D NeRF generation, which produces extremely realistic, photorealistic 3D objects ideal for AR, VR, and visual effects. It doesn’t generate the watertight meshes needed for 3D printing, so it’s not a good fit for that use case, but for game development and AR experiences, it produces some of the most realistic outputs on the market. It has a free mobile app that lets you generate and view your 3D models on the go, with paid tiers starting at $30 per month for professional users.
- Tripo AI: Tripo AI is a fast, browser-based text to 3D tool that can generate a full 3D mesh in under a minute, which makes it great for rapid ideation. It supports exports to all major file formats, including STL, OBJ, and GLB, and has a free tier that lets you generate 30 models per month for non-commercial use. Paid commercial licenses start at $10 per month. It’s a good middle ground between beginner-focused free tools and professional-grade options, with fast generation times and solid quality for most use cases.
- Blender Add-Ons (Dream Textures, Instant NeRF): For creators who already use Blender, the free open-source 3D modeling software, there are several community-built text to 3D add-ons that integrate AI generation directly into your Blender workflow. These add-ons are free to use (if you already have Blender, which is free itself), but they require a basic understanding of Blender to get good results, so they’re not ideal for beginners. They’re perfect for designers who want to generate a base model with AI and then refine it manually in Blender.
When choosing a tool, the most important question to ask first is what you plan to use the model for. If you need a 3D printable STL, prioritize tools that are built specifically for watertight mesh generation, like Meshy or 3DFY. If you need a photorealistic model for an AR filter, NeRF-focused tools like Luma AI are a better fit. If you’re just experimenting and don’t want to pay anything, start with Tripo AI’s free tier or the Blender add-ons if you’re already familiar with 3D modeling.
Tips for Getting High-Quality Results From Text to 3D Tools
Like all generative AI tools, the quality of your text to 3D output depends heavily on the quality of your prompt. Even the most expensive tools will give you bad results if your prompt is vague or missing key information. These practical tips will help you get better outputs, no matter what tool you’re using.
Write Specific, Detailed Prompts
Vague prompts like “a chair” will give you generic, low-quality results that don’t match what you actually want. Good prompts include four key pieces of information that help the AI understand exactly what you need:
- Object type and core function: Clearly state what the object is, for example “a dining chair” instead of just “a chair.”
- Style and material: Specify what it’s made of and what style it should be, for example “solid oak wood, mid-century modern style.”
- Key features: List any specific features the object needs, for example “four tapered legs, curved backrest, no armrests.”
- Dimensions (for 3D printing): If you plan to print the model, include the exact final size you need, for example “finished height 75cm, seat width 50cm.”
A good example of a complete prompt would be: “A mid-century modern solid oak dining chair, four tapered legs, curved wooden backrest, no armrests, finished height 75cm, seat width 50cm, watertight mesh for 3D printing.” A prompt like this will give you a far more accurate result than a vague one-word prompt.
Iterate and Refine Your Model
It’s very rare that you’ll get a perfect final model on your first try. Most creators generate 3-5 different variations of their prompt first, pick the one that’s closest to what they want, then make small adjustments to the prompt or use the tool’s built-in editor to fix issues. For example, if the AI generates a mug with a handle that’s too thin to print, you can add “thick 2cm handle” to your prompt and regenerate, or edit the model directly to thicken the handle. For professional use, most designers use text to 3D to generate a base model, then refine it manually in CAD or Blender to fix any small errors or add details that the AI missed.
Check Model Quality Before Export
If you’re generating a model for 3D printing, one of the most common mistakes is exporting and printing the model without checking for errors first. Most good text to 3D tools automatically repair common issues like non-manifold geometry or holes in the mesh, but it’s still good practice to check the model in a free tool like Meshlab or the tool’s built-in model inspector before you export it. Look for overlapping faces, gaps in the surface, or thin areas that will break when printed, and fix those before you send the file to your 3D printer.
Start Simple, Then Add Complexity
If you’re new to text to 3D, don’t start with a super complex prompt for a 50-part assembly. Start with a simple single object, get familiar with how the tool responds to your prompts, then work your way up to more complex designs. Simple, solid objects like mugs, replacement parts, and basic figurines are much easier for AI to generate well than complex organic shapes or multi-part assemblies. As you get more comfortable, you can start experimenting with more complex designs.
Current Limitations and Future of Text to 3D Technology
While text to 3D technology has improved dramatically in the last two years, it still has important limitations that creators need to be aware of. Understanding these limitations will help you avoid frustration and set realistic expectations for what the technology can do today.
The biggest current limitation is that most consumer-facing tools struggle with complex geometric accuracy, especially for functional parts that require tight tolerances. If you need a replacement gear for a 3D printer that has to fit exactly on a motor shaft, an AI-generated model might get the general shape right, but it might not have the exact tooth profile or diameter you need to work properly. For functional industrial parts, designers still need to manually dimension and check the model after generation to ensure it meets tolerance requirements. Another common limitation is that multi-part assemblies are still very difficult for AI to generate correctly. Most tools can generate a single object well, but generating a fully assembled multi-part product with moving parts is still beyond the capability of most consumer tools today.
Another challenge is copyright and ownership. Unlike 2D generative AI, which has been the subject of multiple high-profile copyright lawsuits, the 3D space is still sorting out who owns AI-generated models. Most tools grant users a commercial license for generated outputs, but there are still open questions about training data: many 3D AI models are trained on public 3D models uploaded by creators who didn’t give permission for their work to be used for AI training, which could lead to legal disputes down the line. For creators selling AI-generated 3D models or products made from them, it’s important to read the terms of service of your tool carefully to understand what rights you have.
Looking ahead, the future of text to 3D technology is moving fast. Researchers are already working on tools that can generate fully functional multi-part assemblies with correct tolerances directly from text, which would open up the technology to even more industrial use cases. We’re also starting to see integration between text to 3D and CAD software, letting designers seamlessly move from AI-generated base model to detailed engineering design without switching platforms. In the next 3-5 years, experts predict that text to 3D will become a standard part of every 3D designer’s toolkit, not just a tool for beginners. It won’t replace skilled 3D designers any time soon, but it will handle the repetitive work of generating base models and ideating concepts, letting designers focus on the high-value creative and engineering work.
Another emerging trend is text to 3D combined with 3D scanning, letting users modify an existing scanned 3D model with a text prompt. For example, you could scan an existing chair, type “make the backrest taller and add a curved armrest,” and get an updated modified 3D model directly. That would make customization of existing designs even faster and easier, opening up new possibilities for custom manufacturing.
Conclusion
Text to 3D model tools are one of the most exciting developments in 3D design and manufacturing in decades, democratizing access to 3D creation for everyone from hobbyists to professional designers. What started as an experimental research project is now a practical tool that can save creators hours of work, open up new business opportunities for custom goods makers, and make 3D printing and 3D design accessible to people who never had the time or money to learn complex 3D modeling software. While the technology still has limitations, especially for functional industrial parts and complex assemblies, it’s improving at a pace that would have been unthinkable just five years ago. By choosing the right tool for your use case, learning to write effective prompts, and understanding current limitations, you can start using text to 3D to speed up your workflow and bring new creative ideas to life faster than ever before. For anyone who works with 3D content, this technology isn’t just a passing trend—it’s a fundamental shift in how 3D design is done, and it’s only going to become more important in the years ahead.