
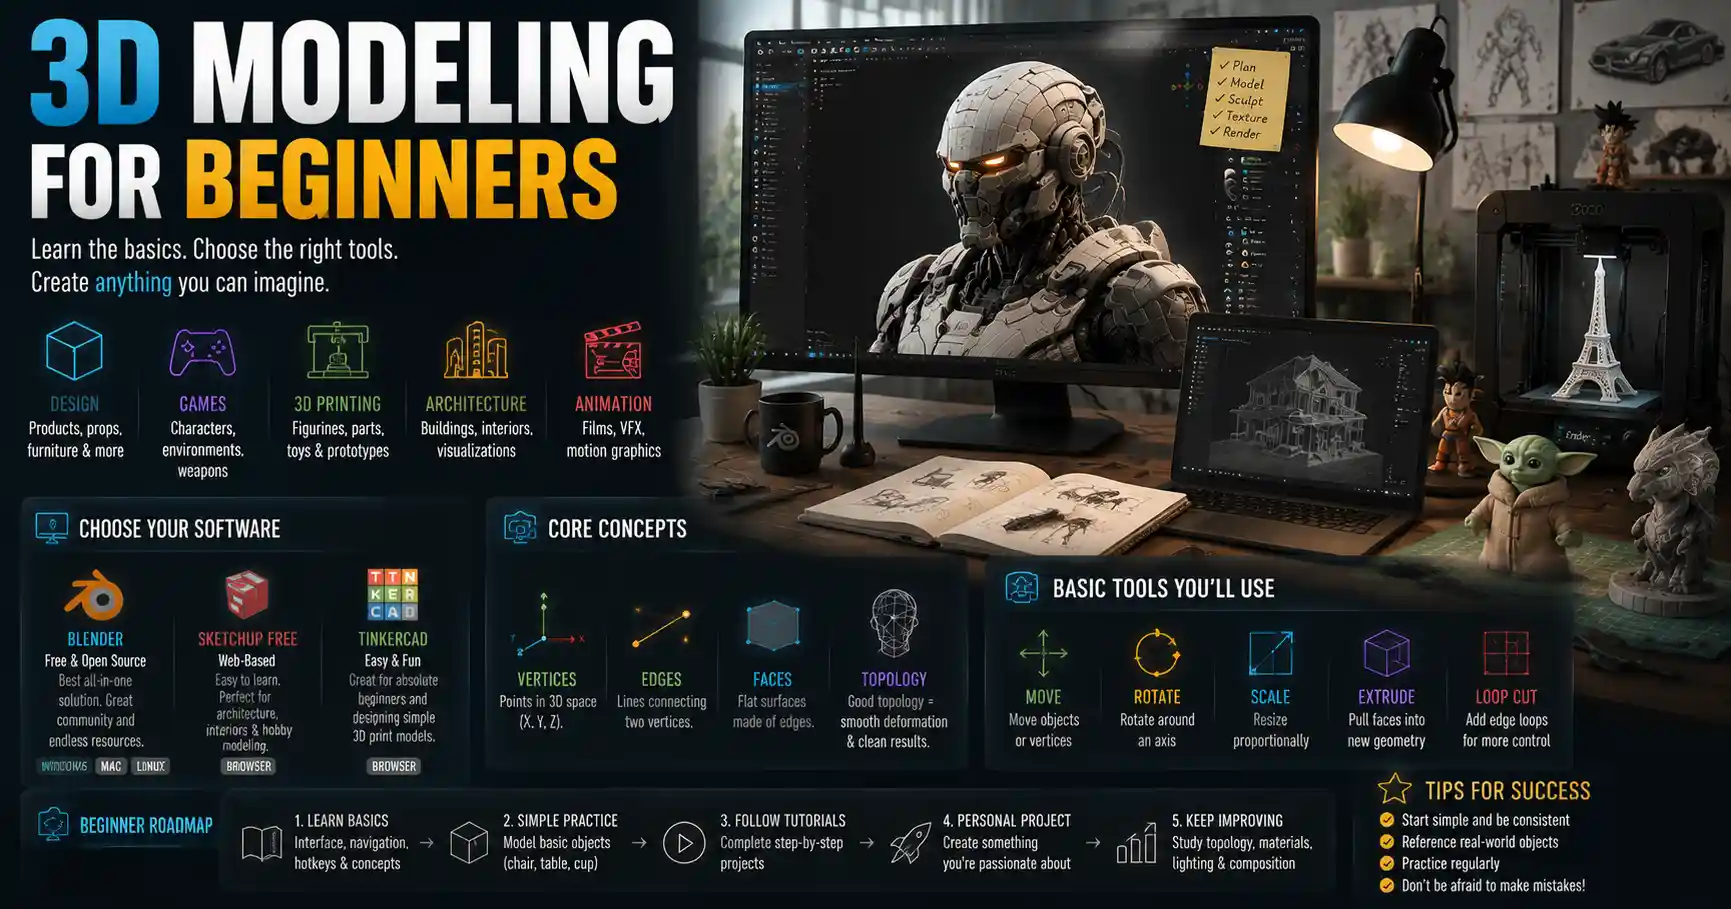
Once, 3D modeling was an exclusive skill reserved for Hollywood visual effects studios and aerospace engineering teams, requiring expensive hardware and years of specialized training. Today, anyone with a laptop and an internet connection can learn to create 3D models for video games, product design, 3D printing, animation, or even personal art. Whether you want to design a custom figurine for 3D printing, build a virtual environment for an indie game, or pivot to a new career in digital design, 3D modeling is more accessible than ever. This guide breaks down everything beginners need to know to get started, from choosing the right software to mastering core techniques that will set you up for long-term success.
Choosing the Right 3D Modeling Software for Beginners
The first step to learning 3D modeling is picking software that matches your goals, budget, and skill level. With dozens of options on the market, it’s easy to get overwhelmed by flashy features or expensive subscriptions you don’t need as a beginner. The best beginner software balances approachability with room to grow, so you don’t have to switch tools entirely once you outgrow the basics.
Free and Open-Source Options for New Learners
If you’re just testing the waters and don’t want to invest money upfront, free software is the perfect starting point. Contrary to popular belief, many free 3D tools are powerful enough for professional work, making them ideal for beginners building their skills.
- Blender: The most popular free 3D modeling software, Blender is a fully-featured open-source tool that supports every step of the 3D workflow: modeling, sculpting, animation, rendering, and even video editing. It has a massive global community that creates free tutorials, assets, and add-ons for every use case, from 3D printing to game development. The only downside is its steep initial learning curve, but the abundance of free learning resources more than makes up for it.
- SketchUp Free: SketchUp is famous for its intuitive push-pull interface that makes it easy to create architectural models, furniture designs, and simple 3D objects. The free web version is perfect for beginners who want to start modeling within minutes without downloading large software. It’s especially popular for hobbyists interested in woodworking or interior design.
- Tinkercad: Developed by Autodesk, Tinkercad is a browser-based tool designed for absolute beginners, particularly students. It uses simple block-building logic that teaches core 3D modeling concepts without overwhelming new users. It’s a great starting point if you want to design simple objects for 3D printing before moving on to more advanced tools.
Paid Options for Specific Goals
If you have a clear end goal for your 3D modeling, it may be worth investing in a paid subscription from day one. Most professional tools offer tiered pricing, including affordable plans for hobbyists and students.
- Autodesk Fusion 360: A favorite for product design and mechanical modeling, Fusion 360 combines 3D modeling with computer-aided manufacturing (CAM) tools, making it perfect for anyone interested in 3D printing or industrial design. It’s free for hobbyists and students, with a low-cost monthly subscription for professional use.
- ZBrush: The industry standard for digital sculpting, ZBrush is used by game studios and VFX houses to create high-detail characters and creatures. It has a unique workflow that takes some getting used to, but it’s unmatched for organic, detailed models. A monthly subscription costs around $10, which is accessible for most beginners serious about sculpting.
- Autodesk Maya: Maya is the industry standard for 3D animation and VFX for film and games. While it has a steep learning curve, it’s a good investment if you plan to pursue a career in entertainment. Students can get a free one-year license, and professionals pay a monthly subscription.
As a general rule, if you’re not sure what you want to model yet, start with Blender. It’s 100% free, supports every type of 3D work, and has more learning resources than any other beginner tool. Once you master the basics, you can switch to a specialized tool if you need specific features for your project.
Core Concepts Every Beginner Needs to Understand
Before you start clicking and dragging to create your first model, it’s important to learn the foundational vocabulary and concepts that power all 3D modeling. Learning these basics early will help you follow tutorials, troubleshoot problems, and plan your projects more effectively.
The Geometry of 3D Models
All 3D models are made of polygons – flat shapes connected by points called vertices. Most models use triangles or quads (four-sided polygons) because they render smoothly and are easy to edit. When you connect multiple polygons, you get a mesh, which is the core structure of your 3D model.
Three key terms describe the mesh geometry you’ll work with every day:
- Vertices: The individual points that define the corners of each polygon. Moving vertices is the most basic way to edit the shape of your model.
- Edges: The lines that connect two vertices, forming the sides of a polygon.
- Faces: The flat surface enclosed by edges, which is what you see when the model is rendered.
Another important concept is topology, which refers to how polygons are arranged in your mesh. Good topology means your polygons are evenly sized and arranged in a way that makes the model easy to edit, animate, and 3D print. Bad topology (like overlapping polygons or n-gons, which are polygons with more than four sides) can cause rendering errors, broken 3D prints, or issues when animating. As a beginner, you don’t need to master perfect topology right away, but it’s important to start practicing good habits early.
Coordinate Systems and 3D Space
Unlike 2D drawing, which only uses X (horizontal) and Y (vertical) axes, 3D modeling adds a third axis: Z, which controls depth. Understanding how to navigate and manipulate objects in 3D space is one of the biggest adjustments for new beginners. Most software lets you orbit, pan, and zoom your view to see your model from any angle, and you can lock movements to specific axes to avoid moving your model out of place accidentally.
Types of 3D Modeling
There are several different 3D modeling workflows, each suited to different types of projects:
- Polygon modeling: The most common type of 3D modeling, where you build a model by shaping and editing a polygon mesh. This works for almost everything, from hard-surface objects like furniture to organic characters.
- Digital sculpting: A workflow that mimics sculpting clay in real life, where you push, pull, smooth, and carve a digital mesh to create high-detail shapes. It’s ideal for creating characters, creatures, and organic art.
- Parametric modeling: A type of modeling where you define shapes with mathematical parameters and rules. If you change one dimension, the entire model updates automatically, which makes it perfect for product design and engineering where precise measurements are critical.
- NURBS modeling: Non-Uniform Rational B-Splines (NURBS) use mathematical curves to create smooth, precise surfaces, which is common in industrial and automotive design.
“The biggest mistake new 3D artists make is trying to learn every tool and technique at once. Start by mastering one workflow, one software, and one small project. Everything else builds on that foundation.”
Step-by-Step Workflow for Your First 3D Model
Once you’ve chosen your software and learned the core concepts, it’s time to create your first model. A common mistake beginners make is starting with an overly ambitious project – like a full 3D character or a detailed house – which leads to frustration and quitting. Instead, start with a simple object, like a mug, a chair, or a block of cheese, to practice your workflow. Here’s the standard step-by-step process most 3D artists follow for any project.
1. Block Out the Basic Shape
The first step is called blocking, where you create a low-detail version of your model that captures the overall proportions and form. Don’t worry about small details at this stage – focus on getting the big shape right. For example, if you’re modeling a mug, your blockout would be a simple cylinder with a smaller cylinder for the handle. This step helps you check proportions early before you spend time adding details.
As a beginner, get in the habit of starting from a simple primitive shape (a cube, sphere, cylinder, or plane) and modifying it, rather than building your model from scratch vertex by vertex. This is faster and helps you keep your topology clean from the start.
2. Refine the Form and Add Details
Once you’re happy with your blockout, it’s time to refine the shape and add medium and small details. For a mug, this might mean rounding the top edge, adding a curve to the handle, and indenting the bottom to create a base. If you were modeling a character, this is where you’d add muscle definition, facial features, or clothing folds.
One key rule to remember here: work from large to small. Always get the big shapes right before adding tiny details like a logo on a mug or pores on a character’s face. If you add details too early, you’ll end up redoing them when you adjust the overall shape later.
3. Check for Errors
Before you move on to texturing or exporting your model, you need to check for common errors that can cause problems later. For most beginners, the most common issues are:
- Non-manifold geometry: Edges that are connected to more or fewer than two faces, which can break 3D prints or rendering.
- Overlapping faces: Two faces that occupy the same space, which causes rendering glitches.
- Open edges: Gaps in the mesh that leave a hole, which makes the model hollow and unusable for 3D printing.
Almost all 3D software has built-in tools to automatically find and fix these errors, so get in the habit of running a check before you finish your model.
4. Add Textures and Materials
Once your model is finished and error-free, it’s time to add textures and materials to make it look realistic. A material defines how the surface of your model interacts with light: for example, a glass material is transparent and reflective, while a wood material is matte and has a grain pattern. Textures are 2D images that add detail to the surface, like scratches, color variations, or patterns.
As a beginner, you don’t need to create custom textures from scratch for your first project. Most software comes with free built-in basic materials, and you can find thousands of free high-quality textures online on sites like Poly Haven or TexturingXYZ.
5. Render Your Final Model
Rendering is the process of turning your 3D model and its materials into a finished 2D image or video. Modern 3D software like Blender comes with built-in render engines (Cycles and Eevee in Blender) that can produce photorealistic results. For beginners, start with a simple render setup with a basic light and a background, then experiment with more complex lighting as you get more comfortable.
Practical Tips to Speed Up Learning and Avoid Common Beginner Mistakes
Learning 3D modeling has a steep initial learning curve, but you can avoid months of frustration by following these practical, battle-tested tips from working 3D artists.
Follow Structured Tutorials, Not Random YouTube Videos
There are thousands of free 3D modeling tutorials on YouTube, but jumping from one random video to the next leaves gaps in your knowledge that will trip you up later. Instead, start with a structured beginner course that teaches you the interface, core tools, and workflow in order. Blender has official free beginner tutorials on its website, and platforms like Udemy, Coursera, and Skillshare have affordable, well-organized courses for every software and skill level.
That said, don’t just follow tutorials passively. After you complete a tutorial project, try repeating the same project without following along, or modify the design to make it your own. This helps you retain what you learn much faster than just copying what the instructor does.
Learn Keyboard Shortcuts Early
3D modeling requires hundreds of small interactions every minute, and clicking through menus for every tool will slow you down and break your focus. Every 3D software has keyboard shortcuts for all the most common tools (move, rotate, scale, undo, etc.), and learning them early will save you hours of time over the course of your learning. Blender even has a built-in shortcut trainer that helps you practice as you work.
Don’t Obsess Over Perfection At First
Many beginners get stuck trying to make their first model perfect, spending weeks tweaking tiny details that no one will notice. As a new learner, your goal is to finish as many small projects as possible, not to create a masterpiece on your first try. Finishing a simple, flawed model teaches you more than spending a month on an unfinished perfect model.
Use Reference Images
Even professional 3D artists don’t model from memory. Always collect reference images of the object you’re modeling from every angle before you start. If you’re modeling a mug, take photos of your own mug from the front, side, and top, and save them to your project folder to reference as you work. For common objects, you can find hundreds of reference images for free on sites like Pinterest or Google Images. References help you get proportions right and add realistic details you would otherwise miss.
Join a Community
Learning 3D modeling doesn’t have to be a solo activity. Joining a community of other beginners and experienced artists gives you a place to ask questions, get feedback on your work, and stay motivated. Some of the most popular communities for beginners include:
- The official Blender Artists forum
- Reddit’s r/3Dmodeling and r/blender communities
- Discord servers for your favorite 3D tutorials or creators
- Local 3D printing or digital design meetups
Getting constructive feedback early on helps you fix bad habits and improve much faster than trying to figure everything out on your own.
Next Steps After Your First Few Projects
Once you’ve finished a few small beginner projects and are comfortable with your software’s interface and core tools, you can start expanding your skills and working toward bigger goals. The next steps you take will depend on what you want to do with your 3D modeling skills.
For Hobbyists and 3D Printing Enthusiasts
If you’re modeling for 3D printing, the next step is to learn how to prepare your model for printing. This includes learning how to hollow out your model to save filament, add supports for overhanging parts, and export your model as a standard STL or OBJ file that slicer software can read. Practice printing small, simple objects first to learn how design choices (like wall thickness) affect print quality, and you’ll quickly get the hang of it.
For Aspiring Professional 3D Artists
If you want to work in game design, VFX, or product design, the next step is to build a portfolio. A strong 3D modeling portfolio has 5-10 of your best completed projects that show off your skills to potential employers. Focus on quality over quantity: one well-finished professional-level project is better than 10 half-finished beginner models. You can also start taking small freelance projects on platforms like Fiverr or Upwork to build experience and get real-world practice.
Expand Your Skill Set
Once you master basic modeling, you can learn related skills that open up more opportunities:
- 3D animation to bring your models to life
- UV unwrapping, the process of preparing a model for texturing
- Retopology, which cleans up high-poly models for use in games
- Shading and lighting to create more realistic renders
Again, don’t try to learn everything at once. Add one new skill at a time, and practice it on a new project before moving on to the next.
Conclusion
3D modeling is an incredibly rewarding skill that can open up new hobbies, creative outlets, and career opportunities. It’s normal to feel overwhelmed in the first few weeks – every 3D artist, even the professionals, remembers how confusing it was to learn to navigate 3D space for the first time. The key to success is to start small, practice consistently, and prioritize finishing projects over perfection.
By choosing the right software for your goals, mastering core concepts early, and following a structured workflow, you’ll be creating your own 3D models faster than you think. Whether you want to design custom toys for your kids, build assets for an indie game, or start a new career as a professional 3D artist, the only thing you need to get started is the willingness to learn and experiment with your first project.