
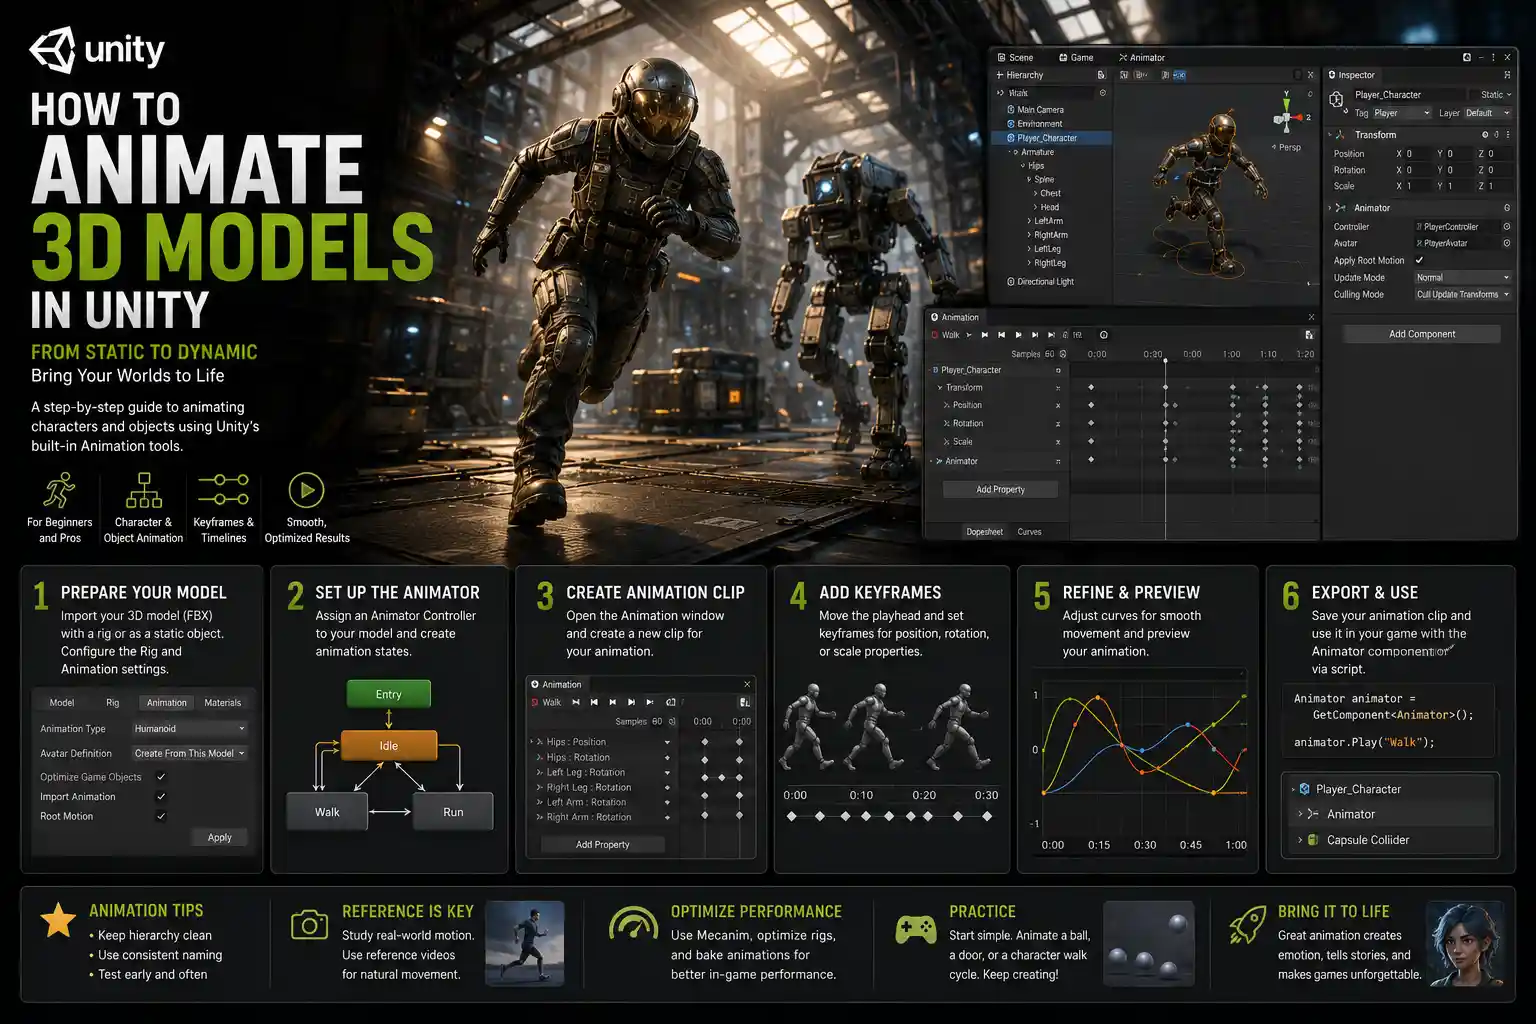
If you’ve ever opened the Unity game engine and stared at a static 3D model, wondering how to bring it to life, you’re not alone. 3D animation is one of the most rewarding skills in game development, turning inert shapes into walking characters, moving vehicles, and interactive environment objects that pull players into your world. Whether you’re building an indie platformer, a VR simulation, or just experimenting with 3D art, Unity provides a full set of tools to animate everything from subtle character eye movements to complex cutscene sequences. This step-by-step guide breaks down the entire process from preparing your model to exporting a final, polished animation, so you can start creating moving content even if you’re new to the engine.
Preparing Your 3D Model for Animation in Unity
Before you open the Animation window or add a single keyframe, your 3D model needs to be properly prepared to animate in Unity. Skipping this step is one of the most common causes of broken rigs, jittery movement, and missing textures down the line, so taking 15 minutes to check your import settings will save you hours of troubleshooting later.
First, you need to decide what type of animation you’re creating, because that determines how your model should be structured. For character models and other deformable objects that need to bend and twist, you’ll need a rigged model—a 3D mesh with a hierarchical skeleton (called an armature) that drives the movement of the mesh vertices. For non-deformable objects like spinning doors, moving elevators, or rotating propellers, you don’t need a full rig; you can animate the entire object’s position, rotation, and scale directly, which is far simpler.
Model File Requirements
Unity supports most common 3D file formats, including FBX, GLB, and OBJ. FBX is the industry standard for animated models because it preserves rig data, bone weights, and embedded animations, so we recommend using it for all animated assets. When exporting your model from a 3D tool like Blender, Maya, or 3ds Max, follow these basic rules:
- Apply all transformations (location, rotation, scale) to your model before exporting. This prevents unexpected scaling or offset when you import it into Unity.
- For rigged characters, make sure bone weights are properly painted so the mesh deforms smoothly when the skeleton moves. Bad weight painting will cause weird stretching or pinching when you animate your character.
- Export animations separately if you plan to use Unity’s Animation System to blend multiple animations (like walking, running, and jumping) on the same character. This makes it easier to manage each clip individually.
Configuring Unity Import Settings
Once you drag your model file into Unity’s Project window, the engine will automatically import it, but the default settings are rarely optimized for animation. Select the imported model and open the Inspector window to adjust the following settings:
For the Model tab: Check that the Scale Factor matches your project’s units. Unity uses 1 unit = 1 meter by default, so if your model was exported in centimeters, set the scale factor to 0.01 to get the right size. Enable Import Blend Shapes if you plan to animate facial expressions, like a character smiling or talking.
For the Rig tab: This is where you tell Unity how to handle your model’s skeleton. If you have a rigged character, set Animation Type to Humanoid if it’s a standard bipedal character (two legs, two arms, one spine) — this lets Unity use its powerful Avatar system to retarget animations from one character to another, which saves a ton of time if you’re using multiple characters. For non-standard rigs (like a four-legged animal, a robot with extra limbs, or an environment prop), select Generic. For static objects that you’ll animate directly, leave it on None.
For the Animations tab: If you embedded animations in your FBX file, you’ll need to split them into separate clips here. For example, if your file has a 10-second timeline that includes a walk cycle (0–2 seconds) and an idle animation (2–4 seconds), you can add two separate clips with start and end timestamps, name them, and Unity will treat them as individual assets. Enable Import Animation and check Root Motion if you want the animation to control the character’s movement through the world, rather than moving the character via a script.
Keyframe Animation for Static Objects
If you’re new to animation in Unity, starting with keyframe animation of non-rigged objects is the best way to learn the basics. Keyframe animation works by setting the position, rotation, or scale of an object at specific points in time, and Unity automatically interpolates (smooths) the movement between those keys. This method is perfect for moving platforms, spinning obstacles, opening doors, and other simple environment interactions.
Setting Up the Animation Window and Clip
To get started, drag your static 3D model from the Project window into the Scene view and position it where you want it in your level. Next, open the Animation window by going to Window > Animation > Animation in the top menu bar. Dock it next to your Project window for easy access.
With your model selected in the Hierarchy, click the Create button in the Animation window. Unity will prompt you to save a new animation clip — save it in a dedicated Animations folder in your project to keep things organized. Once you create the clip, Unity will automatically add two components to your object: an Animator component and an Animation component. The Animation component holds your default clip, while the Animator component connects your animation to Unity’s state machine system.
Creating Your First Keyframe Animation
Now you’re ready to add keyframes. Let’s use a simple example: animating a rotating ceiling fan. At the start of the timeline (time 0:00), the fan is in its default rotation. Add a keyframe by clicking the diamond icon next to Rotation in the Animation window’s property list, or press the K key on your keyboard to add a keyframe for all currently modified properties.
Next, move the timeline playhead to the 1:00 mark (1 second). Change the fan’s X rotation to 360 degrees, which will spin it all the way around. Unity will automatically add a new keyframe at this position because you changed the rotation property. Now when you click the play button in the Animation window, the fan will spin smoothly from 0 to 360 degrees over 1 second.
To make the spin loop continuously, select your animation clip in the Project window, check Loop Time and Loop Pose in the Inspector, and click Apply. Now the fan will spin nonstop when you enter Play Mode in Unity.
One of the most common mistakes new animators make is adding too many keyframes. You only need a keyframe when a property changes direction or value. Extra keyframes just make your animation choppy and harder to edit later.
Here are a few practical examples of simple keyframe animations you can create with this method:
- Opening a sliding door: Animate the door’s position from (0,0,0) to (0,0,2) over 0.5 seconds, so it slides open when the player approaches. You can trigger this animation with a simple C# script that calls
Play()on the door’s Animator component when the player enters a trigger volume. - Bobbing a collectible coin: Animate the coin’s Y position up 0.2 meters over 1 second, then back down over another second, with a continuous rotation around the Y axis. This creates a gentle floating effect that draws the player’s eye.
- Moving a platform in a platformer: Animate the platform’s position back and forth between two points over 3 seconds, with loop time enabled, so the player can jump on it and ride it across a gap.
Once you get comfortable with keyframing, you can adjust the easing of your movement to make it more natural. By default, Unity uses linear interpolation between keyframes, which means movement is constant speed. If you want a door to ease in and ease out when it opens (slowly start moving, speed up, then slow down as it closes), you can right-click on a keyframe and change the tangent type to Auto or Easy In, Easy Out in the Curve Editor. This small adjustment makes a huge difference in how polished your animation feels.
Animating Rigged Characters with the Unity Animation System
For characters and other deformable objects, the process is a little more involved, because you’re animating the movement of a skeleton rather than just the whole object. Unity’s Mecanim Animation System (the modern animation system introduced in Unity 4) makes it easy to manage, blend, and transition between multiple character animations, which is essential for any interactive game where a character can switch between walking, running, jumping, and attacking.
Configuring the Avatar for Humanoid Characters
If you set your character’s rig type to Humanoid in the import settings, Unity will automatically generate an Avatar, which maps your character’s bones to Unity’s standard humanoid bone structure. To check if the Avatar was set up correctly, open the Rig tab in the Inspector and click Configure. This will open the Avatar configuration window, where you can see if Unity correctly identified all of your character’s bones.
In the Muscles & Settings tab, you can adjust the range of motion for each bone, which prevents weird deformations when you rotate a joint past its natural limit. For example, a human knee can’t bend backward, so you can adjust the knee muscle limit to stop the knee from bending past 0 degrees. This is an important step to avoid broken-looking character poses.
The biggest benefit of the Avatar system is animation retargeting: if you have one set of animations for a male character, you can apply those same animations to a female character, a child character, or even a non-human character with a humanoid bone structure without having to reanimate everything from scratch. This saves indie developers hundreds of hours of work, so it’s worth taking the time to set up your Avatar correctly.
Building the Animator Controller
Once your Avatar is set up, you need to create an Animator Controller, which is the state machine that controls when each animation plays and how transitions work between them. Right-click in the Project window, go to Create > Animator Controller, and name it something like PlayerAnimatorController. Drag this controller into the Controller field of your character’s Animator component in the Inspector.
Double-click the Animator Controller to open the Animator window. Here you’ll see a grid where you can add animation states, each linked to a specific animation clip. By default, Unity creates an Entry node and an Any State node. Right-click on the grid and select Create State > Empty to create a new state, name it Idle, and assign your idle animation clip to it in the Inspector. Right-click the Idle state and select Set as Layer Default State so the idle animation plays when the game starts.
Next, add a Walk state and assign your walk cycle animation clip. To create a transition between Idle and Walk, right-click the Idle state, select Make Transition, and drag the arrow to the Walk state. To transition back from Walk to Idle, create another transition from Walk to Idle. To control when these transitions happen, you need a parameter — a variable that the Animator uses to check if it should switch states. Open the Parameters tab in the Animator window, click the plus button, and add a Float parameter called Speed. This parameter will store the character’s current movement speed, so when Speed is above 0.1, the character plays the walk animation, and when it’s below 0.1, it goes back to idle.
Select the transition from Idle to Walk, and in the Inspector, under Conditions, add a condition that Speed > 0.1. Uncheck Has Exit Time so the transition happens immediately when the condition is met, instead of waiting for the current animation to finish. For the transition from Walk to Idle, set the condition to Speed < 0.1 and also uncheck Has Exit Time. Now you can write a simple C# script that reads the player’s input, calculates their movement speed, and sets the Speed parameter in the Animator component: animator.SetFloat("Speed", Mathf.Abs(currentSpeed)); When the player presses the movement keys, Speed increases, and the animation automatically switches from idle to walk. When the player stops moving, Speed drops, and it switches back to idle.
This workflow scales to as many animations as you need: add a Jump state, a Run state, an Attack state, and create transitions controlled by parameters like IsJumping (a bool) or AttackTrigger (a trigger parameter that resets automatically after it’s used). For more complex characters, you can use Blend Trees to smoothly blend between multiple animations based on parameter values. For example, a 1D Blend Tree can blend between idle, walk, and run animations based on the character’s speed, so the movement gets faster and faster smoothly instead of jumping between discrete clips.
Pro Tips for Polishing and Troubleshooting Your Animation
Even if you follow all the steps correctly, you’ll likely run into common issues like jittery movement, foot sliding, or broken blending. These simple pro tips will help you polish your animations and fix most common problems quickly.
Fix Common Animation Issues
- Foot sliding: This happens when your animation’s root motion doesn’t match the actual movement speed of the character in the game. If you’re using root motion, make sure the Bake Into Pose setting for Root Transform Position (XZ) is unchecked, so the animation moves the character correctly. If you’re moving the character via a script, adjust your walk cycle speed to match the script’s movement speed, or use inverse kinematics (IK) to adjust the feet position to match the ground.
- Choppy movement between keyframes: This is usually caused by wrong tangent settings on your keyframes. Open the Curve Editor in the Animation window, select your keyframes, and switch the tangent type to Auto to smooth out the movement. If you have too many unnecessary keyframes, delete the extra ones — most simple movements only need two keyframes (start and end).
- Deformation or weird stretching on the mesh: This is almost always caused by bad bone weight painting in your 3D modeling software, or incorrect bone assignments in the Avatar setup. Go back to your 3D tool and repaint the bone weights around joints like knees and elbows, then reimport the model into Unity.
- Animation doesn’t loop smoothly: Select your animation clip in the Project window, check Loop Time and Loop Pose, then click the Optimize button under Loop Pose to automatically adjust the first and last frame to match, so there’s no jump when the clip repeats.
Using Inverse Kinematics for Natural Poses
One of the best ways to add polish to your character animations is to use inverse kinematics (IK). Unlike forward kinematics, which moves the end of a limb (like a foot) by rotating the parent bones starting from the hips, inverse kinematics lets you set the position of the end of the limb (the foot or hand) and Unity automatically calculates the correct rotation for all the parent bones to get it there. This is perfect for things like making a character’s feet stick to uneven ground, or letting a character’s hands grab a ladder that’s positioned dynamically in the scene.
Unity has a built-in IK system called Two Bone IK that works for limbs like arms and legs, which have two main bones (upper arm + forearm, thigh + calf). To set up IK for a character’s foot, you add a Two Bone IK component to the character’s armature, target the foot bone, set the target transform to an empty GameObject that you position on the ground, and adjust the weight to activate the IK. You can even write a simple script that casts a ray from the character’s foot to the ground and updates the IK target position every frame, so the foot always stays planted no matter what the ground height is. This eliminates foot sliding and makes character movement feel far more natural.
Optimizing Animation Performance
If you’re building a game for mobile platforms or have lots of animated objects in your scene, performance can become an issue. A few simple optimizations will keep your frame rate high:
- Enable Optimize Bone Weights in the Model import settings to remove any zero-weight bones that don’t affect the mesh, which reduces the number of calculations Unity has to do every frame.
- Use Animation Compression in the Animations tab of the import settings. Unity can compress animation curves to reduce file size and memory usage with almost no visible loss of quality.
- For objects that are far away from the camera, disable their Animator component via a script to stop updating their animation when the player can’t see it.
Conclusion
Animating a 3D model in Unity starts with simple preparation, but scales up to complex character interactions and cutscenes as you gain experience. By starting with keyframe animation for simple static objects, you can learn the core concepts of the Animation window, keyframes, and transitions before moving on to rigged characters and the Animator Controller system. The most important thing to remember is that preparation is half the battle: taking the time to configure your import settings, rig, and Avatar correctly will save you hours of troubleshooting later. Whether you’re animating a walking player character or a spinning collectible, Unity’s flexible tools let you create polished, natural-looking animations that bring your project to life. With practice, you’ll be able to prototype and polish animations in a fraction of the time, and focus on what matters most: building a great experience for your players.