
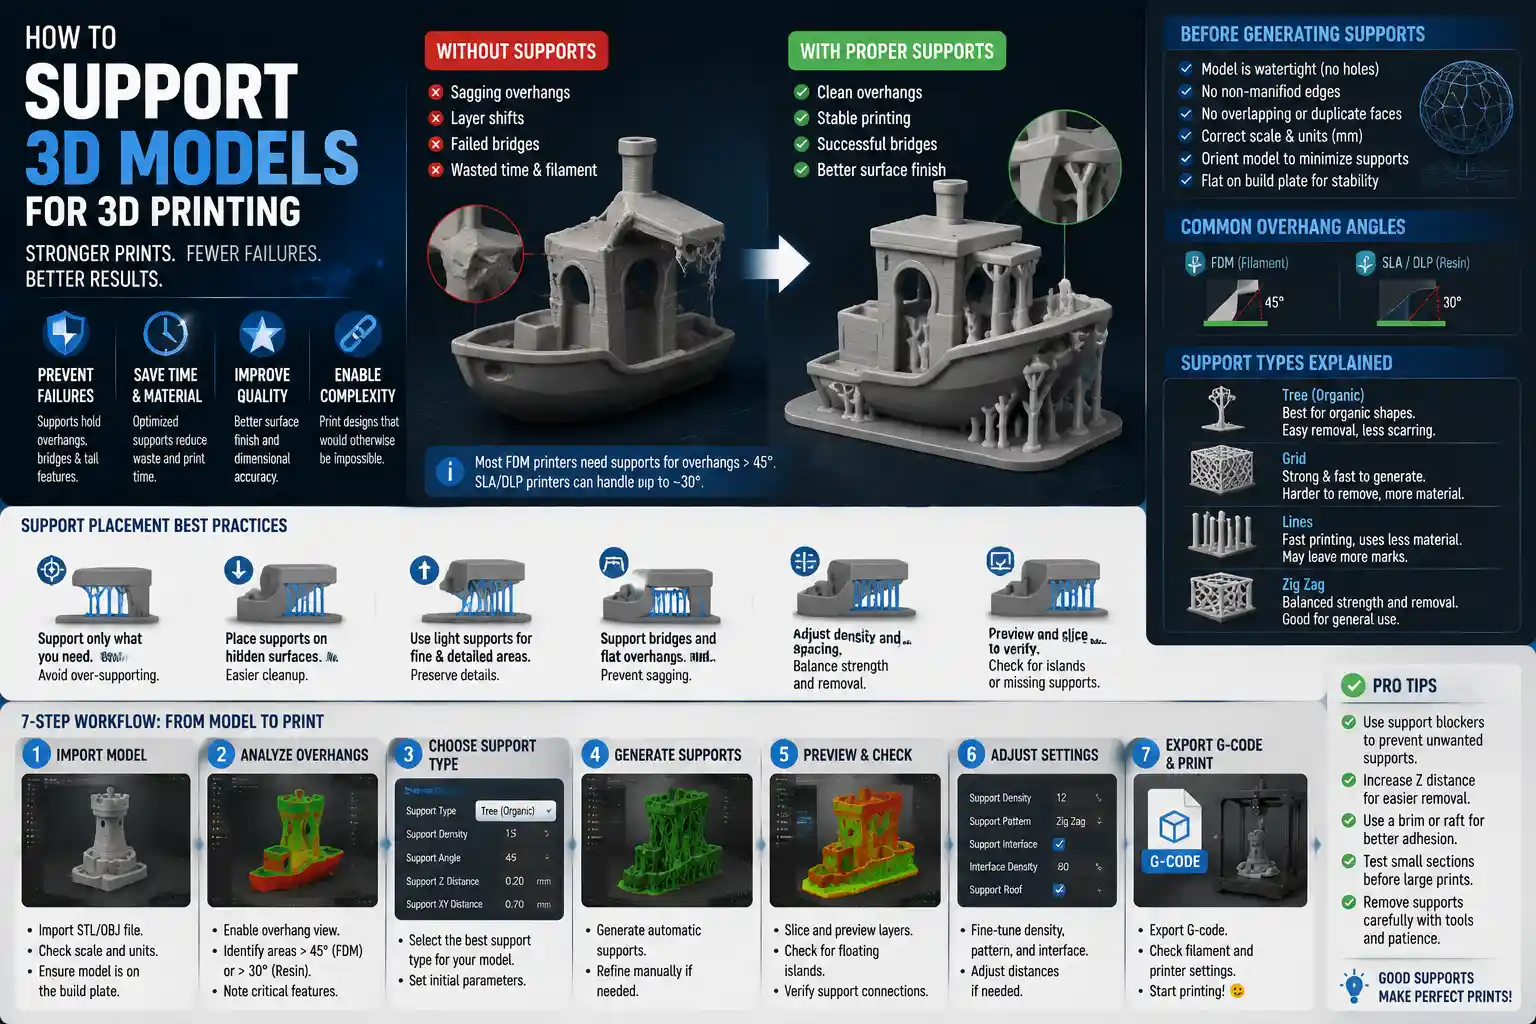
3D printing has moved far beyond industrial prototyping and hobbyist experiments to become a mainstream tool for everything from custom home decor to medical device manufacturing. But even the most high-end 3D printer can fail to produce a usable part if the underlying 3D model isn’t properly prepared for printing. A model that looks perfect on a computer screen can have hidden errors that lead to spaghetti-like messes, weak layers, or wasted filament. Learning how to properly support 3D models for printing is one of the most critical skills to turn digital designs into physical, functional objects.
Understanding Why 3D Models Need Support Structures
Before diving into the practical steps of adding support, it’s important to understand why supports are necessary in the first place. Most common consumer and industrial 3D printing technologies, including Fused Deposition Modeling (FDM) and Stereolithography (SLA), build objects layer by layer from the bottom up. Each new layer relies on the layer below it to hold its shape while the material cures or cools. When a section of a model overhangs beyond a certain angle, there is no solid layer underneath to support the molten plastic or liquid resin as it sets.
What counts as an overhang that needs support? For most FDM printers, the rule of thumb is any overhang with an angle steeper than 45 degrees from vertical will require support. SLA printers, which use a softer resin that cures instantly with UV light, can often handle steeper overhangs closer to 30 degrees, but they still require support for any features that hang completely free. Unsupported overhangs will sag, curl, or detach from the print bed mid-print, ruining the entire part.
Other common reasons to add support beyond overhangs
Supports do more than just hold up overhangs. They also play critical roles in print stability and quality that many new designers overlook:
- Anchor points for high parts: Tall, narrow models are prone to tipping or wobbling during printing. Thick support structures along the base can anchor the part to the print bed and reduce vibration that leads to layer shifting.
- Stability for bridges: A bridge is a flat section of model that spans two raised points, with no material underneath. Even shallow bridges longer than a few centimeters will sag in the middle without support underneath to hold the material while it cools.
- Protection for fine features: Small, delicate details like thin protrusions or intricate textures can break off due to printer vibration or cooling fan airflow. Light support structures hold these features in place until the print is complete.
- Reduction of warping: Large flat parts often warp at the edges as plastic cools and contracts. External support around the base can hold edges flat against the print bed, reducing common FDM printing issues.
It’s important to note that not every 3D printing technology requires supports. Powder-based technologies like Selective Laser Sintering (SLS) or binder jetting use the unsintered powder surrounding the part to act as a built-in support, so no additional structures are needed. But for the vast majority of home and office 3D printers that use FDM or SLA technology, manual or automatic supports are a non-negotiable part of the preparation process.
Preparing the 3D Model for Support Generation
Before you can generate effective supports, you need to make sure your 3D model itself is printable. Many common model errors will cause supports to fail, even if you set up all your parameters correctly. Taking the time to fix these errors before generating supports will save you hours of failed prints and wasted material later.
Check for common mesh errors
3D models for 3D printing are stored as a mesh, a collection of connected triangles that form the surface of the object. If the mesh has errors, slicer software (the program that converts your 3D model into printer instructions) can’t correctly identify where to place supports, or may crash entirely. The most common mesh errors that cause support issues include:
- Non-manifold edges: These are edges that are shared by more or fewer than two triangles, creating a “hole” or overlapping geometry in the mesh. Slicers can’t interpret non-manifold geometry, leading to missing supports or misaligned prints.
- Holes in the mesh: Small gaps between faces can cause the slicer to misinterpret the inside and outside of the model, leading to supports being placed inside the part where they don’t belong.
- Overlapping and duplicate faces: Extra faces stacked on top of each other confuse the slicer’s boundary detection, leading to inconsistent support placement.
Fixing these errors is easier than it sounds. Most free and paid slicers like Cura, PrusaSlicer, and ChiTuBox include automatic mesh repair tools that can fix 90% of common errors with one click. For more complex issues, free STL editing tools like Meshmixer or Blender include advanced repair functions that let you manually fix problematic areas.
Orient the model for minimal support
One of the easiest ways to reduce the number of supports you need is to orient the model correctly on the print bed before generating supports. How you rotate a model can drastically change how much overhang is exposed, and how much support material you end up using. The goal of good orientation is to minimize the number of steep overhangs while also preserving the surface quality of the most critical faces of the part.
For example, if you’re printing a coffee mug with a handle, orienting the mug so the opening faces straight up will create a large, completely unsupported overhang for the base of the handle, requiring a lot of support. Rotating the mug 45 degrees so the handle’s base angles down below the 45 degree threshold can eliminate the need for support entirely, while only leaving a small amount of scarring on a non-critical area of the mug.
“The best support is no support at all. Every support you add leaves a scar on the finished part and wastes material, so good orientation that eliminates unnecessary supports is always the first step.”
When orienting a model, also keep in mind that supports leave visible marks where they attach to the model. If you have a face that needs to be smooth and high-quality, orient that face to avoid needing support, even if that means adding a small amount of support to a less visible area. For functional parts, also consider that support marks can affect fit and function, so avoid placing supports on any face that needs to mate with another part.
Choosing Between Automatic and Manual Support Placement
Once your model is fixed and oriented, the next step is to add supports. Modern slicers offer two main approaches: fully automatic support generation, and manual support placement where you choose exactly where supports go. Each approach has its own advantages and use cases, and many advanced printers use a combination of both for the best results.
Fully automatic support generation
Automatic support generation uses an algorithm in your slicer to scan the model and identify all areas that meet your overhang threshold, then automatically generate supports for those areas. This is the default option in almost all slicers, and it’s perfect for beginners or for simple models with straightforward geometry.
The biggest advantage of automatic supports is speed. It takes just one click to generate all required supports, and it works in seconds even for complex models. For common household prints like toys, tools, or decorative items, modern automatic algorithms are accurate enough to produce good results 80% of the time.
But automatic supports have significant downsides. They don’t distinguish between critical and non-critical surfaces, so they’ll often place supports on high-quality visible faces when it’s not necessary. They also tend to generate far more supports than are actually needed, wasting material and increasing print time. For complex models with intricate internal features, automatic algorithms can miss hard-to-see overhangs entirely, leading to failed prints.
Manual support placement
Manual support placement lets you manually add supports to specific areas of the model, rather than letting the algorithm place them everywhere that meets the overhang threshold. Most slicers let you add supports by simply clicking on the area of the model you want to support, and adjust the size and shape of each support individually.
Manual placement gives you complete control over where supports go, which lets you avoid placing supports on critical visible surfaces, reduce material waste, and ensure hard-to-reach overhangs get the support they need. For advanced use cases like engineering prototypes, figurine painting, or medical parts, manual support placement is almost always worth the extra time.
The main downside of manual support is that it takes more time and experience to do correctly. You have to be able to identify all the areas that need support yourself, and it’s easy to miss a hidden overhang that causes the print to fail. It also requires a learning curve to know how large and dense supports need to be for different types of features.
The hybrid approach: best of both worlds
Most advanced 3D printing users don’t choose between automatic and manual — they combine them. The process works like this:
- Orient your model and run automatic support generation to get a base set of supports.
- Manually delete any supports that are placed on critical visible or functional surfaces.
- Add manual supports to any areas that need support but were missed by the automatic algorithm.
- Adjust the size and density of individual supports to match the load they’ll carry.
This approach saves time compared to fully manual placement, while still giving you the control to avoid common automatic support mistakes. It’s the most popular method for everything from hobbyist figurine printing to low-volume industrial production.
Tuning Support Parameters for Different Printers and Materials
Once you’ve placed your supports, tuning the settings that control how supports are printed can make a huge difference in how easy they are to remove, how much material they use, and how good the finished part looks. Different printers, technologies, and materials require different support settings, so it’s important to adjust these parameters rather than relying on default settings.
Density and pattern
Support density refers to how much plastic is used to fill the inside of the support structure. Lower density uses less material and prints faster, while higher density is stronger for heavy overhangs. For most FDM prints, a density between 10% and 25% is enough for standard overhangs. For large, heavy overhangs or tall supports, you can increase density to 30-40% to add strength.
Support pattern also affects strength and removability. The most common patterns include:
- Grid: Strong, easy to print, but can be harder to remove than other patterns.
- Tree: Branched supports that only touch the model at specific points, leaving smaller scars and using less material. This is one of the most popular patterns for FDM and SLA, especially for organic shapes like figurines.
- Zig-zag: Lightweight, easy to remove, good for shallow overhangs.
- Concentric: Strong for circular overhangs, less common for general use.
Tree supports are a relatively new innovation that have revolutionized support placement for complex organic models. Instead of a solid block under every overhang, tree supports branch out from a single base to touch only the points that need support, reducing material use by up to 70% and leaving much smaller marks on the finished part. Most modern slicers now include tree support as an option, and it’s worth trying for any complex model.
Interface and contact settings
One of the most impactful settings for finished part quality is the contact point between the support and the model. Most slicers let you add a support interface, which is a different layer of material between the support and the model that makes it easier to remove the support without damaging the part. A thin interface layer with a larger gap between the support and model lets you snap the support off cleanly, leaving a minimal scar.
For FDM printing, a common setting is to use a 0.2mm to 0.5mm gap between the tip of the support and the model surface. This gap is small enough that the overhang will still hold its shape, but large enough that the support doesn’t bond too strongly to the part. For SLA printing, where supports are much thinner, you can use a smaller gap of 0.1mm to 0.2mm to get the same effect.
Another useful setting is tree support branch diameter, which controls how thick the branches of tree supports are. For small delicate features, use a thinner branch diameter to avoid accidentally touching non-target areas of the model. For large heavy overhangs, increase the branch diameter to add strength.
Soluble support materials for complex parts
For parts with internal cavities, complex internal overhangs, or very high surface quality requirements, standard breakaway supports can leave deep scars or be impossible to remove without damaging the part. In these cases, soluble support materials are the best solution. Soluble supports are made from a material that dissolves in water or a specific solvent, leaving the part completely intact with no manual removal needed.
For FDM printing, the most common soluble support material is PVA (polyvinyl alcohol), which dissolves completely in room temperature water. PVA is compatible with most dual-extrusion FDM printers, which print the part from PLA, ABS, or PETG and the supports from PVA. After printing, you just leave the part in water for a few hours, and the supports dissolve away, leaving a perfectly smooth surface.
For SLA printing, soluble supports are less common, but some resin manufacturers offer water-soluble resin that works the same way. For industrial SLA, caustic soluble supports are also available for very complex parts.
The main downsides of soluble supports are extra cost and extra print time. PVA is more expensive than standard PLA or PETG, and dual-extrusion prints take longer than single-extrusion prints with standard breakaway supports. But for parts where surface quality or internal geometry is critical, the extra cost is well worth it.
Post-Processing: Removing Supports and Finishing the Surface
Even with perfect support placement and tuning, you’ll need to remove the supports and clean up the surface after printing to get a finished part. How you remove supports depends on whether you’re using breakaway supports or soluble supports, and what type of 3D printing technology you’re using.
Removing breakaway supports
For standard breakaway supports on FDM parts, the removal process starts with pliers. Large, bulky supports can usually be snapped off by hand or with a pair of needle-nose pliers. Start from the base of the support and work your way up, wiggling gently to avoid pulling off a chunk of the part with the support. For thin supports in hard-to-reach areas, you can use a hobby knife or flush cutters to snip the support off close to the surface.
For SLA parts, supports are much thinner than FDM supports, so you can usually snap them off by hand or with a small pair of pliers. Always wear gloves when handling raw SLA parts, as uncured resin can irritate skin, and work slowly to avoid breaking delicate features off the part.
One common mistake new users make is pulling supports directly away from the surface at a 90 degree angle. This can tear a chunk out of the part or leave a deep gouge. Instead, pull the support parallel to the surface of the part, or at a shallow angle, to minimize stress on the part. If a support is bonded too strongly, you can use a hobby knife to gently cut the connection point between the support and the model before pulling.
Finishing support marks
After you remove the supports, you’ll be left with small nubs or marks where the supports attached to the part. For most use cases, these can be cleaned up easily with basic sanding. Start with 120-grit sandpaper to sand down the large nub, then work your way up to 400-grit or 800-grit to smooth the surface to match the rest of the part. For PLA and PETG, you can also use a fine grit sanding sponge to get a smoother finish.
For deeper marks or more visible surfaces, you can fill the mark with a small amount of epoxy filler or plastic cement, sand it smooth, then paint it to match the rest of the part. For SLA parts, which have a very smooth surface out of the printer, light sanding with 400-grit sandpaper is usually enough to remove support marks completely.
Finishing for soluble supports
If you used soluble supports, the removal process is much simpler. For PVA supports on FDM, just place the entire part in a container of room temperature water, and stir occasionally. Small supports will dissolve in 2-4 hours, while larger supports can take 12-24 hours. For faster dissolution, you can use warm water and a small magnetic stirrer to agitate the water. After the supports are fully dissolved, rinse the part with clean water and let it dry completely.
Because soluble supports leave almost no mark, you usually don’t need much additional finishing beyond a light rinse and quick sanding of any tiny contact points.
Conclusion
Supporting 3D models for printing is a skill that balances art and science. It starts with understanding why supports are needed, preparing your model correctly, and orienting it to minimize the amount of support you need in the first place. From there, choosing the right combination of automatic and manual placement, tuning your support settings to match your part’s requirements, and finishing the surface after removal will turn a good print into a great one.
One of the most important things to remember is that the best support is the one you don’t have to use. Taking the time to orient your model correctly and design out unnecessary overhangs during the modeling process will save you time, material, and effort in the long run. When you do need supports, modern tools like tree supports and soluble materials make it easier than ever to get a high-quality finish without excessive waste.
Like any 3D printing skill, getting good at supporting models takes practice. Don’t get discouraged if your first few attempts leave ugly marks or fail entirely. Experiment with different settings, patterns, and placement strategies, and you’ll quickly develop an intuition for what works for different types of parts. With the right approach, you can turn even the most complex digital model into a perfect physical printed part.