
Interactive 3D models have transformed from a niche web design gimmick into a core tool for creating engaging, immersive user experiences. Whether you’re an e-commerce store owner showcasing a custom sofa, an architect sharing a conceptual building design, an educator explaining complex anatomy, or a product designer getting feedback on a new prototype, adding a 3D model to your website helps visitors interact with your content in ways static images and videos never can. Users can zoom, rotate, pan, and even dissect models to see every detail, leading to higher engagement, better decision-making, and lower return rates for physical products. If you’ve never worked with 3D on the web before, the process might seem intimidating, but modern tools have simplified it dramatically. This step-by-step guide breaks down everything you need to know, from preparing your 3D file to optimizing it for fast loading across devices.
Preparing Your 3D Model for the Web
Before you can add a 3D model to your website, you need a properly formatted, optimized file. Most desktop 3D design tools like Blender, Autodesk Maya, SolidWorks, or SketchUp export files in large, raw formats that are not suited for web use. Your goal at this stage is to reduce file size without sacrificing visible quality, because large 3D files will slow down your site, hurt your search engine rankings, and drive visitors away before they even interact with your model.
Choose the Right File Format
Not all 3D file formats work on the web. Some are designed for 3D printing or professional editing, while others are built for fast streaming and rendering in browsers. The most common web-friendly formats today are:
- glTF (GL Transmission Format): Widely considered the gold standard for web 3D. glTF is an open-source format that retains model data (textures, materials, animations, rigging) while keeping file sizes small. It’s supported by all major web 3D libraries and platforms, and it works efficiently with GPU rendering for smooth interactions.
- GLB (Binary glTF): A single-file version of glTF that bundles all model data (including textures) into one compact file, making it easier to manage and upload to your website. This is the most popular choice for most web use cases because it eliminates the need to manage separate texture files.
- USDZ: Developed by Apple, this format is designed specifically for augmented reality (AR) experiences on iOS and macOS. It’s often paired with glTF/GLB for cross-platform support, so users on any device can view your model.
- FBX/OBJ: These older universal formats are still used, but they tend to have larger file sizes and require more processing to render in the browser. They’re not recommended for web use unless you have a specific requirement that forces their use.
If you’re creating your own 3D model from scratch, export it as GLB first. If you’re downloading a model from a marketplace like Sketchfab, TurboSquid, or Google Poly, most sites let you download directly in GLB or glTF format, saving you the step of converting from another file type.
Optimize Your Model for Performance
Even a GLB file can be too large for the web if it’s not optimized. A 3D model’s file size is primarily determined by its poly count (the number of polygons that make up its shape) and the resolution of its textures. A high-poly model created for a movie render might have millions of polygons, which will cause lag on even high-end mobile devices. Follow these optimization best practices:
- Reduce the poly count: For most web use cases, aim for a total poly count between 50,000 and 200,000 triangles. Simple product models can work well with under 50,000 triangles, while complex models like architectural scenes can go up to 300,000 if necessary. Use the decimation tool in Blender or the reduce polygon tool in your 3D editor to lower the count while preserving key details.
- Compress textures: Textures often make up 70% or more of a 3D model’s total file size. Resize textures to match the maximum display size on your website – a 4096x4096 texture is overkill for a small product model displayed in a 500x500 pixel container. Use compression tools like Basis Universal or TinyPNG to reduce file size without visible quality loss, and use modern formats like WebP for textures where supported.
- Remove unnecessary data: Delete hidden geometry, unused materials, extra animation tracks, and default camera lights that you won’t use on the website. Most 3D editors and exporters let you strip out unused data automatically during export.
After optimization, aim for a total final file size of under 10MB for most single models. If you’re embedding multiple models on one page, keep the total combined size under 20MB to avoid slow load times for users on mobile data connections.
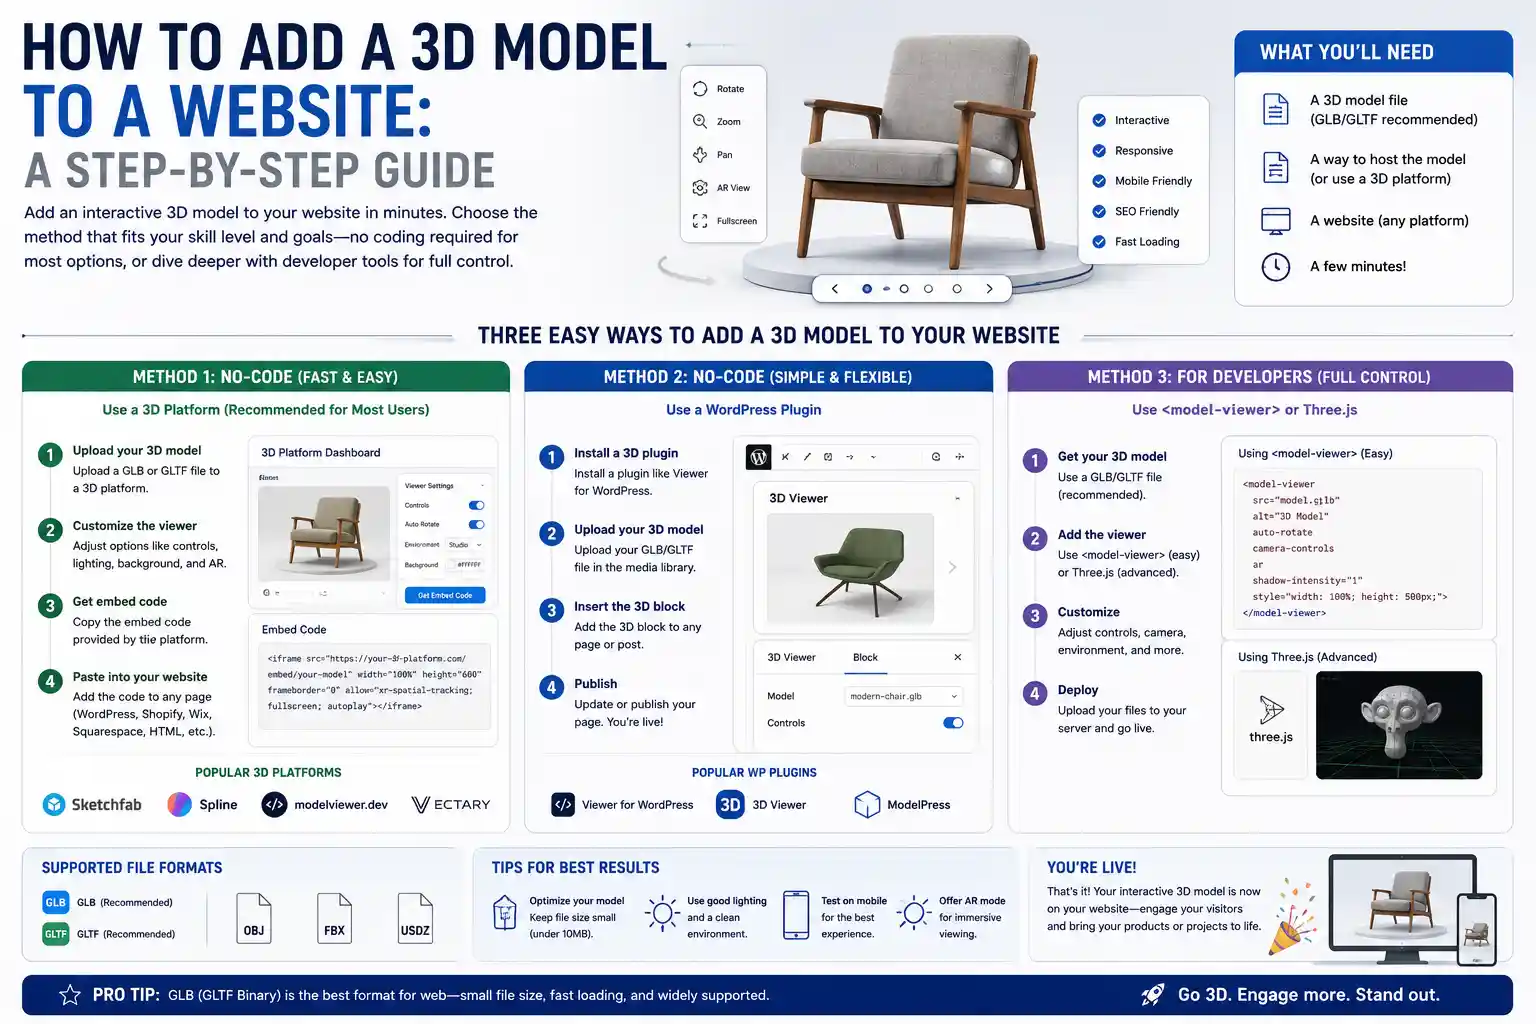
Three Main Methods to Add 3D Models to a Website
There are three common approaches to adding 3D models to a website, each suited to different skill levels, use cases, and budgets. You don’t need to be an expert 3D developer to use any of these methods – even beginners can get a model up and running in less than an hour with the right tool.
No-Code Embed Tools (Best for Beginners)
If you don’t want to write any code, no-code embed tools are the fastest and easiest option. These platforms host your 3D model and give you a simple embed code that you can copy and paste into your website, just like embedding a YouTube video. Most website builders like WordPress, Squarespace, Wix, and Shopify support custom embed codes, so this method works for almost any site.
Popular no-code embed platforms include:
- Sketchfab: One of the largest 3D model marketplaces, and it also offers free and paid hosting for your own models. You can adjust embedding settings (allowing/disallowing download, auto-rotation, zoom limits) directly in your Sketchfab account, and the embed code works on any website. Free accounts include a Sketchfab watermark, while paid pro accounts remove it and offer higher file size limits.
- Model Viewer: Google’s open-source no-code tool that’s specifically built for web 3D and AR. It works with GLB and USDZ files, and you can host the file on your own server while using a simple embed snippet. It’s completely free and has no watermarks.
- Threekit: A commercial platform built for e-commerce 3D and product configuration. It offers advanced features like 3D product customization and AR try-on, but it’s priced for mid-sized to large businesses, so it’s not ideal for hobbyists or small personal projects.
- Adobe Dimension: If you use Adobe’s creative tools, you can export your 3D models directly from Dimension and embed them on your website with a custom Adobe embed code.
The main benefit of no-code tools is speed. You can have your model embedded in 15 minutes or less, and the platform handles all the rendering optimization and cross-browser compatibility for you. The downsides are that you have less control over the design and functionality, and you may have to pay a monthly fee for a watermark-free experience, especially if you have multiple models.
Using JavaScript Libraries (Best for Developers)
If you’re comfortable with basic HTML and JavaScript, using a 3D library gives you full control over every aspect of your model’s behavior and appearance. You host the 3D file on your own server, so you don’t have to rely on third-party platforms, and you can customize interactions (like triggering animations when a user clicks a button) to match your website’s design.
The two most popular JavaScript libraries for web 3D are Three.js and Google Model Viewer. Three.js is a full-featured open-source library that can handle complex animations, interactive scenes, and custom shaders, while Google Model Viewer is a lightweight open-source component focused on simple product models and AR support.
A basic implementation with Three.js follows this general process: first, include the Three.js library in your HTML file from a CDN (content delivery network) so you don’t have to host it yourself. Next, create a div container on your page where the 3D model will display. Then, add a small JavaScript snippet to set up the scene, camera, lighting, and renderer, load your GLB file, add controls so users can rotate and zoom the model, and render it in the container. Even for a simple model, this only takes around 30 lines of code, and there are thousands of free code templates available online to adapt.
WebGL and libraries like Three.js have democratized 3D on the web to the point where any developer with basic JavaScript skills can add a fully interactive 3D experience to their site without expensive proprietary tools.
For simpler use cases, Google Model Viewer is even easier. It’s just a custom HTML element that you add to your page, with attributes for the source of your GLB file, the model’s orientation, and AR settings. A basic embed looks something like this: <model-viewer src="your-model.glb" alt="A 3D model of a chair" auto-rotate camera-controls ar></model-viewer> You just add a single line of code to include the Model Viewer script, and that’s it. It’s fully optimized for mobile and desktop, supports AR out of the box, and requires almost no custom code.
The main advantage of using a JavaScript library is full control. You can adjust every detail, host your own files, avoid third-party watermarks or subscriptions, and integrate the 3D model seamlessly with your website’s existing design and functionality. The downside is that you need at least basic coding skills, and you’re responsible for optimizing performance and fixing any compatibility issues.
Native Browser Integration (Emerging Standard)
Most modern browsers now support 3D model rendering natively, without any external JavaScript libraries or third-party embeds. As of 2024, Google Chrome, Edge, and Firefox support viewing GLB files directly – if you link directly to a GLB file, the browser will render it with basic controls for rotation and zoom automatically. For embedding, the HTML spec is moving toward a native <3dmodel> element, but this is still in development and not widely supported across all browsers yet.
Native integration is promising because it eliminates the need for external scripts, reducing page load times and simplifying the embedding process. But for now, it’s not reliable for production use because it doesn’t work on Safari (the default browser on all Apple devices, which makes up around 30% of the global browser market). For most use cases, it’s better to stick with one of the two methods above until the native standard is fully adopted across all major browsers.
Embedding 3D Models in Popular Website Builders
Most people use a website builder or content management system (CMS) to run their website, and each platform has its own process for adding 3D models. Below are step-by-step guides for the most popular platforms, regardless of whether you’re using a no-code embed or a custom code snippet.
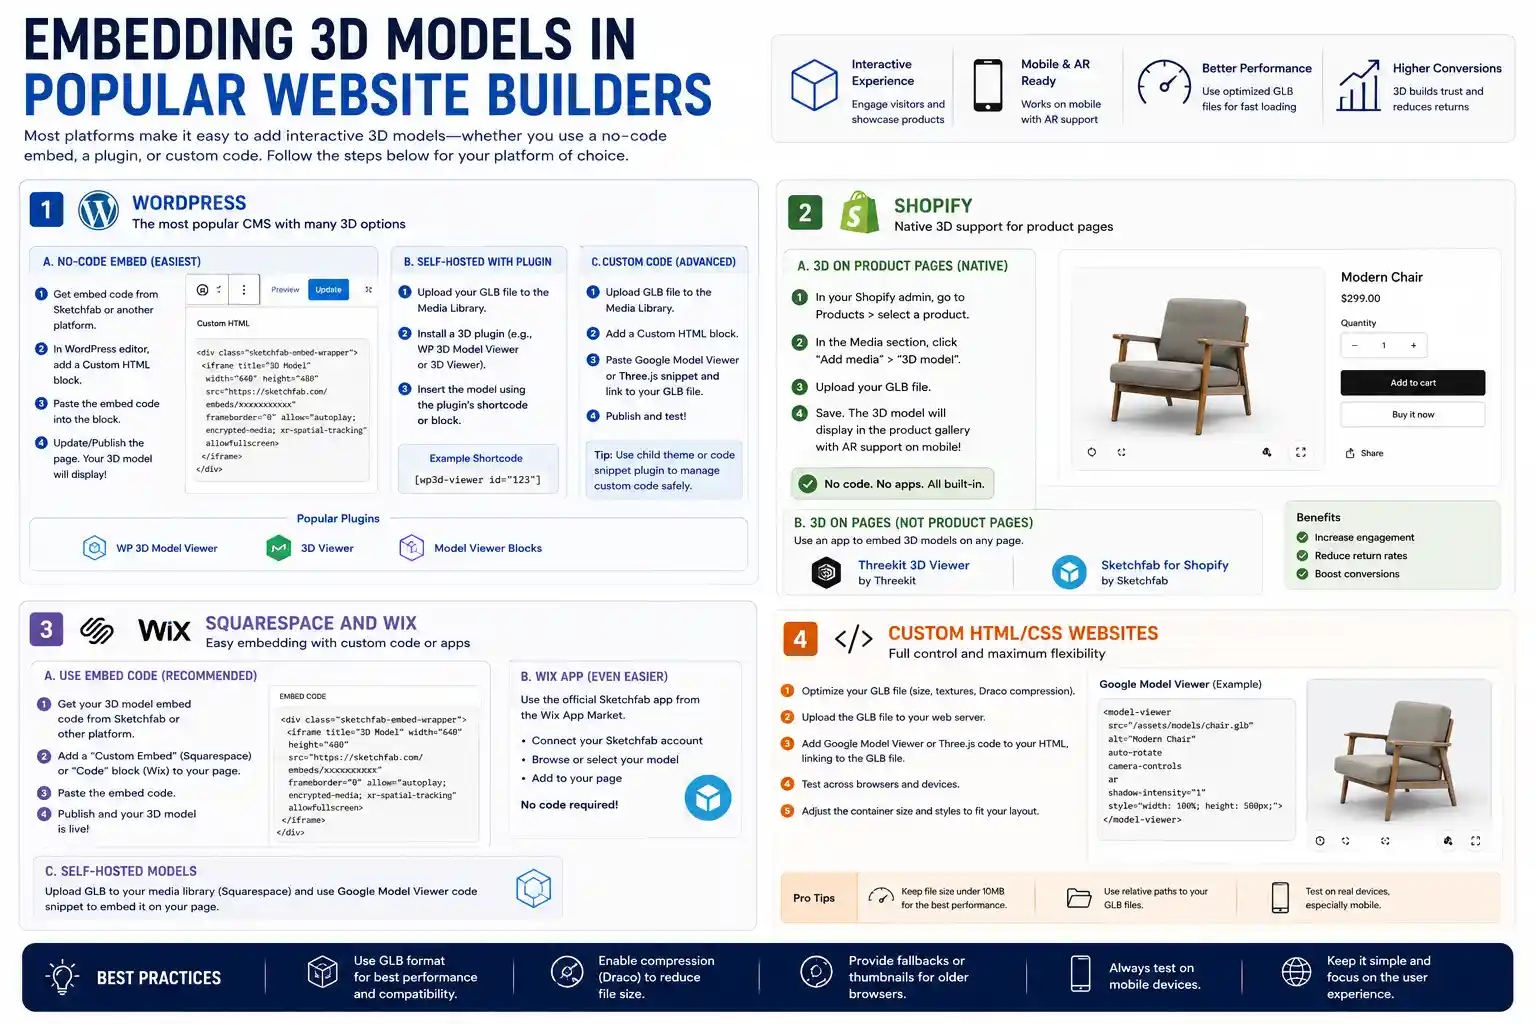
WordPress
WordPress is the most popular CMS in the world, and it supports 3D models in multiple ways. If you’re using a no-code embed from Sketchfab or another platform, just copy the embed code and add a Custom HTML block to your page or post, then paste the code into the block. Update the page, and your 3D model will display automatically.
If you want to host your own GLB file without a third-party platform, you can upload the GLB file directly to your WordPress media library just like you would an image. Then, use a 3D model plugin like WP 3D Model Viewer or 3D Viewer to insert the model into your page using a shortcode. If you’re comfortable with custom code, you can add the Google Model Viewer or Three.js snippet directly to a Custom HTML block, and link to the GLB file you uploaded to your media library.
Shopify
3D models are extremely popular on Shopify, because they let customers interact with products before buying, which reduces return rates. Shopify has native support for 3D models on product pages – you can just upload your GLB file directly to the product media section in your Shopify admin, and it will automatically display as an interactive 3D model in your product gallery, with AR support for mobile users. No extra code or third-party tools required. If you want to add a 3D model to a regular page (not a product page), you can use a Shopify app like Threekit 3D Viewer or Sketchfab for Shopify to embed it with a few clicks.
Squarespace and Wix
Both Squarespace and Wix support custom embed codes, so the easiest way to add a 3D model is to use a no-code platform like Sketchfab to generate your embed code, then add a “Custom Embed” or “Code” block to your page and paste the code. Wix also has a dedicated Sketchfab app in its app market that lets you connect your Sketchfab account and embed models directly without copying code. For self-hosted models, Squarespace lets you upload GLB files to your media library, and you can use the Google Model Viewer custom code snippet to embed it, just like you would on a custom HTML site.
Custom HTML/CSS Websites
If you’re building a custom website from scratch, the process is straightforward. Upload your optimized GLB file to your hosting provider, put it in the same directory as your HTML page, then add the Google Model Viewer or Three.js code snippet to your HTML, linking to the GLB file path. Test it on multiple browsers and devices to make sure it loads correctly, and adjust the size of the container to fit your page layout.
Optimizing Performance and User Experience
Adding a 3D model is only half the battle – you need to make sure it loads fast, works well on all devices, and provides a good experience for all your visitors. Even a well-designed 3D model can hurt your website’s performance if it’s not optimized properly.
Compression and Lazy Loading
After you’ve optimized your 3D model in your 3D editor, compress it further with tools like gltf-pipeline or Squoosh to reduce file size even more. For example, compressing a 12MB GLB file with gltf-pipeline can often shrink it to 4MB without any visible loss of quality. That’s a huge difference for users on slow mobile connections.
You should also use lazy loading for your 3D model if it’s not above the fold (the part of the page that loads first). Lazy loading means the model doesn’t start downloading until the user scrolls down to where it’s displayed, which speeds up the initial page load. All no-code embed tools support lazy loading by default, and if you’re using a custom JavaScript implementation, you can add lazy loading easily with a small script that only initializes the 3D model when it enters the viewport.
Mobile and Cross-Browser Testing
Over 50% of web traffic comes from mobile devices, so you need to test your 3D model on mobile to make sure it works correctly. Mobile GPUs are less powerful than desktop GPUs, so a model that runs smoothly on a desktop may lag on an older phone. Stick to the file size and poly count recommendations we covered earlier to avoid this issue.
Also test your model on all major browsers: Chrome, Firefox, Safari, and Edge. Safari has historically had more issues with WebGL (the technology that powers web 3D) than other browsers, so pay special attention to make sure your model loads and runs correctly on Safari for both desktop and iOS. Most reputable libraries and no-code tools handle cross-browser compatibility automatically, but it’s always good to test before publishing.
Improving User Experience
Small design choices can make a big difference in how users interact with your 3D model. Follow these best practices:
- Add clear, intuitive controls: Most libraries and embed tools include default controls for rotation, zoom, and panning, which work well for most use cases. Avoid overly complicated controls that confuse new users.
- Add a loading indicator: 3D files take a few seconds to load, especially on slower connections. Display a loading spinner or progress bar so users know the model is on the way, instead of leaving them looking at an empty box.
- Enable auto-rotation by default for product models: A slow, gentle auto-rotation gives users an immediate overview of the model and encourages them to interact with it. Just make sure the rotation stops when the user starts dragging the model.
- Include AR support if relevant: For product models, adding AR lets users place the model in their own space to see how it looks before buying. This is a huge conversion driver for e-commerce, and most modern tools support AR with just a single extra attribute in your code or embed settings.
- Add alternative text: Just like with images, you should add descriptive alt text to your 3D model for screen readers and accessibility. This makes your site accessible to users with visual impairments, and helps with search engine optimization.
One common mistake is making the 3D model container too small. A 500x500 pixel container is the minimum for most product models, and larger containers work better for engagement, as long as they fit your page layout. Don’t be afraid to give the model enough space to be the focal point of the section if that’s your goal.
Adding AR Support for Mobile Users
Augmented reality is one of the biggest benefits of adding a 3D model to your website, especially for e-commerce. AR lets users point their phone camera at a space and place your 3D model in the real world to see how it fits, what it looks like from different angles, and whether it matches their existing decor. Adding AR support is much easier than it sounds, and it’s supported by all modern tools.
If you’re using Google Model Viewer, adding AR just requires adding the ar attribute to your model-viewer element, and providing a USDZ version of your model for iOS users. Most 3D editors can export USDZ directly, or you can convert a GLB file to USDZ using free online tools like Convertio or Apple’s Reality Converter. If you’re using a no-code embed tool like Sketchfab or Threekit, AR support is enabled by default for most paid plans, so you don’t have to do any extra work.
For Shopify users, AR is automatically enabled when you upload a GLB 3D model to your product page, so users on both Android and iOS can access the AR view with one tap. That’s one of the reasons 3D models have become so popular for Shopify stores selling furniture, home decor, clothing, and other physical products.
Conclusion
Adding a 3D model to a website is no longer reserved for large companies with teams of 3D developers. Whether you’re a small business owner, a hobbyist, a designer, or a developer, there’s a method that fits your skill level and budget. Beginners can get a model up and running in less than an hour with a no-code embed tool like Sketchfab, while developers can get full control using open-source libraries like Three.js or Google Model Viewer. The key steps are optimizing your model for the web from the start, keeping file sizes small to maintain good performance, testing across all devices and browsers, and adding small UX improvements like loading indicators and AR support to get the most engagement from your visitors.
As browser technology improves and 3D becomes more mainstream, we’ll only see more interactive 3D experiences on the web. Starting with the basics outlined in this guide will give you a solid foundation to experiment and create immersive experiences that keep your visitors engaged and help you achieve your goals, whether that’s selling more products, educating your audience, or showcasing your design work.