
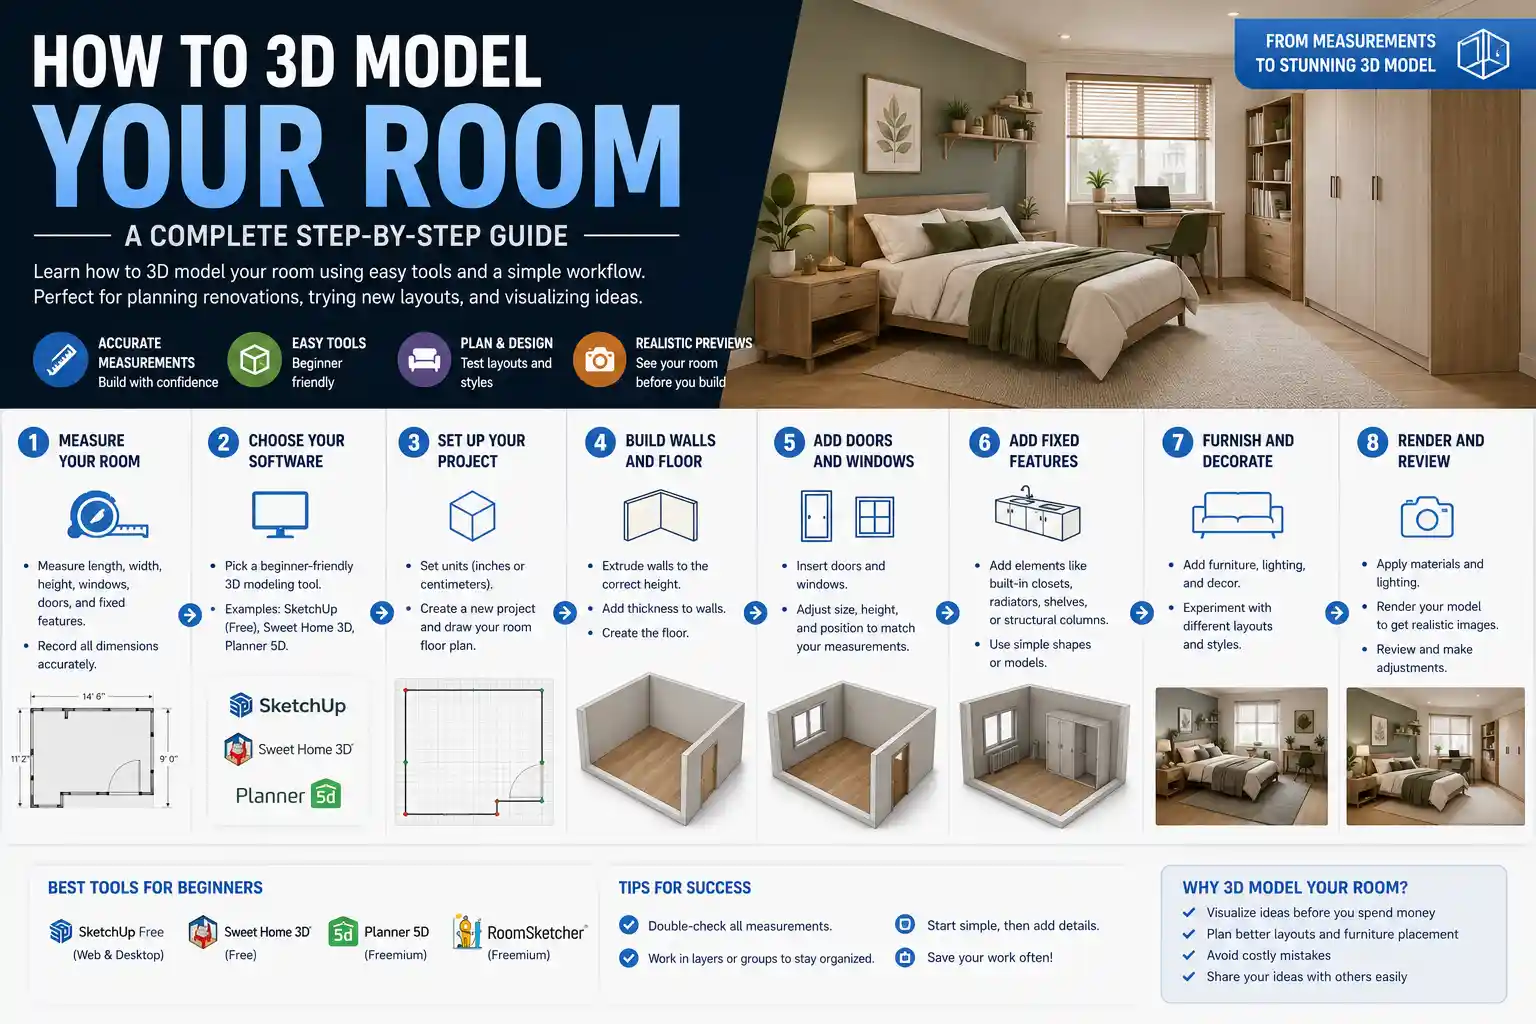
Whether you’re planning a full room renovation, rearranging furniture, or just curious how that new velvet sofa would look against your accent wall, 3D modeling your room removes the guesswork from home design. Gone are the days of hauling heavy couches across the house only to realize they don’t fit, or relying on flat 2D floor plans that fail to capture how light and space actually work in your home. Today, accessible software and mobile apps make it possible for even total beginners to create a realistic, accurate 3D model of their space in an afternoon. This step-by-step guide will walk you through every stage of the process, from taking measurements to exporting a final model you can use to test out designs.
Prep Work: Gather Tools and Take Accurate Measurements
Before you open any design software, the most important step to a successful 3D model is getting accurate measurements. A model that’s even a few inches off will leave you dealing with ill-fitting furniture and wonky proportions when you start testing designs, so taking the time to measure correctly pays off in the long run. You don’t need fancy laser equipment (though it can speed up the process), just a few basic tools to get the job done.
What tools do you need?
For most people, a standard 25-foot retractable tape measure will work perfectly for small to medium rooms. If you have a large open-plan space, a longer tape or a laser distance measurer (available for under $50 at most hardware stores) will make it easier to get readings across long distances without help. You’ll also need a notebook or a notes app on your phone to jot down measurements, and a phone camera to snap reference photos of walls, windows, doors, and any fixed features like fireplaces or built-in shelves. Reference photos will help you match textures and colors later when you’re adding details to your model.
Step-by-step measurement process
- Start by drawing a rough sketch of the room on paper. You don’t need to be an artist—just a basic outline of all four walls with marks for doors, windows, and fixed features. This will give you a place to write down measurements as you go.
- Measure the length of each wall from corner to corner, starting at the baseboard. If your walls have any protrusions (like a chimney breast) or recesses, note those separately with their own width and depth measurements.
- Measure the height of the wall from floor to ceiling. Most homes have standard 8-foot or 9-foot ceilings, but don’t assume—older homes often have uneven ceilings or modified layouts that change the height. Measure at two or three different points to confirm, and use the smallest number if there’s variation to avoid errors.
- Mark the dimensions of all openings: measure the width and height of doors and windows, and note the distance from the edge of the opening to the nearest corner, and from the bottom of the opening to the floor. For windows, don’t forget to include the sill depth if it protrudes into the room.
- Measure any fixed features: fireplaces, built-in bookshelves, radiators, and wall-mounted outlets or light switches. Even small features like these can impact how you arrange furniture, so including them in your model will make it more useful.
- Double-check all your measurements. A good rule of thumb is to measure twice: add up the lengths of all wall segments to make sure they match the opposite wall, which will catch any math errors early.
Once you have all your measurements and reference photos, you’re ready to choose a 3D modeling tool that fits your skill level and goals. There are options for every budget, from free mobile apps to professional design software, so you can pick one that matches what you want to get out of your model.
Choose the Right 3D Modeling Tool for Your Needs
Not everyone needs a professional-grade 3D modeling program to plan a room refresh. The right tool for you depends on three key factors: how much experience you have with 3D design, what you want to use the model for, and how much you’re willing to spend. Below are the most popular options categorized by use case, so you can find the right fit.
Beginner-friendly mobile and web apps (free to low-cost)
If you’re just planning to rearrange furniture or test a new paint color, you don’t need anything more complex than a free mobile or web app. These tools are designed for casual users, with pre-made furniture libraries and automatic room shape generation that cuts down on work. Some of the most popular options include:
- Planner 5D: A free web and mobile app that lets you draw your room in 2D and automatically converts it to 3D. It has a massive library of real brand-name furniture, so you can even test out exact pieces you’re thinking of buying. The free version includes most core features, and a premium subscription costs around $10 a month for advanced textures and exports.
- Magicplan: Perfect for users who want to speed up the measurement process. Magicplan uses your phone’s camera to create a floor plan automatically, though you’ll still want to double-check measurements for accuracy. It’s great for quick projects, with options to add furniture and export 3D models for sharing.
- SketchUp Free: A web-based free version of the popular professional 3D modeling tool SketchUp. It’s a little more hands-on than mobile apps, but it’s still intuitive for beginners, and there are thousands of free pre-made 3D furniture models available in the 3D Warehouse to add to your room.
Mid-range desktop software for serious hobbyists
If you’re planning a full renovation and want more control over materials, lighting, and custom features, mid-range desktop software gives you more flexibility without the steep learning curve of professional tools. SketchUp Pro ($299/year) is a fan favorite for home designers, with advanced rendering tools and the ability to export models for 3D printing if you want a physical copy of your layout. Sweet Home 3D is another free open-source option that’s more powerful than most mobile apps, though its interface is a bit dated compared to newer tools. For users who want realistic photorealistic renders, Homestyler is a free web-based tool with high-quality rendering that’s still easy for beginners to use.
Professional tools for advanced users
If you’re an interior designer or architect, or you just want maximum control over your model, tools like Blender (free open-source), AutoCAD ($169/month), and Revit ($250/month) offer full customization. Blender is especially popular for hobbyists who want to create photorealistic renders for free, though it has a steep learning curve compared to beginner tools. It’s a great option if you want to learn 3D modeling skills that go beyond just room design.
"The biggest mistake new designers make is choosing a tool that’s too complex for their needs. You don’t need a $300 a year subscription to figure out if a new sofa fits in your living room. Start simple, and upgrade to a more powerful tool only if you outgrow the one you have."
Once you’ve picked your tool, it’s time to start building the basic structure of your room. This is the foundation of your model, so taking it slow to match your measurements exactly will save you time later when you add furniture and details.
Build the Basic 3D Room Structure
Most 3D room design tools follow the same basic workflow: you start by drawing the 2D outline of your room, then the tool extrudes it into 3D, and you add openings and fixed features. The process is straightforward, but there are a few common mistakes to avoid along the way.
Draw the 2D floor plan
Start by inputting your wall measurements into your tool. Most beginner tools let you click and drag to draw walls, and automatically lock them to your measurements when you type in the numbers. If your room is a simple rectangle, this will take less than a minute. If you have irregular walls, protrusions, or nooks, use your sketch to add each segment one by one, double-checking that each length matches your measurement. Most tools will automatically connect walls at the correct corners, so you don’t have to worry about adjusting angles manually for standard 90-degree rooms.
If you’re using a tool like Magicplan that lets you scan the room with your phone, this step is even faster—but always double-check the automatic measurements against your manual readings. Camera-based scanning can be thrown off by dark walls, large furniture, or reflective surfaces, so it’s not uncommon for it to be a few inches off.
Add doors, windows, and fixed features
Once your walls are in place, add your openings. Most tools have pre-made door and window objects that you can drag and drop onto a wall, then resize to match your measurements. Make sure to position them correctly by inputting the distance from the nearest corner, just as you measured it. For example, if your window is 24 inches from the left corner of the wall, enter that number in the tool’s position field to avoid placing it incorrectly.
Next, add any fixed features that stay in the room: fireplaces, built-in shelves, radiators, or even large appliances if you’re modeling a kitchen. Most tools have pre-made objects for these features, but if you have a custom size, you can usually adjust the dimensions to match. If your tool doesn’t have the object you need, you can usually create it by combining basic shapes like rectangles or cubes to match the size and shape of your feature.
Adjust floors and ceilings
Don’t forget to input your ceiling height! Most tools default to an 8-foot ceiling, so if yours is taller or shorter, update this to get accurate proportions. You can also add texture to your floor and ceiling at this stage: if you already have hardwood floors you’re keeping, select a matching wood texture from the tool’s library to make the model more realistic. If you’re planning to replace your floors, this is a great time to test out different materials to see how they look in the space.
Once your basic structure is done, do a quick check to make sure everything matches your measurements. Pull up the measurement tool in your software and spot-check a few wall lengths and the ceiling height to catch any errors before you move on to adding furniture. A five-minute check now will save you from having to rearrange all your furniture later if you realize a wall is the wrong size.
Add Furniture, Textures, and Details for Realism
This is where your 3D model goes from a blank outline to a realistic representation of your room. Adding furniture and details lets you test different layouts and design choices before you make any physical changes to your space. Whether you’re working with existing furniture or planning to buy all new pieces, there are a few tips to make this process easy and accurate.
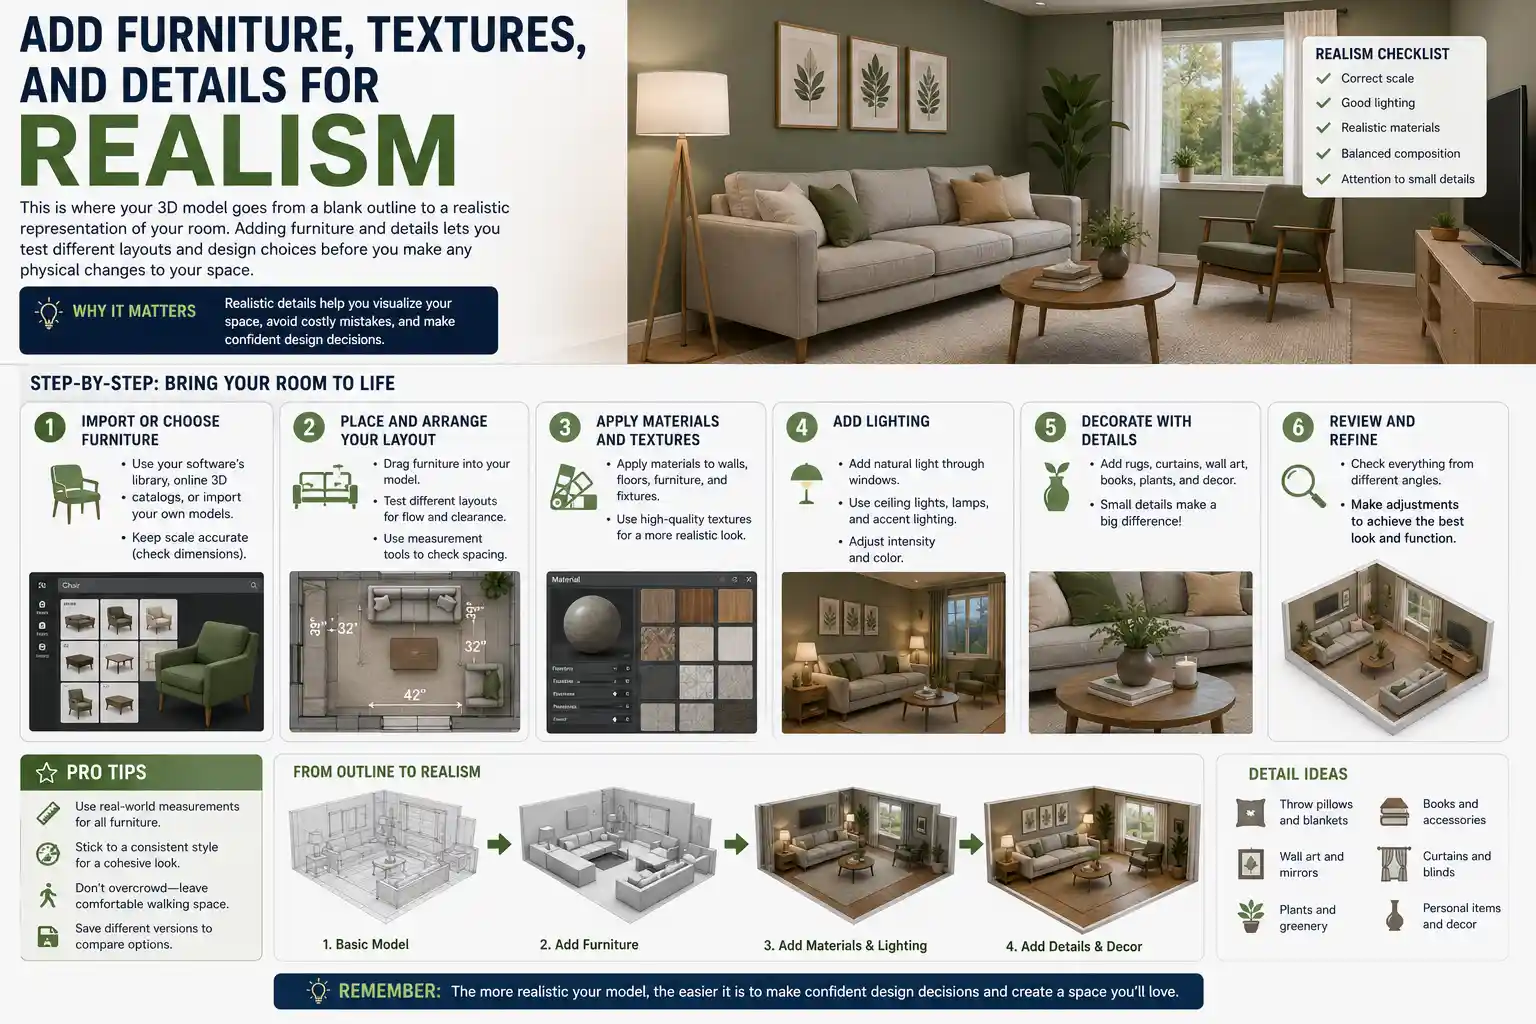
Add existing furniture first
If you’re keeping most of your current furniture and just rearranging or adding a few new pieces, start by adding your existing pieces to the model first. Most design tools have a library of generic furniture shapes in standard sizes, so you can match the dimensions of your couch, coffee table, bed, or dresser to the real thing. If you have a non-standard piece, just adjust the width, depth, and height to match your own measurements of the furniture.
Many major furniture retailers (including IKEA, Wayfair, and West Elm) have free 3D models of their products available for download, or are integrated directly into popular design tools like Planner 5D and SketchUp. If you’re adding a new piece you’re thinking of buying, you can usually import the exact 3D model of the product into your room to see how it fits and looks, rather than guessing based on product photos.
Test different layouts
One of the biggest benefits of a 3D model is that you can try out dozens of furniture arrangements without lifting a single box. Once you have all your furniture added, drag and drop pieces around the room to try different layouts. Keep these practical tips in mind as you test:
- Leave at least 30 inches of clear walkway for high-traffic areas like doorways and paths between furniture. For smaller spaces, 24 inches is the minimum to avoid feeling cramped.
- Leave 14 to 18 inches between a coffee table and a sofa, which is the ideal distance for setting down drinks and reaching snacks.
- For dining rooms, leave at least 36 inches between the edge of the table and the wall or any other furniture to give people room to pull out chairs.
As you test layouts, save different versions of your model so you can compare them side by side. Most tools let you save multiple copies or create different scenes within the same project, so you can go back to your favorite arrangement later.
Add textures, colors, and lighting for realism
Once you’re happy with your furniture layout, adding textures and colors will make your model look much more realistic, and help you test design choices like new paint or wallpaper. Start with your walls: if you’re testing a new paint color, input the hex code of the color (most paint brands list hex codes on their websites) to get an exact match. If you’re using wallpaper, many tools let you upload a custom image of the wallpaper pattern to apply it to your walls.
Lighting is one of the most underrated details for making a 3D model feel realistic. Add your existing overhead lights, table lamps, and natural light from windows to match how your room looks at different times of day. Most modern design tools have a setting to adjust the direction and intensity of sunlight based on your room’s orientation and the time of day, so you can see how natural light hits your furniture and walls at different times. This is especially useful if you’re thinking of hanging new curtains or changing the layout of your seating area to take advantage of natural light.
Use Your 3D Model for Design and Renovation
Once your model is complete, it’s a versatile tool that you can use for more than just rearranging furniture. There are dozens of practical uses for a 3D room model, whether you’re doing a small refresh or a full gut renovation.
Plan renovations and share plans with contractors
If you’re planning to add new features like a built-in bookshelf, a new fireplace, or knock down a wall, your 3D model lets you test the change before you start any construction. You can add the new feature to the model to see how it impacts the flow of the room, and check that it fits with your existing furniture. When you hire a contractor, sharing an accurate 3D model helps them understand exactly what you want, which reduces miscommunication and the risk of costly mistakes. Many contractors can even import your 3D model into their own software to work from your measurements.
Get accurate cost estimates
When you’re planning a renovation, accurate measurements from your 3D model let you get precise cost estimates for materials. For example, if you’re replacing your flooring, you can pull the square footage of your room directly from your 3D model to calculate how much hardwood or carpet you need, so you don’t overbuy or end up short. The same goes for paint, wallpaper, tiles, and any other materials you need for the project.
Shop for furniture with confidence
How many times have you bought a new side table that looked perfect in the store, only to get it home and realize it’s too tall or too wide for your space? With a 3D model, you can drop any new furniture piece into your layout before you buy it, so you know exactly how it will fit and look. Most furniture stores list product dimensions online, so you can easily adjust a 3D model of the piece to match and test it in your room.
Conclusion
3D modeling your room used to be a complicated process reserved for professional interior designers, but today’s accessible tools make it easy for anyone to create an accurate, realistic model in a single afternoon. The key to success is starting with accurate measurements, choosing a tool that matches your skill level and project goals, and taking the time to build a solid foundation before you add furniture and details. Whether you’re just rearranging your living room or planning a full home renovation, a 3D model saves you time, money, and the hassle of moving furniture multiple times to find the right layout. By following the steps in this guide, you’ll have a complete 3D model of your room that you can use to test design ideas, plan renovations, and shop for new pieces with confidence.