
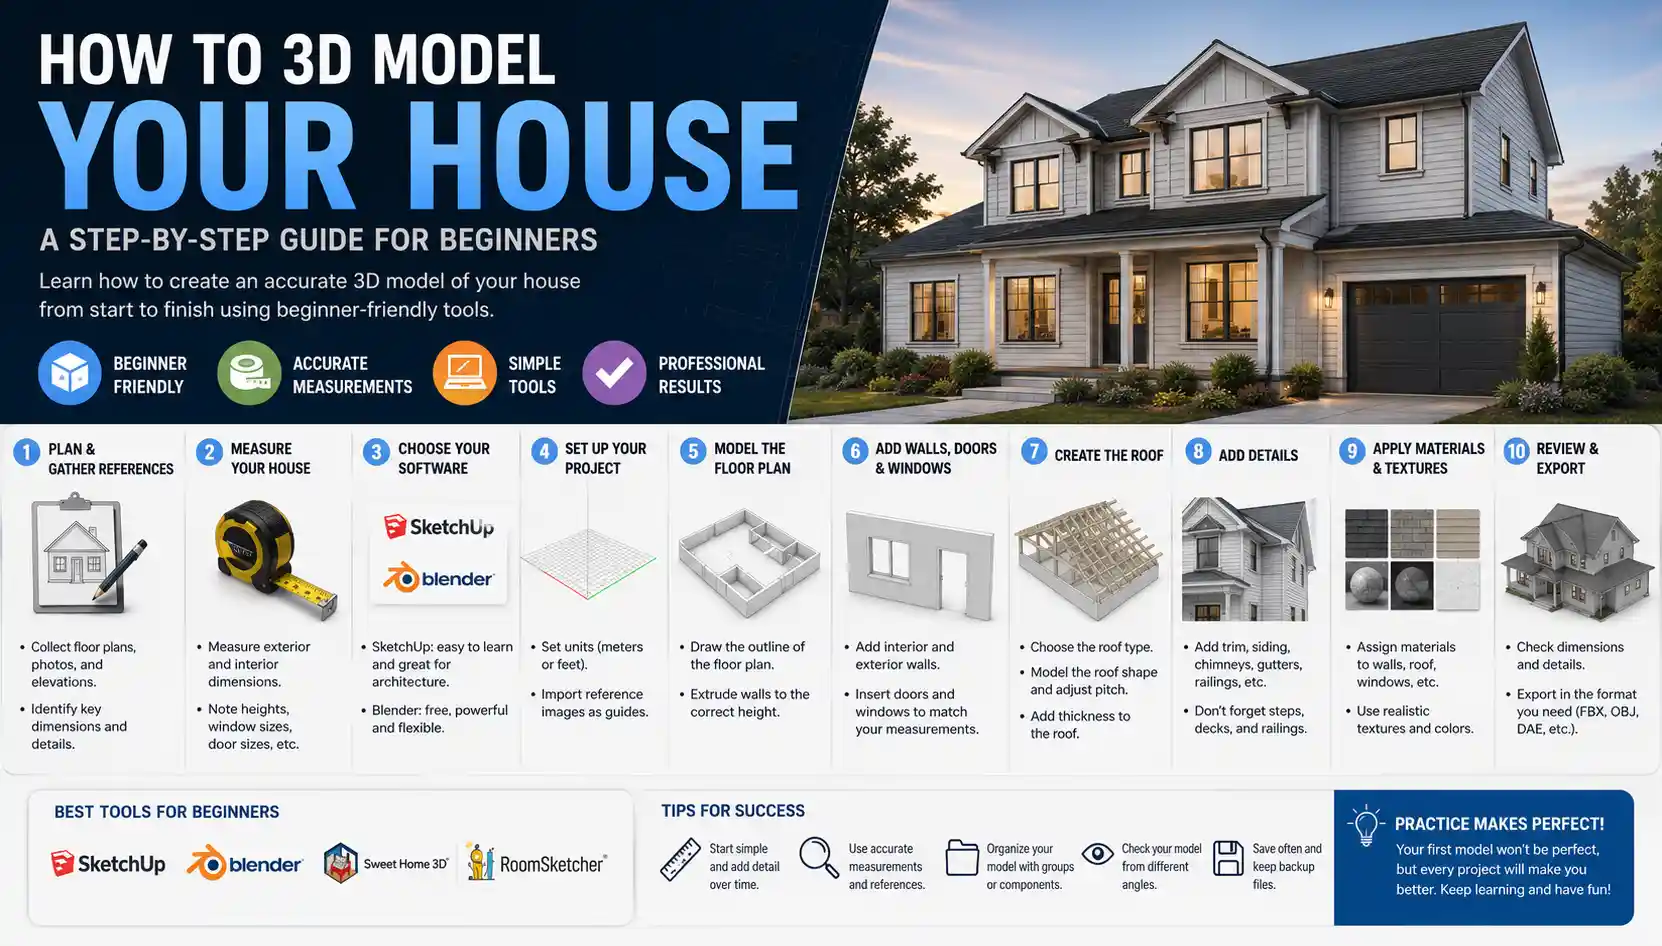
Whether you’re planning a major renovation, trying to sell your home, or just curious to see what a new layout would look like, 3D modeling your house turns a vague idea into a tangible, interactive blueprint. Gone are the days when creating an accurate 3D model required a professional architect with expensive software and years of training. Today, even beginners can build a detailed 3D model of their home with just a smartphone, free software, and a few hours of work. This step-by-step guide will walk you through every stage of the process, from initial measurements to exporting a finished model you can use for any project.
Prep Work: Gather Information and Tools
Before you open any 3D modeling software, you need to lay the groundwork with accurate measurements and the right tools. Skipping this step almost always leads to lopsided walls, misaligned doors, and a final model that doesn’t match your actual home. Even the most advanced 3D scanning apps can’t fix missing or incorrect base measurements, so taking the time to get this right will save you hours of rework later.
Choose Your Toolkit: Scanning vs. Manual Measuring
There are two main approaches to 3D modeling a house: 3D scanning (which uses your phone or a dedicated scanner to automatically capture the space) and manual measuring (which involves taking dimensions by hand and building the model from scratch). Your choice depends on your budget, how accurate you need the model to be, and how much time you want to invest.
- Beginner, low-budget option: A smartphone with a 3D scanning app (like Polycam, Qlone, or Scann3D) and a tape measure. Most basic scanning apps are free for non-commercial use, and a standard $10 tape measure is all you need to confirm key dimensions.
- Intermediate, more accurate option: A laser distance measure ($30–$100) plus free 3D modeling software (like SketchUp Free or Blender). Laser measures can take accurate room dimensions in seconds, even across large spaces, and are far more precise than a tape measure for high ceilings or long walls.
- Professional-grade option: A dedicated 3D scanner ($200+) plus paid software (like Revit or 3ds Max). This is overkill for most personal projects, but useful if you need ultra-accurate models for construction or real estate marketing.
Take Accurate Measurements Manually (If Not Scanning)
If you’re building your model from scratch instead of scanning, you’ll need to map out every room one by one. Start by drawing a rough 2D sketch of your entire house on paper – you don’t need to be an artist, just mark where walls, doors, and windows are, and label each room. Work your way through the house systematically to avoid missing any spaces, including closets, hallways, and attached garages that are easy to overlook.
For each wall, measure the total length from corner to corner, then mark the position and size of any doors, windows, or built-in features like fireplaces or bookcases. Don’t forget to measure the ceiling height too – standard ceilings are 8 feet (2.4 meters) in many homes, but older homes or custom builds often have different heights. Jot down notes about any oddities: sloped ceilings, bay windows, protruding columns, or uneven walls that deviate from a perfect rectangle. These small details make the difference between a generic model and one that matches your actual home.
Option 1: Create a Model Using 3D Scanning
3D scanning is the fastest way to get a complete 3D model of your house, and modern smartphone technology has made it accessible to almost anyone. The process works by using your phone’s camera and LiDAR sensor (found on most recent iPhones and many high-end Android phones) to capture depth data from every angle of your space, which the app stitches together into a 3D mesh. If you don’t have a LiDAR sensor, many apps still work with just a standard camera, though results may be less accurate.
Step-by-Step Smartphone Scanning
Follow these steps for the cleanest, most accurate scan possible:
- Clear clutter from the space you’re scanning. Move small furniture, boxes, and loose items out of walkways – clutter can confuse the scanning algorithm and lead to holes in your final model. Leave large furniture in place if you want it included in the model; move it out if you just want to capture the structure of the house.
- Open your scanning app and start with a corner of the first room. Stand still, and slowly pan your phone around the entire room, keeping the camera aimed at the walls and corners. Move slowly, overlapping each new frame with the previous one by about 50% to give the app enough data to stitch everything together.
- Scan each room one by one, connecting doorways as you go. Most apps let you move from room to room in a single scan, which helps maintain overall accuracy. Stop periodically to check for gaps or black holes in the scan – if you see a gap, rescan that area before moving on.
- Once you’ve scanned all spaces, let the app process the model. This usually takes 2–10 minutes, depending on the size of your house and the power of your phone.
- Clean up the processed model. Most apps have built-in tools to remove floating artifacts, fill small holes, and crop out any unwanted objects you accidentally captured. You can also use the app to automatically convert the scan into a “watertight” mesh that’s ready to use in other programs.
“LiDAR scanning on modern phones is accurate to within about 1 inch for a whole-house model, which is more than enough for most renovation or design projects. The biggest mistake new users make is moving too fast or not overlapping their shots – slow down, and you’ll get a result that’s almost as good as a professional scan.”
Refining Your Scanned Model
Raw 3D scans are rarely perfect. You may notice that walls are slightly curved instead of straight, or that door frames are misaligned. Most apps let you adjust these details manually: you can straighten walls, resize doors, and delete furniture you don’t want to include. If you need a model that only includes the structural layout of your home (not furniture or personal items), you can easily erase those objects from the scan using built-in editing tools.
If you plan to use your model for design or renovation work, you can export it in a common 3D format like OBJ, FBX, or STL. Most free apps let you export a standard resolution model for free, and charge a small fee for high-resolution exports. For most personal use cases, standard resolution is more than sufficient.
Option 2: Build a Model Manually from Scratch
If you don’t have a LiDAR-enabled phone, want more control over the final model, or just enjoy building things from the ground up, manual 3D modeling is a great option. It takes a little more time than scanning, but it’s often more accurate for architectural projects because you can ensure every wall, door, and window is exactly the right size.
Start with the 2D Floor Plan
Almost all 3D modeling software for architecture starts with a 2D floor plan as the base. Free programs like SketchUp Free are perfect for beginners, because they use a simple push-pull system that makes it easy to turn 2D lines into 3D walls. Start by importing your hand-drawn sketch into the software as a reference image, or trace over the lines directly using the line tool.
Use your measurements to draw each wall as a straight line, making sure to use the correct units (feet and inches for US users, meters for most other regions). Connect all the walls to form the outer shell of your house, then add internal walls to separate rooms. Double-check that the total area of your 2D plan matches the square footage of your home listed on your property deed – this is a quick way to catch any major measurement errors.
Extrude Walls and Add Features
Once your 2D floor plan is complete, it’s time to turn it into 3D. In most programs, this is as simple as selecting each wall surface and using the push-pull tool to pull it up to your ceiling height. The software will automatically create solid walls, a floor, and an open ceiling. If you have different ceiling heights in different rooms (for example, a vaulted ceiling in the living room or a lower ceiling in a basement), you can adjust each room individually.
Next, add openings for doors and windows. The easiest way to do this is to draw a rectangle the size of your door or window on the wall, then push the rectangle through to the other side to cut out the opening. Most 3D modeling software has pre-made door and window components you can drag and drop into the openings, which saves you from modeling them from scratch. You can also add built-in features like fireplaces, crown molding, staircases, and kitchen cabinets using pre-made components from the software’s free library.
Add Furniture and Finishes
Once the structure of your house is complete, you can add furniture, finishes, and decorations to make the model look like the real thing. Most free and paid programs have extensive libraries of pre-made 3D furniture models from popular brands, so you can test how a new sofa would fit in your living room or see how a new kitchen layout would work before you buy anything. You can also add textures to walls, floors, and countertops – for example, add hardwood texture to your floors or paint walls your desired new color to see how it looks in the space.
Common Mistakes to Avoid
Even experienced 3D modelers make mistakes when modeling a whole house. Being aware of these common pitfalls will help you avoid them and save you hours of frustration:
Ignoring Off-Grid Walls and Odd Angles
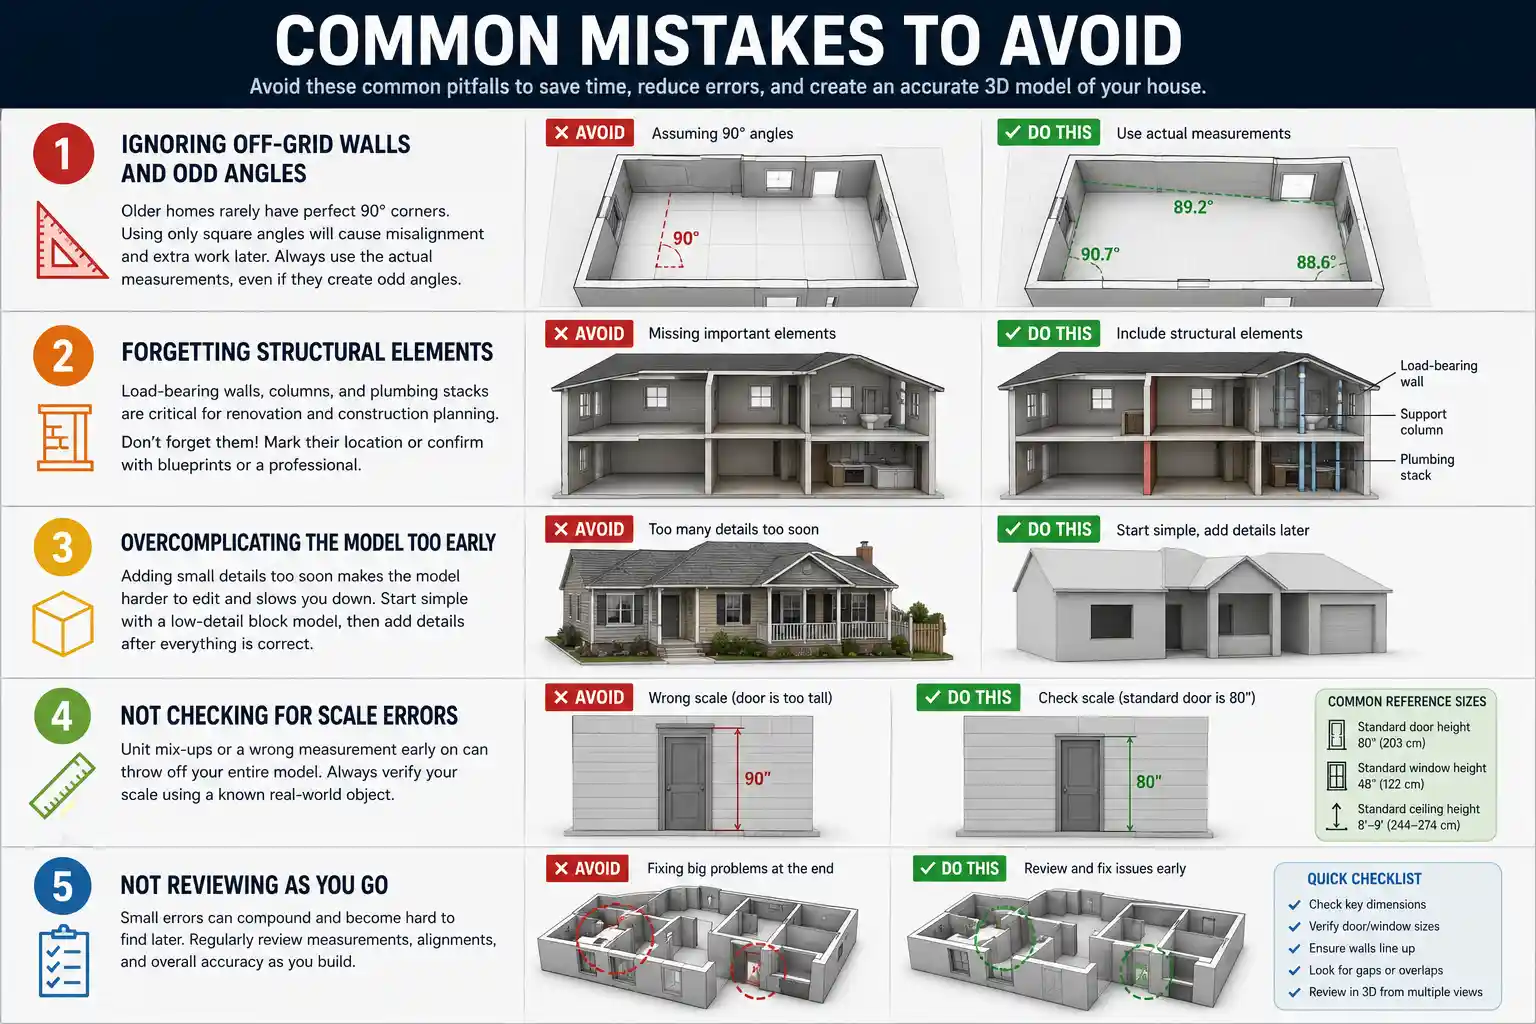
Many older homes don’t have perfectly square rooms or straight walls. It’s common for a 100-year-old house to have walls that are off by a few degrees, or rooms that are slightly trapezoidal instead of rectangular. If you assume all your walls are perfectly square and use 90-degree angles for everything, your model won’t line up when you get to the last wall of the house, and you’ll have to go back and redo half your work. Always use the actual measurements you took, even if they result in odd angles. Most modern 3D software can handle non-rectangular rooms easily.
Forgetting Structural Elements
It’s easy to get caught up in adding pretty furniture and forget to include important structural elements like load-bearing walls, support columns, or plumbing stacks. If you’re creating your model for a renovation project, these elements are critical – moving a load-bearing wall without planning can lead to structural damage, and knowing where your plumbing and electrical lines are will save you from costly mistakes during construction. If you don’t know where these elements are, you can mark their approximate location based on your home’s original blueprints (most city planning departments keep copies of blueprints for older homes) or add notes to your model to confirm with a contractor later.
Overcomplicating the Model Too Early
Many new modelers try to add every tiny detail – doorknobs, electrical outlets, picture frames on the wall – before they get the basic layout right. This leads to a messy, slow model that’s hard to edit if you find a measurement error later. Start with a low-detail block model that only includes walls, doors, and windows. Check that all dimensions are correct and everything lines up before you add any fine details or decorations. This layered approach makes it much easier to fix mistakes early in the process.
Not Checking for Scale Errors
It’s surprisingly common to end up with a model that’s 10% larger or smaller than your actual home, usually because of a unit mix-up (using meters instead of feet, for example) or a single incorrect measurement early on. Always check the scale of your model against a known object before you finish. For example, a standard front door is 80 inches (203 cm) tall – if your door in the model is 90 inches tall, you know you have a scale error somewhere. Catching this early is much easier than fixing it after you’ve added all your details.
How to Use Your Finished 3D Model
Once your 3D model is complete, you can use it for a huge range of projects around your home. Here are some of the most popular uses:
- Renovation and remodeling planning: Test different layouts, move walls, and try out new kitchen or bathroom designs before you hire a contractor or buy any materials. You can export your model as a PDF or image to share with your contractor, so everyone is on the same page about what you want.
- Real estate marketing: If you’re selling your home, a 3D model can be turned into an interactive virtual tour that lets potential buyers walk through the house from anywhere in the world. Many real estate agents now use 3D tours to attract out-of-state buyers and reduce unnecessary in-person showings.
- Home organization and interior design: Test different furniture arrangements, try out new paint colors, or see how a new wardrobe would fit in your bedroom before you move anything or place an order.
- 3D printing: If you want to build a physical scale model of your house for a hobby or presentation, you can export your 3D model as an STL file and print it on a consumer 3D printer.
- Emergency documentation: A detailed 3D model of your home with all your belongings included is a useful document for insurance purposes if you ever experience a fire, flood, or burglary.
For most common uses, you don’t need any special skills to share your model. If you created it with an app like Polycam or SketchUp, you can generate a shareable link that anyone can open in their web browser to view the 3D model interactively, no special software required. If you need to import it into a professional architecture program, you can export it as a DWG or RVT file that works with AutoCAD or Revit.
Conclusion
3D modeling your house is no longer a job reserved for professional architects and designers. Whether you choose the fast scanning route with a smartphone or build your model manually from scratch, you can create an accurate, useful model in a weekend with minimal investment. The key to success is taking your time during the measurement phase, starting simple, and fixing errors early before you add fine details. Once you have your finished model, you’ll have a flexible tool you can use for everything from planning a small paint job to marketing your home for sale, giving you a level of confidence and control that 2D blueprints can never match.