
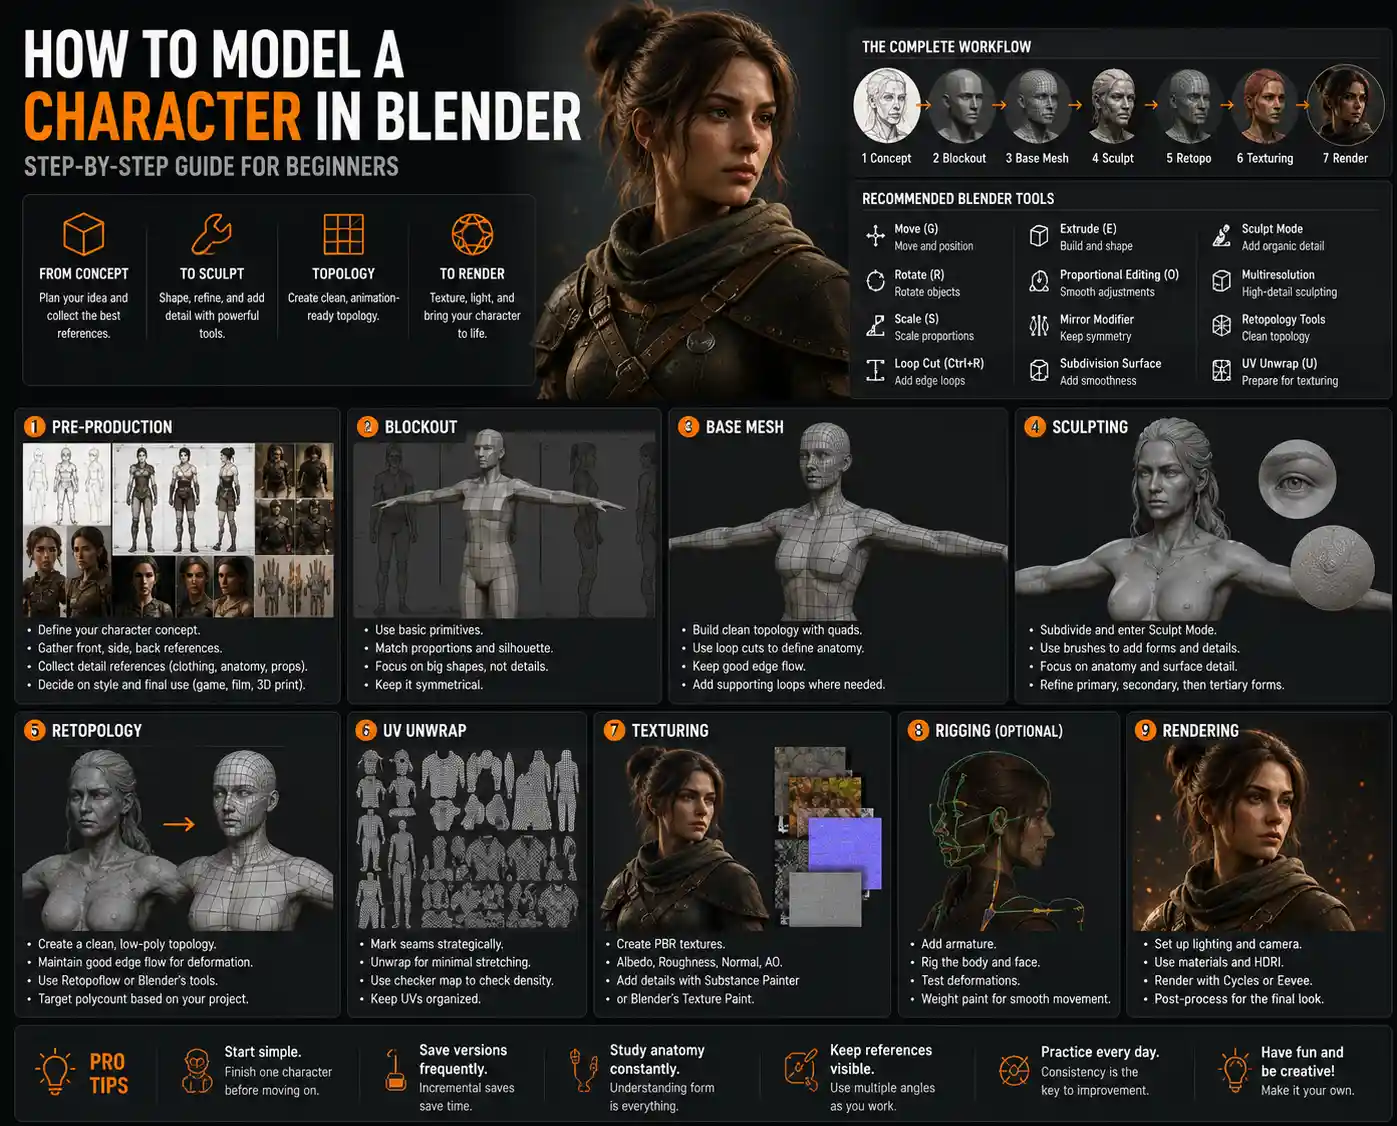
If you’ve ever scrolled through animated short films, played a indie video game, or admired custom 3D printed figurines, you’ve probably wondered how artists bring original characters to life. Blender, the free open-source 3D creation suite, has lowered the barrier to entry for aspiring character artists, turning a hobby once reserved for professionals with expensive software into an accessible creative pursuit. Whether you want to animate your own story, design a character for 3D printing, or just learn a new creative skill, modeling a character from scratch in Blender is an achievable goal with the right workflow. This step-by-step guide breaks down the process from initial concept to final clean topology, so you can build confidence and create a character you’re proud of.
Pre-Production: Planning Your Character Before Opening Blender
Many new artists jump straight into Blender and start pulling vertices around without a clear plan, only to get stuck halfway through with a lopsided, messy model that never gets finished. Pre-production is the most overlooked step in character modeling, but it sets the foundation for a smooth, efficient process and a polished final result. Even if you’re creating a completely original character, spending 30 minutes to an hour on reference and planning will save you hours of rework later.
Gathering and Organizing Reference Materials
Reference isn’t just for new artists—even seasoned professional character artists rely on references to keep their proportions accurate and their designs consistent. The type of reference you need depends on the type of character you’re creating:
- Human or humanoid characters: Start with basic anatomical references. Resources like Anatomy for Sculptors or free 3D reference tools like Sketchfab’s anatomy models help you understand how muscles, bones, and fat create the shape of the body under the skin. If you’re creating a character with a specific body type, age, or gender, collect references that match that description to avoid relying on generic stereotypes.
- Fantasy or non-human characters: Combine references from real animals and anatomy to ground your design. For example, if you’re modeling a centaur, use horse body references and human upper body references to get the proportions right. If you’re creating an original alien creature, mix traits from real-world organisms to make your design feel believable, even if it’s completely imaginary.
- Existing designs: If you’re adapting a character from a comic, game, or movie, collect multiple reference images from every angle (front, side, back, three-quarter view) to capture all details of the original design.
Once you’ve gathered your references, import them into Blender’s Reference Editor or pin them as background images in your viewport. This keeps them visible as you model, so you don’t have to alt-tab between windows and break your workflow.
Blocking Out Your Proportions
Before you start adding details like facial features or clothing, you need to get the overall proportions of your character right. A common beginner mistake is adding fine details early, only to realize the head is too big or the legs are too short and have to redo all that work. The easiest way to block out proportions for beginners is the primitive method: start with basic shapes (cubes, spheres, cylinders) to map out the major mass of the character.
For a humanoid character, start with a large sphere for the head, a elongated cube for the torso, and cylinders for the arms, legs, hands, and feet. Move and scale these primitives to match the proportions from your reference. Remember that the average human body is 7.5 to 8 head heights tall, but stylized characters (like anime characters or cartoon heroes) often use 5 to 6 head heights for a more compact, cute look, or 9+ head heights for a more imposing, heroic look. Write down your proportion rules early, and stick to them as you build.
Base Mesh Creation: Building the Core of Your Character
Once your blockout is approved, it’s time to create the base mesh—the clean, low-poly foundation that you’ll sculpt and add details to later. There are two common workflows for creating a base mesh in Blender: box modeling and extrusion from a single plane. Both work well, but box modeling is more intuitive for most beginners.
Box Modeling Step-by-Step
Box modeling starts with a simple primitive shape and builds up the character by adding edges and pulling vertices into shape. Here’s how to do it for a humanoid head, the most common starting point for character models:
- Start with a UV sphere with 8 segments and 8 rings. Delete half the sphere (along the X-axis) so you only work on one side—you can add a mirror modifier later to mirror your work to the other side, which saves time and keeps your character symmetrical.
- Add a mirror modifier to your half-sphere, check “Clipping” to prevent gaps along the center line, and enable “X-Ray” in the viewport header so you can see through your model as you work.
- Use the loop cut tool to add edge loops where major facial features will go: one across the middle for the eye line, one below that for the nose, one below that for the mouth, and one vertical loop down the center (which you already have from cutting the sphere in half).
- Start pulling individual vertices to match your front and side reference. Move the eye sockets inward, push the nose forward, widen the cheekbones, and pull the chin down to match your reference proportions.
- Once the basic head shape is done, repeat the same process for the torso, arms, and legs, starting with simple primitives and adding edge loops to shape the volume.
The goal of the base mesh isn’t to add details—it’s to get the large shapes right with as few polygons as possible. A good character base mesh for a humanoid should have between 500 and 2,000 polygons, which is easy to work with as you move to sculpting.
Using the Mirror Modifier for Symmetry
Most characters are symmetrical along the X-axis, so the mirror modifier is one of the most useful tools in your Blender workflow. It cuts your work in half by letting you model only one side of the character, and automatically mirrors your changes to the other side. One common mistake new artists make is applying the mirror modifier too early. Wait to apply it until you’re done with all symmetrical sculpting and modeling work—if you need to add an asymmetrical detail like a scar or a crooked nose, you can just turn off clipping and adjust vertices on one side after you’re done with the base shape.
“The most important part of 3D character modeling isn’t the details—it’s the big shapes. Get the big shapes right, and even a simple model will look good. Get the big shapes wrong, and no amount of fine detail will fix it.”
— Jonathan Williamson, Blender educator and co-founder of Blender Guru
Sculpting Details: Adding Form and Personality
Once you have a clean base mesh, it’s time to move to Blender’s Sculpt Mode to add organic details and give your character personality. Sculpting is where you turn a generic blockout into a unique character, adding things like cheek definition, muscle structure, wrinkles, and stylistic choices that make your character feel alive. Blender’s sculpting tools have improved dramatically in recent versions, and they’re now on par with expensive paid sculpting software like ZBrush for most hobbyist and independent artist needs.
Starting with Large Sculpting Strokes
Just like with base modeling, you always want to work from large shapes to small details. Don’t jump straight to sculpting pores or eyelashes—start with the biggest forms first. Use the Clay Strips brush or the Clay build-up brush to add volume where it needs to be: for example, adding more mass to the pectoral muscles, rounding out the hips, or defining the cheekbones. Use the Grab brush to move large areas of the mesh if your proportions are off, and use the Smooth brush to blend harsh edges between different forms.
Keep your reference images open as you sculpt, and rotate your model frequently to check it from all angles. It’s easy to get a shape looking good from the front, only to realize it’s completely wrong from the side. A good habit is to tumble your viewport 360 degrees around your character every few minutes to check for lumps, lopsidedness, or misshapen areas.
Working From Large to Small Details
Once you’re happy with the large forms, you can move on to medium and then small details. Here’s a common hierarchy of details to follow:
- Medium details: These are major features like eye sockets, nose shape, lip volume, jawline, muscle groups, and joint definition. For clothing, this is where you add major folds and creases that come from the character’s resting pose.
- Small details: These are secondary features like cheek dimples, freckles, scars, finger wrinkles, knuckles, and smaller fabric folds. If you’re creating a stylized character, this is where you can exaggerate features to match your design—for example, make the jaw extra sharp for a heroic character, or make the cheeks extra round for a cute cartoon character.
- Micro details: These are fine surface details like skin pores, wrinkles, fabric texture, or stubble. You don’t actually need to sculpt most micro details into your mesh for most projects—you can add these as texture maps later, which keeps your polygon count lower and your model easier to work with.
Blender has dozens of sculpting brushes, but you only need about 5 to 10 to create a full character. Start with these core brushes to avoid overwhelm: Clay Strips for adding volume, Grab for moving large shapes, Smooth for blending, Crease for defining sharp edges like the brow bone or lip line, and Inflate for rounding out areas like the cheeks or forehead. As you get more comfortable, you can experiment with additional brushes, but mastering these five will get you 90% of the way to a great sculpt.
Dynamic Topology for Beginners
One of the most confusing features for new sculptors is Dynamic Topology (or Dyntopo), which automatically adds more polygons to your mesh as you sculpt, so you can add details without having to manually subdivide your mesh. Dyntopo is great for sculpting rough concepts, but it can create messy, uneven geometry if you use it for the entire process. For most character modeling workflows, it’s better to start with a clean base mesh, subdivide it once or twice to get enough polygons for sculpting, and only use Dyntopo when you need to add extra detail to a specific small area. If you do use Dyntopo for the entire sculpt, you’ll need to retopologize your model later to get a clean mesh, which we’ll cover in the next section.
Retopology and UV Unwrapping: Preparing for Texturing
After you finish sculpting your character, you’re left with a high-poly mesh that can have millions of polygons. That’s great for sculpting details, but it’s unusable for animation, 3D printing, or texturing, because the geometry is messy and too heavy. Retopology is the process of creating a new, clean low-poly mesh that matches the shape of your high-poly sculpt. This clean mesh is what you’ll use for UV unwrapping, texturing, rigging, and animation.
Basic Retopology Workflow in Blender
Blender has built-in retopology tools that make the process straightforward, even for beginners. Here’s a step-by-step breakdown:
- Move your high-poly sculpt to a separate layer, and lower its opacity slightly so you can see your new retopologized mesh through it. Turn on X-Ray for the new mesh so you can see what you’re working on.
- >
- Start by drawing new quads (four-sided polygons) over the surface of your high-poly sculpt. For organic characters, you want to follow the flow of the muscles and skin with your edge loops—this is called edge flow, and it’s critical for making sure your character deforms correctly when you animate it later. For example, around the eyes, you want edge loops that circle the eye socket, to follow how the skin stretches when the character blinks or moves their eyes.
- Stick to quads as much as possible. Triangles (three-sided polygons) are unavoidable in some areas, but too many triangles will cause problems when you rig and animate your character. N-gons (polygons with more than four sides) should be avoided entirely, as they cause rendering and deformation issues.
- Once you’ve covered the entire character with a clean quad mesh, use the Shrinkwrap modifier to snap your new mesh to the surface of the high-poly sculpt. This automatically matches the shape of your sculpt without you having to move every vertex manually.
- If you want to keep the fine details from your high-poly sculpt, you can bake them into a normal map or a displacement map that you can add to your low-poly mesh during texturing. This lets you have the look of a high-poly sculpt with the performance of a low-poly model.
How many polygons should your final retopologized character have? It depends on what you’re using it for: a 3D print character can be 10,000 to 50,000 polygons, a game character is usually between 10,000 and 100,000 polygons (depending on whether it’s a main character or a background character), and an animated character for a short film can be up to 100,000 to 500,000 polygons. Blender handles high polygon counts well, but keeping your polygon count as low as possible without losing shape detail makes the rest of your workflow much faster.
UV Unwrapping Explained for Beginners
After retopology, the next step is UV unwrapping, which is the process of flattening your 3D mesh into a 2D map so you can add 2D textures to it. Think of it like unwrapping a cardboard box to lay it flat—you’re just unfolding your 3D character into a 2D plane so you can paint or apply textures to it. Blender has a very good automatic unwrapping tool called Smart UV Project that works well for beginners, but it’s a good idea to manually adjust your UVs to stretch and pin areas to avoid distortion, especially on important areas like the face.
A good rule of thumb for UVs is to give more texture space to areas that need more detail, like the face and hands, and less space to less visible areas like the inside of the mouth or the bottom of the feet. Once your UVs are done, export your UV layout, and you’re ready to move on to texturing.
Final Cleanup and Common Beginner Mistakes to Avoid
Before you move on to texturing and rigging, take some time to do a final cleanup of your model to catch small mistakes that can cause big problems later. This step only takes 15 to 30 minutes, but it saves you hours of frustration down the line.
Final Model Checklist
Go through this checklist to make sure your model is ready for the next steps:
- Check for non-manifold geometry: Non-manifold geometry is geometry with edges that are connected to more than two faces, or faces with zero area, which causes problems with rendering, 3D printing, and animation. Blender has a built-in tool to find and fix non-manifold geometry, found in the Edit Mode > Select > Select Non-Manifold menu. Once you select it, you can delete excess vertices or stitch edges together to fix the issue.
- Check your edge flow: Rotate your character and check that all edge loops follow the natural flow of the body, and that you don’t have any extra edges that don’t need to be there. Extra edges increase your polygon count unnecessarily and can cause weird deformations when animating.
- Check for overlapping vertices: In Edit Mode, use the “Merge By Distance” tool to weld overlapping vertices together, which removes duplicate geometry that can cause rendering gaps or other issues.
- Name all your objects and parts: If you have separate objects for the body, hair, clothing, and accessories, name each one clearly so you can find them later when you’re rigging or texturing. It’s easy to end up with 20 objects all named “Cube.001” when you’re working, and cleaning up your outliner now saves time later.
Common Beginner Mistakes to Avoid
Learning to model characters in Blender is a process, and everyone makes mistakes when they’re starting out. Here are the most common mistakes to watch out for:
First, adding too much detail too early. As we’ve repeated throughout this guide, working from large shapes to small details is the key to a good model. If you add pores and wrinkles before you get your head shape right, you’ll just have to delete all that detail when you realize your proportions are wrong. Second, not using references. Many new artists think using references is cheating, but it’s actually the mark of a professional. Even the best artists in the world use references to keep their work accurate. Third, not checking the model from all angles. It’s easy to work only from the front view, but a good character has to look good from every angle. Tumbling your viewport frequently catches problems you’d miss otherwise. Fourth, making the polygon count too high. More polygons don’t automatically make a better model—what matters is good shape and clean topology. A clean 10,000 polygon model will look better and perform better than a messy 100,000 polygon model.
Conclusion
Modeling a character in Blender is a process that takes practice, but it’s a deeply rewarding skill that opens up endless creative possibilities. By following a structured workflow—planning your character with references, building a clean base mesh, sculpting details from large to small, creating clean topology with retopology, and doing a final cleanup—you’ll avoid the most common frustrations that stop new artists from finishing their first character. Remember that every professional character artist started exactly where you are, and your first model doesn’t have to be perfect. The goal is to learn the process, and each character you model will get better than the last. Whether you want to create characters for animation, games, 3D printing, or just for fun, Blender gives you all the tools you need to bring your imagination to life—all you need is a little patience and practice.