
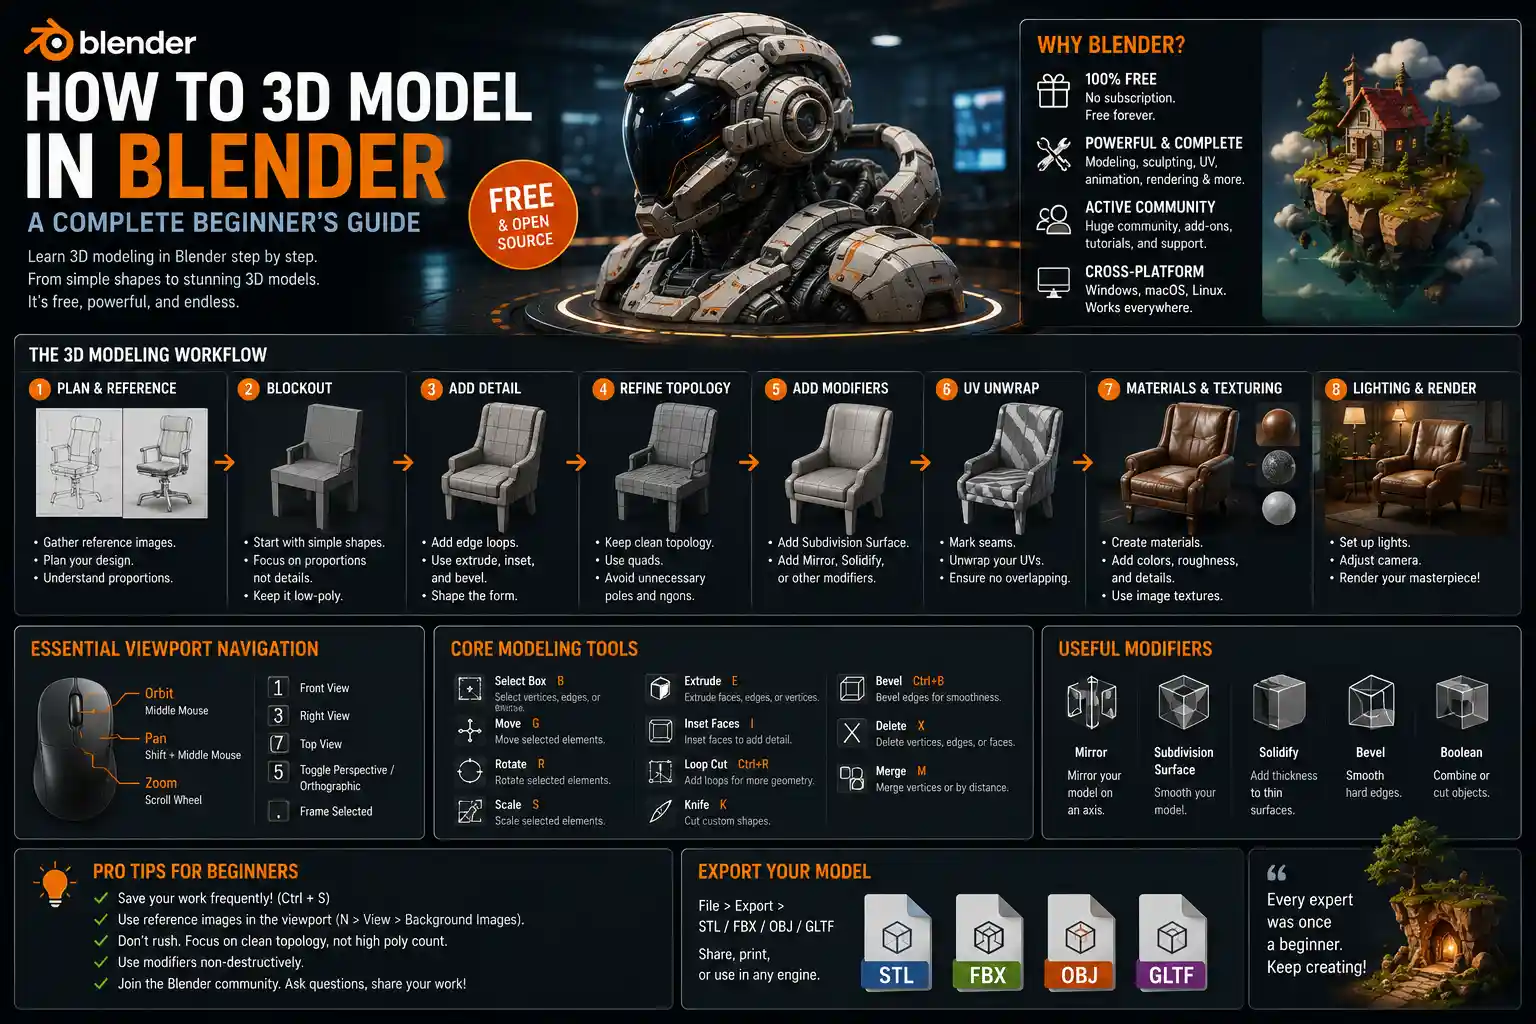
Whether you want to design 3D-printed prototypes, create assets for indie video games, or experiment with digital art, Blender is one of the most powerful tools you can learn—and it’s completely free. Unlike expensive professional 3D modeling suites that cost hundreds of dollars a year in subscriptions, Blender offers every core feature a new creator needs, from basic mesh modeling to advanced animation and rendering, all backed by a massive global community of contributors. For beginners, the sheer number of menus, tools, and keyboard shortcuts can feel overwhelming at first, but breaking the process down into manageable steps makes learning to 3D model in Blender approachable for anyone with patience and a bit of curiosity. This guide walks you through the entire workflow, from setting up your workspace to exporting your finished model, with practical tips to avoid common mistakes along the way.
Setting Up Your Blender Workspace for Success
Before you start shaping your first model, it’s important to set up your Blender workspace to fit your modeling workflow. When you first open Blender, you’ll see a default splash screen that includes a generic 3D view with a cube, light, and camera. While the default layout works for quick tests, customizing your interface will save you hours of frustration as you work.
Adjusting your viewport and layout
Blender’s default layout splits your screen into three main areas: the 3D viewport (where you build your model), the Properties panel (on the right, where you adjust settings), and the Outliner (where you manage objects in your scene). For 3D modeling, most creators prefer to maximize the 3D viewport to get a clear view of their work. To do this, you can collapse the left-side toolbar by pressing the T key, and toggle the right-side Properties panel with the N key when you don’t need it. This gives you the maximum possible space to work on your model.
It’s also helpful to enable a few quality-of-life settings that make modeling easier. Go to Edit > Preferences > Navigation and turn on “Auto Depth” and “Fly/Walk Navigation” for more intuitive camera control. Under the “Add-ons” tab, search for “Mesh Tools” and “Node Wrangler” to enable two free built-in add-ons that add extra functionality for modeling and texturing. These are pre-loaded with Blender but turned off by default, so enabling them early will save you time later.
Learning basic navigation
Navigation is the foundation of 3D modeling, and Blender’s navigation system differs from most 2D software, so it’s worth practicing before you start shaping objects. Three core controls will get you through 90% of your work:
- To rotate your view around the model: Hold down the middle mouse button and drag your cursor.
- To pan (slide) your view: Hold Shift + middle mouse button and drag.
- To zoom in and out: Scroll the middle mouse button up or down.
If you’re using a laptop without a middle mouse button, you can hold Alt + left click to rotate, Alt + left click + Shift to pan, and Ctrl + Alt + left click to zoom. Get comfortable with these controls first—spend 5 to 10 minutes rotating, panning, and zooming around the default cube before you do anything else. Muscle memory here will make every other step of modeling much smoother.
Understanding Core Blender Modeling Terminology and Tools
Before you dive into building a complex model, it’s critical to understand the core building blocks of 3D modeling in Blender. Nearly all 3D models are made of meshes, which are constructed from three basic components: vertices, edges, and faces. A vertex is a single point in 3D space, an edge connects two vertices, and a face is a flat surface bounded by three or more edges. When you modify a model, you’re almost always moving, adding, or removing these components.
Object Mode vs. Edit Mode
Blender has two primary modes for working with mesh models, and confusing them is one of the most common mistakes new creators make. Object Mode is for moving, scaling, and rotating entire objects in your scene. If you want to move a whole chair across the scene or resize a complete mug, you do that in Object Mode. Edit Mode is for editing the individual vertices, edges, and faces that make up a mesh. If you want to carve a handle into your mug or round the legs of your chair, you need to be in Edit Mode. You can switch between modes quickly by pressing the Tab key—this is the most useful keyboard shortcut for any Blender modeler.
In Edit Mode, you can toggle between selecting vertices, edges, or faces by pressing 1, 2, or 3 on your number row, respectively. This lets you target exactly what part of the mesh you want to change. For example, if you want to round the top of a cube, you’d switch to Edit Mode, select the top face, and use a tool to extrude or smooth it.
Essential modeling tools every beginner should master
Blender has dozens of modeling tools, but you only need a handful to create 90% of common models. Start with these core tools, and learn them well before moving on to more advanced features:
- Extrude: Extrude pulls a new face out from an existing edge or face, adding volume to your model. Press E to extrude after selecting a face or edge—this is the most used tool in any modeler’s toolkit. If you want to turn a flat circle into a cylinder, for example, you just extrude the circle upward.
- Loop Cut: Loop Cut adds a new ring of edges evenly across your mesh, which is critical for adding detail or preparing a model to be smoothed. Press Ctrl + R to activate Loop Cut, then click and drag to position the new edge.
- Bevel: Bevel softens sharp edges by adding multiple small faces to a corner, making models look more realistic and professional. Press Ctrl + B to bevel a selected edge, then scroll your mouse wheel to adjust how many segments the bevel has.
- Subdivision Surface: The Subdivision Surface modifier automatically smooths a blocky mesh by splitting every face into smaller, smoother faces. This is how you turn a basic cube into a perfectly rounded sphere or a blocky character into a soft, organic shape.
“The biggest mistake new 3D modelers make is trying to use every tool at once. Start with three tools: extrude, loop cut, bevel. Master those, and you can build almost anything.”
— Blender Studio Lead Developer Francesco Siddi
Step-by-Step Workflow for Your First Model
Now that you understand the basics, let’s walk through building a simple, useful model: a coffee mug. This project uses all the core tools we covered above, and it gives you a finished model you can even 3D print or render when you’re done. We’ll keep it simple, so you don’t need any prior experience to follow along.
Step 1: Start with a base mesh
First, delete the default cube that Blender loads when you open a new file. Click the cube to select it (it will highlight orange), then press Delete or X on your keyboard. Next, add a base mesh for your mug: go to Add > Mesh > Circle. This creates a flat circle that will be the base of your mug. In the Properties panel on the right, set the number of vertices to 32—this gives you a smooth circle without adding unnecessary extra geometry.
Press Tab to switch to Edit Mode, then select the entire circle by pressing A (the select all shortcut). Now press E to extrude the circle upward, then pull your mouse up to pull the sides of the mug out. Click to confirm the extrusion, then press S (the scale shortcut) and drag your mouse inward slightly to make the top opening of the mug a little smaller than the base. Click to confirm, that’s the body of your mug done.
Step 2: Hollow out the interior
A solid coffee mug isn’t very useful, so next we’ll hollow out the inside. Make sure you’re still in Edit Mode, then select the top face of the mug (the big circular opening at the top). Press E to extrude it downward almost all the way to the base, then click to confirm. Don’t extrude it all the way to the bottom—leave a small gap for the base of the mug to keep it solid.
Next, press S to scale the new inner face inward slightly, to leave a thin wall for the mug. A 10-15% reduction in size works well for a standard mug thickness. Click to confirm, and your mug is now hollow. This process of extruding inward to create a hollow shape works for almost any container model, from bowls to vases.
Step 3: Add the handle
Now we’ll add the handle, which is a great way to practice extruding and adjusting edges. First, go back to Object Mode by pressing Tab, then add a new mesh: Add > Mesh > Cube. Move the cube to the side of the mug so it sits roughly where you want the handle to attach. To move it, press G (the grab/move shortcut) and drag it into place. You can scale it by pressing S to make it roughly the right size for a handle.
Switch back to Edit Mode with Tab. We’re going to shape the cube into a curved handle. Start by adding a loop cut down the center of the cube: press Ctrl + R, hover your cursor over the center of the cube, and click to add the loop cut. Move the loop to the center and click to confirm. Now, select the middle row of vertices and pull them outward to curve the handle into a C-shape. If you want a smoother curve, add a second loop cut on each side of the first, then adjust the vertices until the curve looks natural.
Once the shape looks right, bevel the sharp edges of the handle to make it smooth: select all the outer edges, press Ctrl + B, drag to make a small bevel, then scroll your mouse wheel to add 2-3 segments. Click to confirm. Now go back to Object Mode, select both the mug body and the handle by holding Shift and clicking both, then press Ctrl + J to join them into a single object. Your mug is now fully shaped.
Step 4: Smooth your model
The mug is done, but it probably still looks a little blocky right now. To smooth it out, we’ll use the Subdivision Surface modifier. With your mug selected, go to the Properties panel on the right, click the wrench icon (the Modifiers tab), then click Add Modifier > Subdivision Surface. Increase the Levels Viewport to 2 or 3—you’ll see your blocky mug instantly turn into a smooth, rounded shape. The higher you set the levels, the smoother your model will be, but higher levels also slow down Blender on older computers, so 2-3 levels is enough for most projects.
If any parts of the model don’t stay sharp where you want them (like the top rim of the mug), you can select those edges in Edit Mode, right-click, and choose “Mark Sharp”. Blender will keep those edges sharp even when you smooth the rest of the model, which lets you get clean, professional results.
Common Beginner Mistakes and How to Fix Them
Even when you follow the steps correctly, you’ll likely run into common issues that make your model look messy or behave unexpectedly. Most of these are easy to fix once you know what causes them, and avoiding them early will help you build good modeling habits.
Too much geometry (over-modeling)
The most common mistake new modelers make is adding way more geometry (extra vertices and faces) than they actually need. Extra geometry makes Blender run slower, makes your model harder to edit, and can cause weird issues when you smooth or 3D print it. A good rule of thumb is to only add edges where you actually need to change the shape of the model. If you’re making a plain wall, you don’t need 100 edges along it—one is enough. You can always add more detail later if you need it, so start simple.
Non-manifold geometry
Non-manifold geometry is the term for mesh issues that break the rules of 3D modeling, like edges connected to more than two faces, faces with zero area, or overlapping vertices. Non-manifold geometry can cause problems when you 3D print a model, when you smooth it, or when you export it to another program. The good news is Blender has a built-in tool to find and fix it. In Edit Mode, go to Select > Select All by Trait > Non Manifold. Blender will automatically select all the problem areas, so you can delete extra faces or merge overlapping vertices to fix the issue. Get in the habit of checking for non-manifold geometry before you finish your model, especially if you plan to 3D print it.
Not using keyboard shortcuts
Many new Blender users click through every menu to select tools, which is incredibly slow. Blender is built around keyboard shortcuts, and memorizing just a dozen of the most common shortcuts will cut your modeling time in half. Start with these 10 essential shortcuts, and practice using them until they become second nature:
- Tab: Switch between Object Mode and Edit Mode
- A: Select/deselect all
- G: Grab/move selected geometry
- S: Scale selected geometry
- R: Rotate selected geometry
- E: Extrude
- Ctrl+R: Loop Cut
- Ctrl+B: Bevel
- Z: Toggle wireframe view to see through your model
- Ctrl+Z: Undo (Blender supports hundreds of undos, don’t be afraid to experiment)
Ignoring reference images
Another common mistake is trying to model from memory instead of using reference images. Even professional 3D artists use reference images to get proportions right. If you’re modeling a car, find 3-4 photos of the car from the front, side, back, and top, then import them into Blender as background images in your viewport. This makes it easy to trace the shape and get proportions correct, instead of guessing and ending up with a lopsided model. You can add reference images by going to Add > Image > Reference, then position them behind your model to use as a guide.
Next Steps After Your First Model
Once you’ve finished your first model (like the coffee mug we built), you’re ready to expand your skills and take on more complex projects. There are several paths you can take depending on what you want to use your 3D models for, and Blender has tools for every use case.
Texturing and rendering
After you finish modeling, the next step is usually adding textures and rendering your model to get a finished image. Blender’s built-in Cycles renderer produces photorealistic results, and the Eevee renderer lets you preview your work in real time. To get started with texturing, you can use Blender’s built-in PBR (physically based rendering) materials to add colors, roughness, and reflections to your model. For example, you can add a glossy ceramic material to your coffee mug, or a matte finish for a hand-painted mug. There are thousands of free PBR textures available online from sites like Poly Haven and TexturingXYZ, so you don’t have to create your own textures when you’re starting out.
Preparing models for 3D printing
If you want to 3D print your model, there are a few extra steps you need to take after finishing your model. First, make sure your model is completely closed (no holes in the mesh) and has no non-manifold geometry. Next, check the size of your model to make sure it fits on your 3D printer’s build plate. You can use Blender’s built-in Measure tool to check dimensions. Finally, export your model as an STL file, which is the standard file format for 3D printing. Blender exports STLs natively, so you don’t need any extra software to get your model ready for printing.
Learning more advanced techniques
Once you’re comfortable with basic polygon modeling (the method we used for the coffee mug), you can explore more advanced modeling techniques to expand your capabilities. Sculpting is great for creating organic shapes like characters, animals, or landscape, and Blender has one of the most powerful sculpting systems of any 3D software—even compared to paid programs. Retopology lets you take a high-resolution sculpt and create a clean, low-poly version that’s suitable for games or 3D printing. Boolean modeling uses basic shapes cut into each other to create complex shapes, which is great for mechanical models or architectural designs. Blender’s community creates thousands of free tutorials for every skill level, so you can always find a guide for the technique you want to learn.
Conclusion
Learning to 3D model in Blender is a rewarding skill that opens up opportunities for everything from creative hobbies to professional freelance work. The key to success is starting small, mastering the core tools before moving on to advanced features, and embracing mistakes as part of the learning process. You don’t need an expensive computer or a fancy art degree to create great models—all you need is patience and a willingness to practice. Start with a simple project like a coffee mug, build muscle memory for navigation and core tools, fix the common mistakes that trip up new users, and gradually work your way up to more complex projects. With a few hours of practice, you’ll be surprised at how quickly you can go from a blank screen to a finished 3D model you can 3D print, share online, or use in your next creative project.