
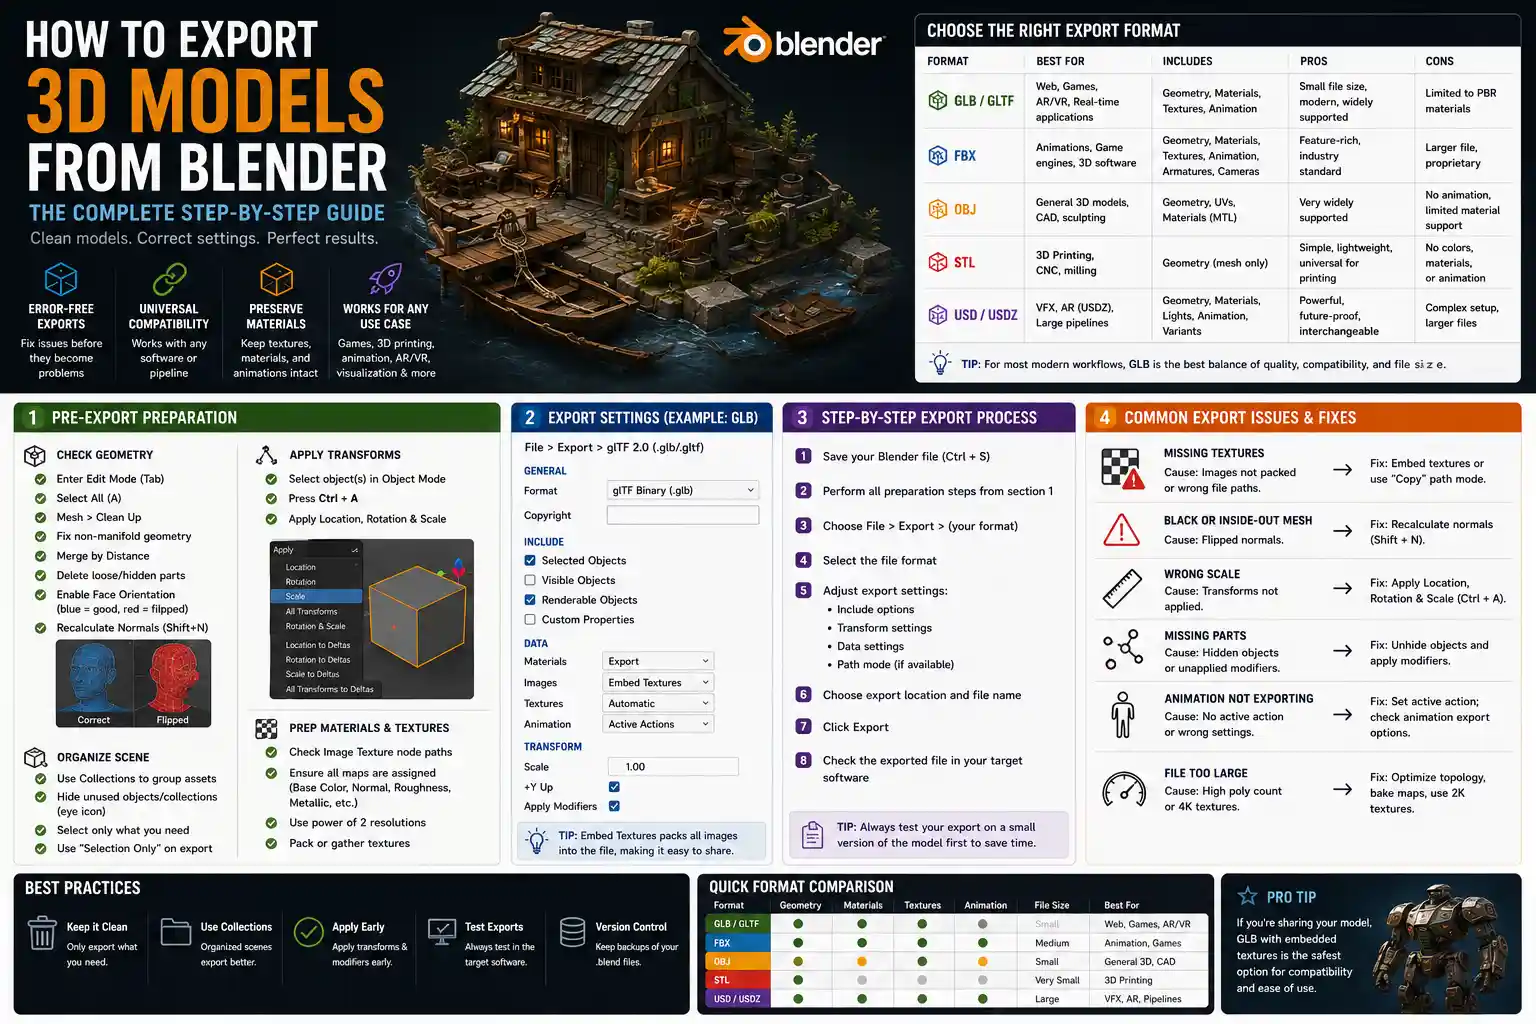
Whether you’re a hobbyist creating 3D printable miniatures, a game developer building assets for your next indie release, or a freelance designer sharing work with a client, exporting your 3D model correctly from Blender can make or break your project. A successful export preserves your geometry, materials, textures, and animation data so your model works exactly as intended in whatever software or workflow you’re moving it to. A bad export, on the other hand, can leave you with missing textures, broken topology, flipped normals, or files that won’t open at all. This step-by-step guide walks you through every stage of the process, from prepping your model for export to choosing the right file format and troubleshooting common issues.
Pre-Export Preparation: Clean Up Your Model First
Before you even open Blender’s export menu, taking 10 minutes to clean up your model will save you hours of frustration later. Many common export issues stem from messy geometry, unused assets, or incorrect object settings that are easy to fix ahead of time. Think of this step like packing for a trip: you wouldn’t bring empty boxes or broken items with you, so don’t export unnecessary data that will bloat your file or cause errors.
Check Geometry for Errors
Start by auditing your model’s geometry for common issues that can break exports or cause problems in other software. Blender has built-in tools to make this quick and easy. First, enter Edit Mode by pressing Tab with your object selected, then press A to select all geometry. From the top menu, navigate to Mesh > Clean Up to access automated cleanup tools.
Key issues to resolve here include:
- Non-manifold geometry: Edges connected to more or fewer than two faces, which often causes errors in 3D printing or game engine imports. Blender’s Select Non-Manifold tool (available in the Select menu in Edit Mode) will highlight these areas so you can fix them.
- Double vertices: Overlapping vertices that create extra unnecessary geometry. Use the Merge By Distance tool to weld these together automatically.
- Hidden faces or unused vertices: Delete any geometry that’s not visible or part of your final model to reduce file size and avoid confusion.
- Flipped normals: Reverse-facing faces that appear transparent in other software. You can check this by enabling Face Orientation in the Overlay menu; blue faces are correct, red faces are flipped. Use the Recalculate Normals tool to fix most issues automatically.
Organize Objects and Collections
If your scene has multiple objects, organizing them into collections and hiding any assets you don’t want to export keeps your final file clean. For example, if you’re exporting a character model, you don’t need to include the reference image planes you used for sculpting or the lighting setup you used for renders. Blender exports all visible objects by default, so simply hiding unused objects or collections with the eye icon in the Outliner panel will exclude them from the final file.
If you only want to export one specific object rather than the entire scene, select that object in Object Mode before opening the export menu, then check the Selection Only box in the export settings. This is a handy trick that avoids accidentally including extra assets you don’t need.
Apply Transforms
One of the most common mistakes new Blender users make when exporting is forgetting to apply object transforms. When you scale, rotate, or move an object in Object Mode, Blender stores that transformation data separately from the object’s actual mesh geometry. Some external software doesn’t read this transform data correctly, resulting in models that are the wrong size, rotated incorrectly, or placed far from the origin when imported.
To fix this, select your object in Object Mode, then press Ctrl + A to open the Apply menu. You’ll want to apply at minimum Location, Rotation, and Scale. For most use cases, applying all three transforms is the best practice. If you’re exporting animation that relies on object-level transformation, you can skip applying location and rotation, but it’s still a good idea to apply scale to avoid unexpected size issues.
Prep Materials and Textures
If your model uses custom materials or textures, make sure these are correctly packed or named before export. For most common file formats like GLB or FBX, Blender can pack texture images directly into the exported file, but you’ll want to double-check that all image paths are correct. You can confirm this by opening the Image Texture node in the Shader Editor and checking that the image file path points to the correct texture on your computer. If you’re using PBR textures, make sure all maps (albedo, normal, roughness, metallic) are correctly assigned before export.
Choosing the Right File Format for Your Use Case
Blender supports more than 20 different export file formats, each designed for specific use cases. Picking the right format is just as important as prepping your model correctly: using the wrong format can result in lost data, incompatible files, or unnecessarily large file sizes. Below we break down the most common formats and when to use each.
GLB/GLTF (General Use, Web, Games, AR/VR)
GLB (the binary version of GLTF) has become the go-to standard for sharing 3D models across the internet, game engines, and augmented/virtual reality projects. This format stores all geometry, materials, textures, and animation data in a single small file, making it incredibly easy to share and use. It’s fully open source and supported by every major 3D tool, including Unity, Unreal Engine, Three.js, and Adobe Substance. If you’re sharing a model on Sketchfab, embedding it on a website, or importing it into a game engine, GLB is almost always the best choice for most modern workflows.
FBX (Animation, Game Engines, 3D Software Interoperability)
FBX has been the industry standard for exchanging 3D assets between software packages for decades, and it’s still widely used for animated models and game development. Unlike GLB, it supports advanced animation features like blend shapes and bone rigs that work reliably across Autodesk products like Maya and 3ds Max, as well as Unity and Unreal. If you’re exporting a rigged character for animation work or need to share assets with a studio that uses Autodesk tools, FBX is still the safe, widely supported choice.
STL/OBJ (3D Printing, Static Models)
For 3D printing, STL is the universal standard. STL only stores surface geometry, ignoring materials, textures, and animation, which makes it perfect for additive manufacturing: all 3D slicer software is designed to read STL files natively. If you’re exporting a static model that doesn’t need textures (for example, a sculpture you’re going to print), STL is your best bet. OBJ is another common format for static models, and it does support basic material and texture data, making it popular for sharing static assets for visual work. Both formats are simple and reliable, but they’re not suitable for animated or complex textured models.
USDZ (AR for Apple Devices)
If you’re exporting a 3D model specifically for augmented reality use on iOS or macOS, USDZ is Apple’s preferred format. Blender has built-in USDZ export as of version 3.0, and this format is optimized for quick loading and smooth AR viewing on Apple devices. It’s a niche use case, but it’s worth mentioning if your goal is to create 3D assets for AR shopping or iOS apps.
The biggest mistake new exporters make is using a general-purpose format when a specialized format would do a better job. You don’t need to export a 3D print as an FBX, and you don’t need to export an animated character as an STL. Matching the format to your end goal eliminates 90% of common export problems before they start.
To give you a quick reference for common projects, here’s a cheat sheet for picking the right format:
- 3D printing: STL
- Sharing a static textured model: OBJ or GLB
- Game engine asset (static or animated): GLB or FBX
- Web embedding or Sketchfab upload: GLB
- AR/VR project: GLB or USDZ
- Exchange between Autodesk products: FBX
Step-by-Step Export Walkthrough for Common Formats
Now that your model is prepped and you’ve picked the right file format, let’s walk through the export process for the three most common use cases. These step-by-step instructions work for Blender 3.0 and newer, which includes all current stable versions of the software as of 2024.
Exporting a GLB/GLTF Model
GLB is the most popular format for modern 3D work, so we’ll start here. Follow these steps for a trouble-free export:
- From the top left menu, click File > Export > glTF 2.0 (.glb/.gltf).
- In the left-hand export settings panel, under Format, select glTF Binary (.glb) for a single file. Select glTF Separate (.gltf + .bin + textures) only if you need to edit the texture files separately after export.
- Under the Include section, check Selection Only if you only want to export your selected object rather than the entire scene. Uncheck this if you want to export all visible objects in the scene.
- Check Pack External under the Data tab to embed all texture images directly into the GLB file. This ensures your textures won’t go missing when you share the file with others or import it into other software.
- If you’re exporting animations, check the Animations and Shape Keys boxes under the Include section to export that data. Leave them unchecked for static models to reduce file size.
- Choose your export location and file name, then click Export glTF to finish.
For most use cases, the default GLB export settings work perfectly. If you’re exporting for a game engine, you can leave the default transform and geometry settings unchanged – Blender handles coordinate system conversion automatically for GLB.
Exporting an FBX Model for Animation or Games
FBX export has a few more settings to pay attention to, especially for rigged animated models. Follow these steps:
- Click File > Export > FBX (.fbx).
- Under the Include section, check Selection Only if you’re exporting a single selected object. If you’re exporting a full rig including the armature, make sure both the mesh and the armature are selected before exporting, or leave Selection Only unchecked to export all visible objects.
- Under the Transform section, check that Forward is set to -Z Forward and Up is set to Y Up. This matches the coordinate system used by most game engines and Autodesk software, preventing your model from importing rotated incorrectly. If you’re exporting to Unity, this setting works perfectly; for Unreal Engine, some users prefer to adjust the up axis to Z Up, but most modern import pipelines auto-correct this difference.
- Under the Geometry section, check Apply Modifiers to make sure all modifiers (like subdivision surface or solidify) are baked into the exported geometry. Uncheck this only if you want the modifiers to remain editable when the model is imported into another Blender project.
- For materials and textures, check Pack Textures to embed image data into the FBX file.
- For animated or rigged models, check Bake Space Transform under the Armature section to ensure bone transforms import correctly. Also check Export Armature and Export Animations to include that data.
- Choose your save location and click Export FBX to complete the process.
Exporting an STL for 3D Printing
STL export is the simplest of the three, but there’s one key setting to get right for high-quality prints:
- Click File > Export > STL (.stl).
- Check Selection Only to export your selected model, not the entire scene.
- Under Geometry, adjust the Scale if needed to match the size your slicer expects. If you applied transforms earlier, your model will already be the correct size, so you can leave scale set to 1.0.
- The most important setting is Selection Only (to avoid exporting extra geometry) and Apply Modifiers, which ensures any modifiers like subdivision surface are included in the exported mesh. If you have a 0.2mm tolerance for your model, the default STL tolerance setting of 0.001 works well for most consumer 3D printers; you only need to adjust this if you’re working on a high-precision industrial project.
- Click Export STL to finish.
Troubleshooting Common Export Issues
Even with careful preparation, you might run into issues when importing your exported model into another program. Here are the most common problems and how to fix them quickly.
Missing Textures or Materials
The most common issue after export is textures that don’t show up when you import the model. This usually happens because textures weren’t packed into the exported file, or file paths are broken. For GLB and FBX exports, always check the Pack External or Pack Textures box before exporting. If you’re using a format that requires separate texture files (like OBJ or separated GLTF), make sure you keep the texture files in the same folder relative to the main 3D file when you move it between computers or share it. If you’re uploading to a platform like Sketchfab, you can also pack your textures into a ZIP file along with the model to avoid broken paths.
Model Is the Wrong Size or Rotated Incorrectly
If your model imports as tiny, giant, or flipped upside down, the issue is almost always unapplied transforms or incorrect coordinate system settings. First, go back to your Blender file, select the model, apply all transforms (Ctrl+A > Location, Rotation, Scale), then re-export. If that doesn’t fix it, double-check your forward and up axis settings for your file format. For FBX, the default -Z Forward, Y Up works for 90% of use cases, but some game engines require different settings – check the documentation for your destination software to confirm the correct axis orientation.
Broken Geometry or Non-Manifold Errors
If your 3D slicer throws a non-manifold error, or your game engine shows holes in your mesh, you missed some bad geometry during pre-export preparation. Go back to Blender, enter Edit Mode, use Select > Select Non-Manifold to highlight the problem areas, then fix the geometry by deleting extra faces, merging overlapping vertices, or reconnecting disconnected edges. For 3D printing, you can also use Blender’s 3D Print Toolbox add-on (enabled in Preferences > Add-ons) to automatically check for common print-related geometry errors.
File Is Too Large
If your exported file is much larger than you expected, it’s usually because you included extra unused data. Double-check that you’re only exporting selected objects, not the entire scene, and that you haven’t included unused textures or animation data you don’t need. For high-poly models, you can also reduce polygon count using Blender’s Decimate Modifier before export to reduce file size without losing too much detail, especially for web or game use where polygon budgets are limited.
Animation Or Rigs Won’t Import Correctly
If your rigged animated model imports without working animations, double-check that you checked the Export Animations and Export Armature boxes in your export settings. For FBX, make sure you selected both the mesh and the armature before exporting if you’re using Selection Only mode. Also, check that your bone rotations are applied correctly in Blender – if you transformed the armature in Object Mode without applying transforms, that can cause issues with bone positioning in other software. For GLB exports, make sure your animations are properly marked as active in the NLA Editor, as Blender only exports detected active animations by default.
Best Practices for Consistent, Reliable Exports
Beyond the step-by-step process, following these best practices will help you avoid issues and create export-ready models every time:
Save a working Blender file before exporting: Always save your .blend project file before exporting. That way, if you need to make changes later, you have the original editable file to go back to. It’s good practice to keep your original Blender files archived even after you export the final model, in case you need to adjust something down the line.
Test your export: Before sending the model to a client or importing it into your final project, do a quick test import into a blank scene in Blender or your destination software. This takes 30 seconds and will catch any issues before they cause problems in your workflow. For example, if you’re exporting a 3D print, load the STL into your slicer before you start printing to confirm it looks correct.
Use consistent naming: Name your objects and materials clearly before exporting. Avoid spaces and special characters in names, as some external software doesn’t handle these correctly. For example, name your character player_character instead of Player Character 1!@# to avoid import errors.
Adjust for your target polygon budget: If you’re exporting for a game engine or web use, make sure your polygon count matches the requirements of your project. A 10 million polygon sculpture might look great in Blender, but it will crash a web browser or mobile game when imported. Use Blender’s Decimate Modifier or the RetopoFlow tool to create a lower-poly version of high-poly models for real-time use.
Use batch export for multiple assets: If you need to export multiple models from a single Blender project, you can use Blender’s built-in batch export add-on or a community add-on like Batch Export to automate the process. This saves time and ensures consistent settings across all your exports, which is especially useful for game asset packs.
Conclusion
Exporting a 3D model from Blender doesn’t have to be complicated. By following a consistent workflow – cleaning up your geometry first, choosing the right file format for your end use, double-checking your export settings, and testing your final file – you can avoid almost all common export issues. The key is to remember that export is not just the final step of your Blender work: it’s the first step of your next workflow, whether that’s 3D printing, game development, web embedding, or sharing with a client. Taking the time to do it right ensures your model looks and works exactly as you intended, no matter where you use it next.
As you gain experience, you’ll develop your own preferences for file formats and settings based on your specific workflow, but the core principles we covered here apply to every project. Start with a clean model, match the format to your use case, and test before you share, and you’ll be exporting perfect 3D models from Blender every time.