
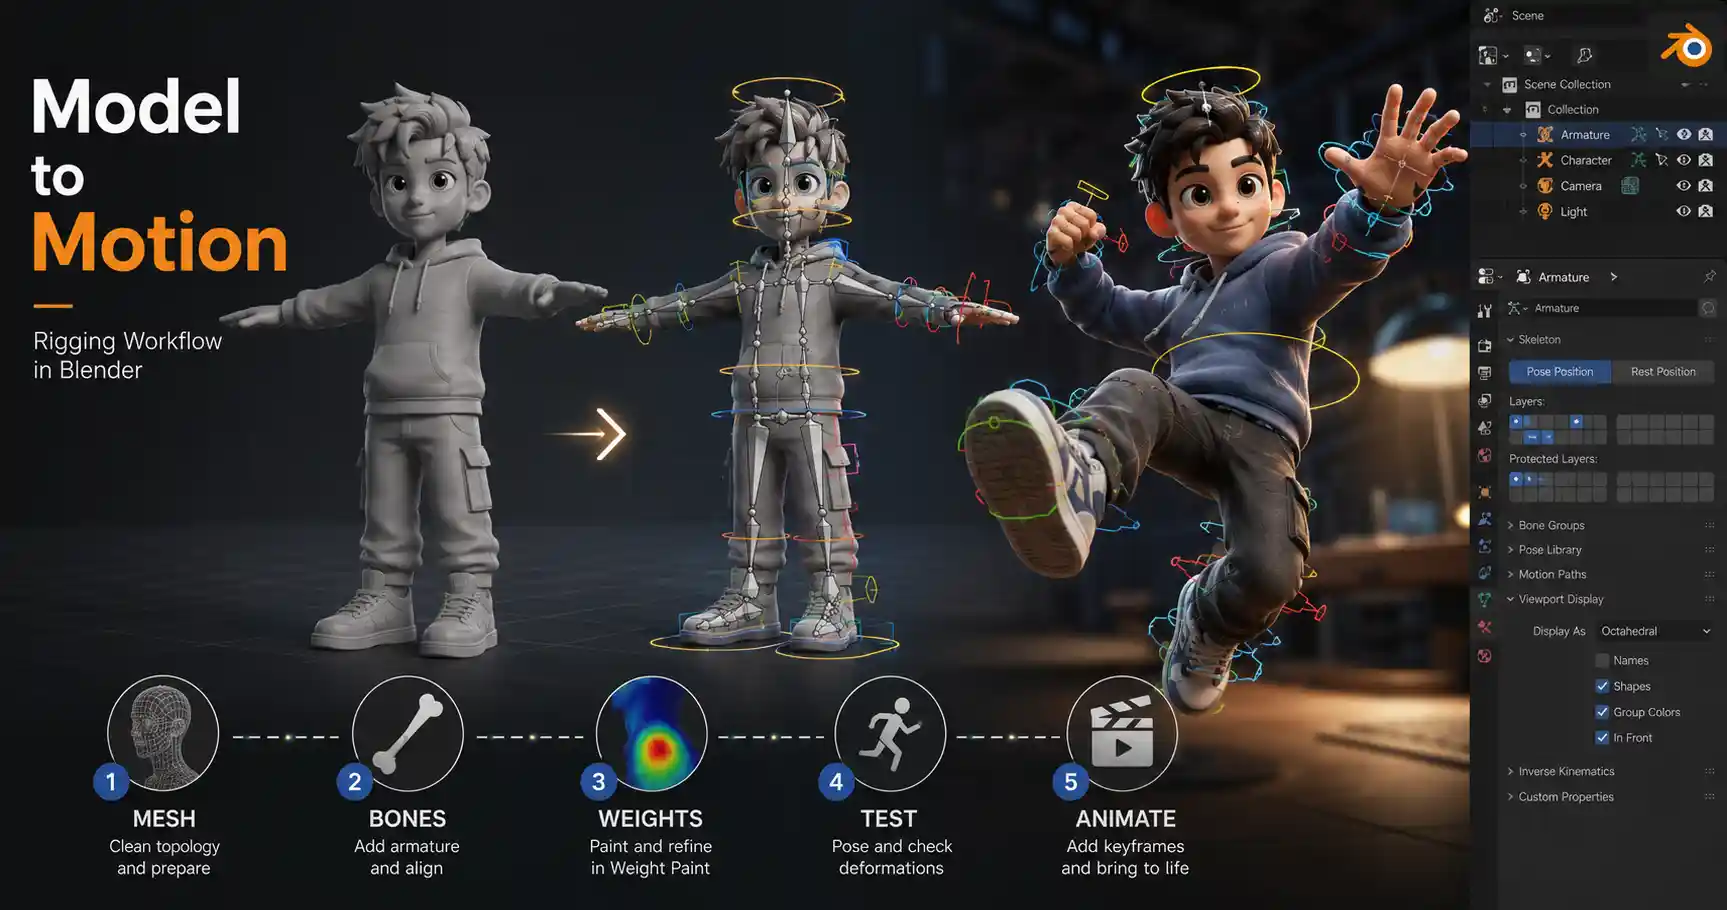
If you’ve ever created a 3D model in Blender and wondered how to turn a static shape into a character that can walk, wave, or make facial expressions, you’ve come to the right place. Rigging is the invisible backbone of every animated 3D object: it’s the process of adding an internal skeleton and controls that let you pose and move your model without distorting its shape. Whether you want to animate a game character, a talking creature for a short film, or even a movable chair for architectural visualization, learning to rig correctly in Blender will turn your static creations into dynamic, usable assets. This step-by-step guide walks you through every core stage of the process, from preparation to final weight painting, so you can rig any model with confidence.
Preparing Your Model for Rigging
Before you add a single bone to your project, good preparation will save you hours of frustrating fixes later on. Rigging a messy, unoptimized model is like trying to build a house on an unlevel foundation: no matter how good your framing is, the final result will be unstable. Blender has a few built-in tools to clean up your geometry and make the weighting process much smoother.
Check Geometry and Topology
Topology—the arrangement of polygons in your model—directly impacts how well your mesh deforms when you move bones. For organic models like characters, you want edge loops that follow the natural flow of muscles and joints. Areas that bend a lot, like shoulders, elbows, knees, and the waist, need extra edge loops to maintain a smooth shape when posed. If you have too few edges, the joint will pinch or collapse when you bend it; too many, and you’ll slow down your workflow and complicate weight painting.
Common issues to fix at this stage include non-manifold geometry (edges connected to more or fewer than two faces), loose vertices, and overlapping faces. Blender’s 3D Print Toolbox add-on has a handy "Make Manifold" tool that can automatically fix many of these issues, but you should always check manually by enabling "Overlay > Statistics" in the Viewport to see your vertex and face count. For most game or animation characters, keep polygon counts reasonable—between 10,000 and 50,000 triangles for a base character is more than enough for good deformation.
Apply Scale and Rotations
One of the most common mistakes new riggers make is forgetting to apply object transforms before adding an armature. If your model has non-uniform scale (for example, if you stretched it along the X-axis to make it wider without applying the change), your weights will be distorted and your bones won’t move correctly when you animate. To fix this, simply select your mesh object, go to the Object menu, hover over "Apply", and select "All Transforms". This will reset your scale, rotation, and location to their default values while keeping your model’s shape intact.
Separate Objects for Independent Movement
If your model has parts that need to move independently of the main body—like a pair of glasses, a sword on a belt, or a separate ponytail—you should separate these into their own objects before rigging. You can then parent them to the appropriate bone later, so they move with the body naturally. To separate a part, enter Edit Mode, select the faces that make up the separate object, press P (the separate shortcut), and choose "Selection". Give each new object a clear name so you can find it easily later.
Adding and Aligning the Armature
Once your model is prepared, the next step is to create the armature: the collection of bones that will act as your model’s skeleton. Blender offers several ways to create an armature, from building it bone by bone to auto-generating one for a humanoid character. The right approach depends on what you’re rigging.
Auto-Rigging With Rigify for Humanoids
For standard humanoid characters, Blender’s built-in Rigify add-on is a game-changer. It lets you generate a fully rigged, production-ready armature with customizable controls in minutes, instead of spending hours building bones from scratch. To use it, first enable the add-on by going to Edit > Preferences > Add-ons, searching for "Rigify", and checking the box to enable it.
The process for using Rigify is straightforward:
- Position your character in a default T-pose (arms outstretched to the sides, palms facing down, legs shoulder-width apart) or A-pose (arms slightly down from the T-position) – Rigify works well with both, but a clear neutral pose makes alignment easier.
- Add a basic meta-rig from the Add > Armature > Human (Meta-Rig) menu. This is a low-resolution preview skeleton that you align to your character.
- Enter Pose Mode for the meta-rig and adjust each bone to match the proportions of your character. Move the head bone to fit inside your character’s head, adjust the spine length to match the torso, and resize the arm and leg bones so their ends line up with the wrists, ankles, and fingers.
- Once aligned, go to the Armature properties tab, find the Rigify section, and click "Generate". Blender will automatically create a full rig with controls for movement, finger bending, and facial expressions.
Rigify is ideal for new riggers because it handles all the complex control setup automatically, but it’s also powerful enough for professional work. Most indie game developers and animators use it as a starting point for character rigs, only making small adjustments for unique character shapes.
Building a Custom Armature Manually
If you’re rigging something non-standard—like a four-legged animal, a snake, a mechanical arm, or a piece of furniture—you’ll need to build your armature manually. Building from scratch gives you full control over where bones go and how they move, which is essential for non-human shapes.
To start, add a new armature object (Add > Armature > Single Bone). Enter Edit Mode to start adding more bones: select the end of an existing bone, press E to extrude a new bone, and position it where you need it. For a dog, for example, you’d start with a root bone at the hips, add spine bones leading up to the neck and head, then extrude leg bones from the hips and shoulder blades, ending with toes.
Key tips for manual bone alignment:
- Always place bones inside your mesh. For joints like knees or elbows, place the beginning and end of the bone exactly at the joint pivot point, so the mesh bends correctly around it.
- Name every bone as you go. A bone called "Left_Thigh" is much easier to find later than "Bone.003". Blender will automatically mirror bone names if you enable X-Axis Mirror in the Armature Edit options, so you only need to build one side of a symmetric character.
- Use bone parenting to define your hierarchy. The root bone should be the parent of all other bones, so moving the root moves the entire character. Spine bones should be parented in order, so moving the upper spine bends the entire torso correctly.
The biggest mistake new riggers make when building a custom armature is adding too many bones. You only need as many bones as the movement you want to create. Extra bones just add complexity and slow down your animation workflow later.
Once your bones are placed and aligned, switch to Object Mode, select your mesh first then shift-select the armature, and press Ctrl+P to parent the mesh to the armature. Choose "With Automatic Weights" as a starting point—we’ll refine the weights later.
Weight Painting: Defining How Your Mesh Deforms
Parenting the mesh to the armature connects the two, but weight painting is what defines how much each vertex of your mesh is influenced by each bone. Every vertex has a weight value between 0 and 1: 0 means the bone doesn’t move it at all, and 1 means it moves 100% with the bone. Good weight painting is what makes a character bend smoothly instead of having weird "stretchy" areas or parts of the mesh that move when they shouldn’t.
Starting With Automatic Weights
When you parent your mesh to the armature with automatic weights, Blender does most of the initial work for you. It calculates which vertices should be influenced by which bones based on their proximity, so you don’t have to paint every single vertex from scratch. For clean, well-topologized models, automatic weights are often 80-90% correct, so you only need to fix small errors.
To check how good your automatic weights are, switch the armature to Pose Mode, select a few bones, and bend them into an extreme pose—for example, bend the elbow 90 degrees or lift the leg all the way up. This will immediately show you problem areas: vertices that stretch out, pinch, or move with the wrong bone.
Refining Weights With the Brush Tool
To enter Weight Paint Mode, select your mesh object, click the Mode dropdown in the top left corner, and select Weight Paint. Blender will color your mesh based on weight values: blue is 0 (no influence), red is 1 (full influence), and green and yellow are values in between. The default brush is a blend brush, which adds weight to the vertices you paint over.
Common weight issues and how to fix them:
- Shoulder or hip deformation: It’s common for the shoulder mesh to follow the upper arm bone when it’s lifted, pulling the chest out of shape. To fix this, select the chest bone, set your brush weight to 1, and paint the chest area to remove influence from the upper arm bone. Use a low brush strength (around 0.2-0.3) so you can gradually adjust the weight instead of making drastic changes in one stroke.
- Pinched joints: If your elbow or knee looks lumpy when bent, you probably don’t have enough weight on the surrounding vertices. Use the blur brush (switch brush type to Blur in the top toolbar) to smooth the transition between the upper and lower bone influences. Blurring weights creates a softer bend at the joint.
- Unintended movement: If part of your mesh (like a ponytail or the brim of a hat) moves when you move the head, that means those vertices have too much weight from the head bone. Select the correct bone (or the bone that that part should be parented to), set weight to 1, and paint over the moving area to assign it to the right bone.
Using the Weight Paint Tools for Efficiency
Blender has several built-in tools to speed up weight painting that most new users miss. The "Weight Gradient" tool lets you draw a smooth transition between two bones, which is perfect for spine areas or long limbs. The "Invert" selection tool lets you quickly swap weights between two bones if you’ve accidentally assigned area to the wrong one. For symmetric characters, you can enable "X Mirror" in the Weight Paint options, so any changes you make to the right side are automatically mirrored to the left side. This cuts your workflow time in half.
One pro tip: keep your brush size small when working around joints, and use the "Auto Normalize" option, which ensures that the total weight of all bones on any vertex adds up to 1. This prevents vertices from being over-influenced by multiple bones and keeps deformations clean.
Adding Controls and Final Adjustments
Once your weights are looking good and your mesh deforms smoothly, the next step is to add controls and fix any small issues to make animating easier. A good rig not only deforms well—it’s also intuitive for an animator to use.
Parenting Separated Objects
If you separated objects like glasses, jewelry, or hair pieces earlier, now is the time to connect them to the armature. To do this, select the separated object, go to the Object Properties tab, find the "Parent" option, and select "Armature Deform". Then, in the "Bone" dropdown, select the bone that the object should move with—for example, the head bone for glasses. When you move the head bone later, the glasses will move with it automatically. For objects that need to be controlled independently, you can add a small dedicated bone and parent the object to that bone instead.
Adding IK Constraints for Natural Movement
By default, when you move a bone in Pose Mode, only that bone moves. If you want to move the entire arm by positioning the hand, you need to add an Inverse Kinematics (IK) constraint. IK lets you pose a limb by moving the end bone (the hand or foot), and Blender automatically bends all the joints along the way, which is much faster than posing each bone individually.
To add an IK constraint to an arm:
- Select your armature, enter Pose Mode, and select the hand bone.
- Go to the Bone Constraints properties tab, click "Add Constraint", and select "Inverse Kinematics".
- Set the "Chain Length" to 2: this means the IK will affect the hand and the two bones above it (the forearm and upper arm), which is exactly what you need for a human arm.
- Create an empty IK control object (Add > Empty > Sphere) and position it at the hand. In the IK constraint settings, set the "Target" to your empty control object. Now when you move the empty, the arm bends correctly to follow the hand.
Repeat this process for the other arm and both legs—legs usually also use an IK constraint with a chain length of 2, so you can position the foot directly without bending each bone separately. For the spine, you can add a spline IK constraint to make bending the torso smooth and natural.
Testing Poses to Catch Errors
Before you consider your rig finished, test it with a range of extreme poses. Push the arms and legs as far as they’ll go, bend the spine in all directions, and rotate the head all the way side to side. This will reveal any weight painting issues that aren’t visible in a neutral or slightly bent pose. Common issues that pop up during testing include:
- Mesh tearing at the armpit or groin when the limb is raised
- Neck mesh stretching when the head is turned
- Finger vertices getting caught on the palm when the hand is closed
All of these are easy to fix by going back into Weight Paint Mode and adjusting the weights around the problem area. It’s much better to catch these issues now than when you’re halfway through animating a scene.
Troubleshooting Common Rigging Problems
Even experienced riggers run into issues, so knowing how to fix the most common problems will save you a lot of time. Here are the problems that pop up most often, and how to solve them:
My mesh is distorted when I move a bone: This is almost always a weight painting issue. Check if vertices near the bone are assigned to the wrong bone, or if the transition between two bones is too sharp. Use the blur brush to smooth the weights, and make sure your topology has enough edge loops at the joint.
Automatic weights didn’t work correctly: If you get a lot of weird weight assignments after automatic weights, the most common cause is that you didn’t apply scale to your mesh before parenting. To fix this without starting over, select your mesh, apply all transforms, then go back to the armature modifier and click "Update Automatic Weights".
My Rigify generated rig has bad deformations: If your Rigify rig’s shoulders or hips are distorted, that means your meta-rig bones weren’t aligned correctly with your mesh. Go back to the meta-rig, adjust the bone positions, and regenerate the rig. It’s worth taking an extra 10 minutes to align the meta-rig perfectly—this makes all the difference in the final result.
Parts of my mesh are missing when I pose: If parts of your mesh disappear when you move a bone, you probably have flipped normals. Go into Edit Mode, select all vertices, and press Shift+N to recalculate normals outside. This will fix the invisible face issue.
Conclusion
Learning to rig in Blender takes practice, but it’s a skill that opens up endless possibilities for 3D creation. Whether you use Rigify for a quick humanoid rig or build a custom armature from scratch for a unique creature, the core process stays the same: prepare your geometry carefully, align your bones to match your model, refine your weights, and test your poses to catch errors. Start with simple models like a basic character or a movable chair before moving on to complex creatures with full facial rigs, and don’t get discouraged if your first few rigs have small issues—every rigger deals with bad deformations and weight errors when they’re starting out.
As you get more comfortable, you can start adding advanced features like facial rigs for lip-syncing, blend shapes for secondary movement, or custom control shapes to make animation even easier. With the free tools built into Blender, you don’t need expensive third-party software to create professional-quality rigs for games, animation, or 3D printing. The key is to take it step by step, and remember: a good rig is invisible to the audience—it just lets the character’s performance shine through.