
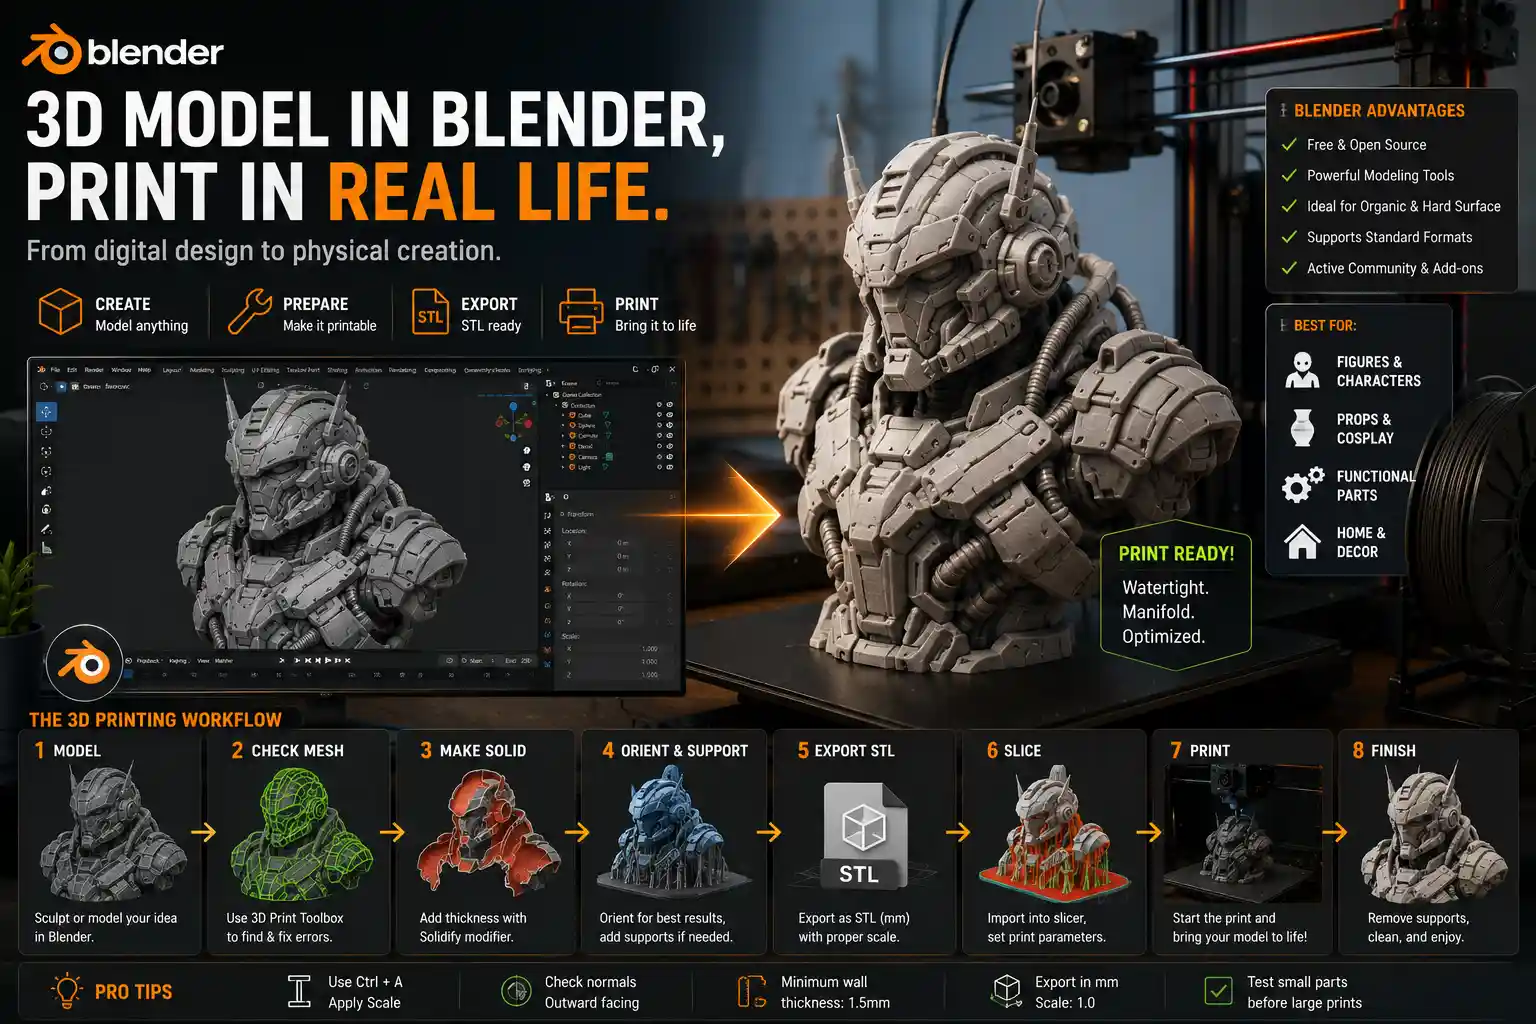
If you’ve ever spent hours sculpting a character, designing a custom robot part, or modeling a unique home decor piece in Blender, you’ve probably wondered: can this digital creation make the jump to the physical world with a 3D printer? Blender is best known as a free, open-source tool for animation, visual effects, and game design, but its 3D modeling capabilities are powerful enough to rival paid CAD software used by professional designers. The short answer is yes, you absolutely can 3D print models made in Blender—but the process requires more than just clicking “print.” Let’s break down everything you need to know to turn your Blender creations into tangible, 3D printed objects.
Understanding Blender’s Role in the 3D Printing Workflow
Before diving into the step-by-step process, it’s important to clarify where Blender fits into the typical 3D printing pipeline. Unlike purpose-built CAD (Computer-Aided Design) tools such as AutoCAD, Fusion 360, or SolidWorks, Blender was originally built for polygon modeling rather than parametric engineering design. This fundamental difference shapes how you prepare your models for printing, but it doesn’t make Blender any less capable of producing printable files.
What Blender does well for 3D printing
Blender’s strength lies in organic, free-form modeling. If you want to 3D print a custom action figure, a sculpted vase, a cosplay prop, or a one-of-a-kind art piece, Blender’s sculpting tools, retopology options, and mesh editing features are perfect for the job. It also supports importing and editing existing models from other sources, so you can tweak downloaded STLs or adjust designs from CAD software before sending them to print. Best of all, it’s completely free to use, even for commercial projects, making it accessible to hobbyists and small business owners who don’t want to pay for expensive CAD subscriptions.
Limitations to keep in mind
Where Blender falls short for some use cases is in parametric design. If you’re creating a functional part that needs precise, adjustable dimensions—such as a gear that needs to mesh with an existing set, or a bracket that fits a specific electronic component—Blender’s non-parametric workflow can be less convenient than tools like Fusion 360. Changing a single dimension in Blender often requires manually editing the mesh, whereas parametric tools update the entire model automatically when you adjust a measurement. That said, Blender does support precision measurement and dimensioning with add-ons, so it’s still possible to create accurate functional parts with a little extra work.
Another common misconception is that Blender can’t export the files 3D printers need. In reality, Blender supports all the standard file formats used in 3D printing, including STL and OBJ, which are the most widely accepted by slicer software and 3D printing services. The real work isn’t exporting the file—it’s making sure your model is actually printable before you export it.
Preparing Your Blender Model for 3D Printing: Step-by-Step
The biggest mistake new Blender users make when trying to 3D print is exporting their model immediately after finishing the design. 3D printers require a manifold mesh—a closed, watertight surface with no holes, overlapping faces, or reversed normals—to generate a valid toolpath. Even a tiny error in your mesh can cause your slicer to crash, produce a malformed print, or result in a finished object that’s full of gaps. Follow these steps to prepare your model correctly:
- Check your model’s dimensions and units
Start by making sure your model is the correct size for your printer and your use case. Blender defaults to generic “blender units,” which can be confusing when you need real-world measurements like millimeters or inches. Go to the Scene Properties panel, set your units to metric or imperial, and use the Measure tool to confirm all key dimensions match what you need. Don’t forget to check that your model fits within the build volume of your 3D printer—most consumer FDM printers have a build volume between 220x220x250mm, so large models will need to be split into multiple parts later.
- Fix common mesh errors
Next, inspect your mesh for errors that will break the 3D printing process. Blender has built-in tools to find and fix most issues:
- Use the 3D Print Toolbox add-on (pre-installed with Blender, just enable it in the Preferences panel) to run an automatic check for non-manifold edges, disconnected faces, overlapping geometry, and zero-area faces.
- Fix reversed normals (faces that point inward instead of outward) by selecting all faces, going to the Normals menu, and clicking “Recalculate Outside.”
- Fill any small holes in your mesh with the “Make Manifold” tool or the Fill Hole command for larger gaps.
- Ensure your model is watertight
A watertight mesh is non-negotiable for 3D printing. If your mesh has any gaps or open edges, your slicer won’t be able to tell where the inside and outside of your model are, leading to broken prints. The 3D Print Toolbox will highlight any non-watertight areas, but you can also do a manual check by entering Edit Mode, selecting all edges, and using the “Select Non-Manifold” command to highlight problem edges. Fix these by merging duplicate vertices, connecting loose edges, or filling open holes.
- Add thickness to solid models
One of the most common mistakes new Blender users make is exporting a model that’s just a hollow surface with no thickness. 3D printers can’t print zero-thickness objects, so you need to give your mesh volume. For solid objects, you can use the Solidify modifier in Blender to add a consistent thickness to your model. For functional prints, 1.5-2mm thickness is standard for most FDM printers. If you’re creating a hollow object like a vase, make sure the wall thickness is at least 1.2mm to prevent it from being too fragile.
- Add and position supports if needed
While most slicers add automatic supports to overhangs, you can save time by adding custom supports directly in Blender, especially for complex organic models. This is especially useful if you need to add custom support structures that don’t damage delicate parts of your print. Blender’s Add Mesh menu has built-in support generator add-ons, or you can model custom supports manually to fit your specific model.
“The difference between a good 3D print and a failed one almost always comes down to mesh preparation, not the software you used to model it. I’ve seen perfect prints from Blender models and terrible prints from expensive CAD software—attention to detail during prep matters more than the tool itself.”
This quote from Joris van Tubergen, a 3D printing educator and Blender community contributor, highlights a core truth: Blender is only as good as the work you put into preparing your model. Taking 10 extra minutes to check for mesh errors can save you hours of failed prints and wasted filament.
Exporting Your Blender Model for 3D Printing
Once your model is fully prepared, the next step is exporting it in a format your slicer or 3D printing service can read. The two most common formats for 3D printing are STL and OBJ, and Blender supports both natively.
Which file format should you use?
STL is the industry standard for 3D printing, and it’s what most consumer 3D printers, slicers, and online printing services expect. It stores only the surface geometry of your model, which keeps file sizes small and compatible with almost every 3D printing workflow. OBJ is a more flexible format that supports texture and color information, which is useful if you’re using a multi-color 3D printer, but for most single-color FDM or resin prints, STL is the better choice.
How to export an STL from Blender
Exporting an STL from Blender is straightforward once your model is ready:
- Select the object you want to export in Object Mode. If you have multiple objects that make up one print, you can join them into a single mesh by selecting all of them and pressing Ctrl+J.
- Go to File > Export > Stl (.stl).
- Check the export options in the right-hand panel: make sure “Selection Only” is checked if you only want to export the selected object (this avoids exporting the default camera, light, and other scene objects that you don’t want to print). You can also adjust the scaling to match your unit settings—if you set your scene to millimeters, keep scaling set to 1.0 to export the correct size.
- Name your file and click Export STL.
Testing your exported file
Before you load your STL into your slicer, it’s a good idea to check it in a free STL viewer like MeshLab or ViewSTL to make sure it looks correct. This will catch any obvious errors like missing parts or incorrect scaling that you might have missed in Blender. Many online 3D printing services also have an automatic STL checker that will flag errors before you send your file to print, which is an extra layer of protection for first-time prints.
If you’re splitting a large model into multiple parts to fit your printer’s build volume, you can do this directly in Blender using the Boolean modifier to cut the model into separate pieces, then export each piece as a separate STL. Just remember to add alignment notches to the cut edges so you can glue the parts together accurately after printing.
Common Challenges and How to Solve Them
Even with careful preparation, you may run into issues when 3D printing Blender models. Most of these issues are easy to fix once you know what causes them. Here are the most common problems and practical solutions:
Non-manifold mesh errors
Non-manifold edges are the number one cause of failed slicer imports when printing Blender models. This happens when edges are connected to more than two faces, or when there are gaps in the mesh that leave an open edge. If Blender’s built-in 3D Print Toolbox can’t fix the error automatically, try these steps:
- Zoom in on the highlighted non-manifold edge and check for duplicated vertices. Merge any overlapping vertices with the “Merge By Distance” tool.
- Delete any stray faces or disconnected parts of the mesh that you aren’t printing—these often cause errors even if they’re far from your main model.
- For complex sculpted models, use the “Remesh” modifier to rebuild the mesh into a clean, watertight volume before exporting.
If all else fails, import your STL into MeshMixer and use the “Inspector” tool to automatically fill holes and fix non-manifold geometry in one click.
Incorrect scaling and size
It’s surprisingly common to export a Blender model that ends up being 10 times bigger or smaller than you intended, thanks to Blender’s default unit settings. To avoid this, always double-check your dimensions after exporting by importing the STL back into Blender or into your slicer and measuring it. If the size is wrong, you can adjust the scaling in your slicer, but it’s better to fix it in Blender first to avoid any scaling artifacts. A good rule of thumb is to always set your scene units to millimeters before you start modeling—this matches the default unit settings used by almost all 3D printing software, so it eliminates scaling confusion.
Thin walls or fragile parts
When you add thickness with the Solidify modifier, it’s easy to accidentally set the thickness too low, especially for complex organic shapes. Thin walls will print flimsy and may even break during the printing process. If you notice gaps in your model when you view it in the slicer, go back to Blender and increase the solidify modifier thickness to at least 1.2mm for FDM prints, or 0.8mm for resin prints (which can print thinner details more reliably). For functional parts that need to hold weight, increase the thickness to 2-3mm for durability.
Overhangs and layer separation
Blender models with lots of organic curves often have steep overhangs that require supports. If you don’t add supports (or your slicer’s automatic supports miss key areas), you’ll get drooping filament or failed layers. To fix this, either add custom supports directly in Blender or adjust your slicer’s support settings to add supports to any overhang steeper than 45 degrees. For very delicate overhangs, you can also model chamfers directly in Blender to reduce the overhang angle and eliminate the need for extra supports.
Large models that don’t fit the build volume
If your model is too big for your 3D printer’s build volume, splitting it into multiple parts in Blender is the most efficient solution. Use the Boolean Modifier to cut the model along clean lines, then add small alignment pins and notches to the cut edges so you can glue the parts together accurately after printing. This is far easier than splitting the model in your slicer, because you can hide the cut lines in natural seams of the model—for example, between the limbs of a character or along the edge of a sculpted vase.
Best Practices for Great 3D Prints from Blender
Beyond fixing errors, following these best practices will help you get consistent, high-quality 3D prints from your Blender models:
- Start with a low-poly base for sculpts If you’re creating an organic sculpt, start with a simple low-poly base mesh before you add high-resolution details. This makes it easier to retopologize the final model and get a clean, watertight mesh for printing, rather than trying to fix a messy high-poly sculpt at the end.
- Use the Decimate modifier for high-poly models Extremely high-poly models with millions of faces can crash your slicer or slow down your 3D printing workflow. Use the Decimate modifier in Blender to reduce the polygon count while preserving detail—most consumer 3D printers don’t need more than 500,000 faces for a high-quality print, so reducing the poly count won’t affect the final result.
- Use Blender add-ons to streamline prep There are several free and paid Blender add-ons that make 3D printing preparation much faster. The built-in 3D Print Toolbox is great for beginners, while add-ons like 3D Print Toolkit, Meshtools, and BoolTool add extra functionality for repairing meshes, splitting models, and checking printability without leaving Blender.
- Do a test print of small parts first If you’re printing a large, complex model, print a small test section first to check the size, fit, and printability. This saves you from wasting hours and filament on a full-size print that has errors you could have fixed easily.
- Design for your 3D printer type FDM printers can handle larger, thicker parts well, while resin printers produce much finer details. If you’re printing a small detailed miniature on a resin printer, you can keep thinner walls and smaller details in Blender that would be impossible to print on an FDM printer. Adjust your model’s detail level to match your printer’s capabilities.
Many professional 3D artists and product designers now use Blender as their primary tool for 3D printable design, especially for custom art and consumer products. For example, cosplay creators regularly design full armor sets and props in Blender, split them into printable parts, and print them on consumer FDM printers with great results. Independent jewelry designers also use Blender to sculpt custom designs for resin 3D printing, taking advantage of the flexible sculpting tools to create unique pieces that would be hard to model in parametric CAD.
Conclusion
Blender is more than capable of producing high-quality, 3D printable models, whether you’re a hobbyist creating a custom cosplay prop, an artist 3D printing your own sculptures, or a designer prototyping a new product. The key to success is understanding Blender’s strengths and limitations, taking the time to prepare your mesh correctly, and fixing common errors before you export your file. Unlike expensive CAD software, Blender’s free price tag and powerful organic modeling tools make it the perfect choice for anyone who wants to create custom 3D printed objects without a big investment in software.
If you’re new to 3D printing from Blender, start with a simple model to practice the preparation and export process before moving on to more complex designs. With a little practice, you’ll be able to turn any Blender creation into a physical 3D printed object, opening up a whole new world of possibilities for your projects.