
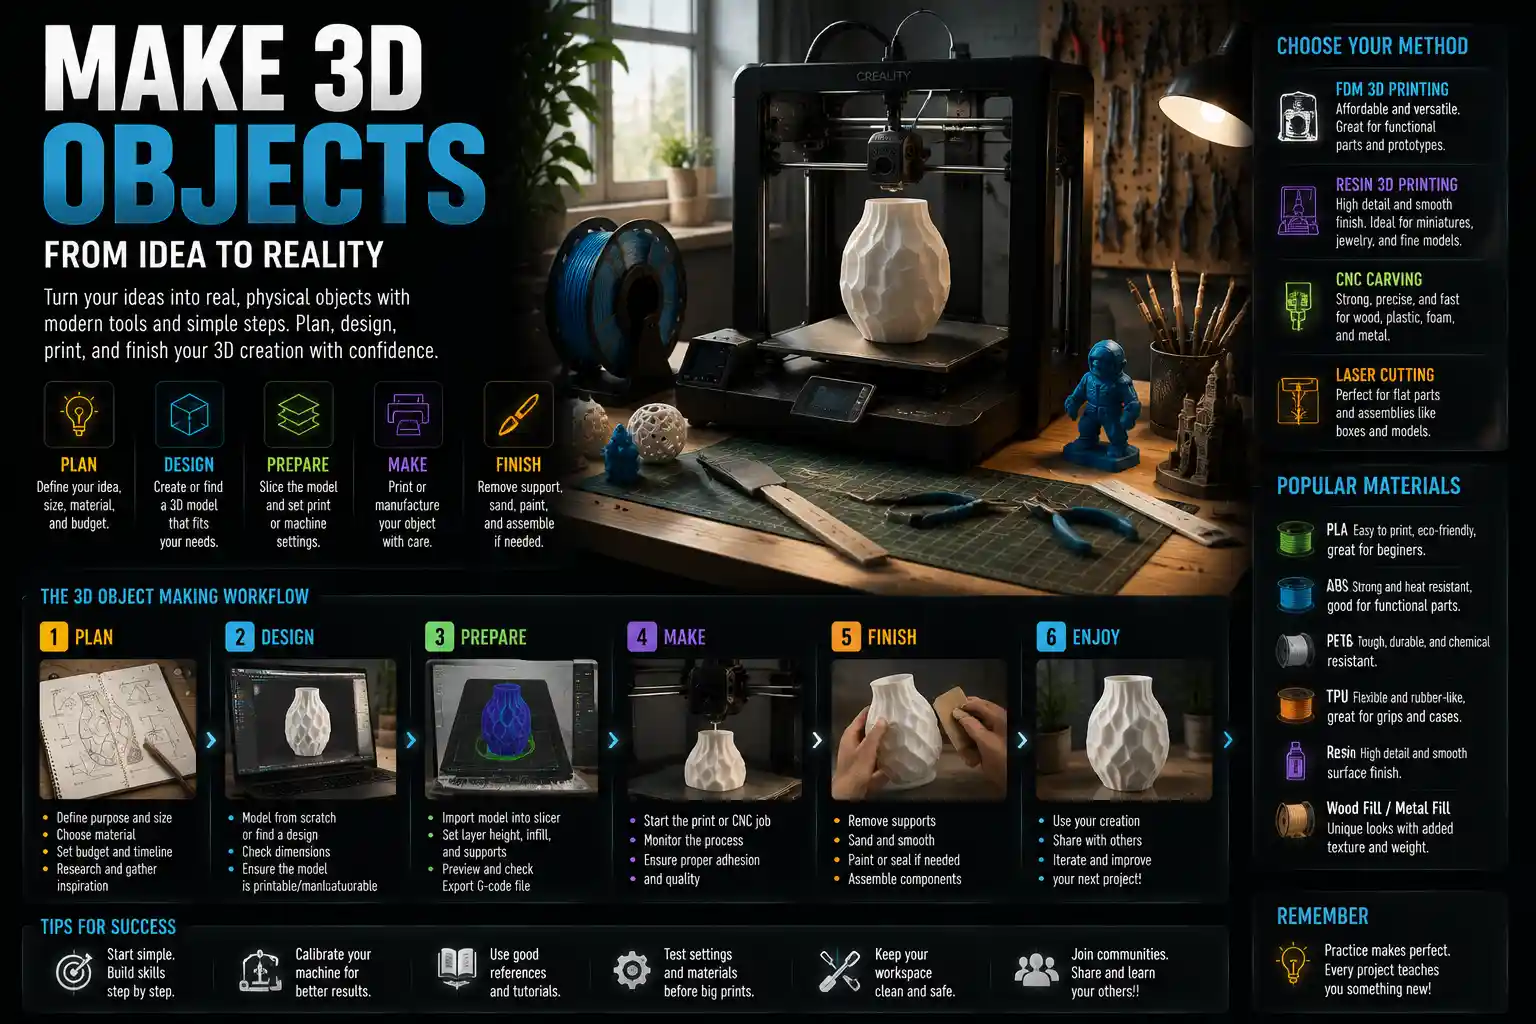
Whether you want to prototype a new product, create custom home decor, design a cosplay prop, or bring a digital character to life, making 3D objects has never been more accessible to hobbyists and professionals alike. Not long ago, 3D manufacturing required industrial machinery and six-figure budgets, but today, affordable consumer tools and free software open the door for anyone to turn an idea into a tangible physical object. This guide walks you through every stage of the process, from planning your design to finishing your final 3D object, regardless of your experience level.
Plan Your 3D Project and Choose the Right Method
Before you open a 3D modeling program or turn on a machine, the first step to making a great 3D object is planning your project and selecting the manufacturing method that matches your goals, budget, and timeline. Not all 3D objects are created equal: a small plastic keychain requires a different approach than a full-size wooden bookshelf, and a one-of-a-kind art sculpture has different needs than a batch of 100 custom parts for a small business.
Define Your Project Requirements
Start by answering a few core questions to narrow down your options. First, what size is your finished object? Consumer 3D printers typically have a maximum build volume of around 30x30x30cm, so anything larger will require printing in multiple parts or using a different method like CNC carving or woodworking. Second, what material do you need? Do you need durable plastic for a functional part, flexible rubber for a grip, solid metal for a tool, or wood for furniture? Third, what is your budget? Entry-level 3D printers start at under $300, while industrial CNC machines can cost thousands, and online 3D printing services let you pay per object without owning any equipment at all. Finally, what level of detail do you require? Intricate organic models like character sculptures need a method that can capture fine curves and small features, while simple structural parts only need basic accuracy.
Compare Common 3D Object Making Methods
The three most popular approaches for making 3D objects today are additive manufacturing (3D printing), subtractive manufacturing (CNC carving/laser cutting), and hybrid/hand crafting. Each has distinct advantages for different use cases:
- Fused Deposition Modeling (FDM) 3D Printing: The most affordable entry-level option, FDM melts plastic filament and layers it to build your object. It works best for functional parts, prototypes, and larger objects, and it supports a wide range of materials from standard PLA plastic to durable ABS, flexible TPU, and even wood-filled or carbon fiber composites. The main downside is that layer lines can be visible on the finished surface, so it requires more sanding and finishing for smooth results.
- Resin 3D Printing: A type of additive manufacturing that cures liquid resin with UV light to create extremely high-detail objects. Resin printers can produce smooth surfaces and capture features as small as 0.1mm, making them ideal for miniatures, jewelry, figurines, and molds. They are generally more expensive than entry-level FDM printers, and resin is more costly per part than filament.
- CNC Carving: A subtractive method that starts with a solid block of material and cuts away excess to create your 3D shape. CNC works with wood, metal, plastic, foam, and stone, and it produces solid, strong parts with a natural material finish. It is faster than 3D printing for large solid objects, but it cannot produce the same intricate internal geometries as 3D printing.
- Laser Cutting: Best for 2D profiles that you assemble into 3D objects, like wooden puzzles, box joins, and architectural models. It is extremely fast and accurate for flat-panel 3D projects, but it cannot create fully solid 3D shapes on its own.
For most beginners starting their first project, FDM 3D printing is the best all-around choice due to its low entry cost, versatility, and large community of users who share tips and troubleshooting advice. If you only need to make one or two objects and don’t want to buy your own machine, online services like Shapeways, Sculpteo, or local makerspaces let you upload your design and pay to have it made without any equipment investment.
Create or Source a 3D Model
Every digital manufacturing method for 3D objects relies on a digital 3D model to tell the machine what to make. Whether you design your own model from scratch or use a pre-made design from a community library, this step is where you turn your idea into a set of instructions for production.
Option 1: Design Your Own 3D Model
Designing your own model gives you full creative control over your object, and modern software options make it accessible even for first-time designers. The best software for you depends on your project type and budget:
- Beginner-friendly free options: Tinkercad is a browser-based tool from Autodesk that uses simple shape building blocks, making it perfect for beginners learning the basics of 3D design. It’s ideal for simple objects like keychains, nameplates, and boxes. Blender is a free, open-source tool for organic 3D modeling, perfect for character models, art sculptures, and curved shapes. It has a steeper learning curve than Tinkercad, but there are thousands of free tutorials online to help you get started.
- Professional free options: FreeCAD is an open-source parametric modeling tool great for engineering parts, functional objects, and projects that require precise measurements. Fusion 360 offers a free license for hobbyists and is one of the most popular tools for both industrial design and organic modeling, with built-in tools for 3D printing preparation and collaboration.
- Quick modern options: Canva 3D and Shapr3D offer intuitive, touch-friendly interfaces for beginners, with Shapr3D working seamlessly on iPads for on-the-go design.
When designing your model for 3D printing, keep a few basic rules in mind to avoid print failures. Overhangs (parts of the model that stick out horizontally without support below them) steeper than 45 degrees will typically require support material to print correctly. If you want to avoid using supports, design your model to minimize steep overhangs, or orient the model differently when you prepare it for printing. Also, all 3D printers have a minimum wall thickness, usually between 1.2mm and 2mm, so make sure your walls are thick enough to avoid being too fragile. For functional parts that need to hold weight, increase wall thickness to 3mm or more for extra strength.
Option 2: Use a Pre-Made 3D Model
If you don’t want to design your own model from scratch, there are millions of free and paid 3D models available online that you can download, modify, and print. This is a great option for beginners who want to start making objects before learning advanced design skills, or for anyone who wants to make an object that already exists. Popular repositories for 3D models include:
- Thingiverse: The largest library of free, open-source 3D models, all uploaded by the community and free to download and use for personal projects
- MyMiniFactory: A mix of free and paid models, with a focus on miniatures, cosplay props, and art objects
- Cults3D: A popular marketplace for independent 3D designers, with thousands of high-quality paid and free models
- CGTrader: A marketplace for professional 3D models, suitable for both 3D printing and digital use
When downloading a pre-made model, always check the licensing terms to make sure you can use it for your intended purpose, especially if you plan to sell the finished object. Many designers allow non-commercial use for free, but require a license for commercial production.
Prepare Your Model for Manufacturing
Once you have your final 3D model, you need to prepare it for your chosen manufacturing method. For 3D printing, this process is called slicing. A slicer program takes your 3D model and cuts it into hundreds or thousands of horizontal layers, then generates a G-code file that tells your 3D printer how to move, how hot to heat the nozzle, and how fast to print. Popular free slicers include Cura, PrusaSlicer, and Bambu Studio, all of which come with pre-set profiles for most common 3D printers, so beginners can get good results without tweaking dozens of settings.
When slicing, you will need to make decisions about infill (the internal pattern that fills your object), layer height, and supports. Lower infill (10-20%) is fine for decorative objects and saves material, while functional parts that need strength should use 50-100% infill. Thinner layer heights (0.12mm) produce smoother, more detailed surfaces but increase print time, while thicker layer heights (0.28mm) print faster but have more visible layer lines. Most slicers can automatically generate supports for overhangs if needed, though you can manually adjust them to save material and reduce finishing work later.
For CNC carving, the preparation process is similar but uses different software to generate tool paths that tell the CNC bit where to cut. Programs like Fusion 360, VCarve, and Carbide Create have built-in tool path generation for CNC, with settings for different bit sizes and material types.
Produce Your 3D Object
Once your model is prepared and your G-code or tool path file is saved to an SD card or connected to your machine, it’s time to start producing your 3D object. The exact process varies depending on your method, but following best practices will help you avoid common mistakes and get a high-quality finished part.
3D Printing Step-by-Step
If you are using a consumer FDM 3D printer, follow these basic steps for a successful print:
- Level your build plate and apply a bed adhesive if needed. Most modern printers have automatic bed leveling, but it’s still important to make sure the nozzle is the correct distance from the bed (about the thickness of a sheet of paper) for the first layer. For PLA filament, common bed adhesives include glue stick, hairspray, or blue painter’s tape, to help the first layer stick and prevent warping.
- Load your filament and let the nozzle heat up to the correct temperature for your material. PLA typically prints at 190-210°C, while ABS prints at 230-250°C. Let the bed heat up to the correct temperature as well – PLA usually needs a bed temperature of 50-60°C.
- Start your print and watch the first layer closely. The first layer is the most important part of any print: if it doesn’t stick evenly to the bed, the entire print will fail. If you see spots where the filament isn’t sticking, or spots where the filament is too squished, pause the print and adjust the bed level before continuing.
- Let the print finish, then let the bed cool completely before removing your object. Most prints will pop off easily once the bed cools, especially if you have a flexible build plate. Forcing a hot print off the bed can damage the bed or break your object.
For resin 3D printing, the process is a bit different: after the print finishes, you need to wash the object in isopropyl alcohol to remove excess liquid resin, then cure it under UV light to harden the resin fully. Always wear nitrile gloves when handling uncured resin, as it can irritate skin.
CNC Carving Step-by-Step
For subtractive 3D objects made with a CNC machine, follow these core steps:
- Secure your raw material block to the CNC bed using clamps or double-sided tape. Make sure it is completely flat and firmly attached, because any movement during cutting will ruin your part. Double-check that the clamps are out of the way of the cutting bit’s path.
- Install the correct cutting bit for your material and project. Smaller bits create finer detail but cut slower, while larger bits cut faster but can’t capture small features.
- Set your X, Y, and Z zero points to tell the machine where the top-left corner and top surface of your material are. This is a critical step – an incorrect Z zero can result in the bit cutting too deep (and into your CNC bed) or not cutting deep enough.
- Start the cut and keep a close eye on the process, especially during the first pass. Have a fire extinguisher nearby if you are cutting flammable materials like wood, and never leave a CNC machine unattended while it is running.
- Once the cut is complete, turn off the machine, remove your part, and sand off any excess material or tool marks.
The difference between a good 3D object and a great 3D object is almost always in the finishing. Most people stop after the print or cut is done, but 15 minutes of sanding and polishing can turn a homemade part into something that looks professionally made.
Finish and Assemble Your 3D Object
Finishing is the final step that turns a raw manufactured part into a polished, functional, or beautiful 3D object. Even the best 3D printers leave layer lines, support marks, or rough edges, and CNC cutting leaves tool marks that need to be smoothed out. The finishing process depends on your material and your desired outcome, but these are the most common steps for a professional finish.
Basic Cleaning and Prep
Start by removing any excess material from your part. For 3D printed parts, this means plucking off supports, scraping away any extra brim or raft material (the extra material you add to help the first layer stick), and trimming any stray strings of filament (called stringing) with a sharp hobby knife. For resin prints, this step is done during the washing process, but you may still need to trim small support marks left where supports attached to the model. For CNC parts, you will need to remove any leftover tabs that held the part to the raw material block and sand the edges.
Next, sand the surface to smooth out layer lines or tool marks. Start with a coarse grit sandpaper (around 120-200 grit) to remove large uneven spots and layer lines, then work your way up to finer grits (400, 800, and even 2000 grit) for a smooth, glossy finish. For FDM prints, sanding in a circular motion helps evenly smooth out layer lines, and wet sanding with fine grit sandpaper reduces dust and creates a smoother surface. Always wear a dust mask when sanding plastic or wood to avoid inhaling fine particles.
Advanced Finishing Techniques
If you want a completely smooth, seamless surface on a 3D printed plastic part, there are a few popular methods to eliminate layer lines entirely:
- Primer and filler: Spray on a thin coat of automotive filler primer, which fills in small gaps and layer lines. Once the primer dries, sand it smooth, then repeat the process 2-3 times for a completely seamless surface. This is the most common method for cosplay props and painted objects.
- Acetone vapor smoothing: For ABS 3D printed parts, exposing the part to acetone vapor melts the outer layer of plastic, which flows out to fill in layer lines and creates a glossy smooth surface. This method only works for ABS, and acetone is flammable, so it should always be done in a well-ventilated area away from open flames.
- Epoxy coating: Brushing or spraying a thin coat of clear epoxy resin over your part creates a thick, smooth, glossy finish that covers layer lines completely. It also adds strength to the part, and it works for almost any material.
Once your part is sanded and smoothed, you can paint it, seal it, or add hardware to assemble it. For plastic parts, use spray paint or acrylic paint for best results, and use a primer first to help the paint adhere evenly. For wooden CNC parts, you can stain it, seal it with polyurethane, or leave it natural for a rustic look. If your 3D object is made of multiple parts (for example, a large 3D print that had to be split to fit your printer’s build volume), you can glue parts together with super glue for PLA, epoxy for resin, or wood glue for wooden CNC parts. Adding reinforcing pins or brackets inside the joint will make it stronger for functional objects.
Post-Finishing Quality Checks
Before you call your project done, do a quick check to make sure everything works as intended. For functional objects like brackets, tool holders, or custom parts, test fit it to make sure it fits correctly and holds the required weight. For decorative objects, check for any small chips, scratches, or uneven paint that you can touch up. Taking five minutes to fix small issues now will save you disappointment later.
Troubleshoot Common Issues
Even experienced makers run into problems when making 3D objects, especially when they are first learning. Knowing how to identify and fix common issues will save you time, material, and frustration.
Common 3D Printing Problems
The most frequent 3D printing issues and their fixes are:
- First layer not sticking: This is almost always caused by the nozzle being too far from the bed, or the bed not being level. Adjust the bed level, add a small amount of adhesive to the bed, and slow down the first layer print speed to help the filament adhere.
- Warping: When the corners of your print lift up off the bed as it cools, this is called warping. It is most common with ABS and PETG, but can happen with PLA in cold rooms. Enclosing your printer to keep the temperature stable, using a heated bed, and adding a brim or raft to the base of your print will reduce warping.
- Stringing: Small thin strings of plastic left between different parts of your print when the nozzle moves across open space. To fix this, turn on retraction in your slicer settings, which pulls the filament back a little when the nozzle moves, preventing plastic from oozing out.
- Layer shifting: When the layers of your print are misaligned, creating a jagged, lopsided object. This is usually caused by a loose belt on your 3D printer, or the printer being moved during printing. Tighten the X and Y axis belts, and make sure your printer is on a stable, level surface.
Common CNC Carving Problems
For CNC projects, the most common issues are:
- Tea burning (charring on the surface of wood): Caused by the cutting bit getting too hot from cutting too slowly. Increase your feed rate (the speed the bit moves through the wood) and use a sharp bit to reduce friction and heat.
- Tear out on the surface: When pieces of wood or material tear out instead of being cut cleanly, leaving a rough surface. This is often caused by a dull bit, or cutting against the grain. Using a sharp bit, taping the surface before cutting, or doing a final climb cut will reduce tear out.
- Incorrect cut depth: Usually caused by an incorrect Z zero setting. Always double-check your Z zero before starting the cut, and do a test cut on a scrap piece of material to confirm the depth.
If you run into an issue you can’t solve, the global maker community is one of the best resources for new 3D object makers. Sites like Reddit’s r/3Dprinting, CNCZone, and Stack Exchange have thousands of experienced makers who are happy to help troubleshoot problems, and most common issues have already been solved and documented in tutorials online.
Conclusion
Making 3D objects is a rewarding hobby and a valuable skill that lets you turn any idea into a physical reality. The process has become far more accessible than it was even a decade ago, with free software, affordable machines, and a huge global community that supports new makers. Start small with a simple project like a keychain or a small planter to learn the basics, then work your way up to more complex projects like cosplay props or furniture. Remember that mistakes are part of the learning process – even experienced makers have failed prints and botched cuts, and every mistake teaches you something that makes your next project better. With a little practice and patience, you’ll be able to make custom 3D objects for your home, your hobbies, your business, or any project you can imagine.