
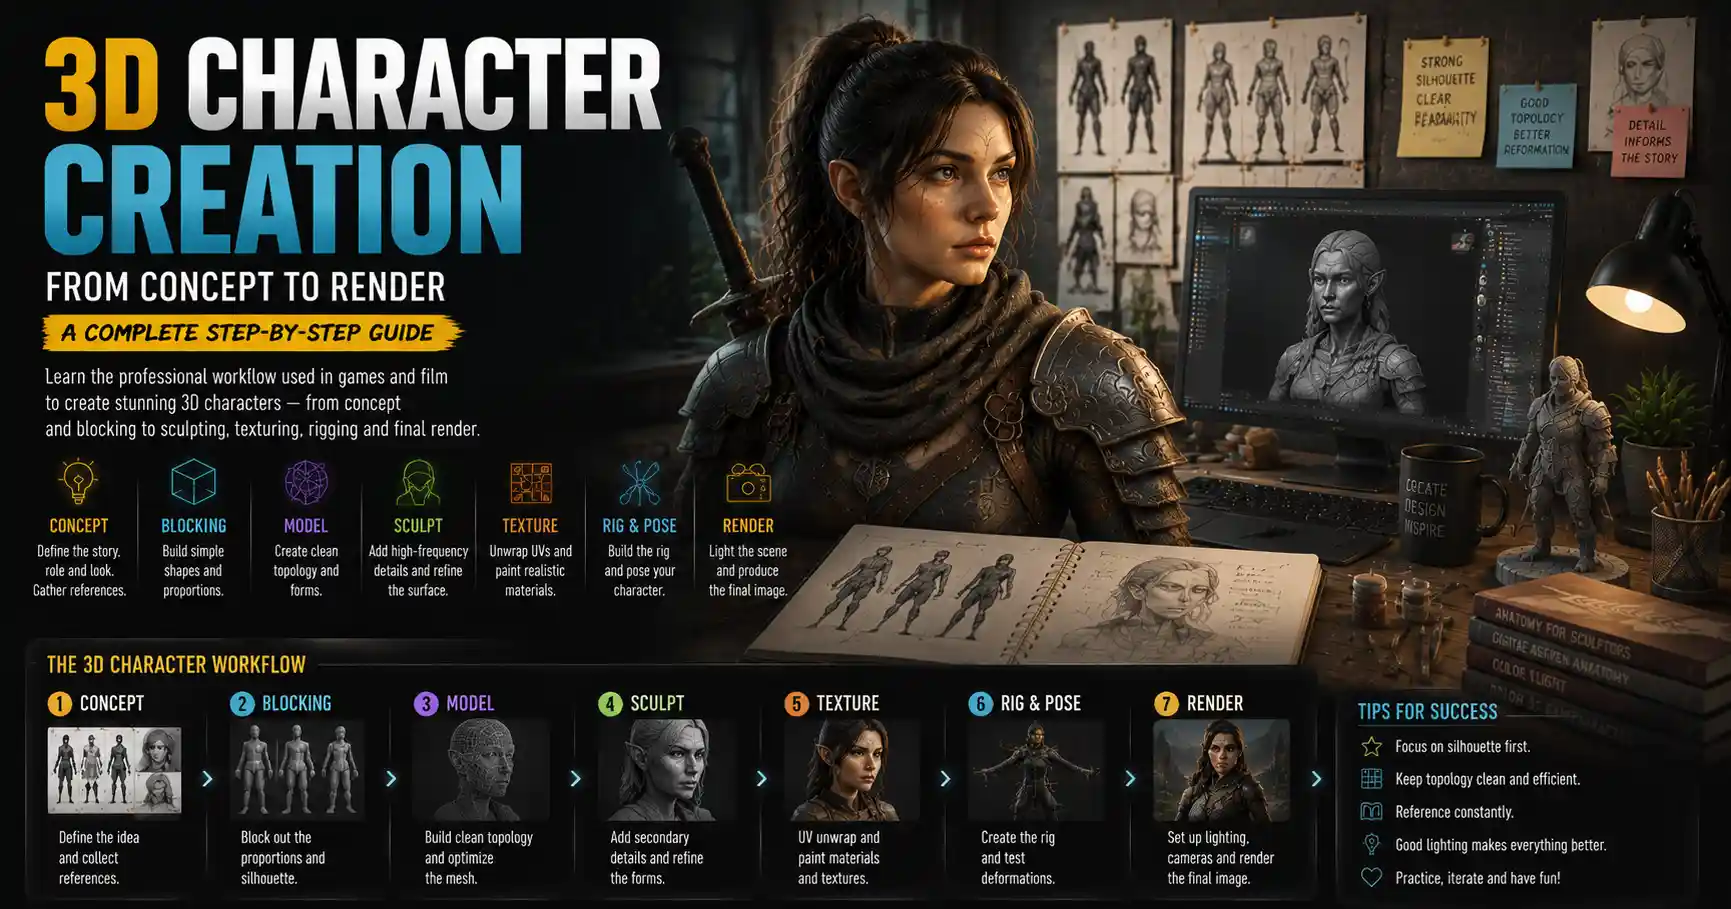
Whether you’re building a character for an indie video game, a feature film animation, a 3D print collectible, or a personal art project, creating a compelling 3D character is equal parts creative vision and technical skill. Unlike 2D drawing, 3D character creation adds layers of complexity: you need to think about volume, movement, topology, and how your character will interact with its environment. Even experienced artists can feel overwhelmed by the number of steps and software options available, but breaking the process down into manageable stages makes it accessible to beginners and rewarding for pros. In this guide, we’ll walk through every core step of making a 3D character, from initial concept to final rendering, with practical tips to help you avoid common mistakes.
Pre-Production: Concept and Reference Gathering
Before you ever open a 3D modeling program, you need a clear plan for your character. Skipping pre-production is one of the most common mistakes new artists make, leading to muddled designs, inconsistent proportions, and hours of rework later on. This stage is all about translating the idea in your head into a concrete visual guide you can follow in 3D.
Start with a clear concept brief
Even if you’re working on a personal project, writing a short 100-word concept brief will help you nail down your character’s core identity. Ask yourself key questions: What is their role? Are they a heroic warrior, a quirky barista, a terrifying monster? What personality traits do they have? Are they confident, shy, mischievous? What world do they live in? A fantasy knight will have very different design elements than a futuristic space pirate. Your brief doesn’t need to be fancy, but it will keep your design focused as you work.
Gather reference images
References are non-negotiable for 3D character creation. Even the most skilled artists don’t rely on memory alone—references help you get proportions, textures, and details right. Build a reference board (tools like Pinterest, PureRef, or Miro work great for this) that includes:
- Anatomical references: If you’re creating a human or humanoid character, collect photos of real human bodies in different poses, showing muscle structure, bone structure, and skin details. For non-human characters, gather references of real animals that inspired your design.
- Clothing and accessory references: If your character wears a leather jacket, for example, collect photos showing how leather folds at the elbows, how it creases when the wearer moves, and what different hardware (zippers, buttons) looks like up close.
- Style and mood references: Collect examples of art styles you want to emulate, color palettes that fit your character’s personality, and lighting references that match the environment your character will live in.
Create front, side, and back orthographic drawings
Once you have your concept and references, draw (or commission) orthographic views of your character: a straight front view, a straight side view, and a straight back view. These drawings will be imported into your 3D software as a template to trace over, ensuring your proportions stay consistent from every angle. For complex characters, you may also want to add a 3/4 view and close-ups of key features like the face, hands, or unique accessories.
“A great 3D character is only as good as its concept. If the design doesn’t read clearly in 2D, it will never read clearly in 3D.”
— Tina Snyder, lead character artist at Riot Games
Blocking and Base Mesh Creation
Once your pre-production is complete, it’s time to move into 3D software and create the first version of your character: the base mesh, or blockout. This step is all about establishing overall proportions, volume, and silhouette before you add any fine details. The goal here isn’t perfection—it’s to get the big shapes right as quickly as possible.
Choose the right software for your project
There are dozens of 3D tools available, and the best one for you depends on your budget, project type, and experience level. Popular options include:
- Blender: Free, open-source, and has a full set of character creation tools. It’s the go-to for beginners and indie artists, and it’s increasingly used in professional studios too.
- Autodesk Maya: The industry standard for film and game animation, with robust character tools, but it requires a paid subscription.
- ZBrush: The leading tool for high-poly sculpting details, used by almost every professional character studio. It has a steep learning curve but unmatched power for organic shapes.
- Autodesk 3ds Max: Common in game development and architectural visualization, with good modeling tools for both organic and hard-surface characters.
For beginners, we recommend starting with Blender: it’s free, has a massive global community with thousands of free tutorials, and it can handle every step of the character creation process from blocking to rendering.
Build your base blockout
Start by importing your orthographic drawings into your 3D software as image planes, then begin blocking out the largest volumes first. For a humanoid character, that means starting with the torso, then the head, upper arms, lower arms, hands, upper legs, lower legs, and feet. Resist the urge to add fingers or facial features at this stage—treat each body part as a simple primitive shape (a cube for the torso, a sphere for the head, cylinders for limbs) to get the overall proportions right.
Pay extra attention to your character’s silhouette. A strong silhouette reads clearly even from a distance, which is especially important for game and film characters. Step back from your screen regularly, turn off the reference images, and see if you can instantly tell what your character is and what their personality is just from the outline. If the silhouette is boring or unclear, adjust your proportions now—it’s much easier to change a blockout than a detailed finished model.
Refine into a clean base mesh
Once you’re happy with the overall proportions and silhouette, you can refine the blockout into a clean base mesh. This means connecting the separate primitive shapes, adjusting the geometry to flow naturally, and adding major secondary shapes like the nose, brow, cheekbones, and shoulder muscles. For game characters, this base mesh will eventually become your final low-poly model, so keep the polygon count as low as possible while still holding the correct shape. For film or 3D print characters, you can use a slightly higher polygon count for the base, but still keep it clean and simple.
Sculpting Details and Retopology
After your base mesh is complete, it’s time to add all the fine details that bring your character to life—from wrinkles and skin pores to fabric folds and scars. For organic characters like humans, animals, or monsters, this is almost always done through digital sculpting, followed by retopology to clean up the geometry.
High-poly sculpting
Start by exporting your clean base mesh from your modeling software into a sculpting tool like ZBrush or Blender’s Sculpt Mode. Sculpting works by adding or subtracting volume from your mesh with different brushes, letting you shape details just like you would with clay in traditional sculpture.
Work from large details to small details, following the same rule as blocking: get big shapes right before moving to small ones. After the primary muscle and bone structure is correct, add secondary details like wrinkles on the forehead, laugh lines around the mouth, knuckles on the hands, and creases where clothing bends. Once those are right, add fine tertiary details like skin pores, stubble, stitching on clothing, scratches on metal, or texture on leather.
A common mistake new sculptors make is adding too much detail too early. Every detail should serve a purpose: a deep scar on a warrior’s cheek tells a story, while unnecessary pores all over a face can make the model look messy when rendered. Remember that the distance from which the character will be viewed changes how much detail you need: a main character in a AAA game needs far more detail than a background character in a mobile game.
Retopology
High-poly sculpts have millions of polygons, which makes them too heavy to animate, use in real-time games, or edit easily. Retopology is the process of creating a new, clean low-poly mesh over the top of your high-poly sculpt, matching its shape exactly but with far fewer polygons. This step is critical for game characters, which need to run in real-time without slowing down the game engine, but it’s also necessary for animated film characters to make rigging and animation smoother.
The key to good retopology is clean topology—the flow of the polygons on your mesh. For animated characters, edge loops (continuous lines of polygons) should follow the muscle structure and flow with the character’s movement. For example, around the eyes and mouth, edge loops should be circular to allow for smooth facial deformation when the character talks or makes expressions. Bad topology leads to weird stretching, pinching, and cracks when the character is animated, so taking the time to get this right is worth it.
Baking maps
After retopology, you need to transfer all the fine details from your high-poly sculpt onto your new low-poly mesh. This process is called baking, and it creates texture maps that store the detail information so it can be displayed on the low-poly mesh without the extra polygons. Common maps you’ll bake include:
- Normal map: Stores the direction of surface detail, making a low-poly mesh look like it has all the bumps and crevices of the high-poly sculpt.
- Ambient occlusion map: Stores shadow information in crevices and small gaps, adding depth and realism to the model.
- Displacement map: Stores height information for extremely detailed surfaces, used mostly for offline rendering in film.
Most modern 3D software has automatic baking tools, but it’s always a good idea to check your baked maps for errors like bleeding or stretched pixels before moving on to texturing.
Texturing and Shading
Texturing is the process of adding color, surface detail, and material properties to your character mesh. It’s what turns a generic gray shape into a character with freckled skin, worn denim, shiny metal armor, or flowy silk. Good texturing can elevate a good character model to a great one, while bad texturing can make even a perfectly sculpted model look flat and boring.
UV unwrapping
Before you can add textures, you need to unwrap your mesh’s UVs. UV unwrapping is the process of flattening your 3D mesh into a 2D space, like peeling an orange and flattening the peel so you can print a pattern on it. A good UV unwrap minimizes stretching (so your textures look the same on every part of the model) and packs all the UV islands into the texture space efficiently (so you get maximum resolution for your details).
For most characters, you’ll want to allocate more texture space to high-visibility areas like the face and hands, and less space to areas that are usually covered by clothing or hidden from view. Just like topology, bad UVs lead to stretching and blurry textures, so it’s worth taking the time to clean up your unwrap.
Texture creation
Today, most character artists use PBR (physically based rendering) texturing workflows. PBR creates textures that react to light correctly in any environment, which makes them ideal for both real-time games and offline rendering. PBR textures use multiple maps to define different properties of the surface:
- Albedo/base color: The base color of the surface, without any shading or shadow information.
- Roughness/metallic: Defines how rough or smooth a surface is (rough surfaces look matte, smooth surfaces look shiny) and whether the surface is metal or non-metal.
- Ambient occlusion: Adds subtle shadow in crevices to enhance depth.
- Opacity: Defines transparent or semi-transparent areas like hair, glass, or thin fabric.
You can create textures in three main ways: hand-paint them directly on your mesh in a program like Substance Painter or Blender, use scanned photo textures from stock sites like Textures.com or Quixel Megascans, or generate them automatically using AI tools like MidJourney or Stable Diffusion. For beginners, starting with pre-made PBR texture sets and adjusting them to fit your character is a great way to get good results quickly.
When texturing, don’t be afraid to add small imperfections. Real-world surfaces are never perfectly uniform: a character’s skin will have freckles, age spots, or small scars; their jeans will have faded areas at the knees and pockets; their boots will have scuffs and dirt. These small details make your character feel real and lived-in, rather than like a generic plastic model.
Shading
Shading is the process of setting up how your texture reacts to light in your 3D software or game engine. Different materials require different shading settings: skin is translucent, so light should pass through thin areas like the ears and nose; metal is reflective, so it should show clear reflections of the surrounding environment; fabric is rough and diffuse, so it doesn’t reflect much light at all. Getting shading right is what makes a character feel believable—bad shading can make skin look like plastic and metal look like cardboard, even if your texture is perfect.
Rigging and Weight Painting
If your character needs to move or be animated, you’ll need to create a rig for it. Rigging is the process of adding a digital skeleton to your character mesh, and setting up how the mesh deforms when the skeleton moves. This is the final technical step before you can pose or animate your character.
Building the skeleton
Start by creating a joint for each bone in your character’s skeleton, matching the proportions of your mesh. For a humanoid character, that means joints for the spine, neck, head, shoulders, upper arms, forearms, hands, fingers, hips, upper legs, lower legs, and feet. If you’re creating a character with a unique anatomy—like a four-armed alien or a giant snake with multiple heads—you’ll need to adjust the skeleton to match that anatomy.
Most 3D software has automatic rigging tools that can generate a humanoid skeleton in a few minutes. These tools are great for beginners or for quick test poses, but professional animators usually prefer to adjust the automatic rig to fit their specific character for smoother deformation.
Weight painting
Once the skeleton is in place, you need to define how much each joint influences each part of the character’s mesh. This process is called weight painting, and it’s one of the most important steps in rigging. For example, when you bend your elbow, the area around the elbow deforms, while the shoulder stays still. Weight painting defines how much the elbow joint pulls the surrounding mesh when it moves.
Bad weight painting causes common problems like the “rubber band arm” effect, where the mesh stretches unnaturally when the arm bends, or mesh popping, where part of the mesh suddenly jumps to the wrong position when the joint moves. It’s normal for weight painting to take several passes: after you paint the initial weights, you need to test every joint through its full range of motion, and fix any areas that deform incorrectly. For facial animation, you’ll also add blend shapes (or shape keys) to control expressions like smiling, frowning, or blinking, which let you create nuanced facial performances.
Final testing
Once your rig is complete, test it by putting your character in a few extreme poses to see how the mesh deforms. Check for pinching, stretching, or cracks in the mesh, especially around joints like the elbows, knees, shoulders, and waist. Fix any issues now before you move on to animation or rendering—it’s much easier to fix rigging problems at this stage than after you’ve already animated the character.
Conclusion
Creating a 3D character is a complex process that combines artistic creativity with technical problem-solving, but breaking it down into clear, manageable stages makes it achievable for anyone willing to put in the practice. From pre-production concepting to final rig testing, each step builds on the last: a strong concept gives you a clear direction, a clean base mesh makes sculpting easier, good topology makes animation smoother, and thoughtful texturing brings your character to life.
Don’t get discouraged if your first few characters don’t turn out exactly how you imagined. Even professional character artists make mistakes and rework parts of their models multiple times. The best way to improve is to practice regularly, study the work of other character artists, and ask for feedback from the community. Whether you want to work in games, film, 3D printing, or just create art for fun, mastering the process of 3D character creation opens up a world of creative possibilities. Start small with a simple character, follow each step, and you’ll be surprised at what you can create.