
If you’ve ever spent hours designing a 3D model, preheated your printer, started a 12-hour print, and come back to find a lopsided mess or a failed first layer, you know how frustrating 3D printing can be. Most failed prints aren’t caused by a broken printer or bad filament—they stem from issues with the digital 3D model itself. Even models downloaded from popular sites like Thingiverse or MyMiniFactory often have hidden flaws that will derail a print before the first layer is complete. Fixing these issues doesn’t require a degree in industrial design; with the right tools and a step-by-step approach, any hobbyist can learn to repair models for reliable, high-quality 3D printing.
Common 3D Model Issues That Break Prints
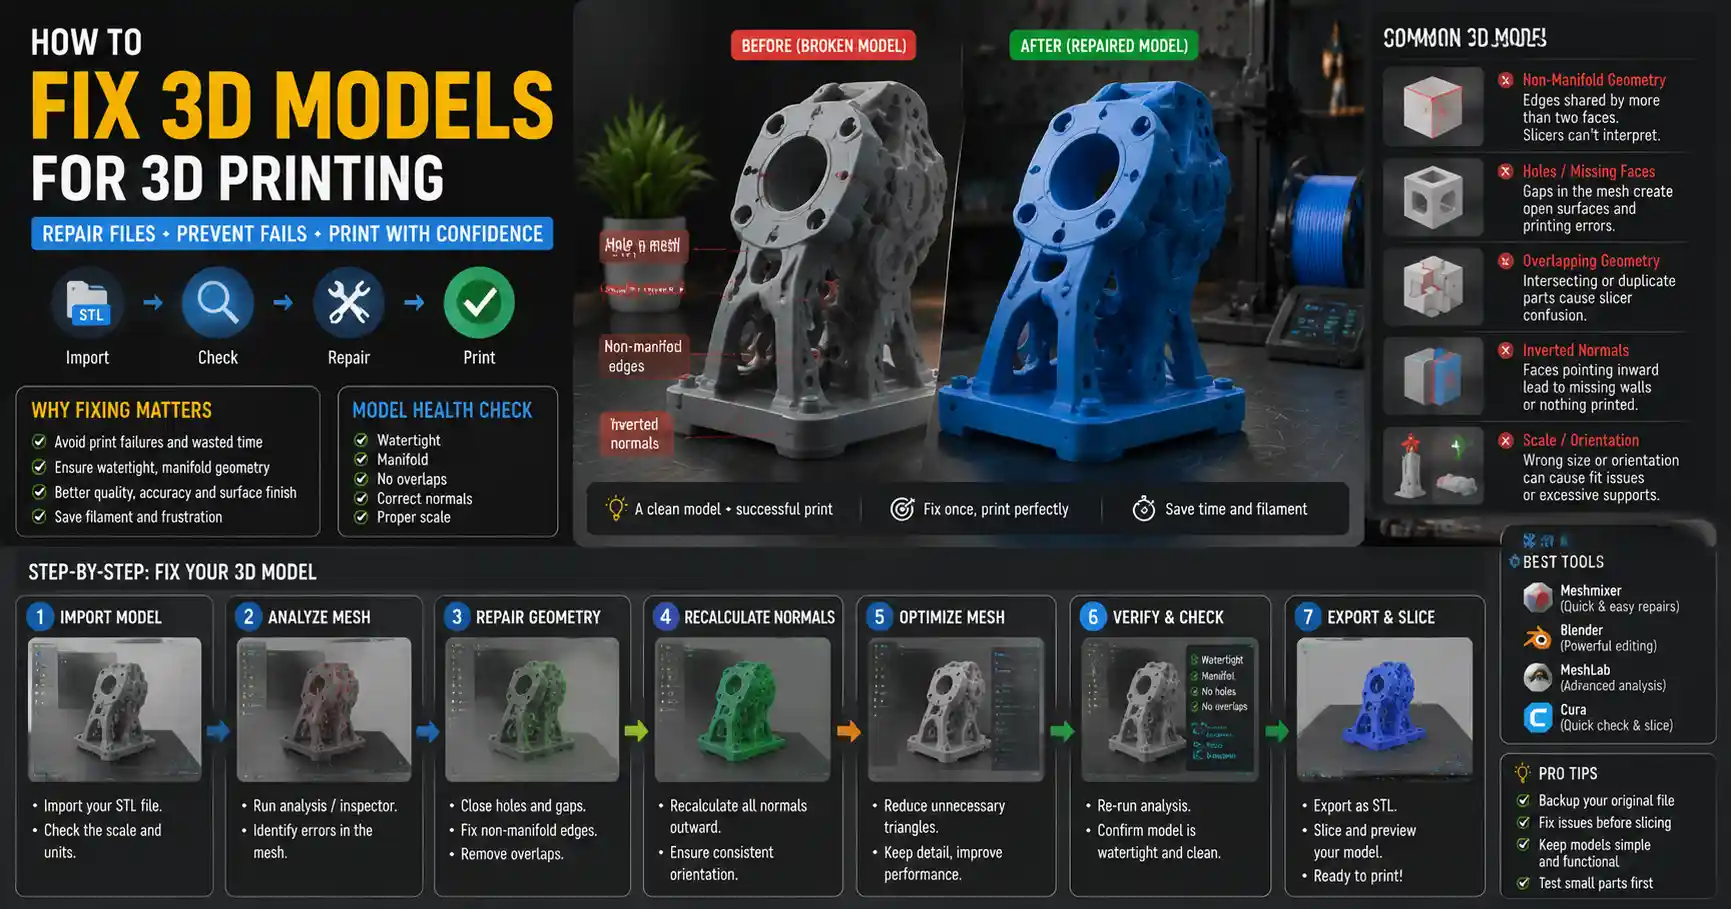
Before you can fix a 3D model, you need to understand what’s wrong with it. Most model-related print failures trace back to a handful of recurring issues, many of which are invisible when you view the model on screen. Learning to spot these flaws early will save you hours of failed print time and wasted filament.
Non-Manifold Geometry
The most common and most destructive 3D model flaw is non-manifold geometry. To understand what this means, think of a 3D printable model as a hollow shell: every face on the shell should have an inside and an outside, and every edge should be shared by exactly two faces. Non-manifold geometry breaks this rule. Common examples include edges shared by three or more faces, internal faces that don’t connect to the outer shell, or holes that leave the model open. Slicer software, which converts your 3D model into printer instructions, can’t reliably interpret non-manifold geometry. It may generate incomplete toolpaths, skip entire sections of the print, or crash entirely before the job even starts.
Holes and Missing Faces
Even when a model is technically manifold, small holes or missing faces can cause big problems. These flaws often happen when models are exported from design software incorrectly, or when they’re scanned from real-world objects. Tiny holes can cause slicers to generate gaps in outer walls, while large holes will turn a solid model into an open mesh that can’t be printed at all. In many cases, these holes are so small you won’t spot them until you see the flaw in the finished print.
Overlapping and Intersecting Geometry
Overlaps happen when two parts of the same model occupy the same space, or when multiple objects in a single file intersect without being merged. For example, if you design a mug with a handle that cuts through the side of the mug without merging the two shapes, you’re left with overlapping faces. Slicers often interpret this overlap as extra solid material, leading to blobby overextrusion at the intersection point, or unexpected gaps in the wall. Even small overlaps can ruin the dimensional accuracy of a functional print like a phone case or a gear.
Scale and Orientation Problems
Not all model issues are geometric. Many new 3D printing hobbyists download models that are designed at the wrong scale, or are oriented in a way that makes printing impossible without support material. A model that’s 200mm tall when you need it to be 50mm tall will have extremely thin walls if you scale it down, leading to brittle prints that break easily. Scaling up a small model can leave you with overly thick walls that waste filament and take twice as long to print. A model oriented standing straight up with a lot of overhangs may require more support than it’s worth, leading to a rough finish and more post-processing work.
Essential Tools for Fixing 3D Models
You don’t need an expensive industrial CAD program to fix 3D models for printing. There are free, beginner-friendly tools available that can handle almost every common repair, and more advanced options for complex projects. The right tool for the job depends on the flaw you’re fixing and your level of experience.
Beginner-Friendly Free Tools
For new hobbyists, these tools require almost no learning curve and can fix 90% of common model issues:
- Meshmixer: Autodesk’s free Meshmixer is the gold standard for beginner 3D model repair. It has one-click automatic repair tools that fix non-manifold geometry, close holes, and remesh bad geometry in seconds. It also includes tools for scaling, reorienting, cutting, and joining models, making it a one-stop shop for most basic repairs. It works with all common 3D file formats, including STL and OBJ, which are the standard for 3D printing.
- Ultimaker Cura: Most people use Cura just for slicing, but it includes basic automatic repair tools that can fix small errors before you slice your model. It’s perfect for quick checks on simple models that you think are good to go—you don’t even need to open a separate program.
- MeshLab: MeshLab is a free open-source tool for processing and repairing triangular meshes. It has more advanced repair options than Meshmixer for complex models, though the interface is less intuitive for new users. It’s ideal for cleaning up large scanned models or fixing models with extensive geometry issues.
Advanced Tools for Complex Repairs
If you work with custom-designed models or need to make major changes to existing models, these tools give you more control:
- Blender: Blender is a free open-source 3D modeling program that can handle any repair job, from patching small holes to rebuilding entire sections of a model. It has a steep learning curve, but there are hundreds of free tutorials for 3D printing-specific repairs online. If you want to modify existing models extensively, Blender is one of the best free options available.
- Fusion 360: Autodesk Fusion 360 is a parametric CAD program that’s free for hobbyists. It’s ideal for fixing models that require dimensional accuracy, like functional parts or mechanical assemblies. You can import an STL, convert it to a editable solid, and fix flaws by remodeling problematic sections from scratch.
- 3D Builder: If you’re on Windows, 3D Builder comes pre-installed and has a simple one-click repair tool that works for small, simple models. It’s not as powerful as Meshmixer, but it’s convenient for quick fixes when you don’t want to download a new program.
“The biggest mistake new 3D printers make is skipping the model check step. They assume because a model is online, it’s ready to print. Five minutes of checking and repairing a model before you slice saves you 12 hours of failed print time and a spool of wasted filament.”
— Chloe Matthews, 3D Printing Educator and content creator for Print That Thing
Step-by-Step Guide to Repairing Common Model Flaws
Now that you know what to look for and what tools you need, let’s walk through the process of fixing the most common 3D model issues. We’ll use Meshmixer for this guide because it’s free, beginner-friendly, and has all the tools you need for most repairs.
Step 1: Import and Inspect the Model
Start by opening your STL or OBJ file in Meshmixer. Once the model loads, use the navigation tools to rotate it and zoom in on all areas. Look for obvious flaws: holes, gaps, overlapping parts, or weird lumps in the surface. To check for hidden non-manifold edges, go to the Select menu and click Select Non-Manifold. Meshmixer will highlight all problematic edges in blue, so you can see exactly where the issues are.
Step 2: Run Automatic Repair
For most simple models, automatic repair will fix 80% of issues in one click. Go to the Analysis tab and select Inspector. Meshmixer will automatically scan the model for holes, non-manifold edges, and overlapping faces. It will highlight every problem area with a small sphere. Click Auto Repair All, and Meshmixer will close holes, fix non-manifold geometry, and remove overlapping faces automatically.
After automatic repair finishes, run the Select Non-Manifold tool again to check if any issues remain. If everything looks good, move on to the next step. If there are still highlighted issues, you’ll need to fix them manually.
Step 3: Fix Remaining Holes Manually
Large holes or holes in complex curved surfaces often don’t get fixed correctly by automatic repair. To fix a hole manually:
- Use the selection brush to select the edges around the hole. Make sure you select all the surrounding faces that connect to the hole.
- Go to the Edit menu and select Close Hole. Meshmixer will generate a new flat or curved surface to fill the gap, matching the curvature of the surrounding model.
- If the new surface doesn’t match the shape you want, use the Sculpt tool to smooth it out and match the surrounding geometry.
Step 4: Fix Overlapping and Intersecting Geometry
Overlapping geometry, like a handle connected to a mug or two parts joined in the same file, can be fixed with Meshmixer’s Boolean tools. To merge overlapping parts correctly:
- Use the selection tool to select one of the overlapping parts.
- Go to Edit > Boolean and select Union. This will merge the two parts into a single solid mesh, removing any internal overlapping faces.
- If you want to remove a section of the model (for example, cutting a model in half to print it in two parts), use the Difference Boolean option to cut the section away cleanly.
For small, unwanted overlapping sections that you don’t need, you can simply select the extra faces with the selection brush and hit delete to remove them.
Step 5: Check Wall Thickness
One of the most overlooked issues that causes failed prints is incorrect wall thickness. If your model’s walls are thinner than your printer’s nozzle diameter, they won’t print at all, or will be so thin they break easily. Most FDM 3D printers use a 0.4mm nozzle, so you want your minimum wall thickness to be at least 1.2mm (three times the nozzle diameter) for strength, or 0.8mm (two times the nozzle diameter) for very fine details.
To check wall thickness in Meshmixer, go to Analysis > Measure and use the distance tool to measure the thickness of walls in thin areas. If walls are too thin, use the Offset tool in the Edit menu to expand the outer surface slightly and increase wall thickness. If walls are too thick, you can use the same tool to hollow out the model, saving filament and reducing print time.
Step 6: Export and Check the Fixed Model
Once you’ve fixed all the issues, export your model as a new STL file (always save a copy of the original so you can go back if you make a mistake). Before you slice it, open it back up in your repair tool and do one final check for flaws. It’s much easier to catch an issue at this stage than after you’ve started printing.
Prepping Models for Print: Beyond Basic Repair
Fixing geometric flaws is only half the battle. There are several extra steps you can take to prep your model for a successful, high-quality print that requires less post-processing.
Adjust Scale and Dimensional Accuracy
Before you slice, double-check that your model is the correct size. Most 3D model files are exported in millimeters, which is the standard for 3D printing, but some are exported in inches by mistake. A 2-inch model that your slicer interprets as 200mm will be 10 times larger than you expect, wasting an entire spool of filament. To avoid this, measure a key dimension of the model (for example, the diameter of a gear that needs to fit a specific shaft) in your repair tool, and scale it up or down to match the size you need.
For functional parts that require tight tolerances (like a snap-fit lid or a gear that meshes with another), add a 0.1-0.2mm compensation gap if you’re using FDM printing. Most FDM printers have a dimensional accuracy of around ±0.1mm, so a small gap will ensure parts fit together correctly on the first print.
Add Supports Where Needed (Or Delete Unnecessary Ones)
Many models downloaded from online repositories come with pre-built support structures, but these are often overkill or poorly placed. You can use your repair tool to add custom supports where you need them, or remove pre-built supports and generate your own in your slicer. For overhangs steeper than 45 degrees, use Meshmixer’s Supports tool to generate custom tree supports that use less material and leave smaller marks on the finished print than generic slicer supports.
Hollow Out Solid Models to Save Filament
Solid models use a lot of unnecessary filament and take much longer to print than they need to. If you’re printing a large decorative model like a statue or a vase, you can hollow it out in Meshmixer to cut print time and filament use by 50% or more. Just use the Hollow tool, add a drain hole if you’re printing with resin (to let excess resin drain out), and you’re done. The finished model will be just as strong as a solid one for most non-functional uses.
Split Large Models to Fit Your Print Bed
If you have a small print bed and want to print a model that’s too large, you don’t have to scrap the project. You can split the model into two or more smaller parts in your repair tool, print each part separately, then glue them together after printing. In Meshmixer, use the Plane Cut tool to cut the model along a straight line, add alignment pegs to the cut edges to make assembling easier, then export each part as a separate STL. This is a common trick for printing large cosplay props or furniture with a small desktop printer.
Pro Tips to Avoid Future Model Issues
Even with good repair skills, preventing issues in the first place will save you time. These pro tips will help you avoid common model problems before you start slicing:
- Always download models from reputable sources. Sites like Thingiverse have a rating system that lets users leave comments about print quality, so you can check if other people have successfully printed the model before you download it. Models from sites like CGTrader that are designed for animation or rendering often aren’t prepped for 3D printing, so you’ll need to do more repair work on them.
- If you’re designing your own models, export your STL correctly. Most CAD programs have an option to export STLs with a specific tolerance—for 3D printing, use a tolerance of 0.01mm to avoid creating extra polygons or gaps in the mesh. Avoid exporting models with extremely high polygon counts that will slow down your slicer and repair tools; 100,000 to 500,000 polygons is more than enough for most FDM prints.
- Run a model check before every slice. Even if you got the model from a trusted source, a 2-minute check for non-manifold geometry and incorrect scale will catch most issues before they ruin a print.
- Use your slicer’s built-in repair as a first line of defense. Most modern slicers like Cura, PrusaSlicer, and Simplify3D have basic automatic repair tools that can fix small errors, so if your model checks out in your repair tool, the slicer will catch any last-minute issues.
- For resin printing, pay extra attention to wall thickness. Resin printers can print much thinner walls than FDM printers, but walls thinner than 0.5mm will warp or break during post-processing, so always double-check thin sections before printing.
One common mistake new designers make is leaving internal geometry in the model when they export it. For example, if you delete an internal part from your design but leave stray faces inside the outer shell, those extra faces will cause non-manifold errors. Always do a final check inside the model to remove any stray geometry before exporting.
Conclusion
Fixing 3D models for printing is a skill that every 3D printing hobbyist can learn, and it will pay off in fewer failed prints, less wasted filament, and more consistent results. You don’t need expensive software or advanced design skills to fix the vast majority of common model issues: a free tool like Meshmixer and a basic understanding of what causes failed prints is enough to handle almost any job. The key is to build the habit of checking and repairing your model before you hit print—five minutes of prep work can save you hours of frustration. As you gain experience, you’ll learn to spot common flaws quickly and even modify existing models to fit your specific needs, opening up a whole world of possibilities for your 3D printing projects.