
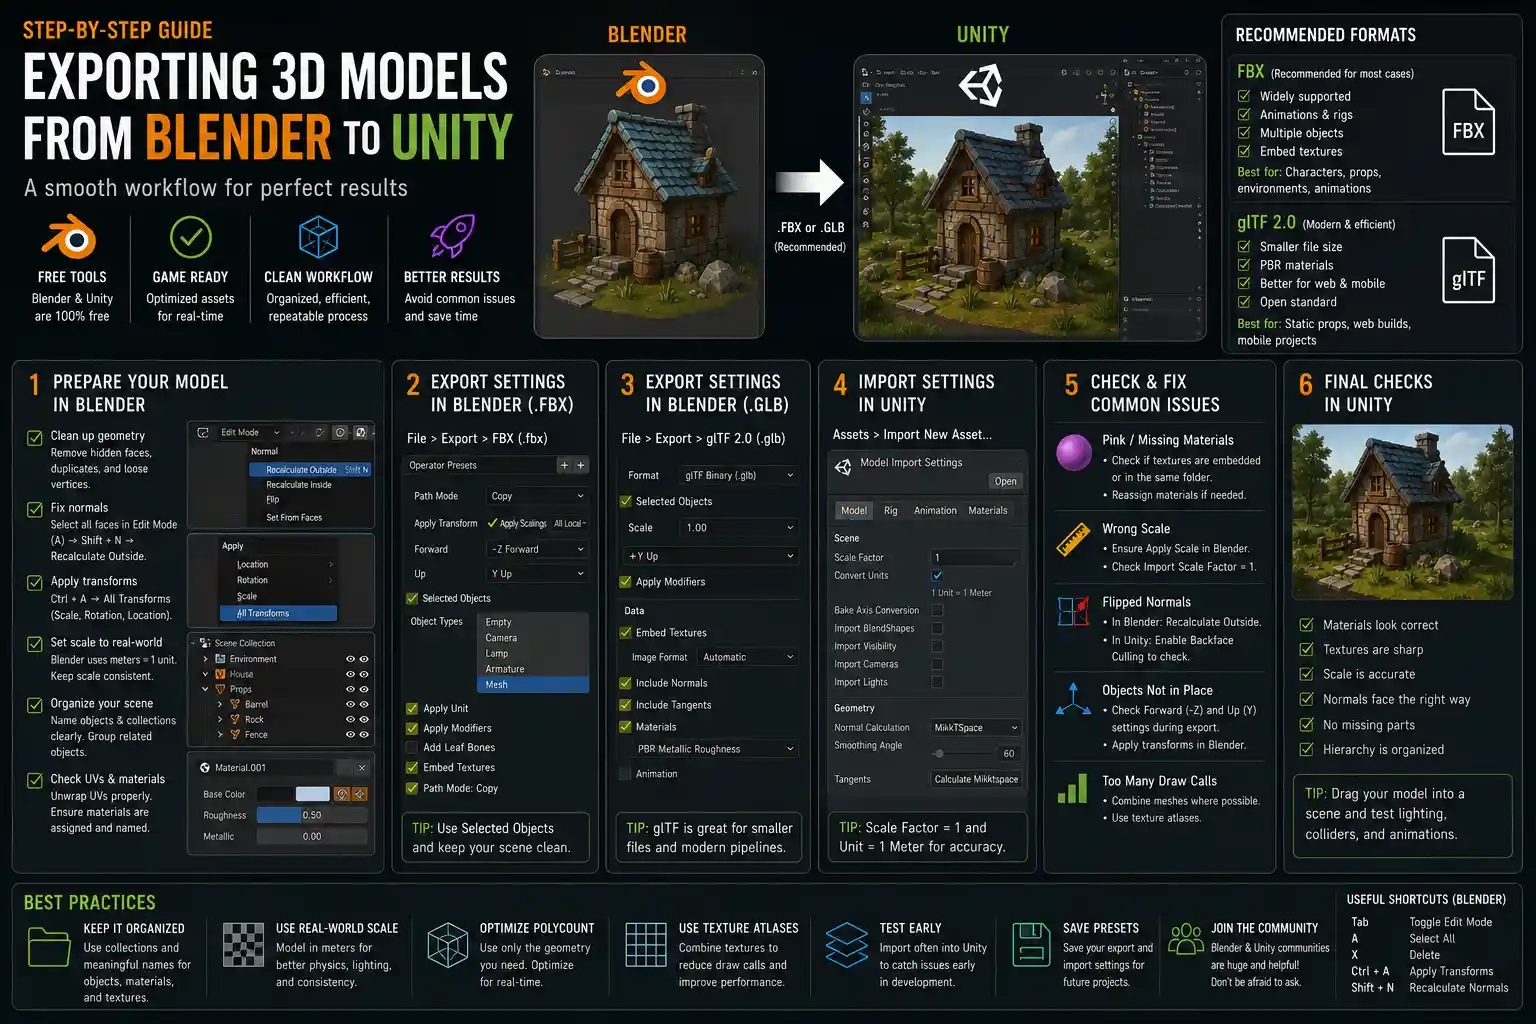
If you’ve ever built a detailed 3D model in Blender and tried importing it into Unity only to face missing textures, flipped normals, or jumbled scale, you’re not alone. Blender and Unity are two of the most powerful free tools for indie game development, architectural visualization, and interactive 3D projects, but they don’t always play nicely together out of the box. The good news is that a smooth workflow between the two programs just requires understanding a few core best practices, from prepping your model correctly in Blender to choosing the right export settings and troubleshooting common issues after import. Whether you’re building your first indie game, creating an interactive product showcase, or experimenting with AR/VR content, this step-by-step guide will walk you through every stage of the process to get your 3D assets from Blender to Unity working perfectly on the first try.
Prepping Your Blender Model for Export
Before you even touch the export menu, the most important work to ensure a smooth transition to Unity happens inside Blender. Poorly optimized models, unapplied transformations, and messy topology will cause problems no matter what export settings you choose, so taking 10 minutes to prep your asset will save hours of troubleshooting later. This phase covers everything from cleaning up your geometry to organizing your objects and materials for easy import into Unity.
Clean Up Geometry and Topology
Unity handles 3D assets far more efficiently when they’re clean and optimized from the start. If you’re bringing a high-poly sculpt from Blender, for example, you’ll need to retopologize it to create a lower-poly version suitable for real-time rendering in Unity. Even for simpler models, take time to delete any hidden faces, leftover vertices, or duplicate objects that you don’t need in the final project. These extra elements add unnecessary file size and can clutter up your Unity hierarchy after import.
You should also check for common geometry issues that will cause rendering errors in Unity. Make sure all your normals are facing the correct direction: flipped normals will make your model appear invisible or see-through in Unity. To fix this in Blender, select your model, go to the Normals menu, and click Recalculate Outside. If you have any open edges or non-manifold geometry, use Blender’s Make Manifold tool to repair these, as non-manifold geometry can cause broken collision meshes or shading errors in Unity.
Apply All Transformations
One of the most common mistakes new creators make is forgetting to apply scale, rotation, and location transformations before exporting. By default, when you resize or rotate a model in Blender, the program stores these changes as a transformation override rather than applying them directly to the mesh. When you export the model to Unity, this can lead to unexpected scaling issues: for example, a 1-meter cube in Blender might import as 100 meters in Unity, throwing off all your game’s physics and level design.
To fix this, simply select all objects in your model, press Ctrl + A (or Cmd + A on Mac), and select All Transforms from the menu. This applies your scale, rotation, and location changes directly to the mesh, ensuring your model retains the correct dimensions when you import it into Unity. A good rule of thumb is to work to a consistent scale: Blender uses meters as its default unit, which matches Unity’s default unit system, so keeping your work in meters will eliminate most scaling issues automatically.
Organize Objects, Materials, and UVs
Organization in Blender translates directly to a clean workflow in Unity. If you’re exporting a model with multiple separate objects (for example, a table with four legs and a tabletop), group related objects into a single parent collection in Blender’s Outliner. This will keep your Unity hierarchy tidy, rather than importing a dozen loose objects that you have to rearrange manually. You can also name each object and material clearly in Blender—naming something “Character_Head” instead of “Cube.001” will save you a lot of time hunting for assets in Unity later.
Unwrapping UVs correctly is another critical prep step. Your UV map controls how your textures are applied to the model, so a messy UV unwrap will lead to blurry or distorted textures in Unity. Make sure you’ve unwrapped your model completely, straightened your UV islands, and packed them efficiently into the texture space. If you’re using texture atlases (combining multiple textures into a single image to improve rendering performance), organize your UVs to match your atlas layout before export.
Choosing the Right Export File Format
Once your model is prepped and ready, the next step is choosing which file format to export from Blender. Blender supports dozens of 3D file formats, but only two are widely recommended for use with Unity: FBX and glTF. Each has its own advantages and use cases, so understanding the difference between the two will help you pick the right one for your project.
FBX: The Industry Standard
FBX has been the go-to file format for game development and 3D asset exchange for decades, and it’s still the most commonly used format for importing Blender assets into Unity. It supports all the features Unity needs, including rigged characters, animations, multiple objects, embedded texture data, and blend shapes. For most use cases—from static environment assets to animated characters—FBX will work flawlessly with both Blender and Unity.
One of the biggest advantages of FBX is its wide compatibility. Every version of Unity supports FBX natively, and Blender has built-in export presets that are optimized for game development. The main downside of FBX is that it doesn’t support some modern 3D features like PBR (physically based rendering) metal/roughness workflows as natively as newer formats, and it can sometimes be larger in file size than glTB. For most traditional game development projects, though, these downsides are negligible.
glTF/GLB: The Modern Alternative
glTF (and its single-file variant GLB) is a newer open standard for 3D asset exchange that has grown rapidly in popularity in recent years. It was designed specifically for web and real-time 3D applications, so it’s optimized for small file sizes and fast loading. glTF natively supports PBR workflows, multiple animations, and embedded textures, and it preserves all your material settings from Blender much more accurately than FBX in many cases.
Unity has supported glTF natively since version 2019, so if you’re using a modern version of Unity, glTF is a solid choice. It’s particularly useful for web-based projects, AR/VR applications, or projects where you need to share assets between multiple tools without losing material data. The main downside is that some older versions of Unity or third-party plugins don’t support glTF as well as FBX, so if you’re working with an older project, FBX is still the safer bet.
Other formats like OBJ or STL are sometimes used for static models, but they’re not recommended for most Unity projects. OBJ doesn’t support animations, rigging, or multiple materials per object, and STL is designed primarily for 3D printing, not real-time rendering. Stick to FBX or glTF for the best results.
Step-by-Step Export Settings Walkthrough
Once you’ve chosen your file format, the next step is configuring the right export settings. The default Blender export settings are rarely optimized for Unity, so tweaking a few options will eliminate most common import errors. Below, we’ll walk through the recommended settings for both FBX and glTF, the two most popular formats.
Recommended FBX Export Settings for Unity
To export an FBX from Blender, go to File > Export > FBX (.fbx). In the export menu on the right-hand side, adjust the following settings for the best results in Unity:
- Forward: -Z Forward, Up: Y Up: This is the most critical setting for orientation. Blender’s default coordinate system differs from Unity’s, so changing this ensures your model doesn’t import rotated or flipped. If you skip this step, your model will be sideways in Unity, and you’ll have to rotate it manually after import.
- Apply Scalings: All: This ensures that any scale adjustments you’ve made are applied to the exported mesh, matching the applied transforms step we covered earlier. Avoid the “Uniform Scaling” option here, as it can break non-uniform scaled objects.
- Selected Objects: Check this if you only want to export specific objects: If you’ve organized your asset and only want to export the objects you need, check this box after selecting your objects in the Outliner. Leave it unchecked if you want to export everything in your Blender scene.
- Mesh > Smooth Normals: Check this: This preserves any smooth shading you’ve applied to your model in Blender, so your model doesn’t import with flat shading in Unity by default.
- Mesh > Export Materials: Check this if you want to export material data: If you’re exporting basic materials, checking this will let Unity import basic material settings automatically. For more complex PBR materials, you’ll usually reassign textures in Unity anyway, so this is optional.
- Armatures > Export Armature: Check this for rigged animated models: If you’re exporting a rigged character with animations, make sure this box is checked. Leave it unchecked for static models to reduce file size.
- Bake Space Transform: Uncheck this: Leaving this unchecked when you’ve already applied all transforms avoids double-scaling issues that can throw off your model’s size in Unity.
Once you’ve adjusted these settings, select your export location, name your file, and click Export FBX. For most projects, these settings will work perfectly every time.
Recommended glTF/GLB Export Settings for Unity
If you prefer to use glTF or GLB, go to File > Export > glTF 2.0 (.glb/.gltf). The default settings are much closer to what Unity needs, but you should still adjust a few key options:
- Under Format, select glTF Binary (.glb) for a single file that includes all your textures and data, or glTF Separate (.gltf + .bin + textures) if you want to keep your files separate. GLB is more convenient for most use cases.
- Under Transform, set Forward to -Z Forward and Up to Y Up, just like you would for FBX. This matches Unity’s coordinate system.
- Check Apply under Transform to apply all your scale and rotation transformations to the exported mesh.
- Under Materials, check Export Materials and select Built-in as the export format. This preserves your PBR material settings for Unity.
- For animated or rigged models, check Export Animations and Export Skin under the Animation section. Leave these unchecked for static models to reduce file size.
After adjusting these settings, export your file, and you’re ready to import it into Unity. glTF generally preserves material and texture data more accurately than FBX, so you’ll often have less work to do after import when using this format.
“The biggest mistake new artists make when moving assets from Blender to Unity is skipping prep work. You can fix almost every common import issue before you ever click export by taking 10 minutes to clean up your mesh, apply transforms, and match coordinate systems. A little prep upfront saves hours of debugging later.”
Importing and Troubleshooting in Unity
Exporting is only half the process: now you need to import your model into Unity and configure the import settings to make sure it works correctly with your project. Even if you exported perfectly from Blender, incorrect Unity import settings can still cause issues with scale, normals, materials, or animations.
Basic Import Workflow
Importing your model into Unity is straightforward: just drag and drop your exported FBX or GLB file from your file explorer directly into the Project window in Unity, or copy the file into your project’s Assets folder. Unity will automatically import the file and generate a prefab, mesh, and material for your model. Once imported, you can drag the model from the Project window into the Scene window to place it in your level.
When you select your imported model in the Project window, the Inspector window will show you all the import settings you can adjust. The most important settings to check first are the Model tab, where you can confirm your scale and orientation, and the Materials tab, where you can adjust how Unity imports your materials from Blender.
Common Issues and Fixes
Even with the best prep and export settings, you might run into one of these common issues after importing. Here are the most frequent problems and how to fix them quickly:
- Model is the wrong size in Unity: If your model is way too big or too small, first double-check that you applied all transforms in Blender and set the correct apply scaling option on export. If it’s still off, adjust the Scale Factor in Unity’s Model import tab. Since Blender and Unity both use meters as their default unit, the scale factor should be set to 1 by default. If you used a different unit system in Blender (like centimeters), set the scale factor to 0.01 to convert to meters correctly for Unity.
- Model is invisible or see-through: This is almost always caused by flipped normals. To fix this, you can either go back to Blender, recalculate your normals, and re-export, or check the Import Blend Shapes option? No, the easier fix in Unity is to enable Double Sided Global Illumination in the material settings, or recalculate the normals in the import settings by checking Recalculate Normals in the Model tab. If that doesn’t work, check that you didn’t accidentally export the model as a hidden layer in Blender.
- Textures are missing or pink: Pink materials in Unity mean that Unity can’t find the texture files assigned to your material. If you’re using FBX, you’ll usually need to assign your textures manually in Unity after import: create a new material using the correct shader (usually the Standard or URP Lit shader for PBR), then assign your albedo, normal, metallic, and roughness textures one by one. If you’re using GLB, make sure you embedded your textures when exporting from Blender, or move the texture files into the correct folder in your Unity project.
- Animations don’t work: If your rigged character’s animations aren’t playing correctly, first double-check that you enabled armature and animation export in Blender. In Unity, go to the Rig tab of your import settings and make sure the Animation Type is set to Humanoid (for characters) or Generic (for non-character animated objects). Then go to the Animations tab and make sure Unity has split your animations correctly; if not, you can adjust the start and end frames for each animation clip manually.
- Model looks jagged or has weird shading: This is usually caused by incorrect normal import settings. Check Calculate Normals in the Model import tab, and set the Normals Mode to Calculate if you want Unity to recalculate smooth normals, or Import if you want to use the normals you created in Blender. If you’re using a normal map, make sure you assigned it correctly to your material in Unity.
Optimizing for Unity Performance
Once your model is imported and working correctly, you can optimize it for better performance in Unity, especially if you’re building a game for mobile or VR. A few simple optimization steps include:
Reduce the polygon count of your model as much as possible without sacrificing visual quality. Unity can handle thousands of polygons per scene, but too many high-poly models will cause low frame rates on less powerful devices. You can use Blender’s Decimate modifier to reduce polygon count quickly for static assets. You should also enable Generate Colliders in the Model import tab if your model needs to have physics interactions, but disable it for background environment assets that don’t need collision—this reduces unnecessary physics calculations and improves performance.
For materials, combine multiple small textures into a single texture atlas to reduce draw calls, which improves rendering performance. Blender has built-in tools to help you create texture atlases, or you can use third-party add-ons to automate the process. Finally, enable mesh compression in the Model import tab in Unity to reduce the file size of your model without noticeable quality loss for most assets.
Conclusion
Exporting 3D models from Blender to Unity doesn’t have to be a frustrating process full of broken imports and missing textures. The key to a smooth workflow is prioritizing prep work before you export: cleaning up your geometry, applying all transformations, matching the coordinate system, and organizing your assets will eliminate 90% of the most common issues before they start. Choosing the right file format (FBX for maximum compatibility, glTF for modern, small-file use cases) and using the correct export settings tailored to Unity ensures your model will import with the correct scale, orientation, and structure.
Once you get the hang of this workflow, you’ll be able to move assets between Blender and Unity in minutes, without spending hours troubleshooting. Whether you’re a new game developer building your first 3D level or an experienced artist working on a professional AR project, these best practices will help you get the most out of both powerful free tools, letting you focus on creating great interactive content instead of fixing broken imports.