
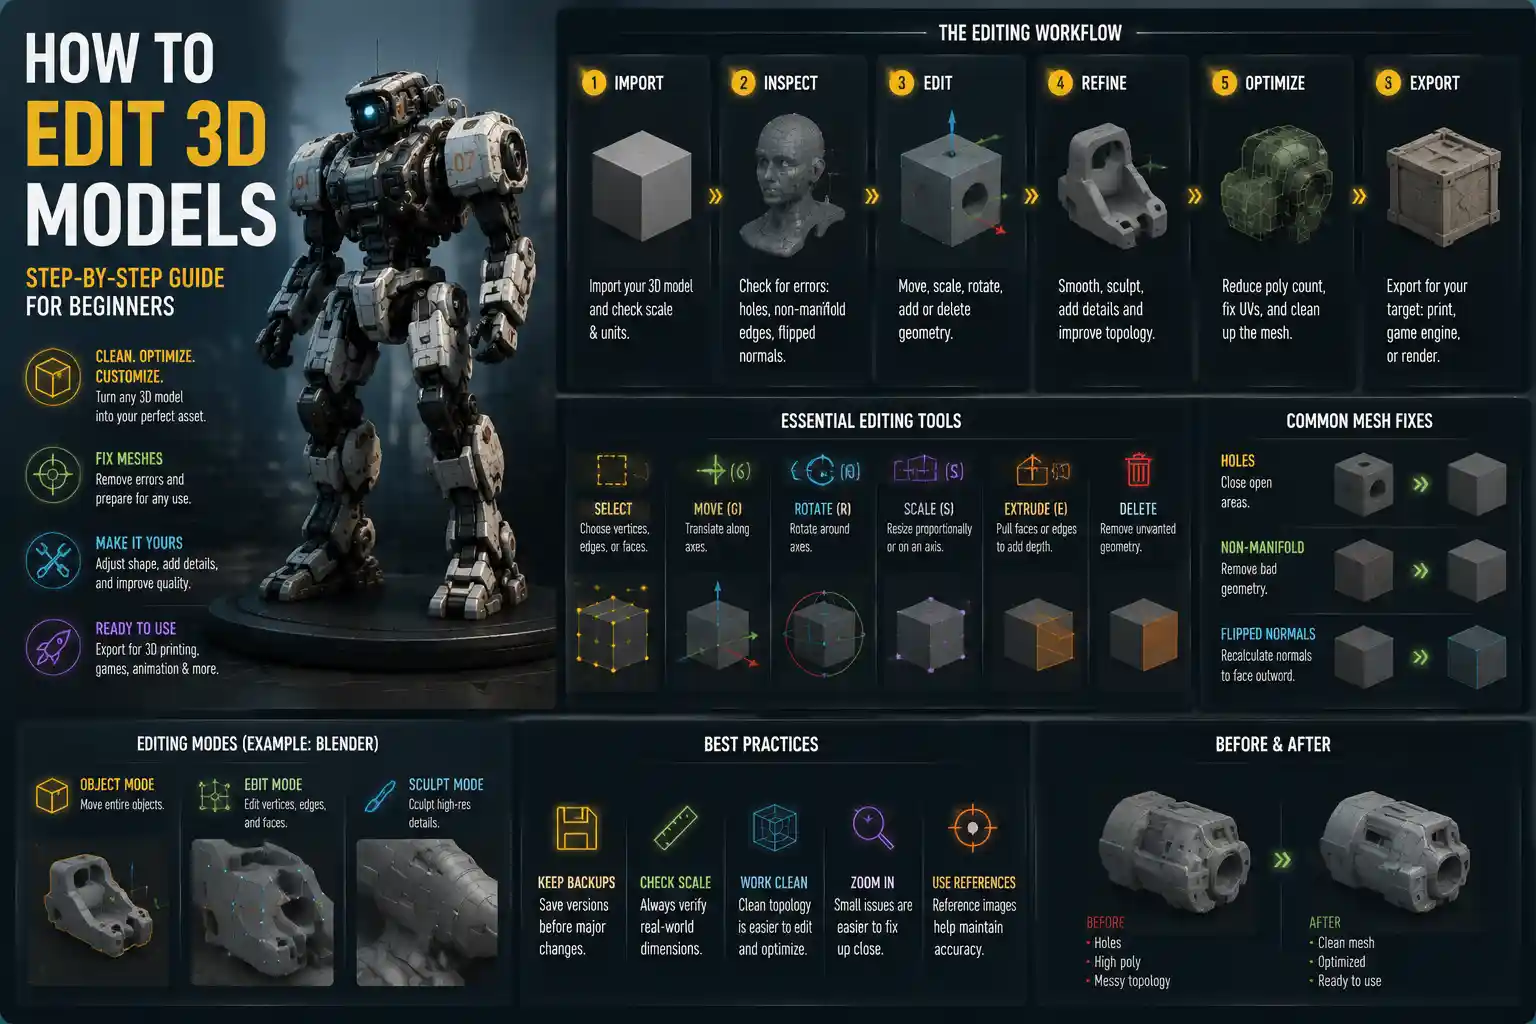
Whether you’re a 3D printing enthusiast refining a custom figurine, a game artist optimizing a character model for a new level, or a product designer preparing a prototype for manufacturing, editing 3D models is a foundational skill that turns rough concepts into polished, usable assets. Unlike 2D image editing, where you work with pixels on a flat plane, 3D editing involves manipulating vertices, polygons, and spatial data to adjust shape, fix errors, and optimize performance for your intended use case. Even if you’re starting with a pre-made model downloaded from a site like Sketchfab or Thingiverse, small edits can mean the difference between a successful print, a seamless game asset, and a frustrating final product. This guide breaks down the end-to-end process of editing 3D models, from preparation to final export, for creators of all skill levels.
Pre-Editing Preparation: Understand Your Model and End Goal
Before you click “edit” on any 3D file, the most important step is to clarify what you need the final model to do and what you’re starting with. Jumping into edits without context often leads to wasted time fixing mistakes that could have been avoided from the start. First, you need to understand the type of 3D file you’re working with, because not all file types are editable in the same way.
Differentiate between editable and non-editable file types
Native source files like Blender’s .blend, Autodesk Maya’s .ma, or SolidWorks’ .sldprt are fully editable, retaining all layers, modifiers, and object data that make editing easy. By contrast, exported files like .stl (the standard for 3D printing), .obj, or .fbx are “baked” files that only contain mesh data—no layered construction history. That means you’ll still be able to edit the mesh, but you won’t be able to go back and adjust a primitive shape or modifier that was used to build the original model. For example, if you download a free .stl of a coffee mug from Thingiverse and want to resize the handle, you won’t have access to the original sketch that created the handle; you’ll have to edit the existing mesh directly.
Define your end use to set editing priorities
The edits you make will vary dramatically depending on what you’re using the model for. Clarifying your end goal upfront helps you prioritize what to fix and what to leave alone. Common use cases include:
- 3D printing: The top priorities are fixing non-manifold geometry, closing all open holes, ensuring wall thickness is consistent, and resizing to match your printer’s build volume. Even a small error like a single open edge can cause a 3D print to fail entirely.
- Video game or VR development: Optimization is key. You’ll need to reduce polygon count (called retopology) to keep frame rates high, clean up overlapping textures, and ensure the model is properly rigged if it’s an animated character.
- Product design and manufacturing: You’ll need to edit for dimensional accuracy, add tolerances for moving parts, and ensure the model meets specific material requirements (for example, adjusting wall thickness for injection molding vs. CNC milling).
- ArchViz or animation: Priorities include smoothing shapes, adding fine details, and ensuring textures are mapped correctly to create realistic renders.
Finally, before you start editing, always save a copy of the original file. It’s common to make a wrong edit that breaks the model, and having an untouched original saves you from having to re-download or rebuild it from scratch. Many creators also save incremental versions (for example, mug_v1.blend, mug_v2.blend) after major edits to track changes and roll back if needed.
Core Editing Tools and Basic Techniques for Beginners
Whether you’re working in a free tool like Blender or a paid professional program like ZBrush, most 3D editing workflows rely on a core set of tools and techniques. Learning what each tool does and when to use it gives you a foundation to tackle almost any editing project. For beginners, it’s best to start with these basic techniques before moving on to more advanced workflows like retopology or UV editing.
Common transform and selection tools
The most basic edits you’ll make involve adjusting the position, size, or rotation of an entire model or part of a model. All 3D editors include three core transform tools:
- Move: Translates selected vertices, edges, faces, or entire objects along the X, Y, or Z axis. This is used to reposition parts of a model—for example, moving the handle of a mug slightly to the left to center it.
- Scale: Resizes the selection proportionally or non-proportionally along a single axis. This is one of the most common edits for pre-made models: resizing a 3D printable toy to fit your printer’s build plate, or shrinking a product model to match required dimensions.
- Rotate: Spins the selection around one or more axes, used to adjust the orientation of a part—for example, rotating a wing on a plane model to match the correct angle of attack.
To use these transform tools, you first need to select what you want to edit. Most 3D editors offer four selection modes for mesh models:
- Object mode: Selects the entire object, for transforming the whole model at once
- Vertex mode: Selects individual points (vertices) that make up the mesh, for fine shape adjustments
- Edge mode: Selects edges between two vertices, useful for adjusting lines or cutting holes
- Face mode: Selects individual polygonal faces, for deleting or reshaping specific sections of the mesh
Basic mesh editing techniques
Once you’re comfortable selecting and transforming parts of your model, you can move on to common mesh edits. For example, if you want to remove a part of a model—say, remove the keychain loop from the top of a 3D printable figurine to turn it into a desk ornament—you’d select the faces that make up the loop and delete them. This leaves an open hole, which you can then fill using the “Make Faces” or “Fill Hole” tool to close the mesh again.
If you need to add more detail to a flat section of the mesh, you’ll use a tool called subdivision surface (or subdivision) which splits existing polygons into smaller ones, giving you more vertices to work with to shape fine details. By contrast, if your model has too many polygons and is slow to work with, you can use a decimate tool to reduce the total number of polygons while preserving the overall shape.
A common beginner mistake is trying to work with too many polygons too early. Blender artist and YouTuber Ian Mcnaughton sums this up well:
Start low poly, add detail slowly. If you jump to a million polygons before your base shape is right, you’re just going to end up wasting hours moving tiny points when you should be adjusting the big forms first.
Another useful basic technique is extrusion, which lets you pull a selected face or edge outward to add new geometry to your model. For example, if you have a plain rectangular box and want to add a protruding drawer front, you can select the front face of the box, click extrude, and pull it forward to create the new shape automatically. This is one of the most widely used tools for adding new parts to existing models.
Fixing Common 3D Model Errors
One of the most common reasons to edit a 3D model is to fix errors that prevent it from working for your intended use. Even professionally created models downloaded from major repositories often have small errors that need fixing, especially if they’re exported as .stl or other baked mesh files. Learning to identify and fix these errors saves hours of frustration later, whether you’re 3D printing or exporting a model for a game.
Non-manifold geometry
Non-manifold geometry is the most common error, and it’s especially problematic for 3D printing. A manifold mesh is one where every edge is shared by exactly two faces, and the mesh has a clear inside and outside. Non-manifold geometry breaks that rule, usually in one of three ways: edges shared by three or more faces, faces that are connected only at a vertex (not an edge), or open edges where a face has no adjacent face on the other side. 3D printers and slicing software can’t interpret non-manifold geometry because they can’t tell where the solid part of the model ends, leading to missing layers or failed prints.
Fixing non-manifold geometry is usually straightforward in modern editors: most tools like Blender, Meshmixer, or Cura have a built-in “Make Manifold” or “Find Non-Manifold Edges” tool that highlights problem areas and automatically fixes most common issues. For more complex non-manifold errors, you may need to manually delete overlapping faces and fill the resulting hole to restore a clean mesh.
Overlapping faces and duplicate geometry
Duplicate faces that occupy the exact same space, or overlapping geometry where two parts of the model intersect, are another common error. For 3D printing, overlapping geometry confuses slicers, which may try to print the same area twice, leading to over-extrusion and uneven surfaces. For game assets, overlapping geometry wastes polygon budget and can cause rendering glitches called Z-fighting, where two overlapping faces fight to be drawn on top of each other, creating a distracting flickering effect.
To fix overlapping faces, most 3D editors have a “Remove Doubles” (Blender) or “Merge Vertices” tool that deletes duplicate vertices and faces that occupy the same space. For larger overlapping sections, you can use a boolean tool to cut away the overlapping part of one object to leave only clean, non-overlapping geometry.
Incorrect wall thickness
Wall thickness issues are almost exclusive to 3D printing and manufactured parts. If a wall is too thin, it will be fragile and may not print at all, because the printer’s nozzle can’t deposit material thin enough to match the model. If a wall is too thick, it wastes material, takes longer to print, and can cause internal stress that leads to cracking as the print cools. Most FDM 3D printers require a minimum wall thickness of 1.2mm to 2mm, depending on the material.
To edit wall thickness, you can use a tool like Meshmixer’s “Offset” or Blender’s “Solidify” modifier to add thickness to a hollow model. For a model that’s too thick, you can use the “Hollow” tool in Meshmixer to remove excess material from the inside of the model, leaving a consistent outer wall thickness that matches your requirements. Always measure the wall thickness after editing with your editor’s measuring tool to confirm it meets your 3D printer or manufacturer’s specifications.
Open holes and gaps
Any 3D model intended for 3D printing needs to be a completely closed mesh, with no open holes or gaps. Even a tiny gap left by a deleted face will cause the model to be non-manifold and prevent the slicer from generating a valid toolpath. Holes are often left after you delete a part of the model, or they can be present in the original exported file due to export errors. Fixing open holes is simple: just select the border edge around the hole and use the “Fill Hole” tool to add a new face that closes the gap. For complex holes with irregular borders, most automatic fill tools will create a clean face that matches the surrounding shape.
Advanced Editing for Polished Professional Results
Once you’ve mastered basic edits and error fixing, you can move on to advanced techniques that create polished, production-ready models for professional use cases. These techniques require a bit more practice, but they open up a huge range of editing possibilities, from optimizing game assets to adding fine details to character models.
Retopology: Optimizing polygon count
Retopology is the process of rebuilding a high-poly mesh (a model with millions of polygons that has all the fine details) into a clean low-poly mesh (a model with far fewer polygons that preserves the overall shape) while transferring the fine details as a normal or bump texture. This is essential for game development and VR, where low polygon counts are required to maintain high frame rates. It’s also useful for reducing the size of large 3D models to make them easier to work with.
The basic retopology workflow involves placing new vertices and edges over the surface of the original high-poly model to create a new, cleaner mesh with far fewer polygons. Modern tools like Blender have automated retopology tools like the Remesh modifier that can speed up this process, but for complex models like character heads, many artists still do manual retopology to get the cleanest edge flow for animation.
UV editing and texture adjustment
If your model has a texture (a 2D image wrapped around the 3D mesh to add color, roughness, or detail), you may need to edit the UV map to fix stretching or misalignment. A UV map is a 2D representation of your 3D mesh that tells the program how to wrap the 2D texture image around the 3D shape. If the UV map has stretched areas, the texture will look blurry or distorted on the model.
UV editing involves unwrapping the mesh into a flat 2D layout, then rearranging and scaling the UV islands to ensure even spacing and no stretching. For example, if you edited the shape of a character’s shirt and the texture is now stretched across the new shape, you can repack the UV islands to fix the distortion. If you need to change the texture itself—for example, swapping the logo on a 3D printable mug—you can edit the texture image in a 2D editor like Photoshop or GIMP, then reimport it onto your model.
Boolean editing for cutting and combining models
Boolean operations let you combine multiple models or cut shapes out of an existing model, which is incredibly useful for customizing pre-made models. There are three main boolean operations:
- Union: Combines two separate models into a single solid model, automatically removing the overlapping internal geometry.
- Difference: Cuts one model out of another—for example, cutting a hole for a bottle opener out of a custom wooden handle model.
- Intersect: Keeps only the overlapping area of two models, discarding the rest.
For example, if you want to combine a custom head sculpt with a pre-made body model for 3D printing, you can use a union boolean to merge them into a single model, then clean up the seam where they meet to create a smooth transition. Booleans can sometimes create non-manifold geometry, so always check your mesh for errors after using a boolean operation.
Sculpting fine details
Digital sculpting is an advanced editing technique that lets you shape a 3D model like you would shape clay, adding fine details like wrinkles on clothing, skin pores on a character, or texture on a rock. Tools like ZBrush and Blender’s Sculpt Mode have a range of brushes that let you push, pull, pinch, and smooth the mesh to add subtle or dramatic details. This is widely used for character models in games and film, and for adding custom details to 3D printable models. For beginners, it’s best to start with a basic base mesh and practice with simple brushes like Clay Buildup and Smooth before moving on to more advanced detailing brushes.
Exporting and Testing Your Edited Model
Once you’ve finished all your edits and fixed any errors, the final step is to export your model in the correct format for your use case and test it to make sure it works as intended. Export settings have a huge impact on how your model works in other programs, so it’s important to choose the right settings for your end goal.
Choose the right export format
Different use cases require different file formats, and using the wrong format can lead to lost data or errors. Common export formats include:
- .stl: The standard format for 3D printing. It only stores mesh data, so it’s universally compatible with all slicers and 3D printers. When exporting .stl, adjust the deviation setting to match your required level of detail: a lower deviation gives a more accurate model but results in a larger file size.
- .obj: A common format for 3D models that supports texture coordinates, so it’s good for exporting models with textures to other 3D editors or rendering programs.
- .fbx: The standard format for game assets and animated models, because it supports rigging, animation, and texture data. It’s compatible with all major game engines like Unity and Unreal Engine.
- .gltf/.glb: A modern format for web-based 3D content, optimized for fast loading and display in browsers.
Test your edited model before use
Always test your edited model before you commit to a full 3D print or integrate it into a game project. For 3D printing, you can import your exported model into your slicer software first to check for errors: most slicers will automatically highlight non-manifold geometry or other issues that need fixing before you start printing. For a large or expensive print, it’s also a good idea to print a small 1:1 scale test of the critical parts (for example, a test of the joint where two parts fit together) to check dimensions before printing the whole model.
For game assets, import the model into your game engine and check the polygon count, frame rate, and how the texture and rig look in motion. Check for rendering glitches like Z-fighting or texture stretching that you may have missed in your 3D editor. For product design models, export a test copy and check the dimensions against your required specifications using the measuring tool in your editor or slicer to confirm everything is the right size.
Conclusion
Editing 3D models is a skill that builds with practice, starting with basic resizing and error fixing and moving up to advanced techniques like retopology and sculpting. The key to success is starting with clear goals: know what you need the model to do, save a copy of your original file, and prioritize fixes that are critical for your use case—whether that’s making a model manifold for 3D printing or reducing polygon count for a game asset. Modern tools like Blender (free) and Meshmixer (free for non-commercial use) have made 3D editing more accessible than ever, so even beginners can tackle common edits with a bit of practice. By following a structured workflow, from preparation to final testing, you can turn rough, error-ridden pre-made models or rough concepts into polished, usable 3D assets that work exactly as you need them to.