
From product designers showcasing custom furniture to game developers sharing character concepts and architecture firms presenting building concepts, embedding 3D models on a website has gone from a cutting-edge novelty to an expected user experience. Today, 70% of consumers say they feel more confident purchasing a product online when they can interact with a 3D preview, according to a 2024 report from Shopify. Whether you’re a small business owner, a freelance creator, or a full-stack developer, learning how to display a 3D model on a website is easier than it sounds, even if you don’t have a background in advanced computer graphics. This guide breaks down every step, from preparing your model to optimizing it for performance, so you can add interactive 3D experiences that engage visitors without slowing down your site.
Choose the Right 3D File Format for Web Use
Not all 3D file formats are created equal when it comes to web display. Traditional 3D files from modeling tools like Blender, AutoCAD, or Maya are often full of extra data that’s unnecessary for web viewing, increasing load times and causing compatibility issues. Picking the right format upfront saves hours of troubleshooting later.
Common Web-Friendly 3D Formats
The most widely supported formats for modern web development share a focus on compression and lightweight performance. The top options today include:
- glTF (GL Transmission Format): Widely considered the gold standard for web 3D, glTF is often called the "JPEG of 3D" because it stores model data, textures, animations, and materials in a compact file that loads and renders quickly. It’s supported by all major 3D libraries and frameworks, and works seamlessly on both desktop and mobile devices.
- GLB (Binary glTF): A binary variant of glTF that stores all model data (including textures) in a single file, rather than separate JSON and texture files. This makes it easier to manage and less prone to loading errors, making it the preferred choice for most simple to complex web 3D projects.
- USDZ: Developed by Apple, USDZ is designed specifically for augmented reality (AR) experiences on iOS and macOS. It works natively with Safari and AR Quick Look, so if you want users to be able to place a product in their own space via their phone camera, USDZ is a required addition to your workflow.
- FBX: A older format that’s still used for some enterprise applications, but it’s larger and less optimized for web than glTF/GLB. It’s generally not recommended for consumer-facing websites unless you’re working with legacy 3D assets that can’t be converted.
- OBJ/MTL: Another legacy format that’s widely compatible but lacks built-in compression and advanced material support. Like FBX, it’s fine for simple static models but not ideal for interactive web experiences.
Converting Your Existing Model to a Web Format
If you created your model in a tool like Blender, SolidWorks, or SketchUp, you don’t need to start from scratch to get a web-friendly file. Almost all modern 3D tools natively export to glTF or GLB: Blender has built-in export options, SketchUp offers free glTF export plugins, and Adobe Substance Painter supports direct GLB export. For files that can’t be exported directly, free tools like Blender, Online 3D Converter, or Convertio can convert almost any 3D format to GLB or glTF in a few clicks. Always test your converted file in a viewer before adding it to your website to make sure textures, materials, and animations load correctly.
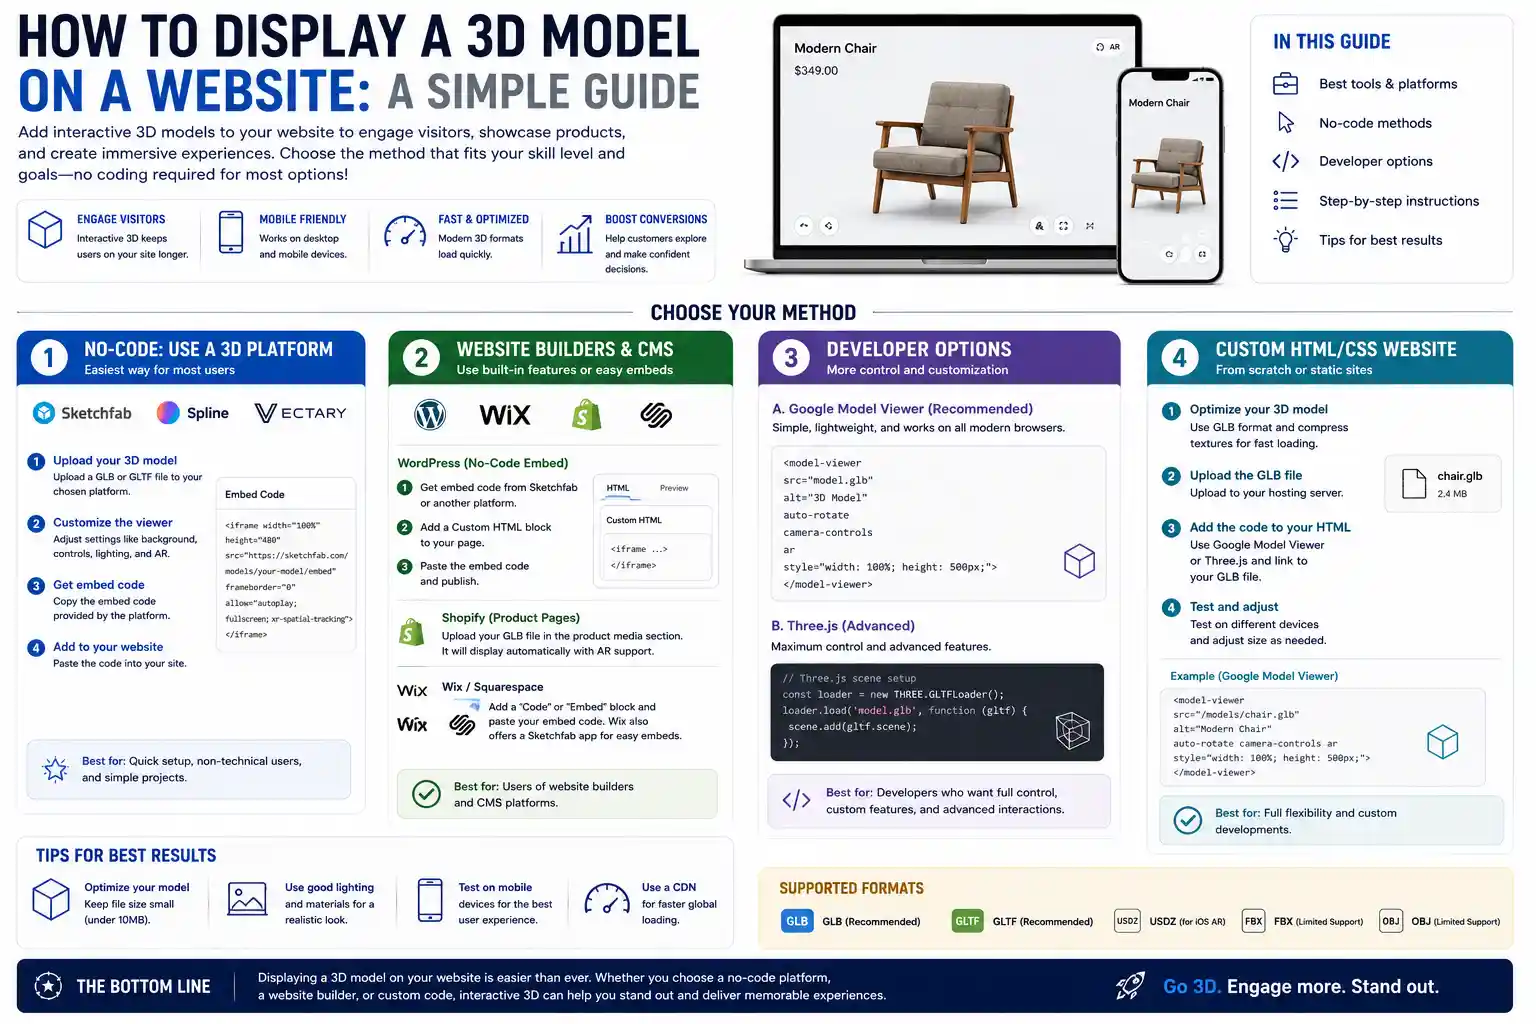
Pick a Method That Matches Your Technical Skill Level
There are multiple approaches to displaying 3D models on a website, ranging from no-code options that take minutes to set up to fully custom implementations that give you complete control over the experience. The best method for you depends on your technical skill, your budget, and the level of customization you need.
No-Code and Low-Code Options for Beginners
If you don’t know how to write JavaScript or don’t want to deal with custom code, no-code tools let you embed 3D models on any website with just a copy-paste embed code. These tools handle hosting, rendering, and optimization for you, making them perfect for small business owners, creators, and marketers. Popular options include:
- Sketchfab: One of the largest 3D model communities online, Sketchfab lets you upload any 3D model for free (with paid plans for private, unbranded embedding) and generate an embed code to add to your website, Squarespace, Wix, or Shopify store. It supports all common 3D formats, includes built-in AR support, and handles all rendering on their servers.
- Google Model Viewer: An open-source tool developed by Google that’s specifically designed for product display and AR. It works as a drop-in web component that you can add to any HTML page, and it supports both GLB and USDZ formats for cross-platform AR. It’s free to use, and many no-code website builders let you add custom HTML to embed it directly.
- Threekit: A commercial platform focused on e-commerce 3D and AR, Threekit lets you create interactive 3D product configurators and embed them on Shopify, BigCommerce, or custom websites. It’s more expensive than Sketchfab, but it’s built for high-volume product catalogs and includes advanced features like real-time material swapping.
- Embedding from 3D modeling tools: Tools like Spline, Blender Cloud, and Autodesk Fusion 360 let you export 3D models directly as embeddable web content, so you can add your work to a portfolio or client website without leaving your modeling tool.
Custom Implementation with JavaScript Libraries
If you’re comfortable working with HTML and JavaScript, or you need full control over the 3D experience (custom interactions, animations, or integration with other website features), a custom implementation with a JavaScript 3D library is the best approach. The most popular options are:
- Three.js: The most widely used open-source 3D library for the web, Three.js abstracts the complexity of WebGL (the web standard for hardware-accelerated 3D rendering) into a simple, well-documented API. It’s free, works on all modern browsers, and has a huge community with thousands of tutorials and pre-built components to speed up development.
- React Three Fiber (R3F): If you’re building a website with React, R3F is a React wrapper for Three.js that lets you write 3D scenes using React’s component syntax. It makes it easier to integrate 3D content with React state and other application features, and it’s become the go-to choice for React developers building custom web 3D experiences.
- Babylon.js: A full-featured open-source 3D framework that includes more out-of-the-box functionality than Three.js, such as built-in physics engines, advanced material support, and game-ready tools. It’s a great choice for more complex projects like interactive 3D games or architectural walkthroughs.
- PlayCanvas: A cloud-based 3D game engine that also supports embedding 3D content on websites. It’s good for collaborative projects and interactive experiences, with free and paid plans depending on your project size.
For 90% of people adding 3D to a website, you don’t need to build a custom renderer from scratch. The biggest mistake beginners make is overcomplicating it: start with a no-code embed if you just need to showcase a model, and only move to custom code when you outgrow the features no-code tools offer.
— Don McCurdy, Three.js core contributor and Google 3D developer
For example, if you’re a furniture maker who wants to add 3D previews of your best-selling sofas to your Shopify site, a Sketchfab embed or Google Model Viewer will work perfectly. If you’re building an interactive 3D configurator that lets customers change the fabric, legs, and size of a sofa in real time, you’ll likely need a custom implementation with Three.js or a dedicated platform like Threekit.
Optimize Your 3D Model for Web Performance
Even if you pick the right format and method, a 3D model that’s too large will slow down your website, hurt your search engine rankings, and drive away visitors, especially those on mobile devices with limited data or slower connection speeds. 3D optimization is the most overlooked step in the process, but it’s just as important as adding the model to your site. Optimizations don’t have to hurt the visual quality of your model when done correctly.
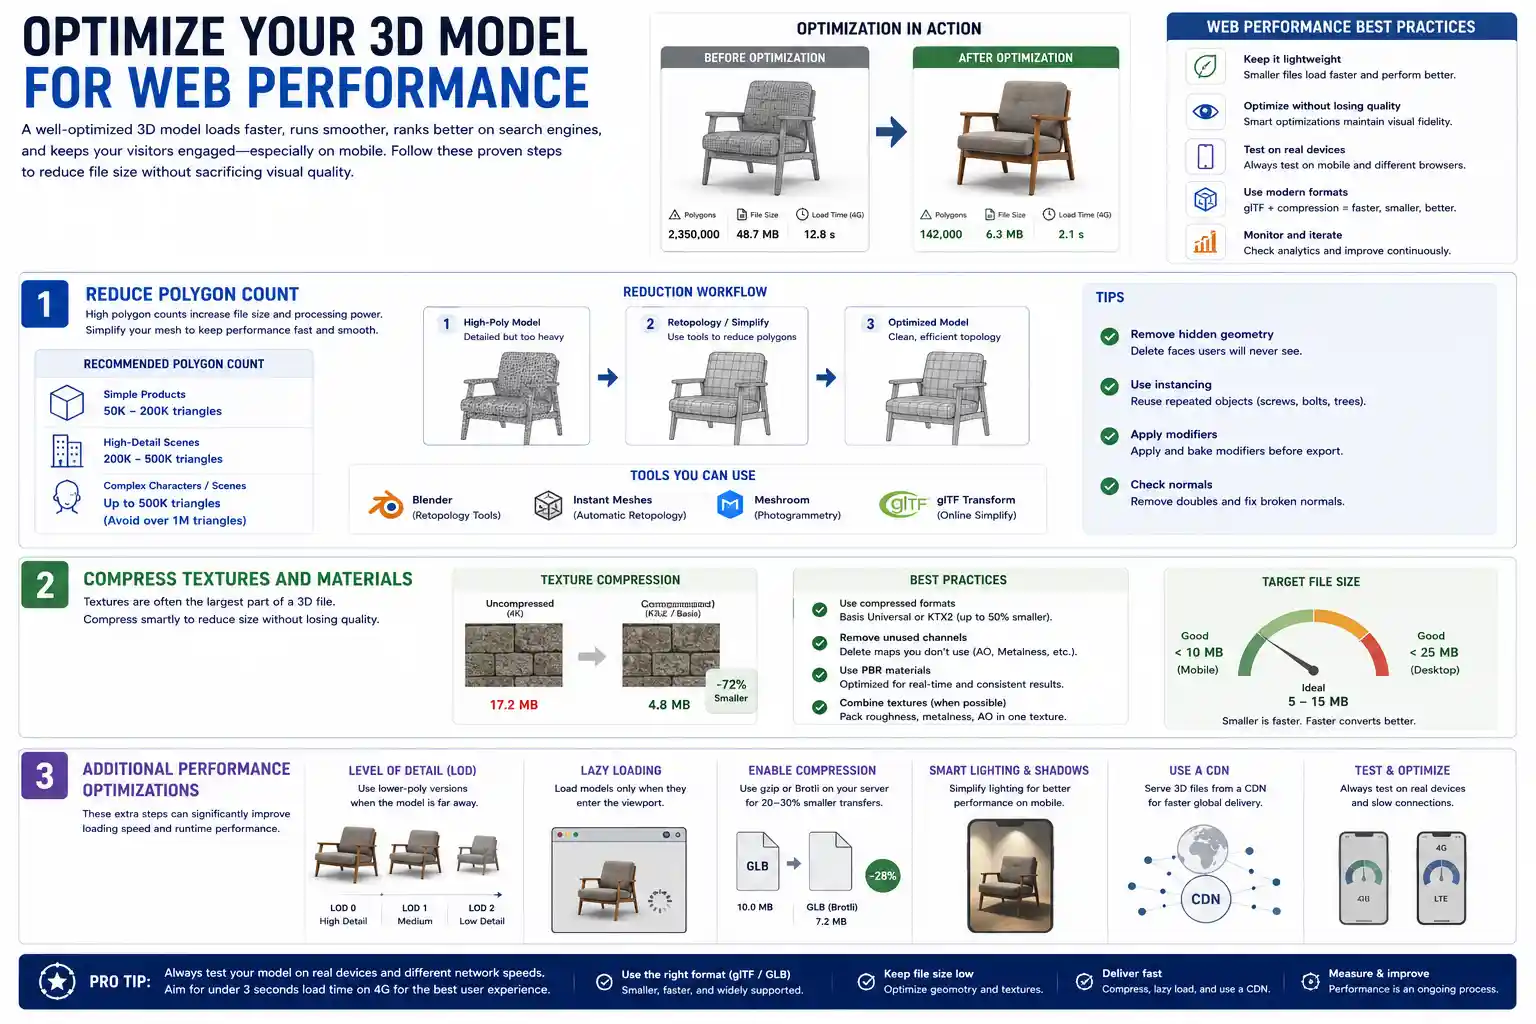
Reduce Polygon Count
Polygon count is the number of triangular faces that make up your 3D model. High-poly models (with millions of polygons) look great in professional renderings, but they take far longer to load and require more processing power to render on a phone. For web display, aim for a polygon count between 50,000 and 200,000 triangles for most products. High-detail models like architectural walkthroughs or complex characters can go up to 500,000 triangles, but anything over 1 million will almost always cause performance issues for most users.
To reduce polygon count without losing detail, use a process called retopology. Tools like Blender have built-in retopology tools, and automated tools like Instant Meshes or Meshroom can simplify high-poly models in seconds. You can also use online tools like glTF Transform to simplify models directly in your browser without downloading any software.
Compress Textures and Materials
Textures (the image files that give your model its color, roughness, and detail) are often the largest part of a 3D file. A 4K 32-bit texture can be several megabytes on its own, and multiple uncompressed textures can push your total file size into tens of megabytes, which is too large for most websites. Aim to keep your total 3D model file size under 10MB for mobile users, and under 25MB for desktop-only experiences.
To compress textures effectively:
- Use 1K (1024x1024) or 2K (2048x2048) resolution textures for most web models. 4K textures are rarely noticeable on mobile screens and add unnecessary file size.
- Use compressed texture formats like Basis Universal or KTX2, which reduce file size by up to 50% without noticeable quality loss. Most 3D optimization tools support these formats natively.
- Remove unused texture channels. If your model doesn’t use a normal map or ambient occlusion map, delete those channels from your file to save space.
- Use PBR (physically based rendering) materials, which are optimized for real-time rendering and produce consistent results across all browsers and devices.
Additional Performance Optimizations
After simplifying your model and compressing textures, you can make a few more tweaks to improve performance. For example, enable level of detail (LOD) which automatically uses a lower-polygon version of your model when it’s far from the camera, reducing processing load for complex scenes. If you have multiple 3D models on one page, use lazy loading to only load models when they scroll into the viewport, which reduces initial page load time. Finally, enable gzip or Brotli compression on your web server for 3D files, which can reduce file size by an extra 20-30% before it’s sent to the user’s browser.
Step-by-Step: Embed Your 3D Model
To make the process concrete, let’s walk through two of the most common use cases: embedding a 3D model with a no-code tool, and adding a simple custom 3D model with Three.js. Both methods work on almost any website, from custom HTML builds to popular CMS platforms like WordPress, Squarespace, and Wix.
Method 1: Embed with Sketchfab (No-Code)
This method is ideal for beginners who want to showcase a 3D model in under 10 minutes:
- Prepare your 3D model as a GLB, glTF, or OBJ file, optimized for web as outlined in the previous section.
- Create a free Sketchfab account and click "Upload" to add your model to the platform. Fill in the title, description, and set the model visibility to "Public" (for free accounts) or "Private" if you have a paid Pro or Business plan.
- Once uploaded, click the "Embed" button on the model page. Customize your embed settings: choose the size, turn off the Sketchfab branding if you have a paid plan, enable AR if you want to support it, and adjust the initial camera angle to show your model in its best light.
- Copy the generated embed code, which is a block of HTML.
- Paste the embed code into the custom HTML block of your website builder. For WordPress, add a "Custom HTML" block to your page or post. For Squarespace, add a "Code" block and paste the code there. Save and publish your page.
- Test the page on desktop and mobile to make sure the model loads correctly and that interactions (panning, zooming, rotating) work as expected.
The main downside of this method is that you’re dependent on Sketchfab’s servers, and free accounts include branding. For personal portfolios or hobby projects, that’s rarely an issue, but for professional business sites, a paid plan or custom embed is usually better.
Method 2: Custom Embed with Three.js (Code)
If you want a fully unbranded, custom experience and you’re comfortable with basic HTML and JavaScript, this method gives you full control:
- Optimize your model and export it as a GLB file, and upload it to your website’s hosting or a cloud storage service that allows hotlinking.
- Add the Three.js library to your HTML page. You can link directly to the CDN version by adding this line to the
<head>section of your page:<script src="https://cdn.jsdelivr.net/npm/three@0.158.0/build/three.min.js"></script> - Add an HTML
<div>element to your page where you want the 3D model to appear, and give it an ID (for example,<div id="3d-container" style="width: 100%; height: 500px;"></div>). Set the width and height to match the space you want the model to fill. - Add a small JavaScript snippet to the page that sets up the scene, loads your model, and renders it. The basic code sets up a camera, a light source, an interactive control that lets users rotate and zoom the model, and loads your GLB file. You can adjust colors, lighting, and initial rotation to match your design.
- Upload the HTML page and your GLB file to your web host, and test the page in multiple browsers. Make sure the model loads within a few seconds even on a slow 3G connection.
For React users, the process is similar with React Three Fiber: you just create a new component for your 3D model, import the necessary dependencies from Three.js and R3F, and follow the same scene setup process within your React app structure.
Add AR Support (Optional but Recommended for E-Commerce)
If you’re displaying product models, adding augmented reality support lets users place the 3D model in their own physical space using their phone camera, which dramatically increases conversion rates. To add AR support, you just need to export a USDZ version of your model (in addition to GLB) and use Google Model Viewer, which automatically detects the user’s device and serves the correct AR experience. For example, iOS users will get AR Quick Look integration, while Android users get Google AR Core support. Most no-code platforms like Sketchfab and Threekit also include AR support by default, so you don’t have to set it up manually.
Test and Troubleshoot Common Issues
Even with careful preparation, you may run into common issues when displaying 3D models on a website. Knowing how to troubleshoot these issues saves time and ensures a smooth experience for all visitors.
Model won’t load or displays a black screen: The most common cause of this issue is incorrect file paths or CORS (Cross-Origin Resource Sharing) errors. If your 3D file is hosted on a different domain than your website, that domain needs to allow cross-origin requests for the file to load. Check that your file path is correct, and if you’re hosting the file on a cloud service like AWS S3, make sure CORS is configured correctly. A black screen can also be caused by missing lights or cameras in your Three.js scene, so double-check that you added at least one light source and positioned the camera so it’s pointing at your model.
Model is too slow to load or lags on mobile: This almost always means your file size is too large or your polygon count is too high. Go back and simplify your model, compress your textures again, and enable lazy loading to reduce initial load time. You can also test your model on a 3G connection using your browser’s developer tools to simulate slow network speeds. If you’re using an embed from a third-party service, check that the service isn’t loading extra unnecessary scripts that are slowing down your entire page.
Textures are missing or look wrong: If textures don’t load at all, double-check that all texture paths are correctly embedded in your GLB file. When exporting from Blender or other tools, make sure you enable the "embed textures" option to include all texture data in the single GLB file, rather than leaving them as separate files that can go missing. If textures look blurry, you may have compressed them too much or used too low of a resolution. If they look too dark or too bright, check that your lighting settings in your scene match the material settings of your model, especially if you’re using PBR materials.
3D model doesn’t show up on iOS or Safari: The most common issue here is compatibility with certain file formats or embedded content. If you’re using AR, make sure you have a USDZ file available, as iOS doesn’t support AR with GLB natively. For custom Three.js scenes, make sure you’re using a recent version of Three.js, as older versions have compatibility issues with newer Safari releases. Also, check that your web server is serving 3D files with the correct MIME type—some servers don’t set the correct MIME type for GLB or USDZ files by default, which can cause Safari to block them from loading.
Conclusion
Displaying a 3D model on a website doesn’t require a team of specialized developers or a huge budget. By starting with the right file format, picking a method that matches your technical skill, optimizing for performance, and testing across devices, you can add engaging, interactive 3D experiences to any website. For beginners, no-code tools like Sketchfab or Google Model Viewer let you go from a finished 3D model to an embedded web experience in less than an hour. For more advanced use cases like product configurators or interactive experiences, JavaScript libraries like Three.js give you all the flexibility you need to build a custom experience that matches your brand. As 3D and AR become more common in online shopping and digital content, getting started with web 3D now gives you a head start over competitors and helps you create more engaging experiences for your visitors.