
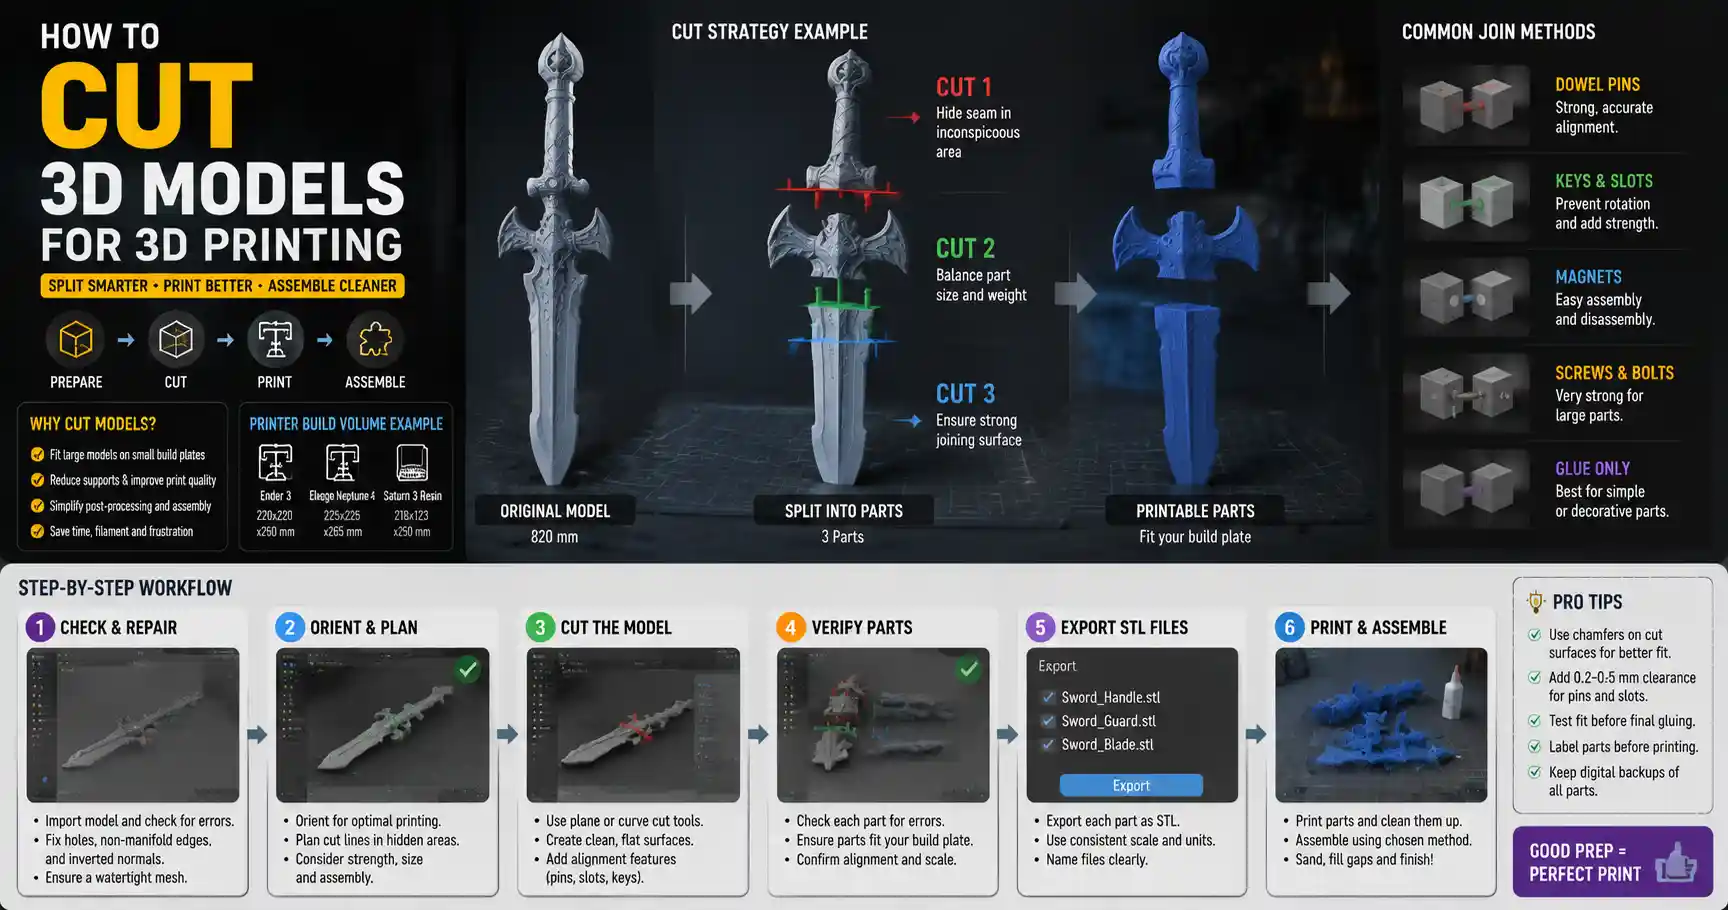
If you’ve ever spent hours designing a detailed 3D model, only to realize it’s too large to fit on your 3D printer’s build plate, you know how frustrating that moment can be. Even for models that fit, splitting complex assemblies into multiple parts can improve print quality, reduce support material waste, and make post-processing far easier. Cutting 3D models for printing is a fundamental skill for any 3D printing enthusiast, from beginners working on their first cosplay prop to professional designers producing large-scale prototypes. With the right tools and techniques, you can split even the most complex models into printable parts that fit together perfectly every time.
Why Cut 3D Models Before Printing?
Before diving into the step-by-step process, it’s important to understand why cutting models is such a common practice in 3D printing. It’s not just a workaround for large models that don’t fit on small build plates; cutting offers a range of benefits that improve both the printing process and the final result.
Fit Large Models on Small Build Plates
The most obvious reason to cut a 3D model is size. Consumer FDM printers typically have build plates ranging from 220x220mm to 300x300mm, while even industrial resin printers rarely exceed 350x350mm in build volume. That means a life-sized cosplay helmet, a full-size furniture prototype, or a detailed architectural model will almost always need to be split into smaller parts. Cutting lets you produce large objects with even the most affordable desktop 3D printers, opening up possibilities that would otherwise be out of reach.
Improve Print Quality and Reduce Supports
Cutting isn’t just for large models. Even small, complex models can benefit from splitting to reduce overhangs and eliminate the need for excessive support material. For example, a model of a hollow vase with a narrow opening and thick walls often requires dense support inside the cavity that’s nearly impossible to remove after printing. Splitting the vase into two halves along its central axis lets you print each half without internal supports, resulting in a cleaner, smoother interior that requires far less post-processing. Similarly, articulated models (like action figures or robotic joints) are often cut into separate parts to ensure each component prints correctly without supports interfering with moving features.
Simplify Post-Processing and Assembly
Cutting a model into logical parts can also make sanding, painting, and assembly much easier. Printing a complete model of a character with multiple distinct color blocks means you’ll have to mask off sections during painting, which is time-consuming and often results in uneven lines. Cutting the model into separate colored parts (like a yellow shirt and blue pants) lets you print each part in the correct color, eliminating the need for extensive painting entirely. For functional parts, cutting also lets you insert threaded inserts, bearings, or other hardware during assembly that couldn’t fit into a single printed hollow part.
“Splitting a model isn’t just about fitting it on the build plate—it’s about designing for the limitations and strengths of 3D printing from the start. A well-split model prints faster, has better quality, and assembles more cleanly than a single part that barely fits.”
Prepping Your Model Before Cutting
Jumping straight into cutting a raw STL file is a common mistake that can lead to misaligned parts, messy joins, and failed prints. Taking the time to prep your model first will save you hours of frustration later. Whether you downloaded a free model from Thingiverse or designed your own from scratch, these prep steps are non-negotiable for a clean result.
Check for Model Errors
3D printing relies on solid, manifold mesh geometry, and cutting a model with existing errors will only amplify those problems. Non-manifold edges, overlapping faces, and holes in the mesh can cause cutting software to crash, produce broken parts, or create misaligned join surfaces. Start by importing your model into a mesh repair tool like Meshmixer, Blender’s 3D Print Toolbox, or Microsoft 3D Builder. Most tools will automatically detect common errors: just run the repair function and check the result before moving on.
Orient the Model for Your Build Plate
Before you make any cuts, decide how each part will sit on your printer’s build plate. Orientation affects print strength, surface quality, and support requirements, so it makes sense to plan this before cutting, not after. For example, if you’re cutting a life-sized sword into three parts, you’ll want each part to lie flat on the build plate with the broad side down, which eliminates most overhangs and maximizes layer adhesion. If you cut first and orient later, you might end up with parts that can’t be oriented properly without requiring extensive supports.
Plan Your Cut Lines and Join Strategy
The location of your cut lines is just as important as the cut itself. A good cut line follows these general rules:
- It’s placed in an inconspicuous area that will be easy to hide with putty or paint after assembly
- It avoids cutting through fine details, intricate features, or thin walls that would be weakened by the join
- It creates parts that are roughly equal in size and weight, to balance printing time and reduce stress on the join
- It accounts for your planned joining method (glue, screws, 3D printed pins) to ensure there’s enough material for the joint
For example, if you’re cutting a human-sized mannequin, the best cut lines are usually at the joints: between the head and neck, between the torso and hips, and between the upper and lower arms. These locations are natural seams, so any visible gap will be far less noticeable than a random cut across the chest. For organic shapes like vases or sculptures, cut along the central symmetry line if the model is symmetrical—this creates two identical halves that are easy to align and print.
You should also decide how you’ll join the parts before cutting, because you’ll need to add space for alignment pins or screw inserts during the cutting process. Common joining methods include super glue with alignment pins, epoxy for large heavy parts, or screw and nut assemblies for parts that need to be taken apart later. Each requires different accommodation in the cut model, so planning ahead ensures you don’t have to go back and re-cut the model after the fact.
Step-by-Step Cutting Methods for Common Tools
There are dozens of 3D modeling tools that can cut STL files, from free open-source options to professional CAD packages. Below, we’ll cover the three most accessible methods for beginners and intermediate users, with step-by-step instructions for each.
Method 1: Free and Easy Cutting with Meshmixer
Autodesk Meshmixer is a free, powerful tool for working with STL files, and it’s one of the most popular options for beginners thanks to its dedicated cut tool. It works with both Windows and Mac, and it’s designed specifically for mesh editing for 3D printing. Follow these steps to cut your model:
- Import your repaired STL file into Meshmixer. Use the
Edit > Placetool to position the model so your planned cut line is aligned with one of the cardinal axes (X, Y, or Z) for a straight cut. - Go to
Edit > Plane Cutin the left sidebar. A blue cutting plane will appear over your model. Drag the handles to move the plane to your pre-planned cut line, and rotate it if you need a non-straight cut. - Choose whether you want to keep both sides of the cut (for splitting into two parts) or just one side (for trimming excess material from a model). Check the "Cut off" box to remove the side you don’t want, or leave it unchecked to keep both.
- If you’re splitting into two parts and want to add alignment pins automatically, check the "Add Drilled Hole" option. This will add a hole to one side and a matching pin to the other, which makes alignment during assembly far easier.
- Click "Accept" to apply the cut, then export each part as a separate STL file. Repeat the process for any additional cuts you need to make.
Method 2: Cutting in Blender for Custom Shapes and Advanced Edits
If you need to make irregular, curved cut lines or want to combine cutting with other mesh edits, Blender is a free open-source option that gives you full control over the process. It has a steeper learning curve than Meshmixer, but it’s extremely flexible for complex projects. Here’s how to do it:
- Import your repaired STL into Blender, switch to Edit Mode, and ensure your model is a single solid mesh.
- Add a "Knife Project" to make your cut: create a plane object, position it along your cut line, then select both the plane and your model, enter Edit Mode on the model, and use the
Mesh > Knife Projecttool. This will cut the mesh exactly along the plane’s surface. - Separate the cut mesh into two objects by pressing
Pand selecting "Separate by Loose Parts". This will give you two individual parts you can edit separately. - Add custom alignment pins by creating a small cylinder mesh, then using a boolean difference to cut a matching hole in the opposite part. This gives you full control over the size and placement of pins, unlike Meshmixer’s automatic pins.
- Export each part as a separate STL file for slicing.
Method 3: Cutting for Solid Models in Fusion 360
If you’re working with a parametric solid model (instead of a mesh STL), Autodesk Fusion 360 is the go-to tool for professional and hobbyist designers. Cutting solid models is more reliable than cutting meshes, because it doesn’t introduce mesh errors. Follow this process:
- Import your model or open your existing design in Fusion 360. Create a new sketch on the plane where you want to make your cut.
- Draw a line across your model along the planned cut line, then exit the sketch. Use the
Combine > Cuttool to split the solid model into two separate bodies along the sketch line. - Right-click each body in the browser menu and select "Save as STL" to export each part individually.
- Use the built-in sketch tool to add holes for pins or inserts directly to the cut face before exporting, so you don’t have to edit the STL later.
Adding Alignment Features and Refining Cuts
A clean cut is only half the battle. If you want your parts to fit together perfectly without gaps or misalignment, you need to add alignment features to the cut faces. This is a step many beginners skip, and it’s the most common reason why assembled 3D printed parts end up lopsided or misaligned.
The Most Common Alignment Features
There are three main alignment features that work for most projects, each with their own advantages:
- Dowel pins: The most popular option for most projects. You can either use 3D printed pins that you glue into one half, or buy off-the-shelf wooden or metal dowels for extra strength. Add two matching holes in one cut face and two matching pins in the other, and the parts will slide together perfectly every time. For most projects, 6mm or 8mm diameter pins work well.
- Box joints: Ideal for large, flat parts like furniture or cosplay armor panels. A interlocking box joint not only aligns the parts, it also increases the surface area for gluing, making the joint much stronger than a simple butt joint. They’re also more visible than pins, so they work best for parts where the seam will be hidden anyway.
- mortise and tenon joints: A traditional woodworking joint adapted for 3D printing. The tenon is a protruding tab on one part that fits into a matching mortise hole in the other. This is great for joining parts at right angles, like the legs of a table or the arms of a chair, and it creates a very strong, stable joint.
Accounting for Tolerances
One of the biggest mistakes when adding alignment pins is not accounting for 3D printer tolerance. Most consumer FDM printers have an accuracy of around ±0.1mm to ±0.2mm, so if you design a 6mm pin to fit into a 6mm hole, it will almost always be too tight (or too loose) because of printer error. The rule of thumb is to make the hole 0.2mm to 0.4mm larger in diameter than the pin. For example, a 6mm pin should fit into a 6.3mm hole. This gives you enough room for slight print errors, while still keeping the joint tight and aligned. If you’re using resin printing, which is more accurate, you can drop that tolerance to 0.1mm to 0.2mm.
Refining Cut Surfaces
After cutting, it’s a good idea to slightly expand each part by 0.1mm to 0.2mm along the cut face to compensate for any material removed during the cut and to create a small gap that can be filled with glue or putty. This prevents overlapping mesh, which can cause the parts to not fit together flush. You should also check the cut face for any leftover mesh errors or stray triangles, especially if you’re cutting an STL mesh rather than a solid model. Running a quick mesh repair after cutting is a good habit to catch any errors before you slice the part.
Common Mistakes to Avoid
Even experienced 3D printers make mistakes when cutting models. Knowing what to look out for can save you time, filament, and frustration. Here are the most common mistakes and how to avoid them:
Cutting Through High-Stress Areas
It’s tempting to place cut lines wherever it’s most convenient, but cutting through a section that will be under a lot of stress (like the handle of a tool or the neck of a large statue) weakens the part and makes it more likely to break at the joint. Always place cut lines in low-stress areas, and if you have to cut through a high-stress area, use a stronger joining method like screws instead of just glue, and add extra material around the joint to reinforce it.
Creating Parts That Are Too Small or Too Thin
When splitting a large model, it’s easy to end up with a small part that has very thin walls around the cut face. Thin walls around the joint are weak, and they can crack when you glue or clamp the parts together. As a general rule, you need at least 2mm to 3mm of material around any alignment holes or pins to keep the joint strong. If your cut leaves you with less than that, adjust the cut line slightly to move it to a thicker section of the model.
Forgetting to Export Parts Separately
This sounds like an obvious mistake, but it’s one of the most common. After cutting a model into three or four parts, it’s easy to accidentally export the entire combined mesh instead of individual parts, or mix up the order of cuts. Always double-check that each part is a separate STL file before you start slicing, and name the files clearly (like helmet-front.stl and helmet-back.stl) so you don’t get confused later.
Not Testing the Fit Before Printing
If you’re working on a large, expensive project with lots of parts, it’s a good idea to print just one joint first to test the fit before you print all the parts. This lets you adjust your tolerance if the pin is too tight or too loose, so you don’t end up with five perfectly printed parts that don’t fit together. For most projects, a 1-hour test print of the joint area is worth the time and filament to avoid a much bigger problem later.
Conclusion
Cutting 3D models for printing is a skill that takes a little practice to master, but it opens up a world of possibilities for 3D printing projects that would otherwise be impossible. By planning your cut lines ahead of time, prepping your model for cutting, choosing the right tool for your project, and adding simple alignment features, you can create perfectly fitting parts that assemble seamlessly. The key is to work with the limitations of your 3D printer, plan ahead for your joining method, and always double-check your work before hitting print. Whether you’re building a life-sized cosplay prop, a large-scale architectural model, or just splitting a small complex model to get better print quality, these techniques will help you get professional results every time.
As you gain more experience, you’ll start to develop an intuition for where to place cut lines and what kind of alignment features work best for different projects. Don’t be afraid to experiment with different tools and methods—what works for a large cosplay prop might not work for a small detailed figurine, so being comfortable with multiple cutting methods will make you a more versatile 3D printer. With a little patience and practice, you’ll be cutting complex models like a pro in no time.