
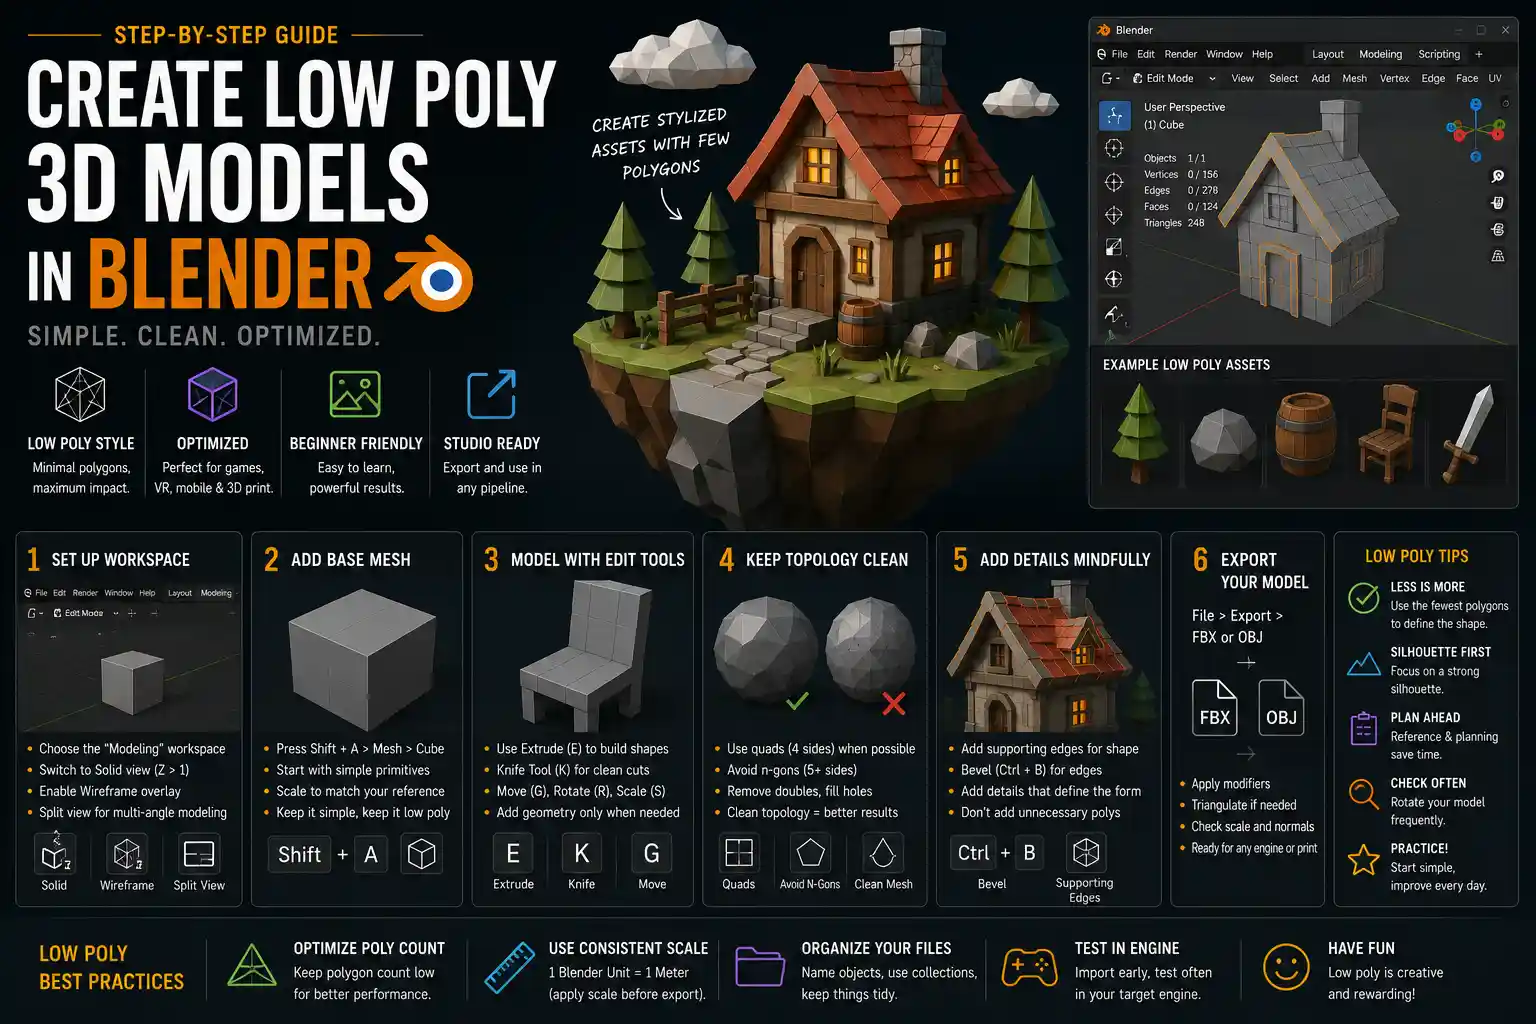
If you’ve ever scrolled through 3D art portfolios, played indie games, or browsed minimalist 3D print designs, you’ve likely encountered low poly 3D models. Defined by their simple geometry and minimal polygon count, low poly models aren’t just a nostalgic throwback to early 3D graphics—they’re a versatile, popular art style perfect for game development, 3D printing, motion graphics, and personal projects. And the best part? You don’t need an expensive 3D software subscription or advanced art degree to create them. Blender, the free open-source 3D creation suite, has all the tools you need to get started. This step-by-step guide will walk you through everything you need to know to create clean, professional low poly 3D models in Blender, from setting up your workspace to exporting your final design.
Preparing Your Blender Workspace for Low Poly Modeling
Before you start modeling, it’s important to set up Blender in a way that streamlines low poly work. Out of the box, Blender’s default layout is designed for general 3D creation, but a few small tweaks will save you time and frustration as you work. Low poly modeling relies on seeing your mesh clearly, so adjusting your viewport settings is the first place to start.
Adjust Viewport Settings for Clarity
By default, Blender opens with a perspective view and shaded display, which can hide small geometry errors that are critical to catch when working with low poly models. Switching to solid view mode (press Z then 1 on your keyboard) will show you your mesh without distracting lighting or texture effects, making it easy to spot uneven edges or extra vertices. You can also enable wireframe overlay by checking the Wireframe box in the top-left Overlay menu. This overlay shows all your polygon edges in a contrasting color, so you can always see how your geometry is constructed, even when you’re working with solid shapes.
Another helpful tweak is turning on edge loops highlighting in Blender’s preferences. Go to Edit > Preferences > Themes > 3D Viewport and increase the Edge Loop Highlight opacity to 75-100%. This makes it easy to see entire edge loops at a glance when you’re selecting and editing geometry, which is a common task in low poly modeling. Finally, consider splitting your 3D view into two windows: one for perspective modeling and one for orthographic top/side/front view. Orthographic view eliminates perspective distortion, so you can check that your model is symmetrical and proportional far more easily than you can in perspective view.
Gather Reference Images
Even experienced low poly artists use reference images to guide their work. A reference helps you lock in proportions early, avoiding time-consuming reworks later. For low poly models, you don’t need high-resolution photos—simple blueprints, reference sketches, or even a few product photos from different angles are enough. Blender makes it easy to import reference images directly into your viewport: go to Add > Image > Reference, then select your image and drag it into place on the axis you need. For example, if you’re modeling a low poly chair, you can add a front reference to the X-Z plane and a side reference to the Y-Z plane to match proportions as you build.
When you’re just starting out, it’s best to pick simple objects for your first low poly projects. A mug, a tree, a house, or a stylized animal are all great starting points with clear geometry that’s easy to simplify into a low poly shape. Avoid complex organic models like human faces until you’ve mastered the basics of polygon management.
Core Low Poly Modeling Techniques in Blender
Low poly modeling is all about intentionality: every polygon in your model serves a purpose. Unlike high poly modeling, where you might use thousands of polygons to create smooth details, low poly work requires you to only keep the geometry you need to define the shape of your object. Blender has several tools that make this process intuitive, even for new users. Most low poly models start with a simple base mesh, which you then shape by adding, removing, and adjusting vertices.
Starting With a Base Mesh
Nearly all low poly models start from a primitive shape: a cube, sphere, cylinder, or plane. Primitives are already low poly by default, so they’re the perfect starting point. For example, if you’re modeling a low poly apple, start with a uv sphere that has 8 segments and 8 rings—this gives you just 64 polygons to work with, which is more than enough to define the shape. If you’re modeling a bookshelf, start with a single cube, then extrude out the shelves and sides as you go.
A common mistake new low poly artists make is starting with too much geometry. If you start with a 32-segment sphere for your apple, you’ll have to spend extra time deleting unnecessary vertices later. Always start with the lowest possible polygon count for your base shape, then add geometry only when you need it.
Essential Editing Tools for Low Poly Work
Blender’s edit mode is where you’ll spend most of your time shaping your low poly model. There are a few core tools that you’ll use for almost every project:
- Extrude: This tool pulls new geometry out from an existing edge or face, making it perfect for building up shapes like chair legs, branch, or book spines. To extrude, select a face in edit mode, press E, drag the new face out to the size you want, then confirm. It’s one of the fastest ways to add detail without adding unnecessary polygons.
- Knife Tool: The knife tool lets you cut new edges into your existing mesh, which is helpful when you need to add a new feature like a handle on a mug or a door on a house. Just press K, click and drag to draw your new cut, then press Enter to confirm. Always make sure your new cuts connect two existing edges to avoid creating n-gons (polygons with more than four sides), which can cause issues later when texturing or exporting.
- Connect Vertex Path: This tool lets you add a new edge between two existing vertices without cutting the entire face, which is perfect for adding subtle detail without cluttering your geometry.
- Merge Vertices: When you’re simplifying a shape, you’ll often end up with two vertices in the same spot. Merging them (press M then select “Merge at Center”) removes extra geometry and cleans up your mesh.
- Decimate Modifier: If you started with a high poly mesh and want to simplify it to low poly, the Decimate modifier is your best friend. It automatically reduces the polygon count of your model while preserving the overall shape.
One key rule to remember when working in edit mode is to keep your mesh made up entirely of triangles and quads (polygons with three or four sides). N-gons might look fine in Blender’s viewport, but they can cause shading errors, texturing issues, or problems when exporting to game engines or 3D printing software. If you end up with an n-gon, you can use the Knife tool to split it into two or more quads, or use the Triangulate Faces command (Ctrl + T) to split it into clean triangles.
Symmetry for Faster, Cleaner Modeling
Most objects you’ll model—from stylized animals to furniture to buildings—are symmetrical along at least one axis. Instead of modeling both sides by hand, you can use Blender’s Symmetry modifier or the X-axis mirror option in edit mode to model one half and Blender will automatically create the other. This cuts your modeling time in half and guarantees your model is perfectly symmetrical, which is hard to achieve by hand.
To enable mirror modeling, add a Mirror modifier after you create your base mesh, select the axis your object is symmetrical along (usually X), and check the “Clipping” box. Clipping prevents vertices on the center line from being pulled away from the axis, which keeps your seam clean. Once you’re done modeling, you can apply the modifier to merge the two halves into a single mesh.
“The beauty of low poly art is that imperfection is part of the charm. You don’t need to get every vertex perfectly placed—if the shape reads correctly, that’s all that matters.”
— Oliver Dev, indie game developer and low poly 3D artist
Cleaning Up Your Mesh for a Polished Low Poly Look
Once you’ve shaped the basic form of your model, it’s time to clean up your mesh to get that crisp, clean low poly aesthetic. A messy mesh with extra vertices or uneven edges will distract from your design, even if the overall shape is correct. This step is quick, but it makes a huge difference in the final result.
Remove Unnecessary Geometry
The most important step in cleaning up your low poly mesh is deleting any vertices, edges, or faces that don’t contribute to the final shape. Any face that’s hidden inside the model (for example, the bottom of a mug that won’t be seen) can be deleted to reduce your polygon count even further. You can also use Blender’s Merge by Distance tool to automatically remove any duplicate vertices that are sitting on top of each other. To use it, select all vertices in edit mode, press M, then select “Merge by Distance.” Blender will automatically merge any vertices that are closer than the threshold you set, which cleans up overlapping geometry in one click.
If you’re not sure whether you can remove a polygon, ask yourself: does removing this change the overall shape of the model when you look at it from a normal distance? If the answer is no, delete it. That’s the core rule of low poly modeling: less is more.
Adjust Vertex Positions and Sharpen Edges
Low poly models get their distinct look from sharp, clean edges between polygons. After shaping your model, take a few minutes to go through your mesh and adjust individual vertices to make lines straight and angles even. For example, if you’re modeling a low poly table, the edges of the tabletop should be perfectly straight, and the legs should be perpendicular to the top. Blender’s snap tool makes this easy: you can snap vertices to the grid, to edges, or to other vertices to get perfectly clean lines.
For an even crisper look, you can enable auto-smooth or mark sharp edges in Blender. If you want hard edges between your polygons (which is standard for most low poly art), select the edges you want to sharpen, right-click, and select “Mark Sharp.” Then add an Auto Smooth modifier to your model, which will keep sharp edges between marked faces while smoothing any soft edges. This gives your model that distinct, faceted low poly look instead of a blurry, smoothed look.
Check for Common Errors
Before you move on to texturing, take a minute to check your mesh for common errors that can cause problems later. Here’s a quick checklist to run through:
- Check for non-manifold geometry: Non-manifold geometry is mesh that has edges connected to more than two faces, or faces with no volume. This can cause issues with 3D printing, exporting, and rendering. To find non-manifold geometry in Blender, go to Select > Select All by Trait > Non Manifold in edit mode. Blender will select any problem areas, so you can fix them by merging vertices or deleting extra faces.
- Check for flipped normals: Normals define which side of a face is the outside. If a normal is flipped, the face will look invisible in render mode or when exported. To check this, enable Face Orientation overlay in the Overlay menu: blue faces are correct, red faces are flipped. Select the red faces and press Shift + N to recalculate normals outward.
- Count your polygons: If you’re creating a model for a game or real-time application, check your polygon count to make sure it fits within your requirements. You can see your polygon count in the top-left corner of the 3D viewport (if it’s not visible, enable it in the Statistics overlay). Most low poly models for games are between 100 and 15,000 polygons, depending on their use—there’s no hard rule, but the goal is to keep it as low as possible while keeping the shape you want.
Texturing Your Low Poly Model in Blender
Texturing is where your low poly model really comes to life. The low poly style works with a wide range of texturing approaches, from solid flat colors to hand-painted details. Blender’s built-in shader editor and texture painting tools make it easy to get the exact look you want, no external software required.
UV Unwrapping for Low Poly Models
Before you can add a texture, you need to UV unwrap your model. UV unwrapping is the process of flattening your 3D mesh into a 2D map so Blender knows how to apply your texture to the model. For low poly models, UV unwrapping is far simpler than it is for high poly models, because you have far fewer faces to work with.
The easiest method for low poly UV unwrapping is smart UV project. To use it, select all your faces in edit mode, go to UV > Smart UV Project, and set the island margin to 0.02 or 0.05. This margin adds space between different parts of your UV map, which prevents bleeding when you bake or paint your texture. Smart UV Project will automatically split your mesh into UV islands and lay them out on the texture space, which works perfectly for most low poly models. If you want more control, you can manually split your mesh into islands by marking seams, but for most simple low poly models, smart projection is more than enough.
Choosing a Texturing Style
Low poly art lends itself to several popular texturing styles, and you can choose the one that fits your project:
- Solid Color Materials: This is the simplest approach, and it creates a clean, minimalist look that’s perfect for 3D printing, motion graphics, or modern illustrations. Just create a new Principled BSDF shader for each color in your model, assign it to the corresponding faces, and you’re done. For example, a low poly tree might have one brown material for the trunk and one green material for the leaves.
- Hand-Painted Textures: This is the most popular style for game assets and art pieces. Blender’s texture painting tool lets you paint directly onto your model with brushes, adding subtle details like shadows, highlights, or small marks. Start with a base color for each section, then add darker tones in crevices and lighter tones on raised edges to give your model depth without adding extra geometry.
- Cell Shading: Cell shading adds hard-edged shadows that complement the faceted low poly style perfectly. You can achieve this effect in Blender by using a toon shader and adjusting the shadow steps to create sharp, defined shadows instead of smooth gradients.
One trick that adds a lot of charm to low poly models is adding a subtle ambient occlusion to your texture. Ambient occlusion adds a soft dark shadow in the crevices between polygons, which helps define the shape of your model without adding extra geometry. You can bake ambient occlusion directly into your texture in Blender by adding a Bake node in the shader editor and selecting Ambient Occlusion as the bake type. This only takes a minute, and it makes a huge difference in how polished your model looks.
Exporting Your Final Model
Once your model is complete and textured, you need to export it for its final use. Blender supports all common 3D file formats, so the format you choose depends on what you’re using the model for:
- If you’re exporting for a game engine like Unity or Unreal, use FBX format, which preserves your materials and UV maps correctly.
- If you’re exporting for 3D printing, use STL format, which is the standard for 3D printing slicers.
- If you’re exporting for a web-based 3D viewer, use GLB or GLTF format, which are optimized for web use and keep file sizes small.
Before you export, double-check that you’ve applied all modifiers (including the Mirror and Auto Smooth modifiers) and that your scale is correct. Blender lets you apply scale by pressing Ctrl + A then selecting Scale, which ensures your model will be the correct size when you open it in another program.
Conclusion
Creating low poly 3D models in Blender is a rewarding process that lets you create beautiful, functional 3D art without the steep learning curve or high cost of more complex 3D workflows. The core principles of low poly modeling—intentional geometry, simplicity, and focusing on shape over detail—make it accessible for new 3D artists, while still offering plenty of room for creativity and expression for experienced creators. By setting up your workspace for low poly work, starting with a simple base mesh, using core editing tools to shape your model, cleaning up your geometry, and adding textures that complement the low poly style, you’ll be able to create professional-quality low poly models for any project. The best way to improve is to practice: start with simple objects, experiment with different styles, and don’t be afraid to delete extra geometry. Over time, you’ll develop an eye for what works, and you’ll be able to create clean, charming low poly models that stand out.