
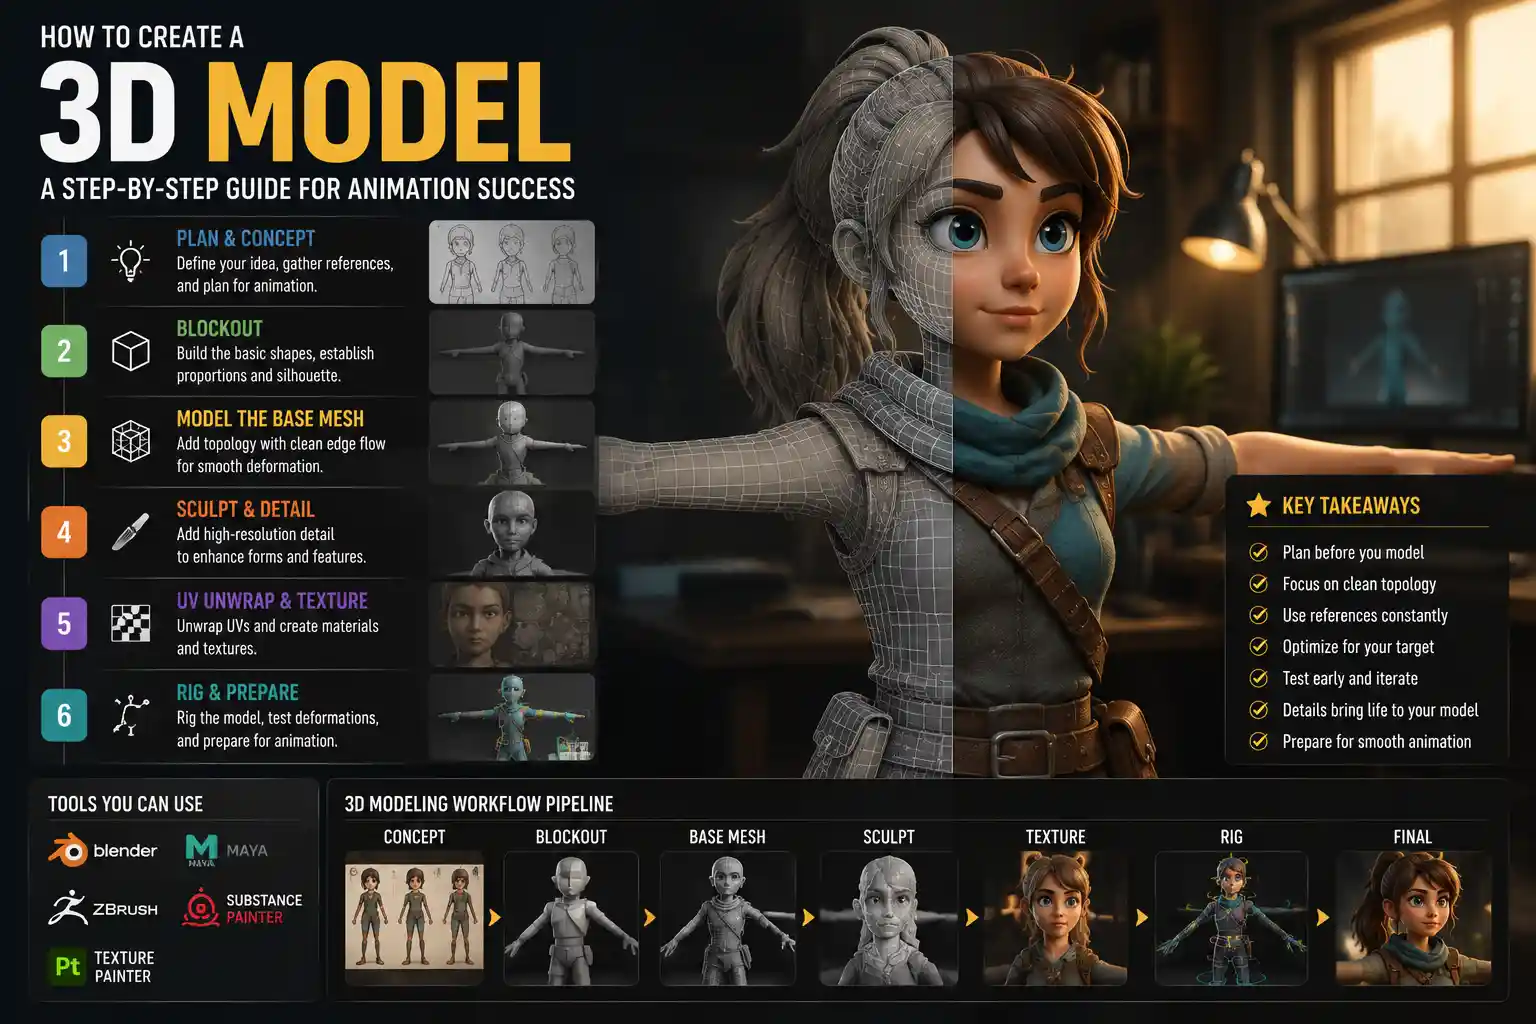
From the whimsical characters of Pixar’s Inside Out to the sweeping alien landscapes of Avatar: The Way of Water, 3D animation brings impossible stories to life. Every memorable moment on screen starts with one foundational step: building a 3D model. Whether you’re a hobbyist hoping to animate your first short film, a game developer designing assets for an indie release, or a creative professional looking to add 3D skills to your toolkit, creating a usable, animation-ready 3D model follows a clear, learnable process. The good news is you don’t need a Hollywood-sized budget or a decade of experience to get started—you just need to follow core principles and avoid common beginner mistakes. This guide breaks down the entire process from initial concept to a final, rig-ready model that animates smoothly.
Pre-Production: Plan Your Model for Animation
Many new creators jump straight into 3D software and start pulling vertices around without a clear plan, only to end up with a model that breaks when they try to animate it. Pre-production is where you fix problems on paper, where changes cost nothing, instead of reworking your entire model hours into the process. The goal here is to build a model that meets the specific needs of your animation, whether that’s a 2-second TikTok clip or a 90-minute feature film.
Define your use case and polygon budget
A 3D model is made up of polygons, the small flat shapes that connect to form its surface. The number of polygons you use—your polygon budget—depends entirely on where the model will appear. A main character that’s the focus of every shot needs far more detail than a background rock on a distant hill. For real-time projects like games or AR filters, polygon counts are especially important because the model has to render 60+ times per second, so too many polygons will cause lag. For pre-rendered animation like a short film, you can afford higher polygon counts because each frame is rendered individually after animation.
As a general rule of thumb:
- Real-time mobile AR/VR main characters: 1,000 – 10,000 polygons
- Indie game main characters: 10,000 – 50,000 polygons
- AAA game main characters: 50,000 – 150,000 polygons
- Pre-rendered feature film main characters: 100,000+ polygons
Keeping your polygon count low where possible doesn’t just improve performance—it also makes the model easier to rig and animate later on.
Gather reference and sketch your concept
Even the most experienced 3D artists don’t model from memory. Reference images keep your proportions accurate and help you nail small details that make the model feel believable. If you’re creating an original character, collect reference photos of real people or animals that match your character’s body type, age, and clothing style. If you’re designing a prop, like a vintage coffee mug or a sci-fi gun, find photos from multiple angles to see how light interacts with the surface.
Before opening 3D software, sketch your model from the front, side, and back. These orthographic sketches can be imported into your 3D software as a background guide to help you match proportions as you model. This step takes 15 minutes and saves hours of correcting lopsided heads or misaligned limbs later.
Choose the Right 3D Software for Your Workflow
There are dozens of 3D tools on the market, and picking the right one can feel overwhelming. The best software for you depends on your budget, your goals, and what kind of animation you plan to create. There’s no “wrong” choice, but some tools are better suited for beginners or specific use cases than others.
Beginner-friendly free and low-cost options
If you’re just learning, you don’t need to pay hundreds of dollars for a professional license. Blender is the most popular free open-source 3D tool, and it has every feature you need to model, rig, and animate professional-quality 3D models. It’s used by indie studios, hobbyists, and even some large studios for previsualization, thanks to a huge community that creates free add-ons and tutorials. For beginners, Blender’s active community also means you can find answers to almost any problem with a quick search.
Other low-cost options include:
- Autodesk Maya: The industry standard for feature film and game animation, available for ~$20 per month for individuals. It’s overkill for many beginners, but it’s worth learning if you want to work at a major studio.
- ZBrush: A sculpting tool ideal for adding high-detail textures and organic shapes like faces or creatures, available for ~$10 per month. It’s often paired with other modeling tools for a full workflow.
- SketchUp: A simple tool for hard-surface modeling like architecture or props, with a free version for hobbyists.
For most new creators, starting with Blender is the best choice. It’s free, powerful, and the skills you learn transfer easily to other professional tools if you need to switch later.
Understand core modeling workflows
There are two primary workflows for creating 3D models for animation: polygonal modeling and sculpting. Most projects use a combination of both. Polygonal modeling is the process of building a model face by face, starting with a basic shape like a cube or sphere and extruding edges to add new parts. This method is ideal for hard-surface models like robots, furniture, or buildings, where clean, precise edges are important.
Sculpting works more like modeling with clay: you push, pull, and smooth a dense digital mesh to create organic shapes like characters, faces, or natural landscapes. It’s much more intuitive for creating organic, detailed shapes, and it’s often used to add high-resolution detail to a basic polygonal base mesh. Most modern pipelines use a process called retopology to take a high-resolution sculpt, clean it up, and create a lower-resolution mesh that’s easy to animate.
Modeling Your Animation-Ready Base Mesh
Once you’ve planned your model and chosen your software, it’s time to start building. The most important thing to remember at this stage is that your model needs to deform well when it’s animated. A beautiful static model is useless if its arm bends into a weird point when you try to move it. That’s why building a clean base mesh is the most critical step of the entire process.
Start with primitive shapes and block out major forms
The first step of actual modeling is blocking out the major shapes of your model before adding any small details. For example, if you’re creating a human character, start with a cylinder for the torso, another cylinder for the neck, and two more cylinders for the arms and legs. Use simple shapes to get the overall proportions right, matching your reference sketches. Don’t worry about fingers, ears, or wrinkles at this point—you just need to make sure the height of the character matches your concept, the arms are the right length, and the head is the right size.
“Animation is not about the details, it’s about the movement. If your base mesh is wrong, the best textures and the most detailed sculpt in the world won’t fix a bad animation.”
This blocking step takes less than an hour for most characters, and it’s the best time to adjust proportions. If you try to fix proportion issues after you’ve added all the details, you’ll have to redo hours of work. Many animators recommend getting feedback on your blocked model at this stage, because fresh eyes can spot lopsided proportions much more easily than you can after staring at the screen for hours.
Follow topology rules for smooth deformation
Topology is the way polygons are arranged on your model. For a model to animate well, you need good topology that follows the movement of the model. Bad topology will cause weird stretching, pinching, and uneven shading when you bend a joint. There are a few core rules for good topology that every animator should follow:
- Keep polygons as quadrilaterals (quads) as possible. Quads are four-sided polygons, which subdivide and deform much more smoothly than triangles (tris) or n-gons (polygons with more than four sides). Triangles are fine for small areas or the final output, but building your base mesh with quads makes it much easier to edit.
- Add edge loops around joints. An edge loop is a continuous line of edges that circles a part of the model, like the shoulder, elbow, knee, or wrist. Adding at least two or three edge loops around a joint gives the mesh enough geometry to bend smoothly when you animate the arm or leg moving. Without those edge loops, the joint will collapse into a weird, lumpy shape when you bend it.
- Follow the form of the model with your edge flow. Edges should follow the natural curves of the character or object. For example, edges around a character’s face should follow the muscle structure of the jaw and cheekbones, which makes it easier to animate facial expressions like smiling or frowning without pinching.
If you’re working from a high-resolution sculpt, you’ll do retopology at this stage to create your clean base mesh. Retopology is the process of drawing a new, clean low-poly mesh over the surface of your high-resolution sculpt. This gives you the detailed shape from your sculpt and the clean topology you need for smooth animation.
Fix common beginner mistakes
Even experienced artists make mistakes when building a base mesh, but being aware of common issues can help you catch them early. One of the most common mistakes is adding too many polygons too early. A messy mesh with thousands of unnecessary polygons is harder to edit and slower to animate. Another common mistake is not checking the mesh for errors: overlapping faces, flipped normals (where the inside of the model is facing out), or holes in the mesh. These errors cause problems with rendering and rigging later on, so it’s worth running a mesh check in your software to catch them before you move forward.
Detailing, UV Unwrapping, and Texturing
Once you have a clean base mesh, it’s time to add detail and color to make the model come alive. This stage is where your basic shape turns into a realistic character, a worn prop, or a stylized creature that fits your animation’s art style. Even here, you need to keep animation needs in mind to avoid problems later.
Add high-frequency detail
High-frequency detail is small surface detail like wrinkles, pores, scratches, or stitching that makes a model feel realistic. You don’t need to add all this detail to your base mesh—instead, most artists use a process called normal mapping to bake high-resolution detail from a sculpt onto a low-resolution base mesh. This means you get the look of a high-poly detailed model with the performance and animation ease of a low-poly model.
For example, if you’re creating a character’s face, you can sculpt all the fine wrinkles and pores in ZBrush at a high resolution, then bake that detail into a normal map that you apply to your clean base mesh. The result looks just as detailed as the high-resolution sculpt, but the base mesh has a fraction of the polygons, making it much easier to animate.
Unwrap your UVs
To add a 2D texture (like color, roughness, or metallicness) to your 3D model, you need to unwrap your UVs. UV unwrapping is the process of flattening your 3D mesh into a 2D plane, like peeling an orange and flattening the peel so you can print a pattern on it. This tells your software where each part of the 2D texture should map onto the 3D surface of the model.
Good UV unwrapping avoids stretching, so your texture looks the same across the entire model. Stretched UVs make your texture look blurry or warped, which ruins the final render. You also want to arrange your UVs to pack as efficiently as possible into the texture space, so you get the highest possible resolution for your texture. Most modern software has automatic UV unwrapping tools, but it’s still worth adjusting the UVs manually to avoid stretching, especially around important areas like a character’s face.
Texture your model for your art style
Texturing is where you add color, roughness, metallicness, and other surface properties to your model. The texture workflow you use depends on your art style. For a stylized animation, you might use flat, hand-painted textures with bold outlines. For a realistic feature film, you might use photorealistic texture maps that capture every imperfection of the surface.
Common texture sets you’ll need for almost any model include:
- Albedo/base color: The base color of the surface, including any patterns or markings.
- Normal map: Stores high-resolution surface detail as we discussed earlier.
- Roughness/metallic map: Defines how shiny or rough the surface is—for example, a rubber shoe will be very rough, while a steel sword will be metallic and smooth.
- Ambient occlusion: Adds subtle shadows in crevices to make the model look more depthful.
If you’re a beginner, you don’t have to paint all your textures from scratch. There are thousands of free, high-quality texture libraries available online (like Poly Haven or TexturingXYZ) that you can use for non-commercial and most commercial projects.
Preparing the Model for Animation
You’ve got a fully modeled and textured model—now you need to prepare it so it’s ready to rig and animate. Skipping this step means you’ll run into frustrating issues when you start moving your model, so taking a little time to check everything over is well worth it.
Check the model for deformation
Before you start rigging, test how your model deforms when you bend its joints. Most software has a simple test mode that lets you bend an arm or leg to see how the mesh handles movement. If you see pinching, stretching, or weird bulges at the joint, this is the time to fix the topology, not after you’ve spent hours rigging the model.
For example, if your elbow bends and the mesh collapses into a point, you probably need to add another edge loop around the joint to give it more geometry. If you see weird stretching along the forearm, you may need to adjust the flow of your edges to follow the arm’s shape. Catching these issues now saves hours of reworking rigging later.
Combine objects and organize your scene
If your model is made up of multiple separate objects (for example, a character with a separate shirt, shoes, and hat), you need to organize them in your scene so they’re easy to work with. Group related objects together, name every part clearly, and delete any unused geometry or materials. A messy, disorganized scene makes it much harder to find the part you need when you’re animating, especially if you’re working on a larger project with multiple characters.
If you’re exporting your model to another software for animation or rigging, make sure you export it in a compatible file format. Common formats for animated models include FBX and glTF, which work with almost every 3D and game engine. Double-check your export settings to make sure you’re exporting your UVs, textures, and object positions correctly.
Weight painting for smooth deformation
Once you’ve added a rig (the digital skeleton that moves your model), you’ll do weight painting to define how much each part of the mesh moves when a bone moves. For example, when you move your shoulder bone, the area around your shoulder should move with it, but the forearm should only move a little, and the hand should follow the lower arm bone. Weight painting lets you control this by assigning a weight to each vertex of the mesh, from 0 (doesn’t move with the bone) to 1 (moves completely with the bone).
Good weight painting is the difference between a smooth, natural animation and a stiff, robotic one. Take your time to adjust the weights, and test the movement over the full range of motion the character will have. For example, if a character needs to lift their arm all the way over their head, test the deformation at that full range to make sure there’s no pinching.
Conclusion
Creating a 3D model for animation is a process that builds on itself, from pre-production planning to final preparation for rigging. The biggest mistake new creators make is rushing through the early stages to get to the fun part of animating, only to hit a wall when their model doesn’t move right. By taking the time to plan your polygon budget, build a clean base mesh with good topology, test for deformation early, and organize your scene, you’ll end up with a model that animates smoothly and saves you hours of frustration later.
The best way to improve your 3D modeling skills is to practice. Start with simple props before moving on to full characters, and don’t be afraid to start over if your first attempt doesn’t work out. Every professional 3D modeler has thrown out dozens of models that didn’t work out—it’s part of the learning process. With time and practice, you’ll develop a workflow that works for you, and you’ll be able to turn any concept into an animation-ready 3D model that brings your story to life.