
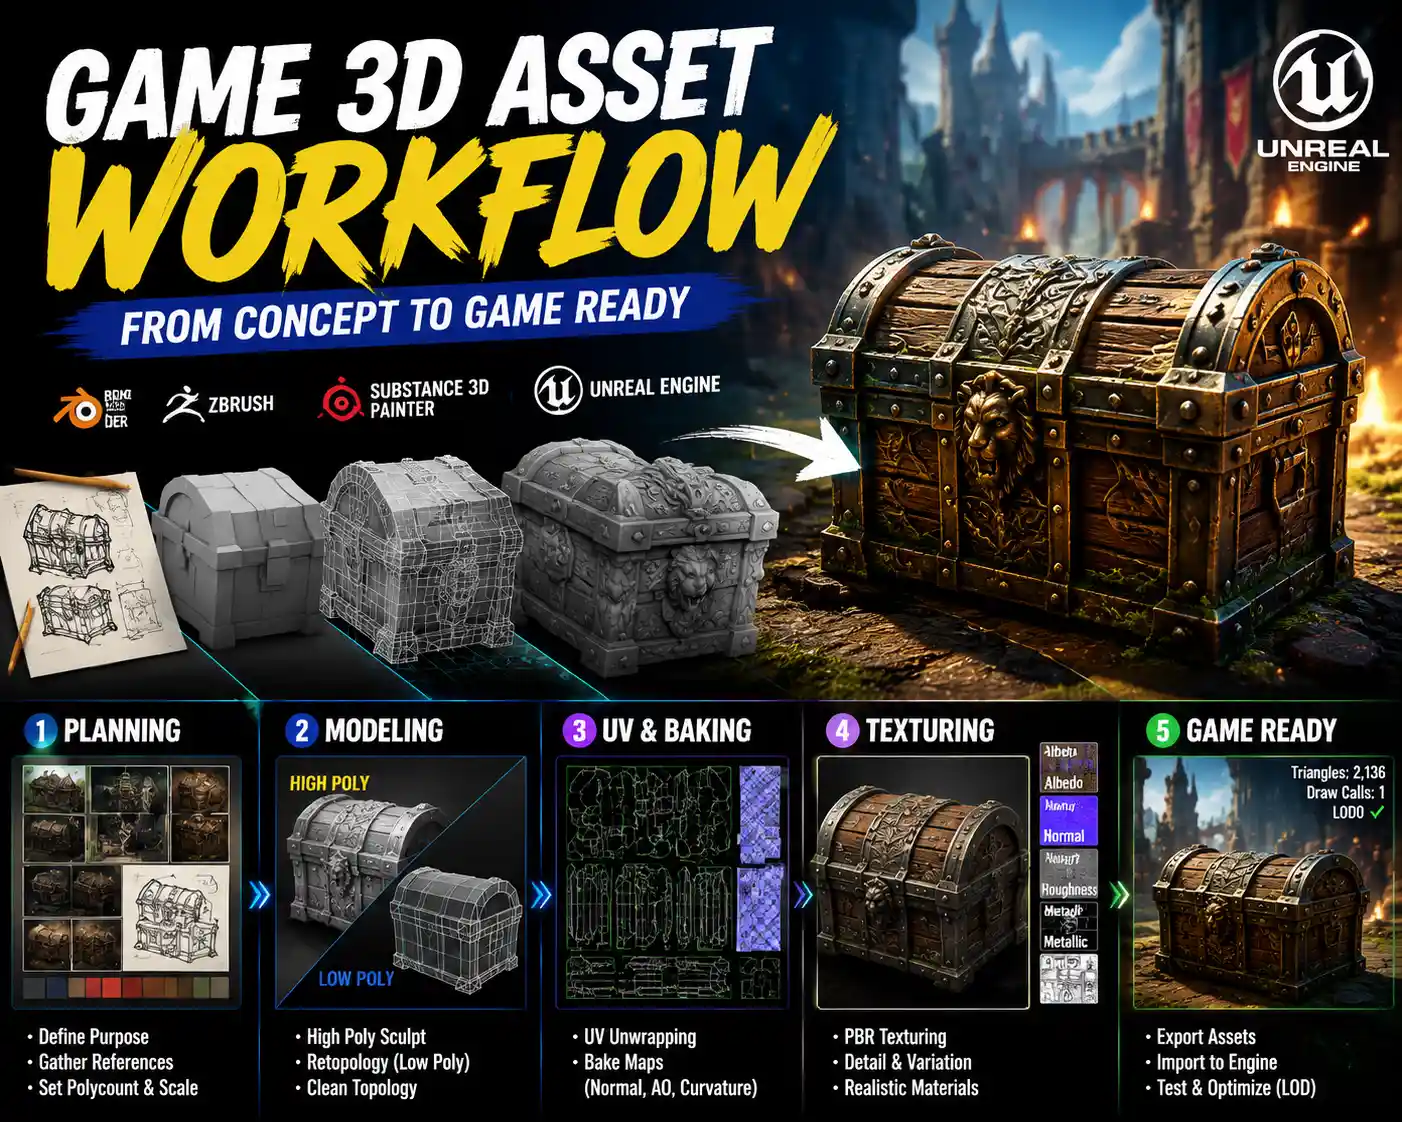
Whether you’re building an independent indie game, modding a popular title like Skyrim, or working toward a role as a professional game 3D artist, creating high-quality 3D assets is one of the most impactful parts of game development. Every tree a player walks past, every weapon they wield, and every character they interact with starts as a basic 3D asset shaped by an artist’s vision and technical skill. Unlike static 3D art for film or advertising, game assets need to balance visual appeal with performance, working smoothly across everything from high-end gaming PCs to mobile phones. If you’re new to the process, the number of tools, techniques, and best practices can feel overwhelming, but breaking the workflow into manageable steps makes it accessible for anyone willing to learn. This guide walks you through every key stage of creating game-ready 3D assets, from initial planning to final export, with practical tips to help you avoid common mistakes.
Planning and Pre-Production for Game Assets
Before you open a 3D modeling program, the most important work of creating a great game asset happens in planning. Game assets don’t exist in a vacuum—they need to fit the art style, performance budget, and narrative purpose of the game they’re built for. Skipping this step often leads to reworking assets later, wasting hours of work that could have been avoided with a clear direction.
Define the asset’s role and technical requirements
Start by answering two core questions: what is this asset, and where will it be used? A 1000-year-old castle wall that serves as a background detail in an open-world game has very different requirements than a protagonist’s melee weapon that players will stare at for dozens of hours. Background assets need to be lightweight to avoid dragging down frame rates, while hero assets (close-up, frequently viewed items) can afford more polygons and higher-resolution textures.
You’ll also need to confirm the polycount budget for your asset. Polycount is the total number of polygons used to build the 3D mesh, and it directly impacts game performance. A mobile game might only allow 100–500 polygons for a small prop, while a AAA game on PC could allow 100,000+ polygons for a main character. If you’re working independently, check what similar assets in your target game engine use for polycount to set a realistic budget.
Gather reference material
Even the most skilled 3D artists rely on reference material to create accurate, believable assets. If you’re creating a real-world object like a vintage coffee mug or a medieval sword, collect photos from multiple angles, note wear and tear, and pay attention to small details like scratches, logos, or texture variation. If you’re creating a fantasy creature or original asset, collect concept art, color palettes, and references for real-world materials that inspire your design. Free resources like Unsplash, Pinterest, and PureRef make it easy to organize references in one place while you work.
“A good reference is worth more than an hour of guessing. The best 3D assets don’t come from perfect technical skill alone—they come from observing how the world actually works.”
— Amber Scribner, Lead 3D Artist at Riot Games
Once you have your references, block out the basic shape of your asset in your 3D editor to test scale. A common mistake new artists make is building an asset that looks out of place next to other game objects—for example, a coffee mug that’s twice the size of a player character’s hand. Blocking out scale early saves you from resizing the entire asset after you’ve finished detailed modeling.
3D Modeling: Building the Base Mesh
After planning, you’ll move on to creating the base mesh, the core 3D shape of your asset. The tools you use depend on your budget and preference: Blender is a free, open-source option used by indies and professionals alike, while industry standards include Autodesk Maya, 3ds Max, and ZBrush for high-detail sculpting. For most beginners, starting with Blender is an excellent choice that doesn’t require an expensive software subscription.
High-poly vs low-poly modeling
Most modern game assets use a high-poly to low-poly workflow that balances detail and performance. Here’s how it works:
- You create a high-poly model with every detail you want, including scratches, carvings, bumps, and intricate shapes. This model can have hundreds of thousands or even millions of polygons, because it’s only used to capture detail, not to run in the game.
- You then create a low-poly model with a minimal number of polygons that matches the overall shape of the high-poly version. This is the mesh that will actually be rendered in the game, so it needs to stay within your polycount budget.
- You bake the detail from the high-poly model onto a texture map for the low-poly model, which makes the low-poly model look just as detailed as the high-poly version without the performance cost.
This workflow is the industry standard for a reason: it gives you the best of both worlds. For example, a high-poly model of a worn wooden chest can have every knot, dent, and wood grain sculpted in, while the low-poly version running in the game might only have 2,000 polygons.
Best practices for clean topology
When building your low-poly mesh, the most important thing to focus on is clean topology, the arrangement of polygons and edges that make up your mesh. Bad topology can cause problems with texturing, animation, and rendering in game engines. Follow these practical rules to keep your mesh clean:
- Use quadrilaterals (four-sided polygons) wherever possible. Most game engines and 3D tools process quads more efficiently than triangles, and they make it easier to edit your mesh later. Triangles are fine for small details or hard edges, but avoid n-gons (polygons with five or more sides) as they can cause shading errors.
- Follow the natural contours of your object. If you’re modeling a human character, arrange edge loops to follow the flow of muscles and skin, which makes animation smoother. For a hard-surface object like a chair, align edges with the corners and curves of the shape.
- Add more geometry where you need it, less where you don’t. This is called edge looping or topology optimization: add extra edges around curved areas or detailed parts like a door handle, and remove extra edges from flat areas like a table top that don’t need detail.
- Remove unnecessary faces. If a face is never going to be seen by the player (for example, the bottom of a crate that sits on the ground), delete it. Every extra polygon adds up, so cutting unseen geometry is an easy way to stay within your polycount budget.
If you’re working on a stylized game (like Minecraft or Fortnite), you can skip the high-poly to low-poly bake and build your low-poly mesh directly. Stylized art often prioritizes clean, simple shapes over hyperrealistic detail, so direct modeling works perfectly for this style.
UV Unwrapping and Texture Baking
Once your mesh is complete, the next step is UV unwrapping. A UV map is a 2D representation of your 3D mesh that tells game engines how to wrap 2D texture images around your 3D shape. Think of it like unfolding a cardboard box to lay it flat before printing a design on it. Without a clean UV map, your textures will be stretched, distorted, or misaligned, which ruins the final look of your asset.
How to unwrap UVs effectively
Most 3D programs have automatic UV unwrapping tools, but automatic unwraps almost always need manual adjustment to look good. Follow these tips to get clean UVs:
- Minimize stretching. Stretching happens when a 3D face is squashed or stretched on the 2D UV map, which makes your texture look blurry or warped. Use your software’s UV stretching checker to identify problem areas and adjust your seams to fix it.
- Place seams along hidden edges. Seams are the lines where you cut your 3D mesh to unfold it into 2D. Place seams where players won’t notice them: for example, under a chair, along the back of a character’s head, or in the crevice between a handle and a mug. This hides any stretching or seam lines from view.
- Use texture space efficiently. The UV map fits into a 1x1 square, so you want to use every pixel of that space. Give more space to larger or more detailed parts of your asset, and less space to small or hidden parts. For example, the front of a sword blade should get more texture space than the hidden inner part of the hilt.
- Pack overlapping UVs for identical parts. If you have identical objects (like the four legs of a table), you can overlap their UVs to use the same texture space. This saves space and makes your texture resolution sharper for all parts of the asset.
After you finish your UVs, it’s time to bake your high-poly detail onto the low-poly mesh. Baking creates texture maps that transfer all the sculpted detail from your high-poly model to your low-poly model. The most common maps you’ll bake are:
Normal maps are the most common, and they fake the look of bumpy surface detail by changing how light interacts with the low-poly mesh. Ambient occlusion maps add soft shadow to crevices and gaps, which makes the asset look more realistic and adds depth. Height maps and displacement maps add actual geometric detail for close-up assets, while roughness maps and metalness maps define how the surface interacts with light for physically based rendering.
Popular baking tools include Substance Painter, Marmoset Toolbag, and Blender’s built-in bake tool. Always test your baked maps in your game engine before moving on to texturing—catching baking errors like seams or missing detail early saves time later.
Texturing and Material Creation for Games
Texturing is where your 3D asset comes to life. It’s the process of adding color, surface detail, and material properties to your mesh, so players can tell at a glance if something is made of wood, metal, stone, or fabric. Modern games use physically based rendering (PBR), which is a standard for creating materials that react to light consistently, no matter what engine or environment the asset is in. PBR has become the industry standard because it looks realistic across different lighting conditions and works seamlessly in all major game engines like Unity and Unreal Engine.
Choose the right texture resolution
Texture resolution is measured in pixels, with common sizes being 128x128, 1024x1024, 2048x2048, and 4096x4096. Higher resolution textures look sharper but take up more memory, which can hurt performance on lower-end devices. Again, match your resolution to the asset’s role: small background props can use 1024x1024 or smaller, hero assets can use 2048x2048 or 4096x4096. If you’re building for mobile, stick to 1024x1024 or lower for most assets to keep memory usage low.
Workflow tips for PBR texturing
Most artists use a program like Substance Painter or Substance Designer for texturing, because they’re built specifically for game asset texturing and have built-in PBR templates. Blender also has built-in texture painting tools that work well for beginners. Here are practical tips to make your textures look more believable:
- Add wear and tear. Even brand-new objects have small scuffs, dust, or imperfections. A completely smooth, perfectly uniform texture looks fake. Add subtle scratches to metal, dirt in crevices, and fading to painted surfaces to make your asset feel lived-in.
- Match the texture to the art style. If you’re working on a cel-shaded cartoon game, you’ll use flat colors and hard edges instead of photorealistic detail. If you’re working on a hyperrealistic horror game, you’ll focus on subtle surface variation and accurate material properties. Always adjust your texturing style to fit the rest of your game.
- Use tileable textures for large assets. For large assets like walls or floors, use tileable textures that repeat across the surface instead of one large texture. This saves memory and makes it easy to create large environments without using massive texture files.
- Test your materials in different lighting. PBR materials should look good in bright sunlight and dark indoor rooms. Load your textured asset into your game engine and test it in different lighting conditions to catch any issues, like a metal material that’s too shiny or a wood material that looks too dark.
One of the biggest mistakes new texture artists make is over-saturating colors. Real-world materials are rarely extremely bright or saturated, so toning down saturation just a little often makes textures look more natural. Of course, this rule doesn’t apply to stylized games that intentionally use bright, saturated colors—adapt the rule to your project’s needs.
Exporting and Testing Assets in Game Engines
Once your asset is modeled, UV’d, and textured, the final step before using it in your game is exporting and testing. A great asset that works perfectly in your 3D modeling program can break or look wrong in a game engine if you export it incorrectly, so this step is just as important as any earlier stage.
Export best practices
The most common export format for game assets is FBX, which is supported by every major game engine and 3D tool. Some artists also use GLB or GLTF for web-based games or mobile, but FBX is still the standard for most projects. When exporting, keep these tips in mind:
- Apply transforms before exporting. Transforms are the position, rotation, and scale of your asset in your 3D modeling program. If you don’t apply transforms, your asset can end up the wrong size or rotated incorrectly when you import it into the game engine. This is one of the most common mistakes new artists make, and it’s easy to fix with one click in most 3D programs.
- Delete any extra data. Extra objects, hidden meshes, or unused materials can bloat your file size and cause import errors. Delete anything that isn’t part of the final asset before exporting.
- Export your textures in the correct format. Most game engines support PNG, JPG, or TGA textures. For textures with transparency (like a leaf or a decal), use PNG to preserve the alpha channel. JPG is smaller and works well for opaque textures. For high-end assets, some engines support compressed formats like Basis Universal that reduce file size without losing much quality.
Testing and iteration in the game engine
After importing your asset into Unity, Unreal, or your engine of choice, you need to test it to make sure everything works as intended. Start by checking the scale: place your asset next to other existing assets or a player character to confirm it’s the right size. Next, check the shading: does the material look correct? Are there any weird shading errors on flat surfaces? Common issues like flipped normals (faces that point inward instead of outward) can be fixed in your 3D modeling program and re-exported.
Then test performance. If you’re adding multiple copies of your asset (like trees in a forest), check the frame rate to see if your asset is too heavy. If frame rate drops, you can optimize by reducing the polycount, compressing textures, or using level-of-detail (LOD) systems. LODs are multiple versions of your asset with different polycounts: when the player is far away, the engine uses the low-poly version, and when they get close, it switches to the high-poly version. This is a simple and effective way to improve performance for open-world games with lots of assets.
Finally, test your asset in the actual environment it will be used in. A wooden crate that looks great in a gray test environment might look out of place in a rainy forest, because the color or roughness doesn’t match the mood. Adjusting textures after testing in context is a normal part of the process, and it’s how you end up with assets that feel cohesive with the rest of your game.
Conclusion
Creating game-ready 3D assets is a skill that takes practice, but it’s built on a consistent, repeatable workflow that anyone can learn. Start with clear planning to define your asset’s purpose and technical requirements, build clean meshes that fit your polycount budget, unwrap UVs carefully to avoid texture distortion, use PBR texturing to bring your asset to life, and always test thoroughly in your game engine to catch issues early.
Don’t get discouraged if your first few assets don’t turn out exactly how you want. Even professional 3D artists make mistakes and iterate on their work dozens of times before getting it right. Start small with simple props like mugs or crates to practice each step of the workflow, then work your way up to more complex assets like characters or environments. As you build your skills, you’ll develop your own process and style that works for your projects. Whether you’re building a small indie game or preparing for a career in game development, mastering 3D asset creation opens up endless creative possibilities.