
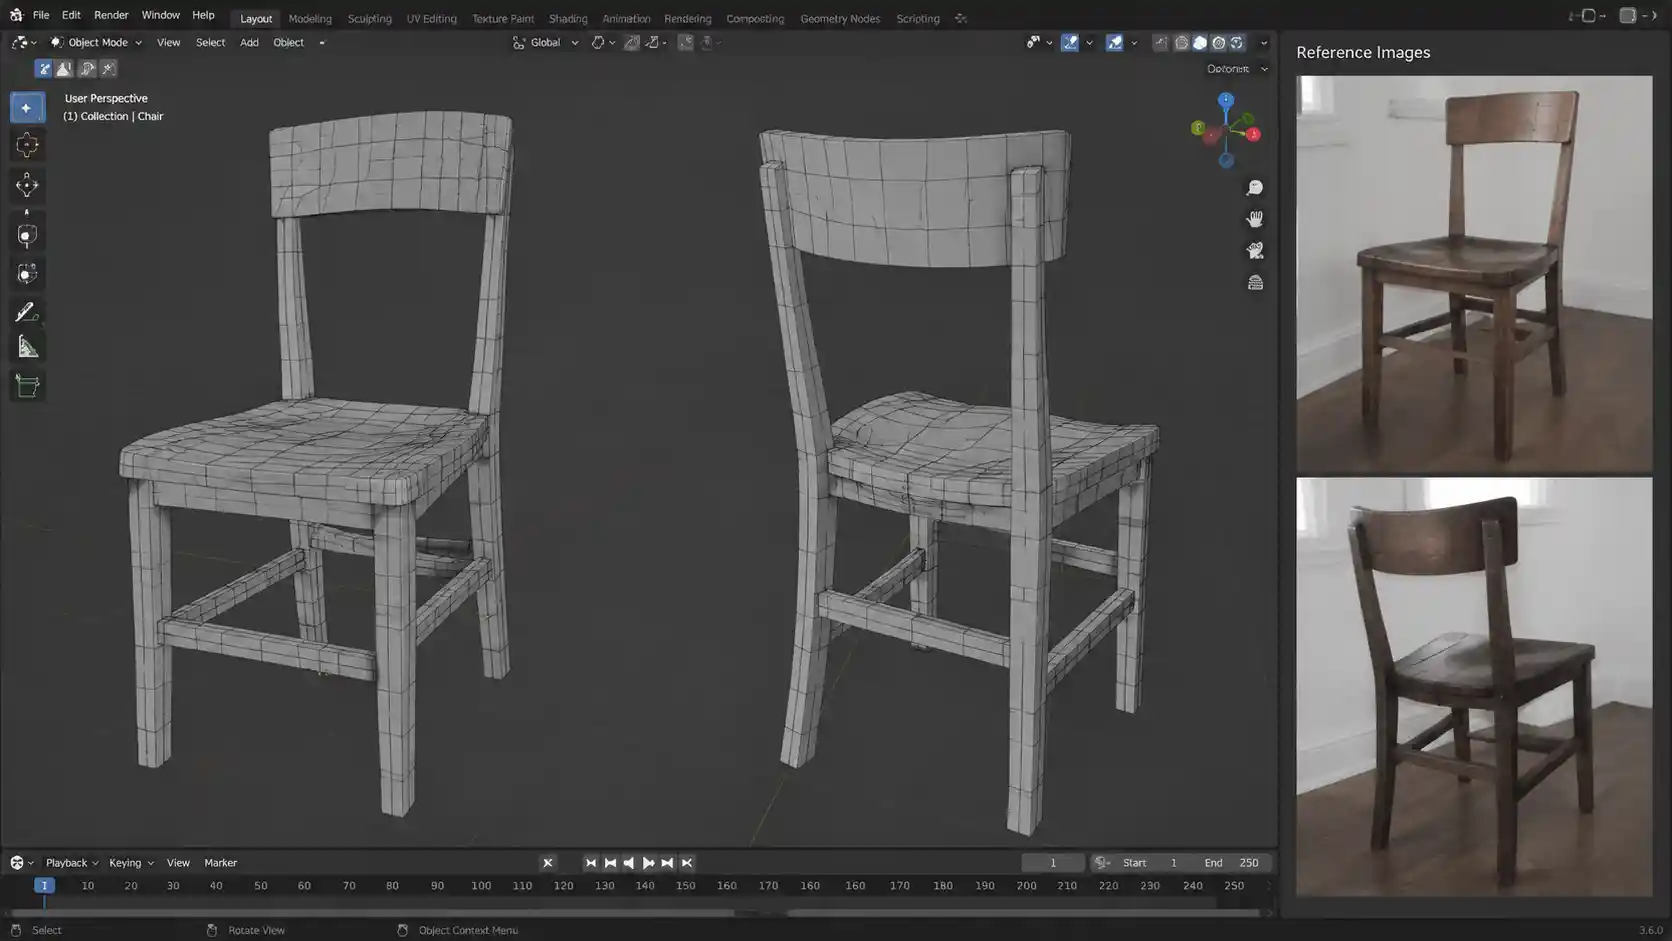
If you’ve just started 3D modeling, it’s easy to get caught up in the excitement of turning a blank sketch into a tangible digital object. Whether you’re designing assets for a game, creating a prototype for 3D printing, or learning to model for animation, small mistakes in your early workflow can snowball into hours of extra work later. Many novice modelers assume that the biggest challenges come from mastering complex tools, but the most common issues are actually simple, avoidable habits that slip in when you’re focused on getting the shape right. Over time, these minor mistakes can turn a fun project into a frustrating experience, and even hold you back from developing the consistent, professional habits that make 3D modeling rewarding. Let’s break down the most common missteps new 3D artists make, and how you can fix them before they become ingrained.
Ignoring Reference Photos and Starting Blind
One of the first mistakes many new 3D modelers make is jumping straight into the viewport without gathering reliable reference material. It’s tempting to rely on your memory to recreate a common object like a chair, a coffee mug, or a character’s face, but human memory is notoriously unreliable. Even if you think you know what an object looks like, small details like the angle of a handle, the proportion of a leg, or the spacing of screw holes are almost never as you remember them. Skipping reference work leads to models that look “off” even to untrained eyes, and you’ll end up spending far more time reworking proportions later than you would have spent collecting references upfront.
Different types of references for different projectsNot all references are created equal. For organic models like characters or plants, you need multiple angles to capture accurate proportions: a front view, side view, back view, and close-ups of small details like ears or leaves. For hard-surface models like furniture or machinery, you’ll need measurements, blueprints if available, and photos of real-world examples to capture functional details that impact how the model fits together. Even for abstract or creative designs, collecting references for texture, lighting, and overall shape helps you stay consistent as you build.
Many new modelers also make the mistake of using only one reference image. If you’re modeling a human head from only a front-facing photo, you’ll have no way to judge how far the jaw extends back or how deep the eye sockets are. Building a reference board doesn’t have to be complicated: free tools like PureRef let you collect and arrange multiple images in one window that you can keep open beside your 3D software. Even saving a folder of photos from your phone or a stock photo site works for beginner projects.
“A good model is 90% reference, 10% modeling. If you get your references right at the start, every other decision you make becomes easier.”
This common saying among professional 3D artists holds true for beginners and experts alike. Taking 15 to 30 minutes to collect references before you start modeling will save you hours of reworking down the line, and help you create models that feel grounded and accurate even when you’re designing something entirely original.
Bad Topology and Ignoring Mesh Flow
Topology—the way the vertices, edges, and faces of your 3D mesh are arranged—is one of the most intimidating concepts for new modelers, and it’s also one of the most commonly neglected. Many novices focus only on getting the outer shape correct, and don’t think about how the mesh is structured underneath. This doesn’t cause problems for a static render of a simple object, but it creates major issues if you want to animate your model, subdivide it for a smoother shape, or 3D print it. Bad topology can make deformations look lumpy, create weird shading artifacts, and increase your file size unnecessarily.
Common topology mistakes new modelers makeThere are a few specific bad topology habits that pop up constantly in beginner work. Understanding these helps you catch and fix them early:
- N-gons: Any face with more than four sides is called an n-gon. While some modern 3D software can handle n-gons for static work, they cause problems when subdividing, exporting to different programs, or 3D printing. They also make it harder to edit your mesh later. Most beginner n-gons happen when you delete an edge or merge vertices without cleaning up the resulting face.
- Triangles in bad places: Not all triangles are bad—triangles are necessary for closing up meshes and working on certain hard-surface details—but placing triangles in areas that need to deform smoothly for animation creates weird bending. A triangle placed across a character’s elbow or knee, for example, will cause the mesh to crease unnaturally when the arm bends.
- Too many polygons: Novices often subdivide their mesh way earlier than they need to, creating millions of polygons before they’ve finalized the basic shape. This slows down your computer, makes editing clunky, and doesn’t add any real quality to your work until the proportions are locked in.
- Too few polygons: On the flip side, some new modelers leave their mesh too low-poly when it needs smooth curves, resulting in a blocky, faceted shape that doesn’t render well.
The good news is that fixing bad topology doesn’t require advanced skills. The core rule for good mesh flow is simple: edges should follow the natural contours of your object. For a character’s arm, edges should run horizontally around the arm and vertically along it, matching how the muscle bends and stretches. For a car fender, edges should follow the curve of the body to create smooth shading. Taking the time to adjust your edge flow as you build, rather than leaving it for the end, makes the process far less painful.
For beginners, a good rule of thumb is to keep your mesh as simple as possible until you need more detail. Work on your low-poly base first, check that all your faces are quads (four-sided faces) wherever possible, and only add more geometry when you need to shape a new detail. This habit will serve you well whether you’re modeling for games, film, or 3D printing.
Neglecting Scale and Real-World Units
It’s easy to forget about scale when you’re working entirely in a digital viewport. Many novice modelers work in generic “unitless” space, eyeballing proportions without setting a real-world measurement for their model. This seems harmless until you need to combine your model with other assets, send it to a 3D printer, or import it into a game engine. A chair that’s three times the size of your character, or a 3D printed mug that’s too small to hold anything, is the result of skipping this simple step.
Scale issues for common use casesDepending on what you’re using your model for, incorrect scale creates different types of problems:
3D printing: If you model a chess piece as 10 meters tall instead of 10 centimeters, your slicer software will either scale it down incorrectly and leave you with a tiny speck, or try to print a 10-meter piece that will take weeks and use kilometers of filament. Even a small error in scale can make your printed part not fit with other parts you’ve printed.
Game assets: Game engines rely on correct scale to calculate lighting, physics, and how assets fit together. A tree that’s smaller than a blade of grass, or a door that’s too short for your player character to walk through, will require you to go back and resize everything, which can throw off texture placement and other details.
Product design and prototyping: If you’re modeling a replacement part for a household appliance, even a 1-millimeter error in scale can make the part completely useless. Working with real units from the start ensures that your model matches the physical object it needs to fit.
Another common mistake is inconsistent scale across a single model. For example, a new modeler might model a wooden table with correctly sized legs, but accidentally make the table screws the size of doorknobs because they didn’t stop to check their measurements. This is another area where reference work pays off: if you know a standard dining chair is around 80 centimeters tall, you can block that in as a base before you add any details.
Fixing this mistake is incredibly simple: just set your software to use real-world units (centimeters, inches, or meters, depending on your project) before you start blocking out your model. Most 3D programs let you measure distances between vertices directly in the viewport, so you can check your work as you go. For example, if you’re modeling a human character, you can start by blocking in a 170-centimeter tall skeleton to base your proportions on, so every part of the character scales correctly from the start. This takes less than a minute to set up, and prevents hours of corrective work later.
Poor UV Unwrapping Habits
UV unwrapping—the process of flattening your 3D mesh into a 2D map so you can add textures—is one of the least glamorous parts of 3D modeling, and it’s an area where new modelers often cut corners. Many novices rush through UV unwrapping just to get to the texturing step, and end up with distorted textures, stretched details, or wasted texture space that makes your final model look blurry and unprofessional. Like topology, bad UVs don’t always show up immediately, but they create big problems when you go to render or use your model.
The most common UV mistakes beginners makeThere are two minor mistakes that cause most beginner UV problems: stretching and inefficient packing. Stretching happens when the 2D UV map doesn’t match the proportions of the 3D mesh. If you have a square panel on your 3D model that gets stretched into a long rectangle on the UV map, any texture you place on that panel will look stretched and distorted in the render. It’s the same idea as wrapping a birthday present: if you pull the wrapping paper too much in one area, the print on the paper stretches out of shape.
Inefficient packing happens when you leave too much empty space between your UV islands (the separate flattened pieces of your mesh). Texture files have a fixed resolution, so empty space means less space for your actual details. If you waste half your 1024x1024 texture sheet on empty space, your details are effectively half the resolution they could be, leading to blurry textures when you render or export the model.
Many new modelers also make the mistake of ignoring UV seams, placing them in visible areas where the texture interpolation will create a noticeable line. The trick to good seam placement is hiding seams in areas that are naturally shaded or out of sight: for example, under the chin of a character, along the inner edge of a chair leg, or behind the handle of a mug. This way, any minor artifacts from the seam are not noticeable to the viewer.
Thankfully, modern 3D software has tools that make UV unwrapping much easier than it used to be. Automatic unwrapping tools work well for simple models, but you still need to check for stretching and adjust seams manually. Most programs have a distortion checker that highlights stretched areas in red, so you can see exactly where you need to adjust your UVs. Taking the time to pack your UV islands tightly and fix stretching before you start texturing saves you from having to redo your texture work later when you notice the distortion.
Another simple habit is to match the density of your UVs to the importance of the area. For example, the face of a character needs more texture space than the back of the head, because viewers focus on the face. A beginner might give both areas the same amount of space, which wastes texture resolution on a less visible area and leaves not enough for the face. Adjusting your UV island sizes to allocate more space to high-detail areas makes your final texture look much sharper without needing a larger, slower file.
Messy Scene Organization and Uncleaned Meshes
When you’re focused on getting your model done, it’s easy to let your 3D workspace get messy. Novices often leave leftover vertices, hidden extra objects, unused materials, and duplicate geometry in their scene without cleaning it up. This is a minor mistake at first, but it causes big problems when you need to edit your model later, share it with another artist, or export it to another program. A messy scene can also slow down your 3D software, making editing frustrating even on powerful hardware.
Common organizational mistakes and how to avoid themOne of the most common messy mesh habits is leaving floating geometry and extra vertices in your model. Floating geometry are small pieces of mesh that are not connected to your main object, often left over from editing or from when you accidentally dragged a vertex and created a new face. These extra polygons don’t do anything, but they increase your file size, can cause rendering errors, and will show up if you 3D print your model as random extra blobs.
Another common mistake is not naming your objects and layers. If you have a model of a house with 20 objects all named “Cube.001”, “Cube.002”, and “Cube.003”, you’ll have a hard time finding the wall you need to edit 2 weeks after you started the project. The same goes for materials: if all your materials are named “Material”, “Material.001”, you’ll waste time clicking through every material to find the one you need for the wooden tabletop.
Many new modelers also forget to merge overlapping vertices or fill holes in their mesh. Overlapping vertices are two vertices that are in the same exact position but not connected, which can create shading issues and make it harder to edit your mesh. Holes in the mesh cause problems for 3D printing, rendering, and exporting, because most software expects a closed mesh for many uses.
Building good organizational habits doesn’t add much time to your workflow, but it makes everything easier. A few simple habits to adopt include:
- Name every object and material as you create it, using clear labels like “KitchenTable_WoodTop” instead of default names
- Delete any unused objects, materials, and textures from your scene before you save
- Run a “merge vertices by distance” tool to weld overlapping vertices after you finish editing a section of mesh
- Group related objects into layers or collections to keep your outliner clean
- Check your model for holes and n-gons before you export it for use
These steps take just a few extra minutes at the end of each modeling session, and they prevent the common headache of opening an old project and having no idea where anything is, or dealing with weird errors when you export your model. Even if you’re the only person who will ever use the file, good organization saves you time and frustration.
Conclusion
As a novice 3D modeler, making these minor mistakes is completely normal. Every new artist starts by focusing on getting the shape right, and it takes time to learn how the small, behind-the-scenes decisions impact your final work. The good news is that these mistakes are all easy to fix once you know to look for them, and building good habits early will help you progress much faster than trying to correct bad habits later.
The core theme across all these common mistakes is that putting in a small amount of extra work at the start of your project prevents hours of extra work at the end. Collecting references, setting correct scale, checking your topology, cleaning up your UVs, and organizing your scene are all small steps that add up to a much better final model. Over time, these steps become second nature, and you’ll be able to focus on the creative part of 3D modeling instead of fixing avoidable errors. If you’re just starting out, don’t get discouraged by these mistakes—they’re part of the learning process, and catching them early is the first step to becoming a confident, skilled 3D modeler.