
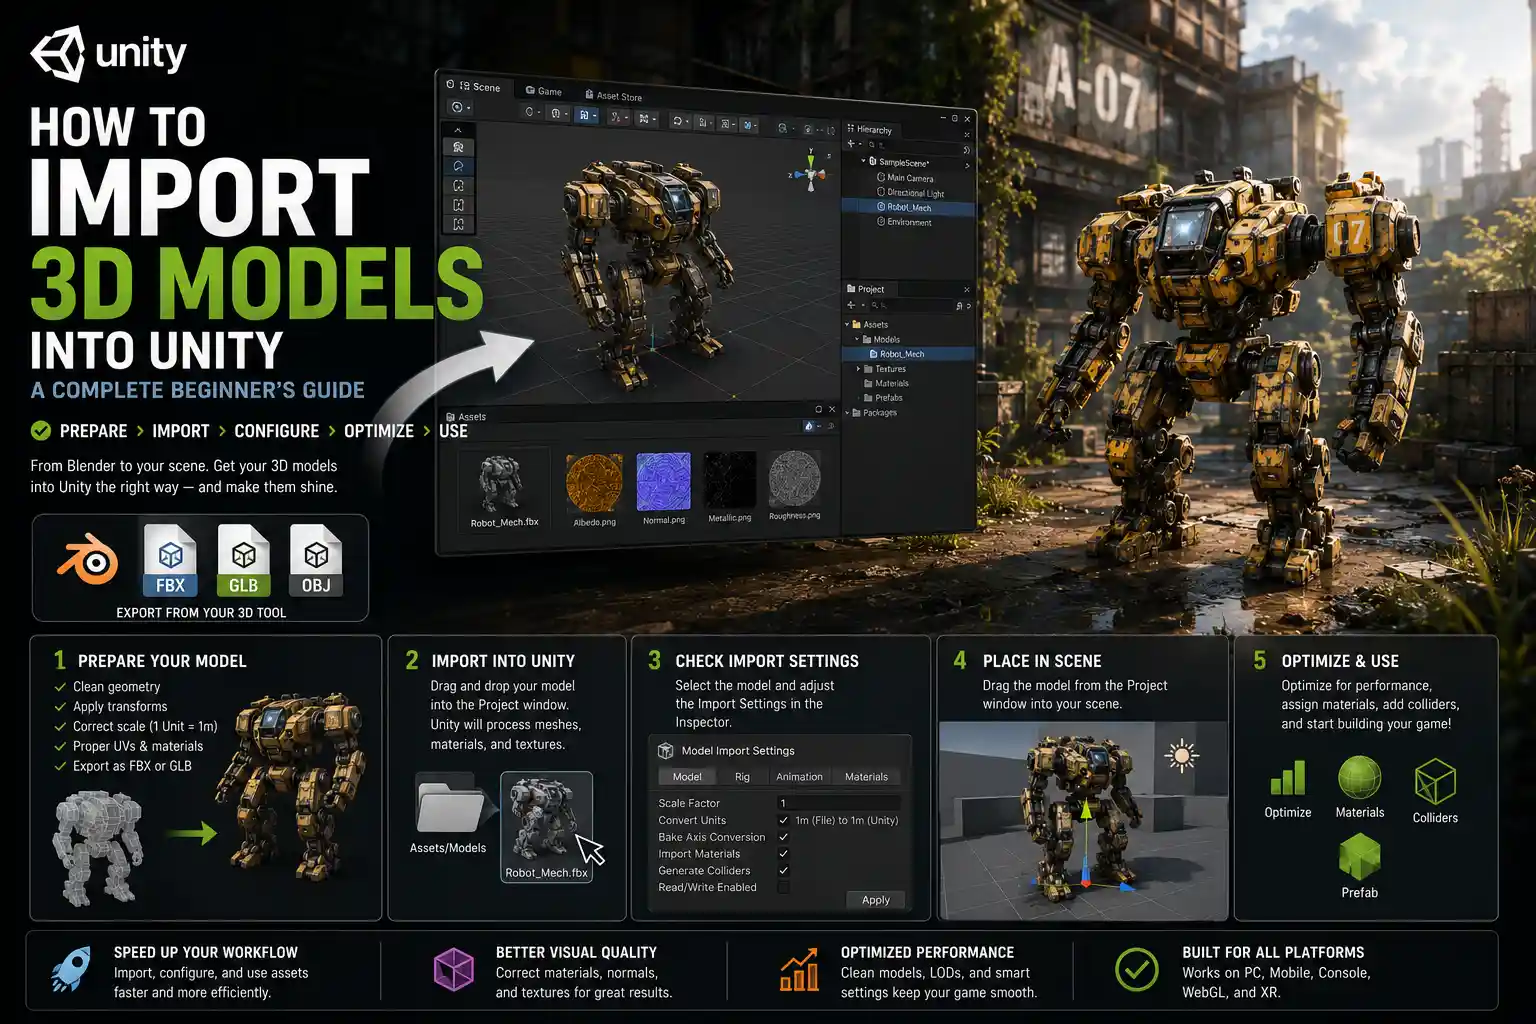
If you’ve ever opened the Unity game engine and stared at a blank scene wondering how to get your own custom 3D assets into the project, you’re not alone. For new game developers, indie creators, and even experienced designers branching into new project types, importing and preparing 3D models is one of the first major hurdles between an idea and a playable experience. Whether you’re building a cozy indie adventure, a 3D product configurator, or an architectural visualization, understanding how to correctly add, configure, and optimize 3D models in Unity will save you hours of debugging later. This step-by-step guide covers every stage of the process, from preparing your model outside Unity to troubleshooting common issues that pop up after import.
Preparing Your 3D Model Before Import
Before you ever drag a file into your Unity project folder, taking the time to prepare your 3D model correctly will eliminate 80% of the most common import errors. Whether you created the model yourself in Blender, Maya, or ZBrush, or downloaded it from a marketplace like Sketchfab or the Unity Asset Store, small pre-export checks make a huge difference in how your model looks and performs in-engine.
File Format Best Practices
Unity supports a wide range of 3D file formats, but some are far more reliable than others for everyday use. The most popular options are FBX and GLB/GLTF, with OBJ as a simpler alternative for static models. Each format has specific use cases:
- FBX: The industry standard for most game development workflows. It supports rigged characters, animated sequences, multiple materials, embedded textures, and custom normals. Most 3D modeling tools export FBX natively, and Unity handles FBX imports consistently across versions.
- GLB/GLTF: A modern open-source format ideal for web-based Unity projects and assets that need to be shared across multiple platforms. GLB packs the entire model, textures, and materials into a single small file, making it easy to manage.
- OBJ: A simple older format that works well for static, single-material models like environment props. It does not support animation or rigging, so avoid it for characters or animated objects.
As a general rule, export as FBX for most Unity projects unless you have a specific reason to use GLB or OBJ. Avoid exporting directly from your modeling software as a native .blend or .ma file – while Unity can import these files natively, it requires the corresponding modeling software to be installed on every machine that opens the project, which creates compatibility issues for team workflows.
Model Cleanup and Optimization Checks
Even if your model looks perfect in your 3D modeling software, it may need small adjustments before export to work well in Unity. Run through this quick checklist before you save your export:
- Remove unnecessary geometry: Delete hidden faces, duplicate objects, and extra vertices that don’t contribute to the final shape. For example, if you modeled a table with a hidden solid base under the wooden top, remove the unused solid geometry to reduce polygon count.
- Apply scale and rotation transforms: Most modeling tools let you “apply” transforms to reset the model’s scale to 100% and rotation to 0. If you skip this step, your model may import into Unity at the wrong size or flipped normals.
- Unwrap UVs correctly: UV unwrapping maps 2D textures to your 3D model, so ensure your UVs don’t have overlapping islands unless you intend them to, and that they fit properly within the 0-1 texture space. This prevents texture stretching or bleeding in Unity.
- Separate objects by material: If your model uses multiple materials (for example, a chair with a wooden seat and metal legs), separate the material slots correctly before export to avoid materials mixing up after import.
- Check for flipped normals: Normals define which side of a face is visible. Flipped normals result in invisible or see-through objects in Unity, so flip any incorrect normals before export.
The biggest mistake new Unity developers make is skipping pre-import preparation. They spend hours troubleshooting why their model is invisible or the wrong size, when a two-minute check in Blender would have fixed the problem before it ever reached Unity.
Importing 3D Models Into Your Unity Project
Once your model is prepared and exported correctly, adding it to your Unity project is a straightforward process, but there are multiple workflows to suit different project types. We’ll cover the two most common methods, along with how to organize your assets to keep your project manageable.
Drag-and-Drop Import (The Most Common Method)
For most users, dragging and dropping your model file directly into the Unity Editor is the fastest way to import. First, make sure you have your project open and the Project window visible (it’s usually at the bottom of the Editor by default). Create a dedicated folder structure for your assets to keep everything organized – for example, create a folder called Assets > Models with subfolders for characters, props, and environment pieces. Organizing your assets from the start makes it much easier to find files later when your project grows.
To import, simply select your exported 3D file (and any separate texture files, if they aren’t embedded in the model file) from your computer file explorer, and drag it directly into your project folder in the Unity Project window. Unity will automatically process the file, generate a mesh, and import any embedded materials and animations. Once the import process finishes (the progress bar is in the bottom right of the Editor), you’ll see your model file appear in the project folder.
Importing From the Unity Asset Store or Marketplaces
If you’re using a pre-made 3D model from the Unity Asset Store or a third-party marketplace like TurboSquid or Sketchfab, the import process is slightly different. For Asset Store assets, open the Package Manager in Unity (Window > Package Manager > My Assets), find the 3D model asset you purchased or downloaded for free, and click Import. Unity will automatically add all the model files, textures, and pre-configured materials to your project, so you don’t have to adjust import settings manually in most cases.
For models downloaded from third-party marketplaces, unzip the downloaded file to access the model and texture files, then follow the same drag-and-drop process above. Always check the license terms for marketplace assets – some require attribution, or can’t be used for commercial projects, so confirm you have the right usage rights before adding them to your project.
Understanding the Unity Model Importer Settings
After importing, when you click on your model file in the Project window, the Inspector window will display the Model Importer settings. These settings control how Unity processes your model, and getting them right is critical for performance and appearance. The most important settings to check are:
- Mesh Tab > Scale Factor: By default, 1 Unity unit equals 1 meter in the real world. If your model imports too big or too small, adjust the scale factor here. For example, if you exported your model in centimeters instead of meters, set the scale factor to 0.01 to get the correct size in Unity.
- Mesh Tab > Mesh Compression: This reduces the file size of your mesh by compressing vertex data. Use higher compression for background props that don’t need high precision, and lower or no compression for close-up objects like main characters.
- Materials Tab > Import Materials: If you’ve already created materials in Unity and just want to import the mesh, uncheck this box. If you want Unity to import the materials embedded in your FBX file, leave it checked. You can also assign your existing materials here after import.
- Rig Tab > Animation Type: For static props like walls or tables, leave this set to None. For animated characters or objects, set this to Generic for most non-humanoid models, or Humanoid for characters that will use Unity’s IK and animation retargeting system.
- Animations Tab > Import Animation: Check this box if your model has baked animation sequences. You can split multiple animations into separate clips here, for example splitting a single walk/run/jump animation file into three separate usable clips.
After changing any import settings, click the Apply button at the bottom of the Inspector to reprocess the model with your new settings. Unity will automatically update all instances of the model in your project.
Setting Up Your 3D Model in the Unity Scene
Once your model is imported and configured correctly, it’s time to add it to your game or application scene and get it looking right. This stage involves placing the model in the scene, assigning materials and textures, adjusting lighting and colliders, and fixing any common appearance issues.
Adding the Model to the Scene
To add your imported 3D model to the current open scene, simply drag it from the Project window into the Scene view or Hierarchy window. When you release the mouse button, the model will appear as a new GameObject in your scene. If it doesn’t appear immediately, it may be too far from the camera, or the wrong size. Double-click the new GameObject in the Hierarchy to focus the Scene view on it, and use the scale tool (shortcut: R) to adjust its size if needed.
For models you’ll use multiple times in your project (like environment props, enemies, or collectibles), it’s a good idea to turn your imported model into a prefab. To do this, drag the model GameObject from the Hierarchy into your Project window. This creates a reusable prefab asset that you can drag into the scene multiple times, and any changes you make to the prefab will automatically update all instances, saving you a lot of time when you need to make edits.
Assigning Materials and Textures
Even if Unity imports materials automatically, you’ll usually want to adjust or assign custom materials to get the look you want. Materials in Unity define how the surface of your 3D model interacts with light, so getting this right is key for a polished result. Here’s how to assign a material:
- Right-click in the Project window and select Create > Material. Name it something descriptive, like “WoodenTableTop”.
- In the Material Inspector, select the correct shader for your use case. For most standard projects, the HDRP/URP Lit shader works for most objects if you’re using a scriptable render pipeline, or the Standard shader for the built-in render pipeline.
- Drag your texture map (albedo, normal, roughness, etc.) into the corresponding texture slots in the material Inspector.
- Drag the finished material from the Project window onto your 3D model in the Scene view. The material will automatically be applied to the correct mesh.
If your model has multiple materials on a single mesh, you can assign different materials to each material slot in the Mesh Renderer component of the GameObject. Just select the GameObject, find the Mesh Renderer in the Inspector, and you’ll see a list of materials. Assign your custom materials to each slot here.
Adding Essential Components
For most projects, your 3D model will need at least one extra component to work correctly in the scene. The most common components to add are:
- Mesh Collider: If you want your model to interact with physics (for example, for the player to walk into it, or for objects to bounce off it), you need a collider. For simple shapes, you can use primitive colliders like Box Collider or Sphere Collider, which are faster for performance. For complex models with an irregular shape, add a Mesh Collider component to use the model’s own mesh for collision detection. Note that Mesh Colliders are more performance-heavy, so use primitive colliders where possible.
- Lightmap UVs: If you’re using baked lighting for your scene, Unity automatically generates lightmap UVs during import, but you can adjust them in the Model Importer settings if you see weird light bleeding on your model.
- Animator Component: For rigged, animated models, add an Animator component and assign your animation controller to play animations in runtime.
Optimizing 3D Models for Performance in Unity
Even if your model looks perfect in the editor, poor optimization can lead to low frame rates, long load times, and poor performance on mobile or web platforms. Optimization doesn’t have to mean ruining the detail of your model – it’s about making smart choices to reduce unnecessary workload for the GPU and CPU. Here are the most effective optimization steps for 3D models in Unity.
Reduce Polygon Count
The polygon count (or triangle count) of your model is one of the biggest factors affecting performance. A common rule of thumb is: the closer an object is to the camera, the more detail it needs, and the farther away it is, the fewer polygons it needs. For example, a main character that’s always on screen should have between 5,000 and 15,000 triangles for a mobile game, while a background mountain can have less than 500 triangles.
Use a decimation or retopology tool in your 3D modeling software to reduce the polygon count of high-poly models before importing. If you’ve already imported the model into Unity, you can use the LOD Group component to set up level of detail: this automatically switches to lower-poly versions of your model when it’s far from the camera, drastically reducing GPU load for large open worlds. To set up LODs, add an LOD Group component to your GameObject, then assign different quality versions of your mesh to each LOD level, and set the camera distances for each level.
Optimize Textures and Materials
Textures are often the biggest contributor to file size and memory usage in a Unity project, so optimizing them has a huge impact on performance. Some best practices include:
- Use power-of-two texture sizes: Unity performs best with texture sizes that are powers of two (e.g. 256x256, 512x512, 1024x1024, 2048x2048). Non-power-of-two textures work, but they take up more memory and compress less efficiently.
- Use texture compression: In the texture import settings, select the appropriate compression quality for your target platform. For example, use ETC2 compression for Android and ASTC compression for iOS, which reduce texture file size significantly with minimal visible quality loss.
- Combine materials where possible: Each separate material on a model requires an extra draw call from the GPU, which reduces performance. If multiple parts of your model use the same material, combine them into a single material and mesh to reduce draw calls.
Combine Meshes for Static Objects
If you have multiple static objects in your scene (like a group of rocks or a wall made of multiple bricks), you can use Unity’s static batching or combine meshes manually to reduce the number of draw calls. To enable static batching, just check the Static checkbox at the top right of the GameObject Inspector for all your static environment objects. Unity will automatically combine them into batches at build time, which drastically improves rendering performance.
For mobile or web projects where every millisecond counts, you can also combine multiple small static meshes into a single mesh manually using Unity’s Mesh.CombineMeshes method or a third-party tool, which removes the overhead of multiple GameObjects and draw calls entirely.
Troubleshooting Common 3D Model Issues in Unity
Even with careful preparation, you may run into common issues after importing your 3D model. Here are the most frequent problems and how to fix them quickly:
My model is invisible or see-through
This is almost always caused by flipped normals. To fix it, you can either go back to your 3D modeling software, flip the normals, and re-export, or enable Double Sided Global Illumination in the material settings, or add a Normal Reversing shader to the mesh. If the entire model is invisible, it may also be because it’s positioned behind the camera, or scaled to zero, so check the position and scale values in the Transform component first.
My model is the wrong size
This happens when you didn’t apply transforms before export, or used the wrong unit system. Instead of scaling the GameObject in the Unity scene (which can cause issues with physics and colliders), adjust the Scale Factor in the Model Importer settings, then click Apply. This changes the scale of the mesh itself at the source, so all instances will update correctly.
My textures are pink/purple
Pink materials in Unity mean that the material is missing its shader or texture. If you’re using a scriptable render pipeline like URP or HDRP, and your imported material uses the built-in Standard shader, Unity can’t render it, so it turns pink. To fix this, create a new material using the correct Lit shader for your render pipeline, assign the textures, and reapply it to the model. If you have multiple pink materials, you can use a script to upgrade all materials to the correct pipeline automatically.
My animations don’t play
If your animated model isn’t playing animations, check that you checked the Import Animation box in the Animations tab of the Model Importer, and that you added an Animator component to the GameObject with a valid animation controller assigned. For humanoid characters, confirm that you set the Animation Type to Humanoid in the Rig tab, and that Unity correctly mapped the bones.
Conclusion
Adding 3D models to Unity is a process that starts before you ever import a file, with careful preparation that saves you time and frustration later. By choosing the right file format, cleaning up your model, configuring import settings correctly, and optimizing for performance, you can ensure your assets look great and run smoothly across every platform, from desktop to mobile to web. Whether you’re creating your first 3D game or adding custom assets to a professional visualization project, these steps will help you avoid the most common mistakes and build a polished, high-performing project. As you gain experience, you’ll develop your own workflow that fits your project type, but these core best practices will remain the foundation of any good Unity asset pipeline.