
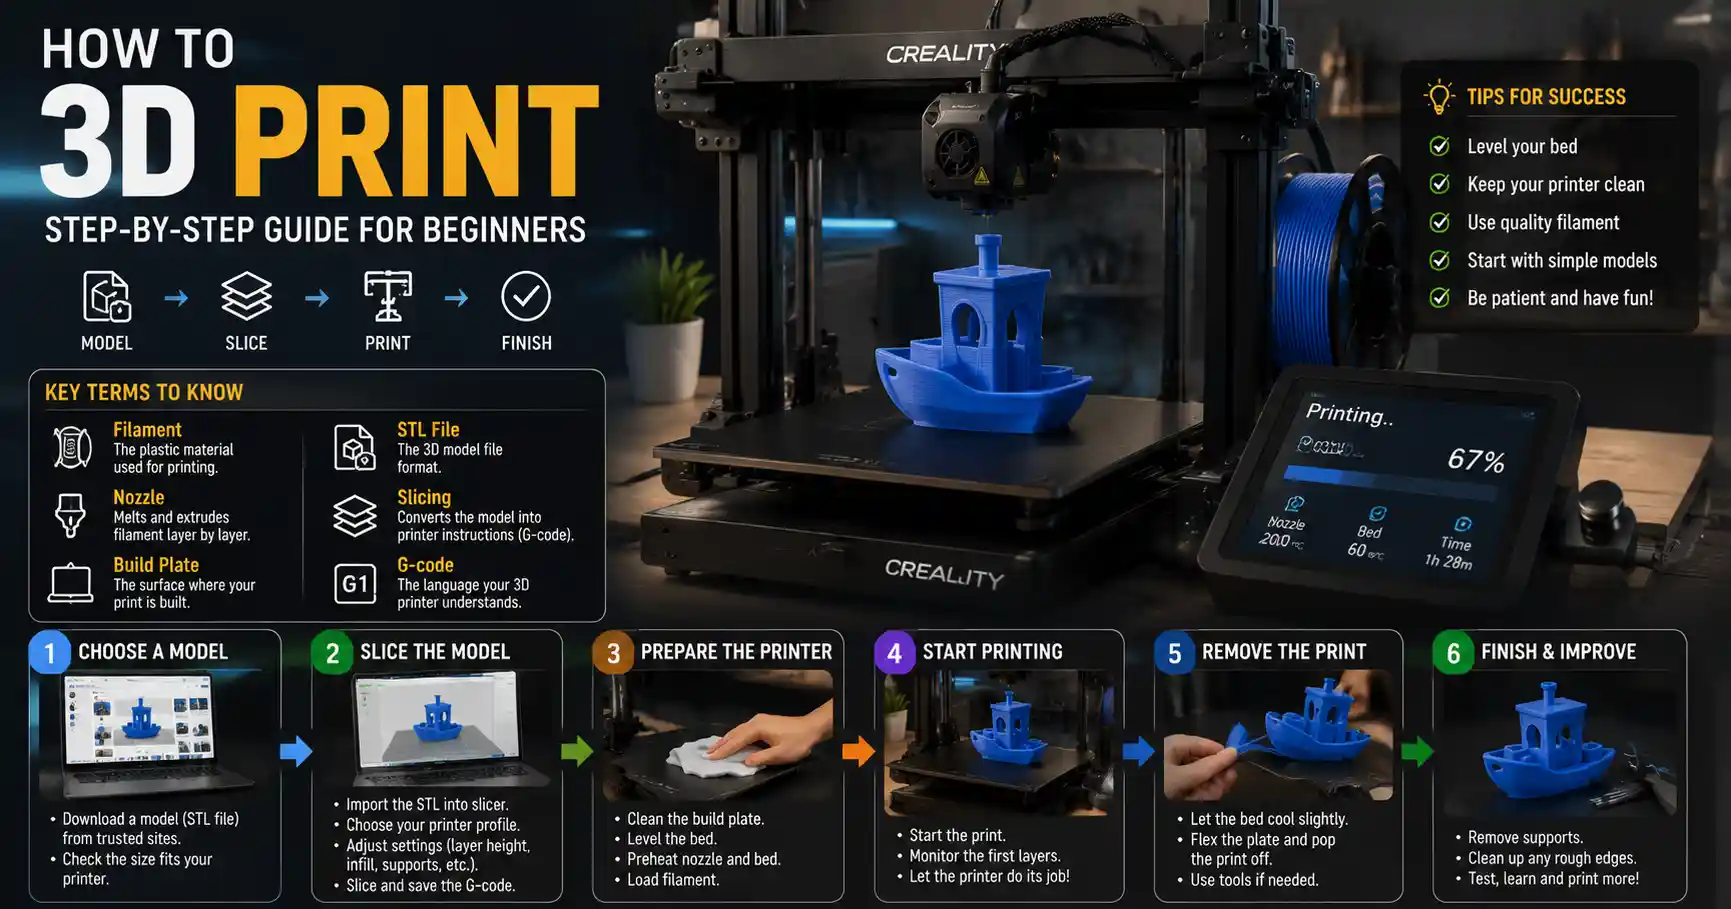
If you’ve ever scrolled social media and seen a fully customized phone case, a functional replacement hinge for a broken kitchen cabinet, or an intricate figurine of your favorite video game character and wondered “how did they make that?” the answer is almost always 3D printing. What was once a niche industrial tool costing tens of thousands of dollars is now an accessible hobby for anyone with a few hundred dollars to spare and a curiosity for making things. Whether you want to create custom home goods, prototype a new invention, or just make fun toys for your kids, 3D printing opens up a world of creative possibility. This guide breaks down everything a beginner needs to know to get started, from choosing your first printer to troubleshooting your first failed print.
Understanding the Basics of 3D Printing
At its core, 3D printing is an additive manufacturing process: instead of cutting away material from a solid block (like carving wood or CNC milling), it builds objects layer by layer from the bottom up. This method makes it possible to create shapes and internal structures that would be impossible to produce with traditional manufacturing methods. For hobbyists, the most common type of 3D printing is Fused Deposition Modeling (FDM), which melts a solid plastic filament and extrudes it through a nozzle onto a build plate. The other common consumer option is resin printing, which uses UV light to cure liquid resin layer by layer, producing much higher detail but with a smaller build size and more post-processing work.
Key 3D Printing Terms Every Beginner Should Know
- Filament: The spooled plastic material used for FDM printing. The most common types are PLA and ABS, with many specialty options available for different uses.
- Nozzle: The small brass or steel tip that melted filament flows through. Most beginner printers come with a 0.4mm nozzle, which is a good all-around size for most prints.
- Build Plate: The flat surface that your print adheres to during printing. Many modern printers have heated, flexible build plates that make removing finished prints much easier.
- STL File: The standard file format that contains the 3D model of the object you want to print. You can download free STLs from sites like Thingiverse or Printables, or create your own with 3D modeling software.
- Slicing: The process of converting a 3D STL model into G-code, a set of step-by-step instructions that your 3D printer understands. Slicer software lets you adjust settings like print speed, layer height, and infill density to customize your print.
For most beginners, FDM is the best starting point. It’s cheaper, less messy, and more forgiving than resin printing, and it can produce large, functional objects that work perfectly for everyday use. Resin printing is better if you plan to print highly detailed miniatures, jewelry, or art pieces, but it requires more safety precautions and cleanup, so it’s usually a next step after you get comfortable with FDM.
Choosing Your First 3D Printer
One of the biggest mistakes new 3D printing enthusiasts make is buying a cheap, no-name printer from an online marketplace to save money. While these printers often look like a great deal on paper, they usually come with poor customer support, flimsy parts, and outdated firmware that will leave you frustrated and troubleshooting for weeks before you get a successful print. It’s better to spend a little more on a reputable, beginner-friendly model from a brand that offers good documentation and community support.
What to Look for in a Beginner 3D Printer
- Pre-assembled or easy-to-assemble kits: Most major brands sell either fully assembled printers or kits that take less than an hour to put together with basic tools. Avoid complex kits that require you to source extra parts or calibrate every single component as a beginner.
- Heated flexible build plate: A heated plate helps prevent plastic from warping as it cools, and a flexible plate lets you flex the plate to pop your finished print off without damaging it or prying aggressively.
- Automatic bed leveling: Early 3D printers required you to manually level the build plate before every print, a finicky process that can take 10-15 minutes. Automatic bed leveling uses sensors to measure the bed for you, which saves time and drastically reduces failed prints from an uneven bed.
- Enclosed or open frame? For printing with basic materials like PLA, an open frame is perfectly fine and usually cheaper. If you plan to print with engineering plastics like ABS or nylon that require higher temperatures, an enclosed frame helps maintain consistent temperature and reduces warping.
If you’re working with a budget under $300, models like the Ender 3 V3 SE from Creality or the Elegoo Neptune 4 Pro are extremely popular with beginners. They have all the core features you need, a huge global community that shares tips and upgrades, and affordable replacement parts if something breaks. For a budget between $300 and $500, you can get faster printers with larger build volumes, like the Bambu Lab A1 Mini, which comes fully assembled and works almost straight out of the box with very little calibration. If you do decide to go the kit route, a well-designed kit can actually help you learn how your printer works, which makes troubleshooting easier later on. Just make sure the kit comes with clear, step-by-step instructions from a reputable brand.
Beyond the printer itself, you’ll need a few basic accessories to get started. A set of small metal files helps smooth out rough edges on finished prints. A spatula or print removal tool helps pry prints off the bed if they don’t pop off easily. A spare 0.4mm nozzle is always good to have on hand, since nozzles can clog or wear out over time. And you’ll need filament, of course – we’ll cover how to choose that next.
Choosing Filament and Preparing Your First Print
Filament is the raw material your 3D printer uses, and choosing the right filament for your project makes a huge difference in how your print turns out. Filament comes in two common diameters: 1.75mm and 3mm. Almost all modern consumer FDM printers use 1.75mm, so that’s what you should buy unless your printer specifically says otherwise. The two most common materials for beginners are PLA and PETG, each with their own strengths and weaknesses.
PLA: The Best Filament for Beginners
Polylactic Acid (PLA) is by far the most popular filament for new 3D printers. It’s made from plant-based starches, so it’s biodegradable (though not always compostable in home facilities) and it prints at a much lower temperature than other plastics – usually between 190°C and 210°C. It doesn’t require a heated bed (though having one helps) and it adheres very well to most build plates, so it produces consistent results even for beginners. PLA is rigid, has a low tendency to warp, and comes in every color and finish you can imagine, from matte to glow-in-the-dark to wood-filled composites. The main downside of PLA is that it softens at around 50°C (120°F), so it’s not suitable for objects that will be exposed to high heat – like a mug holder that sits next to a stove or a part that lives inside a hot car. For most hobby prints, planters, display figurines, and non-functional prototypes, PLA is perfect.
PETG: The Best All-Around Functional Filament
PETG is a slightly more advanced plastic that’s become extremely popular for functional prints. It prints at a higher temperature than PLA, usually between 220°C and 240°C, and requires a heated bed (at least 60°C to 80°C) to print well. It’s more flexible and impact-resistant than PLA, and it can withstand temperatures up to 80°C (176°F) without softening, so it’s great for things like outdoor signs, kitchen utensils, replacement parts, and water bottles. It’s also food-safe (once printed correctly, with a sealed layer) and resistant to moisture, which makes it more versatile than PLA for everyday use. The only downsides for beginners are that it can string more than PLA (leave thin strands of plastic between gaps in your print) and it’s more prone to sticking too tightly to the build plate if your bed temperature is too high. Once you get a few successful PLA prints under your belt, PETG is the next material you should try.
Once you have your printer and filament, it’s time to prep your first print. The easiest way to start is to download a pre-made test model, instead of designing your own first. Popular first print test models include the 3D Benchy, a small tugboat designed specifically to test all the key settings of your 3D printer, or a calibration cube that helps you check if your printer is extruding the right amount of filament. You can find free STLs of these models on popular community sites like Thingiverse, Printables, or MyMiniFactory.
Next, you’ll need to slice your model. Slicer software converts the 3D STL into G-code that your printer can read. Most beginner printers come with a free recommended slicer – for example, Creality printers use Cura, which is free and open-source, and Bambu Lab printers use Bambu Studio, which is also free. Slicers have default settings for different filament types, so as a beginner you don’t need to adjust every setting right away. Just select your printer model, select the type of filament you’re using, and slice the model. Then you can save the G-code to an SD card or transfer it directly to your printer over Wi-Fi, if your printer has that feature.
“Your first 10 prints will probably fail. That’s not a sign you’re bad at this, that’s a sign you’re learning. 3D printing is a skill that takes a little practice, and every failed print teaches you something new.”
Before you start the print, double-check that your filament is loaded correctly. Most printers have a loading procedure that guides you through feeding the filament through the extruder and nozzle until it starts oozing out. Once that’s done, you’re ready to start. Watch the first few layers of your print closely – most failed prints fail in the first layer, so if you see the filament not sticking or bunching up, you can stop the print early and adjust settings instead of wasting an hour of time.
Troubleshooting Common Beginner Problems
Even with the best printer and the best settings, you’re going to run into failed prints as a beginner. That’s totally normal, and part of the learning process. Most problems have simple fixes once you know what to look for. Here are the most common issues beginners face, and how to solve them:
First Layer Not Sticking to the Build Plate
This is the most common problem for new printers. If the first layer isn’t sticking, the whole print will come loose halfway through and turn into a tangled mess of plastic. The most common causes are an unlevel bed, incorrect nozzle height, or incorrect bed temperature. Start by checking if your bed is level – if you have automatic bed leveling, run the leveling procedure again. If that doesn’t work, adjust the nozzle height: most printers let you adjust the Z-offset, which is the distance between the nozzle and the build plate. If the nozzle is too far away, the filament will be too far from the bed and won’t stick. If it’s too close, the nozzle will scrape the bed and cause the filament to bunch up. A good rule of thumb is that the first layer should be squished slightly onto the bed, like a tape that’s pressed down firmly. You can also add a thin layer of glue stick or hairspray to the bed for extra adhesion, especially if you’re printing on glass.
Stringing and Blobbing
Stringing happens when small thin strands of plastic are left between different parts of your print, like the gaps between the legs of a chair or the holes in a lattice. This is most common with flexible filaments or PETG. The easiest fix is to enable retraction in your slicer settings. Retraction pulls the filament back a little when the nozzle moves across an empty space, so it doesn’t oozed out plastic while it’s moving. If you’re still getting stringing, increase the retraction distance by 1mm increments, or slightly increase your print temperature. Blobbing, where large globs of plastic form on the surface of your print, is usually caused by incorrect print speed or over-extrusion. If your nozzle pauses too long in one spot, it will ooze extra plastic that forms a blob. Adjusting your retraction and travel speed usually fixes this.
Warping
Warping happens when the edges of your print cool and pull up off the build plate, leaving you with a curled, warped print. This is most common with materials that have higher shrinkage when cooling, like ABS and PLA printed in cold rooms. To fix warping, make sure your bed temperature is correct: for PLA, 60°C is usually enough, and for PETG 70-80°C works. If you’re printing in a cold room, enclose the printer with cheap cardboard panels to keep the temperature consistent. You can also add a brim to your print in the slicer – a brim is a thin layer of extra plastic around the base of the print that increases the surface area and helps it stick better to the bed. Rafts are another option, but they use more plastic and are harder to remove than brims.
Clogged Nozzle
A clogged nozzle happens when old plastic or debris gets stuck in the nozzle, blocking the flow of filament. This usually results in under-extrusion, where the printer isn’t putting out enough plastic, or no plastic at all. The easiest fix for beginners is the “cold pull” method: heat the nozzle to the printing temperature of your filament, then turn off the heat and pull the filament out quickly when the nozzle cools down to around 100°C. This pulls any debris out with the old filament. Cut the end of the filament at an angle before reloading, to help it feed through smoothly. If that doesn’t work, you can use a small needle to gently clear the clog while the nozzle is hot. Always be careful not to burn yourself when doing this.
One of the best things about 3D printing as a hobby is the huge global community that exists online. If you run into a problem you can’t solve, chances are hundreds of other beginners have had the same problem, and you can find a step-by-step solution on Reddit’s r/3Dprinting, YouTube, or the official forum for your printer brand. Don’t be afraid to ask for help – most experienced 3D printing enthusiasts are happy to help new people get started.
Getting the Most Out of Your 3D Printer
Once you get comfortable with the basics and can consistently get good prints, there are a lot of ways to expand your 3D printing hobby. Many beginners start with downloading pre-made STLs, then move on to designing their own models. Free software like Tinkercad is perfect for beginners learning 3D modeling, it’s browser-based and has a very gentle learning curve. If you want to design more complex models, Fusion 360 is free for hobbyists and has tons of free tutorials online. You can even sell your prints on Etsy or at local craft fairs once you get good – there’s huge demand for customized 3D printed products like wedding favors, personalized home decor, and replacement parts for vintage appliances.
Regular maintenance will also keep your printer running well for years. A few simple habits go a long way:
- Clean the build plate regularly with isopropyl alcohol to remove grease and leftover plastic residue, which helps new prints stick better.
- Lubricate the linear rods every 3-6 months with a light machine oil to keep the print head moving smoothly.
- Replace your nozzle every 3-6 months, depending on how often you print. Nozzles wear out over time, especially if you print with abrasive filaments like wood-filled or metal-filled PLA.
- Check the belt tension every few months – loose belts can cause layer shifting, where your print shifts halfway through and ruins the model.
If you want to experiment, there are dozens of specialty filaments to try. Carbon fiber-filled filament is stiffer and stronger than regular PETG, perfect for functional parts like drone frames or tool handles. Flexible filament like TPU lets you print rubbery objects like phone cases, gaskets, and toys. Water-soluble PVA filament lets you print complex support structures for overhanging parts that just dissolve away in water, so you don’t have to manually break support material off. Once you outgrow your first printer, you can upgrade to a larger model for bigger prints, or try a resin printer for high-detail miniatures and art.
Conclusion
3D printing is an incredibly rewarding hobby that lets you turn digital ideas into physical objects right on your desk. It can feel overwhelming at first, with all the new terms and settings to learn, but the learning process is part of the fun. Start with a good beginner printer, stick to PLA for your first few prints, and don’t get discouraged by early failures. Every failed print teaches you something new that will help you get a better print next time. Whether you want to make custom gifts for your family, fix broken things around your house, or just experiment with creative design, 3D printing gives you the power to make almost anything you can imagine.