
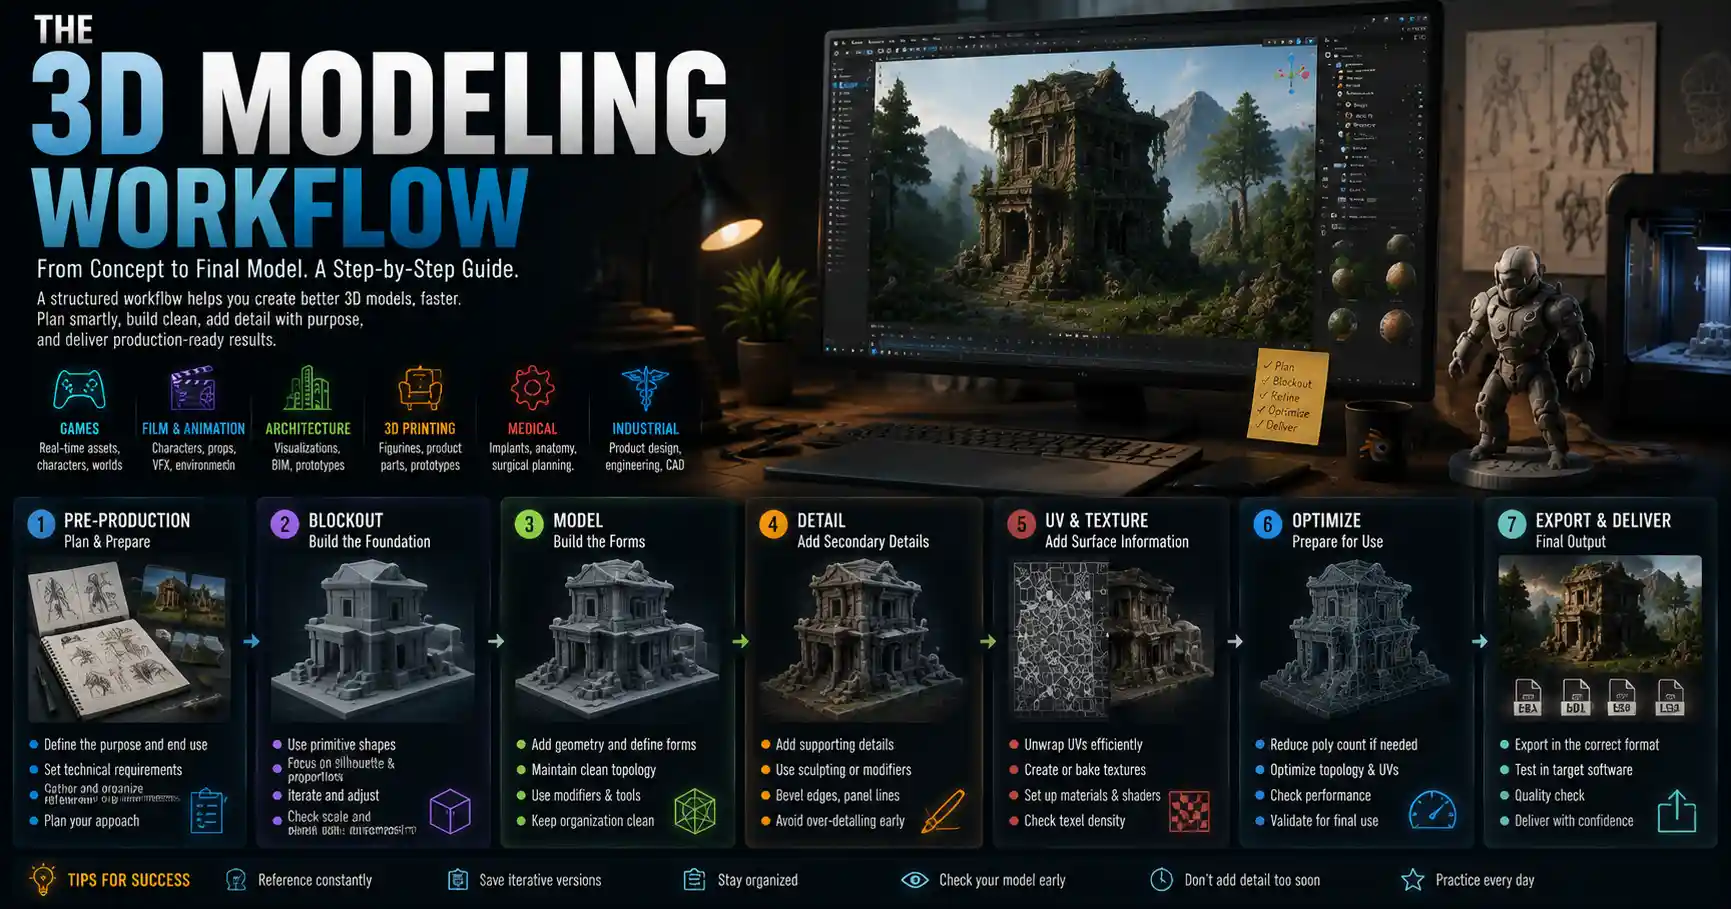
3D modeling has transformed from a niche skill used exclusively by Hollywood animators and industrial designers into a mainstream tool powering industries from video game development to construction, 3D printing, and even medical research. Whether you want to design a custom figurine for 3D printing, build a immersive environment for a new video game, or create architectural visualizations for a client proposal, understanding a consistent, efficient 3D modeling workflow turns messy creative experiments into polished, production-ready results. A structured workflow doesn’t stifle creativity—it frees you to focus on problem-solving and design, rather than scrambling to fix avoidable mistakes late in the process. In this guide, we break down every stage of a professional 3D modeling workflow, from initial planning to final export, with practical tips to help beginners and experienced artists alike work more efficiently.
Pre-Production: Planning Your 3D Model Before You Start
Many new 3D artists jump straight into pulling polygons in their favorite software before they have a clear idea of what they’re creating. This approach almost always leads to rework, messy topology, and hours of wasted time fixing issues that could have been avoided with a little pre-production planning. Pre-production doesn’t have to be lengthy or formal—even 15 minutes of planning can save you 15 hours of work later on. The goal of this stage is to define the purpose of your model, gather reference material, and outline core requirements before you create a single vertex.
Define the Model’s Purpose and End Use
Every 3D model is created for a specific end goal, and that goal dictates every decision you make during the modeling process. A model for a 3D printed collectible needs clean, manifold geometry with consistent wall thickness, while a real-time model for a mobile video game needs to keep polygon counts as low as possible to preserve performance. An architectural visualization for a client presentation prioritizes accurate dimensions and realistic surface details, while a concept model for a character design only needs to capture the overall shape and vibe of the design.
Before you start, ask yourself a few key questions to clarify your requirements:
- Will this model be used for 3D printing, manufacturing, or another physical output?
- Does it need to be optimized for real-time rendering (like in video games or interactive AR/VR experiences)?
- Is it for a high-resolution static render or animation for film or marketing?
- Are accurate measurements or design specifications required?
- What level of detail is necessary for the project?
These answers will shape everything from your polygon budget to your modeling technique, so taking time to get clarity here is non-negotiable.
Gather and Organize Reference Material
Even the most experienced 3D artists don’t create complex models from memory. Good reference material is the foundation of a convincing, accurate 3D model. References can include photos, sketches, technical drawings, blueprints, existing product designs, or even physical objects you can scan or measure. For organic models like characters or animals, this might mean collecting multiple photos from different angles to capture how light interacts with the form, how joints bend, and what small unique details make the design feel real. For hard-surface models like furniture or machinery, technical blueprints give you exact dimensions to work from.
Once you’ve collected your references, organize them in a dedicated folder or use a reference tool like PureRef to arrange all your images in one place that you can keep open alongside your modeling software. This eliminates the need to alt-tab out to search for missing photos every time you need to check a detail, keeping your workflow smooth and uninterrupted.
Blockout: Building the Core Foundation of Your Model
Once your pre-production work is complete, the next stage is creating a blockout (also called a low-resolution base mesh). This is the rough, simplified version of your model that captures the overall proportions, silhouette, and large-scale shapes before you add any fine details. The blockout stage is where you nail the big-picture design, so you don’t waste time adding detail to a shape that doesn’t work. It’s much easier to adjust the proportions of a 500-polygon blockout than a 5 million-polygon high-resolution model.
Blocking for Different Model Types
Blocking out organic models (like characters, plants, or animals) usually starts with basic primitive shapes—cubes, spheres, and cylinders—that you sculpt or adjust to match the overall silhouette. For a human character, for example, you might start with a cylinder for the torso, spheres for the head and joints, and elongated cylinders for the limbs, then push and pull the shapes until the overall proportions match your reference. For hard-surface models like cars or furniture, you might start with a rough bounding box that matches the overall size of the object, then cut into that shape to define major components like doors, wheels, or drawers.
During the blockout stage, ignore small details like buttons, texture seams, or surface imperfections. Your only goal is to get the overall form right. It’s common to go through multiple iterations of a blockout, adjusting proportions and moving major components around until the design works. Many artists will even render out quick test renders of the blockout to check how the silhouette reads from different angles, especially for models that will be viewed from multiple perspectives in a final product.
Check for Core Issues Early
The blockout stage is also the best time to check for core issues that will cause problems later. If you’re working on a model for 3D printing, you can rough in the interior volume to make sure your wall thickness will work for your printer’s specifications. If you’re working on a game character, you can test how the blockout fits into your game’s engine to make sure the scale is correct relative to other assets. For architectural models, you can import your blockout into the site plan to confirm it fits within the required property boundaries. Catching these issues early saves hours of rework down the line.
“The most important thing you can do early on in 3D modeling is get the big shapes right. Details don’t matter if the overall form is wrong. I’ve seen so many beginner artists spend a week adding fine sculpt details to a character that has completely messed up arm proportions, and they end up having to start over.”
Modeling and Refinement: Adding Detail and Cleaning Up Geometry
Once you’re happy with your blockout, it’s time to move into the core modeling and refinement stage. This is where you build out the detailed geometry, clean up your mesh, and add mid-level details that define the object. The exact process here depends on whether you’re working with polygonal modeling, sculpting, or a combination of the two, but the core goal remains the same: build a clean, accurate mesh that meets the requirements you defined in pre-production.
Understanding Topology and Mesh Cleanup
One of the most important parts of this stage is maintaining clean topology—the arrangement of vertices, edges, and faces that make up your 3D mesh. Good topology makes your model easier to edit, deform correctly for animation, and renders efficiently. Bad topology can cause weird shading errors, make it impossible to add subdivision surfaces, and break 3D prints.
Key rules for clean topology that every artist should follow:
- Avoid n-gons (polygons with more than 4 sides) whenever possible, especially for models that will be animated or 3D printed. Stick to quads (4-sided polygons) for most modeling work.
- Keep polygon distribution proportional to the detail in the model. Add more edges where the shape curves a lot, and fewer edges in flat areas to keep your polygon count down.
- Delete unseen internal geometry. For example, if you’re modeling a table that will never show the underside, you don’t need to keep those polygons—they just add unnecessary weight to your model.
- Fix non-manifold geometry. Non-manifold edges or vertices are geometry that doesn’t have a clear inside and outside, which will break 3D prints and rendering software. Most modern 3D tools have automatic checks to find and fix these issues.
Even experienced artists forget to clean up their mesh as they go, leading to a big messy project at the end. Make mesh cleanup a regular part of your refinement process, checking for errors every time you finish a major component of your model. This keeps your project manageable and avoids last-minute panics when your model won’t export correctly.
Adding Detail: High Poly vs Low Poly Workflows
Most modern production workflows use a high poly/low poly approach, where you create two versions of the same model: a high-resolution version with all the fine surface details, and a low-resolution version optimized for performance or production. You then bake the details from the high poly model onto a texture map that you apply to the low poly model. This gives you the best of both worlds: all the detail of a high-resolution model with the performance of a low-resolution model, which is critical for real-time applications like video games.
For example, if you’re modeling a character’s leather jacket, your low poly model might only have a few hundred polygons to capture the overall shape of the jacket, while your high poly model will have millions of polygons to capture the wrinkles, stitches, and scuffs in the leather. You bake those details into a normal map or a roughness map, which you apply to the low poly model to make it look detailed without the performance cost of millions of polygons. This workflow is also common for product visualization and architectural rendering, where performance is still a priority.
If you’re creating a model for 3D printing or manufacturing, you usually only need a single high-resolution mesh, but you still need to make sure it’s clean and manifold. The same clean topology rules apply here, with extra checks for wall thickness and overlapping geometry that will cause print errors.
UV Unwrapping: Preparing Your Model for Texturing
Once your model is finalized and cleaned up, the next stage is UV unwrapping. UV unwrapping is the process of unfolding your 3D mesh into a flat 2D map, so you can apply 2D texture images to the surface of your model. Think of it like unfolding a cardboard box into a flat sheet: you’re taking a 3D shape and laying it flat so you can print a design on it before you fold it back into shape. A good UV unwrap ensures textures stretch correctly across your model, no wasted texture space, and clear detail where you need it most.
Key Best Practices for UV Unwrapping
UV unwrapping has a reputation for being tedious, but modern software has automated many of the most time-consuming parts of the process. Even with automatic tools, however, you still need to check your unwrap to avoid common issues. The most important rule is to minimize texture stretching: if your UVs are stretched unevenly, your textures will look blurry or distorted on the 3D model. Most tools have a checkered UV test grid you can apply to your model to spot stretching easily.
Another key best practice is to organize your UV shells (the individual unfolded pieces of your mesh) to make the most of your texture space. Packing shells tightly together means you get more resolution for your textures, which makes your final model look sharper. You should also place seams (the cuts you make to unfold your mesh) in places that are less visible to the viewer. For example, on a character model, you’d place a seam under the arm or along the back of the neck, where it won’t be noticeable, rather than across the front of the face.
For game assets, you’ll also need to follow any specific UV tiling or padding requirements set by your project’s art style guide. Padding is the empty space between UV shells that prevents texture bleeding (when colors from one part of the texture leak onto another part of the model when the texture is compressed). Adding enough padding avoids this common issue.
Automatic vs Manual UV Unwrapping
Many modern 3D tools include automatic UV unwrapping that works well for simple models or for artists who are still learning. Automatic unwrapping is fast, but it often doesn’t place seams in ideal locations or pack texture space as efficiently as a manual unwrap. For professional work, most artists still do at least some manual adjustments to automatic unwraps to fix stretching and optimize texture space. For complex models like characters, most artists still do full manual unwraps to get the best possible quality.
Texturing and Shading: Bringing Your Model to Life
Texturing and shading is the stage where your model goes from a grey shape to a realistic, believable object. Texturing adds color, surface detail, and material properties to your model, while shading defines how the surface interacts with light. A wooden table, a plastic toy, and a metal wrench all reflect light very differently, and good shading captures those differences to make your model feel tangible.
Building a PBR Workflow
The industry standard for most modern 3D work today is PBR (physically based rendering), which uses a set of standard texture maps to define material properties that interact consistently with any lighting environment. PBR makes it easy to share assets between different projects and software, and it produces consistent, realistic results every time. A standard PBR material uses several core texture maps:
- Base Color: Defines the base color and albedo of the material, excluding any lighting information.
- Metallic: Defines which parts of the model are metal (100% metallic) and which are non-metal (0% metallic).
- Roughness: Defines how rough or smooth a surface is—rough surfaces scatter light, while smooth surfaces reflect light sharply.
- Normal Map: Adds fine surface detail (like scratches or bumps) without adding extra geometry.
- Ambient Occlusion: Adds soft shadows in crevices and small gaps to add depth and realism.
PBR workflows are used in everything from video games to architectural visualization to product rendering, because they’re consistent, predictable, and produce realistic results with minimal tweaking. Most modern 3D software and game engines support PBR natively, so you don’t need to reinvent the wheel to create good materials.
Adding Realism with Small Details
The difference between a good textured model and a great one is often in the small, realistic imperfections that you add. A perfect, uniform wooden table looks fake—real wooden tables have scratches, dents, knots, and slight color variations. Adding these small imperfections makes your model feel lived-in and real, rather than like a computer-generated object. You don’t need to overdo it, but subtle details go a long way.
Another common mistake new artists make is using too much contrast in their roughness or metallic maps. Most real-world materials aren’t 100% rough or 100% smooth—even a brand new chrome bumper has tiny imperfections that make it slightly less than perfectly reflective. Adding subtle variation to your material maps makes the final result feel more natural.
Once your texturing is complete, do a few test renders with different lighting setups to check how your material looks. Check your model under both bright and dim lighting to catch any weird shading errors or stretching that you didn’t notice while you were working. This is also a good time to check that your texture resolution is high enough, and that small details are still sharp at the distance your model will be viewed from.
Final Rendering and Export: Preparing Your Model for Its End Use
Once your model is fully modeled, UVed, and textured, it’s time to export or render it for its final use. The exact steps here depend entirely on what your model is for, but there are a few universal best practices that apply to every project.
Preparing Exports for Different End Uses
If you’re exporting a model for use in a game engine or interactive application, you’ll need to optimize your model and textures to meet your project’s performance requirements. This usually means double-checking your polygon count, compressing your textures to the right size and format, and testing the model in the target engine to make sure it loads correctly and doesn’t cause frame rate drops. You’ll also need to export in the right file format—most game engines use FBX or glTF, which support rigged animated models and embedded textures.
If you’re exporting a model for 3D printing, you’ll need to export it as an STL or OBJ file, and do a final check for manifold geometry and wall thickness. Many 3D printing services will automatically check your model for errors, but catching them yourself before you export saves time and avoids failed prints. For architectural models being sent to a client for visualization, you’ll usually export high-resolution image sequences or static renders, with settings matched to the client’s required resolution and color space.
Rendering for Final Output
For static renders or animations, rendering is the process of generating the final 2D image or video from your 3D scene. The quality of your final render depends on your render settings, your lighting setup, and your output resolution. For photorealistic work, most artists use ray tracing or path tracing, which simulates how light travels in the real world to produce incredibly realistic results. The tradeoff is that ray tracing takes longer to render than real-time rasterization, so you’ll need to adjust your sample count to balance render time and image quality—more samples give a cleaner, less noisy image, but take longer to process.
When rendering, always make sure your output resolution matches the end use. A render for a social media post only needs 1080p resolution, but a render for a large print billboard needs 4K or higher resolution to look sharp when scaled up. It’s also a good idea to export your raw render in a high-bit-depth format like EXR before you do any color grading, so you have more flexibility to adjust brightness and contrast without introducing banding or other artifacts.
Conclusion
A consistent, well-planned 3D modeling workflow is the difference between a frustrating, error-prone process and a smooth, productive creative experience. By breaking your work down into clear stages—starting with pre-production planning, moving through blockout, refinement, UV unwrapping, texturing, and final export—you avoid common mistakes, catch issues early, and produce better results in less time. The workflow we’ve outlined here is used by professional artists across every industry, from game development to 3D printing to architecture, and it can be adapted to fit any project size or style. As you gain experience, you’ll adjust this workflow to fit your own creative process, but sticking to these core stages will give you a solid foundation to build on. Whether you’re a beginner working on your first 3D print or an experienced artist refining your process, a clear workflow frees you to focus on what matters most: creating great 3D art.